STEINEL L 265 LED Owner's manual
- Category
- Outdoor lighting
- Type
- Owner's manual

N
GR
TR
H
CZ
SK
PL
RO
SLO
HR
EST
LT
LVRUS
FI
DK
SPE
NL
F
GB
D
I
Датчики, светильники
Представитель в России
Сенсорные технологии
Телефон:(499)2372868
www.steinel-rus.ru
RUS
SAET-94 S.L.
C/ Trepadella, n° 10
Pol. Ind. Castellbisbal Sud
E-08755 Castellbisbal (Barcelona)
Tel.: + 34/93/772 28 49
Fax: +34/93/772 01 80
Pronodis - Soluções Tecnológicas, Lda.
Zona Industrial Vila Verde Sul, Rua D, n.º 11
P-3770-305 Oliveira do Bairro
Tel.: +351 234 484 031
Fax: +351 234 484 033
[email protected] · www.pronodis.pt
Roliba A/S
Hvidkærvej 52
DK-5250 Odense SV
Tel.: +45 6593 0357
Fax: +45 6593 2757
www.roliba.dk
Oy Hedtec Ab
Lauttasaarentie 50
FI-00200 Helsinki
Tel.: +358/207 638 000
Fax: +358/9/673 813
www.hedtec.fi/valaistus · [email protected]
Vilan AS
Olaf Helsetsvei 8
N 0694 Oslo
Tel.: +47/22 72 50 00
Fax: +47/22 72 50 01
ELNAS s.r.o.
Oblekovice 394
CZ-671 81 Znojmo
Tel.: +4 20/5 15/22 01 26
Fax: +4 20/5 15/24 43 47
[email protected] · www.elnas.cz
CZ
E
P
S
DK
FI
N
PANOS Lingonis + Sons O. E.
Aristofanous 8 Str.
GR-10554 Athens
Tel.: + 30/210/3 21 20 21
Fax: +30/210/3 21 86 30
GR
EGE SENSORLU AYDİNLATMA İTH. İHR.
TİC. VE PAZ. Ltd. STİ.
Gersan Sanayi Sitesi 2305 · Sokak No. 510
TR-06370 Bati Sitesi (Ankara)
Tel.: +90/3 12/2 57 12 33
Fax: +90/3 12/2 55 60 41
ww.egeithalat.com.tr
TR
KARL H STRÖM AB
Verktygsvägen 4
S-553 02 Jönköping
Tel.: +46/36/31 42 40
Fax: +46/36/31 42 49
www.khs.se
"LŁ" Spółka z ograniczoną
odpowiedzialnością sp.k.
Byków, ul. Wrocławska 43
PL-55-095 Mirków
Tel.: +48/71/3980861
Fax: +48/71/3980819
PL
STEINEL Vertrieb GmbH
Dieselstraße 80-84
33442 Herzebrock-Clarholz
Tel: +49/5245/448-188
Fax: +49/5245/448-197
www.steinel.de
Steinel Austria GmbH
Hirschstettner Strasse 19/A/2/2
A-1220 Wien
Tel.: +43/1/2023470
Fax: +43/1/2020189
PUAG AG
Oberebenestrasse 51
CH-5620 Bremgarten
Tel.: + 41/56/6 48 88 88
Fax: +41/56/6 48 88 80
STEINEL U. K. LTD.
25, Manasty Road · Axis Park
Orton Southgate
GB-Peterborough Cambs PE2 6UP
Tel.: +44/1733/366-700
Fax: +44/1733/366-701
Socket Tool Company Ltd
Unit 714 Northwest Business Park
Kilshane Drive · Ballycoolin · Dublin 15
Tel.: 00353 1 8809120
Fax: 00353 1 8612061
STEINEL FRANCE SAS
ACTICENTRE - CRT 2
Rue des Famards - Bât. M - Lot 3
F-59818 Lesquin Cedex
Tél.: +33/3/20 30 34 00
Fax: +33/3/20 30 34 20
VAN SPIJK AGENTUREN
Postbus 2
5688 HP OIRSCHOT
De Scheper 260
5688 HP OIRSCHOT
Tel. +31 499 571810
Fax. +31 499 575795
www.vanspijk.nl
VSA handel Bvba
Hagelberg 29
B-2440 Geel
Tel.: +32/14/256050
Fax: +32/14/256059
www.vsahandel.be
Minusines S.A.
8, rue de Hogenberg
L-1022 Luxembourg
Tél. : (00 352) 49 58 58 1
Fax : (00 352) 49 58 66/67
www.minusines.lu
D
A
CH
GB
IRL
F
NL
B
L
STEINEL Italia S.r.l.
Largo Donegani 2
I-20121 Milano
Tel.: +39/02/96457231
Fax: +39/02/96459295
www.steinel.it
I
Daljinsko upravljanje d.o.o.
Bedricha Smetane 10
HR-10000 Zagreb
t/ 00385 1 388 66 77
f/ 00385 1 388 02 47
www.daljinsko-upravljanje.hr
HR
FORTRONIC AS
Teguri 45c
EST 51013 Tartu
Tel.: +3 72/7/47 52 08
Fax: +3 72/7/36 72 29
NECO SK, A.S.
Ružová ul. 111
SK-01901 Ilava
Tel.: +421/42/4 45 67 10
Fax: +421/42/4 45 67 11
[email protected] · www.neco.sk
Steinel Distribution SRL
Parc Industrial Metrom
RO - 500269 Brasov
Str. Carpatilor nr. 60
Tel.: +40(0)268 53 00 00
Fax: +40(0)268 53 11 11
www.steinel.ro
Log-line d.o.o.
Suha pri predosljah 12
SLO-4000 Kranj
Tel.: +386 42 521 645
Fax: +386 42 312 331
[email protected] · www.log.si
EST
SLO
SK
RO
AMBERGS SIA
Brivibas gatve 195-16
LV-1039 Riga
Tel.: 00371 67550740
Fax: 00371 67552850
www.ambergs.lv
LV
STEINEL China
Representative Office
Shanghai Rm. 21 A-C,
Huadu Mansion No. 838
Zhangyang Road Shanghai 200122
Tel: +86 21 5820 4486
Fax: +86 21 5820 4212
www.steinel.cn
CN
ТАШЕВ-ГАЛВИНГ ООД
Бул. Климент Охридски № 68
1756 София, България
Тел.: +359 2 700 45 45 4
Факс: +359 2 439 21 12
www.tashev-galving.com
BG
DINOCOOP Kft
Radvány u. 24
H-1118 Budapest
Tel.: +36/1/3193064
Fax: +36/1/3193066
H
KVARCAS
Neries krantine 32
LT-48463, Kaunas
Tel.: +3 70/37/40 80 30
Fax: +3 70/37/40 80 31
LT
110034659 08/2014_G Technische Änderungen vorbehalten. / Subject to technical modification without notice.
Information
265L
Information
LED265
Page is loading ...
Page is loading ...
Page is loading ...

- 9 -
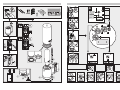
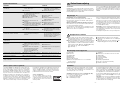
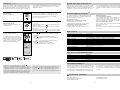
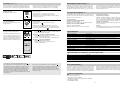
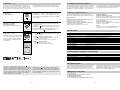
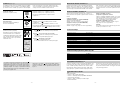
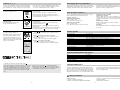
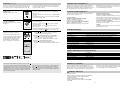
System components
Glass shade
Retaining screw
Light housing
Wall mount
LED corona of light
Power LED Effect Light
Mini-sensor unit (removes for ease of setting functions)
Sealing plug
Installation instructions
Dear Customer,
Congratulations on purchasing your new STEINEL SensorLight
and thank you for the confidence you have shown in us. You
have chosen a high-quality product that has been manufactured,
tested and packed with the greatest care.
GB
Safety instructions
n During installation, the electrical wiring being connected
must be dead. Therefore, switch off the power first and use
a voltage tester to check that the power supply is discon-
nected.
n Installing the SensorLight involves work on the mains volt-
age supply. This work must therefore be carried out pro-
fessionally in accordance with national wiring regulations
and electrical operating conditions. (
D- VDE 0100,
A-ÖVE/ÖNORM E8001-1, -SEV 1000)
Please familiarise yourself with these instructions before
attempting to install the SensorLight because prolonged reli-
able and trouble-free operation will only be ensured if it is fitted
properly.
We hope your new STEINEL SensorLight will bring you lasting
pleasure.
n Only use genuine replacement parts.
n Repairs must only be made by specialist workshops.
n The glass shade must be screwed firmly onto the light
housing with the sealing ring .
Sealing ring
Engagement lug for removing sensor unit
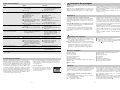
Time setting
Twilight setting
Programme setting
Principle
Adjusting the detection zone
Manual override
Operation / Maintenance
Principle
LED light corona and Power LED effect light
The LEDs are twilight controlled. Ideal for permanently illumi-
nating house numbers, for example. If preferred, also only in
response to movement.
Activation of LED lamp on detecting persons
When the mini-sensor detects a person, the LED lamp comes
ON for the period of time selected.
The integrated high-performance infrared sensor is equipped
with a double 360° sensor that detects the invisible heat emit-
ted by moving objects (persons, animals etc.).
The heat detected in this way is converted electronically into
a signal that switches the light “OFF” automatically. Heat is
not detected through obstacles, such as walls or panes of
glass. Heat radiation of this type will, therefore, not trigger the
sensor. The unit achieves a coverage angle of 360° with an
aperture angle of 90°. A sneak-by guard ensures coverage
below the sensor.
Important: The most reliable way of detecting motion is to
install the SensorLight with the sensor aimed across the
direction in which a person would walk and by ensuring that
no obstacles (such as trees and walls, for example) obstruct
the line of sensor vision.
Reach is limited when walking directly towards the light.
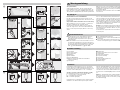
Installation
The site of installation should be at least 50 cm away from
another light because heat radiated from it may activate the
system. To obtain the specified reach of 8 m, the sensor
should be installed at a height of approx. 1.8 – 2 m.
Connecting the mains and load supply lead (see illustration)
The mains supply lead is a 3-core cable.
L = phase conductor (usually black or brown )
N = neutral conductor (usually blue)
PE = protective-earth conductor (green/yellow)
If in doubt, a voltage detector must be used to identify the
lead; subsequently disconnect the power supply again.
Connect the phase conductor (L), neutral conductor (N) to the
terminal block. Getting the cable connections crossed will
produce a short circuit in the unit or in your fuse box. In this
case, you must identify the individual cables and re-connect
them. Insulate protective-earth conductor (PE) and simply
place it next to terminal block.
Note: A mains switch for switching the unit ON and OFF may
of course be installed in the mains supply lead. A mains
switch is required for the manual override function (see Manu-
al override function) .
8.1
8.1
- 8 -
SensorLeuchte schaltet unerwünscht ein
SensorLeuchte Reichweitenveränderung
Rote LED blinkt schnell
n Wind bewegt Bäume und Sträucher
im Erfassungsbereich
n Erfassung von Autos auf der Straße
n plötzliche Temperaturveränderung
durch Witterung (Wind, Regen,
Schnee) oder Abluft aus Ventilatoren,
offenen Fenstern
n Bereich umstellen
n Bereich umstellen
n Bereich verändern,
Montageort verlegen
n andere Umgebungstemperaturen n Erfassungsbereich durch
Abdeckschalen genau einstellen
n interne Sicherung aktiviert n SensorLeuchte aus- und nach
5 Sek. wieder einschalten
LED-Lichtkranz trotz Dunkelheit aus
n Programm 3 oder 4 gewählt n Programm ändern
Betriebsstörungen
SensorLeuchte ohne Spannung
SensorLeuchte schaltet nicht ein
SensorLeuchte schaltet nicht aus
Störung
n Sicherung defekt, nicht eingeschaltet,
Leitung unterbrochen
n Kurzschluss
n neue Sicherung, Netzschalter ein-
schalten; Leitung mit
Spannungsprüfer überprüfen
n Anschlüsse überprüfen
n bei Tagesbetrieb, Dämmerungseinstel-
lung steht auf Nachtbetrieb
n LED-Leuchtmittel defekt
n Netzschalter AUS
n Sicherung defekt
n Erfassungsbereich nicht gezielt einge-
stellt
n interne elektrische Sicherung wurde
aktiviert (rote LED blinkt schnell)
n Netzanschlussklemme
nicht richtig aufgesteckt
n neu einstellen (Regler )
n austauschen
n Einschalten
n neue Sicherung,
evtl. Anschluss überprüfen
n neu justieren
n SensorLeuchte aus- und nach
ca. 5 Sek. wieder einschalten
n Klemme fest zusammendrücken
n dauernde Bewegung im Erfassungs-
bereich
n Sensoreinheit ist nicht eingerastet
n Bereich kontrollieren und evtl. neu
justieren
n Sensoreinheit mit leichtem Druck
einrasten
LEDs gehen nicht wie gewünscht um
ca. Mitternacht aus
n externe Lichtquelle (z. B. anderer
Bewegungsmelder oder -leuchte)
schaltet die SensorLeuchte inaktiv
n SensorLeuchte gegen das fremde
Licht abschotten, SensorLeuchte
mehrere Tage beobachten, sie
benötigt einige Zeit, um sich wieder
auf den richtigen Wert einzustellen
LEDs schalteten nicht komplett aus
n Komfortprogramm gewählt n Programmwahlschalter auf 4
Ursache Abhilfe
Funktionsgarantie
Dieses STEINEL-Produkt ist mit größter Sorgfalt hergestellt,
funktions- und sicherheitsgeprüft nach geltenden Vorschriften
und anschließend einer Stichprobenkontrolle unterzogen.
STEINEL übernimmt die Garantie für einwandfreie Beschaffen-
heit und Funktion. Die Garantiefrist beträgt 36 Monate und
beginnt mit dem Tag des Verkaufs an den Verbraucher. Wir
beseitigen Mängel, die auf Material- oder Fabrikationsfehlern
beruhen, die Garantieleistung erfolgt durch Instandsetzung
oder Austausch mangelhafter Teile nach unserer Wahl. Eine
Garantieleistung entfällt für Schäden an Verschleißteilen sowie
für Schäden und Mängel, die durch unsachgemäße Behand-
lung oder Wartung auftreten. Weitergehende Folgeschäden an
fremden Gegenständen sind ausgeschlossen.
Die Garantie wird nur gewährt, wenn das unzerlegte Gerät mit
kurzer Fehlerbeschreibung, Kassenbon oder Rechnung (Kauf-
datum und Händlerstempel), gut verpackt, an die zutreffende
Servicestation eingesandt wird.
Reparaturservice:
Nach Ablauf der Garantiezeit oder Mängeln
ohne Garantieanspruch fragen Sie Ihre
nächste Servicestation nach der Möglichkeit
einer Instandsetzung.
GB

- 11 -
Operation/Maintenance
The SensorLight is suitable for switching light “OFF” automati-
cally. Weather conditions may affect the way the SensorLight
functions. Strong gusts of wind, snow, rain or hail may cause
the light to come “ON” when it is not wanted because the
sensor is unable to distinguish sudden changes of temperature
from sources of heat. The detector lens may be cleaned with
a damp cloth if it gets dirty (do not use cleaning agents). The
mini-sensor unit can be removed for cleaning the LED
corona .
Declaration of conformity
This product complies with
- Low Voltage Directive 2006/95/EC
- EMC Directive 2004/108/EC
- RoHS Directive 2011/65/EC
- WEEE Directive 2012/19/EC
Manual override function
If a mains switch is installed in the mains supply lead, the light
is capable of the following functions in addition to the simple
“ON”/“OFF” function:
Sensor mode
1) Switch light “ON” (when light is “OFF”):
Turn switch “OFF” and “ON” once.
Light stays “OFF” for the period selected.
2) Switch light “OFF” (when light is “ON”):
Turn switch “OFF” and “ON” once.
The light goes out or switches to sensor mode.
Manual override
1) Activate manual override:
Switch 2 x “OFF” and “ON”. The light will stay on for 4 hours
(red LED lights up behind the lens).
Then it returns automatically to sensor mode (red LED off).
2) Deactivate manual override:
Turn switch “OFF” and “ON” once. The light goes out or
switches to sensor mode.
Important:
The switch should be actuated in rapid succession
(in the 0.5 – 1 sec. range).
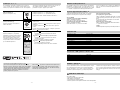
Adjusting the detection zone
The detection zone can be limited to suit requirements. The
shrouds supplied with the light can be used to mask out as
many lens segments as you wish.This prevents the light from
being activated unintentionally, e.g. by cars, passers-by etc.
and allows you to target danger spots. The shrouds and
shroud foils can be divided along the grooves. They can then
simply be pushed or stuck onto the lens.
- 10 -
Once installed, the sensor can be put into operation. Control
dials are provided on the sensor unit for selecting time, twi-
light and programme settings. After pressing the engagement
Functions , ,
lug with a flat-bladed screwdriver, the sensor unit can be
removed for ease of setting. In this case, the SensorLight
automatically switches to constant output.
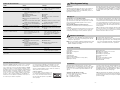
Twilight setting
(sensor response threshold)
(factory setting: daylight operation 2000 lux)
The sensor's response threshold can be infinitely varied from
2 – 2000 lux.
Control dial set to = daylight operation at approx. 2000 lux.
Control dial set to = night-time operation at approx. 2 lux.
To adjust the detection zone in daylight, the control dial must be
set to (daylight operation).
Switch-off delay
(time setting)
(factory setting: 5 sec.)
Light “ON” duration can infinitely varied from 5 sec. to 15 min.
Control dial set to – = shortest time (5 sec.)
Control dial set to + = longest time (15 min.)
When setting the detection zone, it is recommended to select
the shortest time –.
5 sec. – 15 min.
2 - 2000 lux
Programme setting
(factory setting: programme 1)
The following programmes only relate to
the LED corona of light and the Power LED
effect light. Once ambient light levels reach
the twilight setting, the main light always
switches “ON” in response to movement
and “OFF” again after the selected time
setting.
Programme + : LED comfort programme:
l
LEDs “ON” from twilight setting for the whole night.
Programme : LED comfort economy programme*:
l
LEDs “ON” from twilight setting to the middle of the night.
l
The LEDs then switch “ON” in response to movement.
Programme : LED standard programme:
l
LEDs switch “ON” in response to movement.
l
LEDs go out when time setting elapses.
1
2
3
4
* Note on LED comfort economy programme :
The sensor does not have any integrated clock. The middle of
the night is only determined on the basis of the length of dark-
ness phases. To work perfectly, therefore, it is important for
the light to be permanently connected to the power supply
during this period. During the first night (calibration phase) the
LEDs remain activated. Values remain saved even in the event
of mains power failure.
We recommend not to interrupt the power supply in pro-
gramme . As the values are determined over several nights,
the sensor should, in the event of any fault, be observed over
several nights to ascertain whether the LED switch-off time
moves towards the middle of the night.
3
3
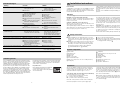
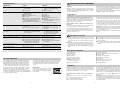
Technical specifications
Dimensions (W x H x D): 295 x 72 x 105
Power supply: 230 – 240 V/50 Hz
Output: 12 W LED effect light and LED Power light, approx. 1 W
low-energy bulb only with max. Ø of 48 mm / 15 W max.
Angle of coverage: 360° with 90° angle of aperture and sneak-by guard
Sensor reach: 8 m max. all round
Time setting: 5 sec. – 15 min.
Twilight setting: 2 – 2000 lux
Programme setting: 4 programmes geared to practical needs (see above)
Manual override: selectable (4 hrs.)
Condition: switch in mains power supply lead
Temperature range: -10 °C to +50 °C
IP rating: IP 44
Protection class: II
Technical specifications for the enclosed LED lamp
Output: 8.5 W / E27
Luminous flux/efficiency: 674 lm / 79.3 lm/W
Colour-rendering index: RA ≥ 80
Colour temperature: 3000 K (warm white)
LED life expectancy: 25,000 hours
GB

- 13 -
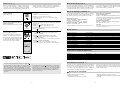
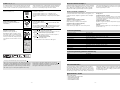
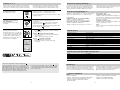
Description de l'appareil
Verrine de lampe
Vis de blocage
Châssis de lampe
Support mural
Couronne lumineuse LED
Eclairage LED effet Power
Minidétecteur (le retirer pour
effectuer les réglages)
Bouchon d'étanchéité
Instructions de montage
Cher client,
Nous vous remercions de la confiance que vous témoignez à
STEINEL en achetant cette lampe à détecteur. Vous avez choi-
si un article de très grande qualité, fabriqué, testé et condition-
né avec le plus grand soin.
F
Consignes de sécurité
n Pendant le montage, les conducteurs à raccorder doivent
être hors tension. Il faut donc d'abord couper le courant et
s'assurer de l'absence de courant à l'aide d'un testeur de
tension.
n L'installation de la lampe à détecteur implique une inter-
vention sur le réseau électrique et doit donc être effectuée
correctement et conformément à la norme NF C-15100.
(
D- VDE 0100, A- ÖVE / ÖNORM E8001-1, - SEV
1000)
Avant de l'installer, veuillez lire attentivement ces instructions
de montage. En effet, seules une installation et une mise en
service correctement effectuées garantissent durablement un
fonctionnement impeccable et fiable.
Nous souhaitons que votre nouvelle lampe à détecteur
STEINEL vous apporte entière satisfaction.
n Utiliser uniquement des pièces de rechange d'origine.
n Les réparations ne doivent être effectuées que par des
ateliers spécialisés.
n Il faut veiller à bien mettre en place l’anneau d’étanchéité
de visser fermement la verrine sur le châssis de la
lampe .
Anneau d'étanchéité
Encoche permettant de retirer le minidétecteur
Temporisation
Réglage de crépuscularité
Réglage des programmes
Le principe
Ajustage de la zone de détection
Mode éclairage permanent
Utilisation/Entretien
Le principe
Couronne lumineuse LED et éclairage LED effet Power
L'allumage et l'extinction des LED sont pilotés par un inter-
rupteur crépusculaire. C'est idéal par ex.pour éclairer en per-
manence les numéros de maison. Sur demande, éclairage
uniquement en cas de mouvement.
Ampoule LED raccordée en plus en cas de détection de
personnes
Lorsque le minidétecteur saisit une personne, l'ampoule LED
est raccordée en plus pour la durée programmée.
Le détecteur infrarouge haute performance intégré est com-
posé d'un détecteur double à 360° qui détecte le rayonne-
ment de chaleur invisible émis par les corps en mouvement
(personnes, animaux, etc.).
Ce rayonnement de chaleur capté est ensuite traité par un
système électronique qui met en marche la lampe. Les obs-
tacles comme les murs ou les vitres s'opposent à la détection
du rayonnement de chaleur et empêchent toute commutation.
Le détecteur couvre un angle de détection de 360° avec une
ouverture angulaire de 90°. La surveillance du champ situé
sous le détecteur assure une protection au ras du mur.
Important : La détection des mouvements est la plus fiable
quand la lampe à détecteur est montée perpendiculairement
au sens de passage et qu'aucun obstacle (arbre, mur, etc.)
n’obstrue le champ de visée.
La portée est réduite si vous vous dirigez directement vers la
lampe.
Installation
Il faut monter l'appareil à 50 cm au moins de toute lampe dont
la chaleur pourrait entraîner un déclenchement intempestif du
détecteur. Pour obtenir la portée indiquée de 8 m, il faut monter
le détecteur à une hauteur de 1,8 – 2 m environ.
Raccordement des conduites secteur et consommateur
(v. ill.)
La conduite secteur est composée d'un câble à 3 conduc-
teurs :
L = phase (généralement noir ou marron)
N = neutre (généralement bleu)
PE = conducteur de terre (vert/jaune)
En cas de doute, il faut identifier les câbles avec un testeur de
tension puis les remettre hors tension. Raccorder la phase (L)
et le neutre (N) au domino. Une inversion des branchements
entraînera un court-circuit dans l'appareil ou dans le boîtier à
fusibles. Dans ce cas, il faut identifier les câbles et les raccor-
der en conséquence. Isoler la terre (PE) et la placer simple-
ment à côté.
Remarque : Il est bien sûr possible de monter sur la conduite
secteur un interrupteur permettant la mise en ou hors circuit
de l'appareil. Ceci est indispensable pour le fonctionnement
en éclairage permanent (v. chapitre Fonctionnement en éclai-
rage permanent) .
8.1
8.1
- 12 -
Sensor light switching “ON” when
it should not
Change in SensorLight reach
Red LED flashing rapidly
n Wind is moving trees and bushes in
the detection zone
n Cars in the street are being detected
n Sudden change in temperature due
to weather (wind, rain, snow) or air
expelled from fans, open windows
n Change detection zone
n Change detection zone
n Change detection zone, change site
of installation
n Differing ambient temperatures n Use shrouds to define detection
zone precisely
n Internal fuse activated n Switch SensorLight “OFF” and back
““ON” again after 5 sec.
LED corona “OFF” although it is dark
n Programme 3 or 4 selected n Change programme
Troubleshooting
SensorLight without power
SensorLight will not switch “ON”
SensorLight will not switch “OFF”
Malfunction
n Fuse has blown; not switched “ON”;
break in wiring
n Short circuit
n Fit new fuse; switch “ON” mains
switch; check wiring with voltage
tester
n Check connections
n Twilight control set to night-time during
daytime operation
n LED lamp faulty
n Mains power switch “OFF”
n Fuse faulty
n Detection zone not properly targeted
n Internal electrical fuse has been acti-
vated (red LED flashing rapidly)
n Mains terminal not connected properly
n Re-adjust (control )
n Change
n Switch “ON”
n Fit new fuse,
check connection if necessary
n Re-adjust
n Switch SensorLight “OFF” and back
“ON” again after 5 sec.
n Firmly press terminal together
n Permanent movement in the detec-
tion zone
n Sensor unit not properly engaged
n Check detection zone and re-adjust
if necessary
n Lightly press sensor unit to clip it
into place
LEDs do not go out at about midnight
as desired
n External light source (e.g. other
motion detector or light) inactivating
the SensorLight
n Shade SensorLight from extra-
neous light, observe SensorLight
for several days as it takes time
to return to the correct value
LEDs do not switch “OFF” completely
n Comfort programme selected n Turn programme selector dial to 4
Cause Remedy
Functional Warranty
This STEINEL product has been manufactured with great
care, tested for proper operation and safety in accordance
with applicable regulations and then subjected to random
sample inspection. Steinel guarantees that it is in perfect
condition and proper working order. The warranty period is
36 months and starts on the date of sale to the consumer.
We will remedy defects caused by material flaws or manufac-
turing faults. The warranty will be met by repair or replace-
ment at our own discretion. The warranty shall not cover
damage to wear parts, damage or defects caused by improp-
er treatment or maintenance. Further consequential damage to
other objects shall be excluded.
Claims under the warranty will only be accepted if the product
is sent fully assembled and well packed complete with a brief
description of the fault as well as a receipt or invoice (date
of purchase and dealer's stamp) to the appropriate Service
Centre.
Repair Service:
Please ask your nearest service centre how
to proceed for repairing faults not covered
by the warranty or occurring after the war-
ranty expires.
F
Page is loading ...
Page is loading ...
Page is loading ...
Page is loading ...
Page is loading ...
Page is loading ...
Page is loading ...
Page is loading ...
Page is loading ...
Page is loading ...
Page is loading ...
Page is loading ...
Page is loading ...
Page is loading ...
Page is loading ...
Page is loading ...
Page is loading ...
Page is loading ...
Page is loading ...
Page is loading ...
Page is loading ...
Page is loading ...
Page is loading ...
Page is loading ...
Page is loading ...
Page is loading ...
Page is loading ...
Page is loading ...
Page is loading ...
Page is loading ...
Page is loading ...
Page is loading ...
Page is loading ...
Page is loading ...
Page is loading ...
Page is loading ...
Page is loading ...
Page is loading ...
Page is loading ...
Page is loading ...
Page is loading ...
Page is loading ...
Page is loading ...
Page is loading ...
-
 1
1
-
 2
2
-
 3
3
-
 4
4
-
 5
5
-
 6
6
-
 7
7
-
 8
8
-
 9
9
-
 10
10
-
 11
11
-
 12
12
-
 13
13
-
 14
14
-
 15
15
-
 16
16
-
 17
17
-
 18
18
-
 19
19
-
 20
20
-
 21
21
-
 22
22
-
 23
23
-
 24
24
-
 25
25
-
 26
26
-
 27
27
-
 28
28
-
 29
29
-
 30
30
-
 31
31
-
 32
32
-
 33
33
-
 34
34
-
 35
35
-
 36
36
-
 37
37
-
 38
38
-
 39
39
-
 40
40
-
 41
41
-
 42
42
-
 43
43
-
 44
44
-
 45
45
-
 46
46
-
 47
47
-
 48
48
-
 49
49
-
 50
50
-
 51
51


STEINEL L 265 LED Owner's manual
- Category
- Outdoor lighting
- Type
- Owner's manual
Ask a question and I''ll find the answer in the document
Finding information in a document is now easier with AI
in other languages
- italiano: STEINEL L 265 LED Manuale del proprietario
- français: STEINEL L 265 LED Le manuel du propriétaire
- español: STEINEL L 265 LED El manual del propietario
- Deutsch: STEINEL L 265 LED Bedienungsanleitung
- русский: STEINEL L 265 LED Инструкция по применению
- Nederlands: STEINEL L 265 LED de handleiding
- português: STEINEL L 265 LED Manual do proprietário
- slovenčina: STEINEL L 265 LED Návod na obsluhu
- dansk: STEINEL L 265 LED Brugervejledning
- polski: STEINEL L 265 LED Instrukcja obsługi
- čeština: STEINEL L 265 LED Návod k obsluze
- Türkçe: STEINEL L 265 LED El kitabı
- eesti: STEINEL L 265 LED Omaniku manuaal
- svenska: STEINEL L 265 LED Bruksanvisning
- suomi: STEINEL L 265 LED Omistajan opas
- română: STEINEL L 265 LED Manualul proprietarului
Related papers
-
STEINEL L 265 S Specification
-
STEINEL ST 670115 Specification
-
-
STEINEL HF 3360 Specification
-
STEINEL IS 140-2 Owner's manual
-
-
-
-
STEINEL IS D360 Owner's manual
-
STEINEL L 115 S Owner's manual
Other documents
-
 Avsl PIR User manual
-
 Artek A330S Assembly Instructions
-
LIVARNO 113950 Owner's manual
-
Panlux PN31100011 Operating instructions
-
NATURE & DECOUVERTES 15225640 Operating instructions
-
Orbis DICROMAT User manual
-
JUNG BM240S1A Operating instructions
-
-
KPS KPS-IC300 Owner's manual
-
HQ EL-PIRLA90 Installation guide

