Page is loading ...

D51855 Coil Framing Nailer (1-1/2" – 3-1/2") (38 mm – 90 mm)
Cloueuse à bobine pour charpente D51855 (38 mm – 90 mm) (1-1/2 po – 3-1/2 po)
Clavadora alimentada por rollo D51855 (38 mm – 90 mm) (1-1/2 pulg. – 3-1/2 pulg.)
EXTERNAL TOOL PARTS
D51855 COIL FRAMING NAILER
PIÈCES EXTERNES
CLOUEUSE À BOBINE POUR CHARPENTE D51855
PIEZAS EXTERNAS DE LA HERRAMIENTA
CLAVADORA ALIMENTADA POR ROLLO D51855
70 psi
4.9 bar
• Actuating tool may result in flying debris,
collation material, or dust which could harm
operator’s eyes. Operator and others in work
area MUST wear safety glasses with side shields.
These safety glasses must conform to ANSI
Z87.1 requirements (approved glasses have “Z87”
printed or stamped on them). It is the employer’s
responsibility to enforce the use of eye protection
equipment by the tool operator and other people
in the work area. (Fig. A)
• Always wear appropriate personal hearing
and other protection during use. Under some
conditions and duration of use, noise from this
product may contribute to hearing loss. (Fig. A)
• Use only clean, dry, regulated air. Conden-
sation from an air compressor can rust and
damage the internal workings of the tool. (Fig. B)
• Regulate air pressure. Use air pressure
compatible with ratings on the nameplate of
the tool. [Not to exceed 120 psi (8.3 bar] Do not
connect the tool to a compressor rated at over
175 psi. The tool operating pressure must never
exceed 175 psi even in the event of regulator
failure. (Fig. C)
• Only use air hose that is rated for a maximum
working pressure of at least 150 PSI
(10.3 BAR) or 150% of the maximum system
pressure, which ever is greater. (Fig. D)
• Do not use bottled gases to power this tool.
Bottled compressed gases such as oxygen,
carbon dioxide, nitrogen, hydrogen, propane,
acetylene or air are not for use with pneumatic
tools. Never use combustible gases or any other
reactive gas as a power source for this tool.
Danger of explosion and/or serious personal
injury may result. (Fig. E)
• Use couplings that relieve all pressure from
the tool when it is disconnected from the
power supply. Use hose connectors that shut
off air supply from compressor when the tool is
disconnected. (Fig. F)
• Disconnect tool from air supply when not in
use. Always disconnect tool from air supply
and remove fasteners from magazine before
leaving the area or passing the tool to another
operator. Do not carry tool to another work
area in which changing location involves the
use of scaffoldings, stairs, ladders, and the
like, with air supply connected. Do not make
adjustments, remove magazine, perform
maintenance or clear jammed fasteners while
connected to the air supply. If the contact trip
is adjusted when the tool is connected to the air
supply and nails are loaded, accidental discharge
may occur. (Fig. G)
• Connect tool to air supply before loading
fasteners to prevent a fastener from being
fired during connection. The tool driving
FIG. C
FIG. B
FIG. A
FIG. D
FIG. E
INSTRUCTION MANUAL
GUIDE D’UTILISATION
MANUAL DE INSTRUCCIONES
INSTRUCTIVO DE OPERACIÓN, CENTROS DE SERVICIO
Y PÓLIZA DE GARANTÍA. ADVERTENCIA: LÉASE ESTE
INSTRUCTIVO ANTES DE USAR EL PRODUCTO.
DEWALT Industrial Tool Co., 701 East Joppa Road, Baltimore, MD 21286 (AUG10)
Part No. N084997 D51855 Copyright © 2008, 2009, 2010 DEWALT
The following are trademarks for one or more D
EWALT power tools: the yellow and black color scheme; the
“D” shaped air intake grill; the array of pyramids on the handgrip; the kit box configuration; and the array of
lozenge-shaped humps on the surface of the tool.
If you have questions or comments, contact us.
Pour toute question ou tout commentaire, nous contacter.
Si tiene dudas o comentarios, contáctenos.
1-800-4-DEWALT • www.dewalt.com
IF YOU HAVE ANY QUESTIONS OR COMMENTS ABOUT THIS OR ANY DEWALT TOOL, CALL US TOLL FREE AT: 1-800-4-DEWALT (1-800-433-9258)
POUR TOUTE QUESTION OU TOUT COMMENTAIRE CONCERNANT CET OUTIL OU À PROPOS DE TOUT AUTRE OUTIL D
EWALT, COMPOSER SANS FRAIS LE : 1-800-4-DEWALT
(1-800-433-9258).
SI TIENE ALGUNA DUDA O ALGÚN COMENTARIO SOBRE ÉSTA U OTRA HERRAMIENTA D
EWALT, LLÁMENOS AL NÚMERO GRATUITO: 1-800-4-DEWALT (1-800-433-9258)
SAVE THESE INSTRUCTIONS
Important Safety Instructions for Pneumatic Tools
WARNING: When using any pneumatic tool, all safety precautions, as outlined below, should be followed to avoid the risk of death or serious injury. Read and
understand all instructions before operating the tool.
CONSERVEZ CES DIRECTIVES
Consignes de sécurité importantes pour les outils pneumatiques
AVERTISSEMENT : lorsqu’on utilise un outil pneumatique quelconque, respecter toutes les mesures de sécurité, décrites ci-après, pour éviter un risque de décès ou
de blessures graves. Lire et assimiler toutes les directives avant d’utiliser l’outil.
CONSERVE ESTAS INSTRUCCIONES
Instrucciones importantes de seguridad para las herramientas neumáticas
ADVERTENCIA: Al utilizar una herramienta neumática, deben seguirse todas las precauciones de seguridad descritas a continuación, a fin de evitar el riesgo de
muerte o lesiones graves. Lea y comprenda todas las instrucciones antes de emplear la herramienta.
Definitions: Safety Guidelines
The definitions below describe the level of severity for each
signal word. Please read the manual and pay attention
to these symbols.
DANGER: Indicates an imminently hazardous
situation which, if not avoided, will result in death or
serious injury.
WARNING: Indicates a potentially hazardous situation
which, if not avoided, could result in death or serious
injury.
CAUTION: Indicates a potentially hazardous situation
which, if not avoided, may result in minor or moderate
injury.
CAUTION: Used without the safety alert symbol indicates
a potentially hazardous situation which, if not avoided,
may result in property damage.
FIG. F
FIG. G
• L’outil actionné pourrait projeter des débris,
de la colle d’assemblage ou de la poussière,
qui peuvent tous provoquer des lésions
oculaires à l’opérateur. L’opérateur et les
autres personnes œuvrant dans la zone de
travail DOIVENT porter des lunettes de sécurité
munies de protecteurs latéraux. Ces lunettes
de sécurité doivent être conformes à la norme
ANSI Z87.1 (les lunettes approuvées portent
l’inscription imprimée ou estampillée « Z87 »).
L’employeur a la responsabilité d’imposer le
port d’un équipement de protection oculaire par
l’opérateur de l’outil et toute personne se trouvant
dans la zone immédiate de travail. (fig. A)
• Toujours porter une protection auditive et
toute autre protection convenable lors de
l’utilisation de l’outil. Dans certaines conditions
et selon la durée d’utilisation, le bruit émis par ce
produit pourrait contribuer à une perte auditive.
(fig. A)
• Utiliser exclusivement de l’air propre, sec et
régulé. La condensation issue d’un compresseur
d’air risque de faire rouiller et d’abîmer les
composants internes de l’outil. (fig. B)
• Réguler la pression d’air. Utiliser une pression
compatible à celles inscrites sur la plaque
signalétique de l’outil [ne pas excéder les
8,3 bars (120 psi)]. Ne pas raccorder l’outil à
un compresseur d’une puissance nominale
supérieure à 12,6 bars (175 psi). La pression de
fonctionnement de l’outil ne doit jamais excéder
12,6 bars (175 psi) même dans l’éventualité
d’une défaillance du régulateur. (fig. C)
• Utiliser exclusivement un tuyau à air prévu
pour une pression de fonctionnement
maximale d’au moins 10,3 bars (150 psi) ou
150 % de la pression maximale du système,
selon la pression la plus élevée. (fig. D)
• Ne pas utiliser de gaz en bouteille pour faire
fonctionner cet outil. Les gaz comprimés en
bouteille comme l’oxygène, le dioxyde de carbone,
l’azote, l’hydrogène, le propane, l’acétylène
ou l’air ne doivent pas être utilisés avec les
outils pneumatiques. Ne jamais utiliser de gaz
combustibles ou tout autre type de gaz réactif
comme source d’énergie pour cet outil. Leur
utilisation représente un danger d’explosion et
peut se solder par des blessures corporelles
graves. (fig. E)
• Utiliser des raccords qui libèrent toute la
pression de l’outil lorsqu’il est débranché de
l’alimentation. Utiliser des connecteurs de tuyau
qui coupent l’alimentation en air dès que l’outil est
débranché. (fig. F)
• La herramienta en funcionamiento puede
generar residuos volátiles, materiales
colacionados o polvo, que pueden dañar
los ojos del operador. El operador y toda
otra persona que se encuentre en el área de
trabajo DEBEN usar anteojos de seguridad con
protección lateral. Estos anteojos de seguridad
deben cumplir con los requisitos ANSI Z87.1 (los
anteojos aprobados tienen impreso o estampado
“Z87”). Es responsabilidad del empleador exigir
el uso de equipo de protección para los ojos por
parte del operador de la herramienta y de las
personas en el área de trabajo. (Fig. A)
• Siempre utilice la protección auditiva
apropiada mientras usa la herramienta. En
ciertas circunstancias y según el período de uso,
el ruido de este producto puede contribuir a la
pérdida de audición. (Fig. A)
• Utilice sólo aire limpio, seco y regulado. La
condensación de un compresor de aire puede
oxidar y dañar los mecanismos internos de la
herramienta. (Fig. B)
• Regule la presión de aire. Utilice presión
de aire compatible con las indicaciones
de la placa de la herramienta. [No exceda
8,3 bar (120 psi)]. No conecte la herramienta a un
compresor con una capacidad nominal superior
a 12,1 bar (175 psi). La presión de operación
de la herramienta nunca debe exceder 12,1 bar
(175 psi), aún en el caso de una falla en el
regulador. (Fig. C)
• Utilice únicamente una manguera de aire
que tenga una capacidad nominal para una
presión de trabajo máxima de 10,3 BAR
(150 psi), como mínimo, o el 150% de la
presión máxima del sistema, el valor que sea
mayor. (Fig. D)
• No utilice gases envasados para esta
herramienta. Los gases comprimidos envasados
como el oxígeno, el dióxido de carbono, el
nitrógeno, el hidrógeno, el propano, el acetileno
o el aire no son para utilizar con herramientas
neumáticas. Nunca utilice gases combustibles
o cualquier otro gas reactivo como fuente de
energía para esta herramienta. Podría provocarse
un peligro de explosión y/o lesiones personales
graves. (Fig. E)
• Utilice acoplamientos que liberen toda la
presión de la herramienta cuando ésta está
desconectada de la fuente de alimentación.
Utilice conectores de mangueras que cierren
el suministro de aire del compresor cuando la
herramienta está desconectada. (Fig. F)
Définitions : lignes
directrices en matière de sécurité
Les définitions ci-dessous décrivent le niveau de danger
pour chaque mot-indicateur employé. Veuillez lire le mode
d’emploi et porter une attention particulière à ces symboles.
DANGER: indique une situation dangereuse imminente
qui, si elle n’est pas évitée, entraînera la mort ou des
blessures graves.
AVERTISSEMENT : indique une situation potentiellement
dangereuse qui, si elle n’est pas évitée, pourrait entraîner
la mort ou des blessures graves.
ATTENTION : indique une situation potentiellement
dangereuse qui, si elle n’est pas évitée, peut causer des
blessures mineures ou modérées.
ATTENTION : utilisé sans le symbole d’alerte de sécurité,
indique une situation potentiellement dangereuse qui, si elle
n’est pas évitée, pourrait entraîner des dégâts matériels.
Definiciones: Normas de
seguridad
Las siguientes definiciones describen el nivel de gravedad
de cada palabra de señal. Lea el manual y preste atención
a estos símbolos.
PELIGRO: IIndica una situación de peligro inminente
que, si no se evita, provocará la muerte o lesiones
graves.
ADVERTENCIA: Indica una situación de peligro potencial
que, si no se evita, podría provocar la muerte o lesiones
graves.
ATENCIÓN: Indica una situación de peligro potencial
que, si no se evita, puede provocar lesiones leves o
moderadas.
ATENCIÓN: Utilizado sin el símbolo de alerta de seguridad
indica una situación de peligro potencial que, si no se evita,
puede provocar daños en la propiedad.
TRIGGER WITH TRIGGER LOCK-OFF
GÂCHETTE MUNIE D’UN VERROUILLAGE
DE GÂCHETTE
GATILLO CON SEGURO
DEPTH SETTING
WHEEL
BOUTON DE RÉGLAGE
DE PROFONDEUR
DISCO DE AJUSTE DE
PROFUNDIDAD
CONTACT TRIP
DÉCLENCHEUR
PAR CONTACT
ACTIVADOR POR
CONTACTO
EXHAUST CAP
CAPUCHON DU
DÉFLECTEUR
D’ÉCHAPPEMENT
TAPÓN DE ESCAPE
CANISTER
LATCH
VERROU DU
BOÎTIER
SEGURO DEL
RECIPIENTE
CANISTER
BOÎTIER
RECIPIENTE
WEAR GUARDS
PROTECTEURS
ANTI-USURE
PROTECTORES DE
DESGASTAMIENTO
RAFTER HOOK
CROCHET
GANCHO
NAIL GUIDE DOOR
PORTE DE GUIDAGE
DES CLOUS
PUERTA DE GUÍA DE
CLAVOS

mechanism may cycle when tool is connected to
the air supply. Do not load fasteners with trigger
or safety depressed to prevent unintentional firing
of a fastener.
• Do not remove, tamper with, or otherwise
cause the tool, trigger, or contact trip to
become inoperable. Do not tape or tie trigger
or contact trip in the on position. Do not remove
spring from contact trip. Make daily inspections
for free movement of trigger and contact trip.
Uncontrolled discharge could result.
• Inspect tool before use. Do not operate a tool
if any portion of the tool, trigger, or contact
trip is inoperable, disconnected, altered, or
not working properly. Leaking air, damaged
parts or missing parts should be repaired or
replaced before use. Refer to Repairs. (Fig. H)
• Do not alter or modify the tool in any way.
(Fig. I)
• Always assume that the tool contains
fasteners.
• Do not point the tool at co-workers or yourself
at any time. No horseplay! Work safe! Respect
the tool as a working implement. (Fig. J)
• Keep bystanders, children, and visitors away
while operating a power tool. Distractions can
cause you to lose control. When tool is not in
use, it should be locked in a safe place, out of the
reach of children.
• Remove finger from trigger when not driving
fasteners. Never carry tool with finger on
trigger. Using the trigger lock-off will prevent
accidental discharge. Accidental discharge could
result.
• Do not overreach. Maintain proper footing and
balance at all times. Loss of balance may cause
personal injury. (Fig. K)
• Make sure hose is free of obstructions or
snags. Entangled or snarled hoses can cause
loss of balance or footing.
• Use the tool only for its intended use. Do not
discharge fasteners into open air, concrete,
stone, extremely hard woods, knots or any
material too hard for the fastener to penetrate.
Do not use the body of the tool or top cap as
a hammer. Discharged fasteners may follow
unexpected path and cause injury. (Fig. L)
• Always keep fingers clear of contact trip to
prevent injury from inadvertent release of
nails. (Fig. M)
• Refer to the Maintenance and Repairs
sections for detailed information on the
proper maintenance of the tool.
• Always operate the tool in a clean, lighted area.
Be sure the work surface is clear of any debris and
be careful not to lose footing when working in
elevated environments such as rooftops.
• Do not drive fasteners near edge of material.
The workpiece may split causing the fastener to
ricochet, injuring you or a co-worker. Be aware
that the nail may follow the grain of the wood
(shiner), causing it to protrude unexpectedly
from the side of the work material. Drive the nail
perpendicular to the grain to reduce risk of injury.
(Fig. N)
• Do not drive nails onto the heads of other
fasteners or with the tool at too steep an
angle. Personal injury from strong recoil, jammed
fasteners, or ricocheted nails may result. (Fig. O)
• Be aware of material thickness when using the
nailer. A protruding nail may cause injury.
• Be aware that when the tool is being utilized
at pressures on the high end of its operating
range, nails can be driven completely through
thin or very soft work material. Make sure the
pressure in the compressor is set so that nails are
set into the material and not pushed completely
through. (Fig. P)
• Keep hands and body parts clear of immediate
work area. Hold workpiece with clamps when
necessary to keep hands and body out of
potential harm. Be sure the workpiece is properly
secured before pressing the nailer against the
material. The contact trip may cause the work
material to shift unexpectedly. (Fig. Q)
• Do not use tool in the presence of flammable
dust, gases or fumes. The tool may produce
a spark that could ignite gases causing a fire.
Driving a nail into another nail may also cause a
spark. (Fig. R)
• Keep face and body parts away from back
of the tool cap when working in restricted
areas. Sudden recoil can result in impact to the
body, especially when nailing into hard or dense
material. (Fig. S)
• Grip tool firmly to maintain control while
allowing tool to recoil away from work surface
as fastener is driven. In bump action mode
(contact actuation mode) if contact trip is allowed
to recontact work surface before trigger is released
an unwanted fastener will be fired.
• Choice of triggering method is important.
Check the manual for triggering options.
BUMP OR CONTACT ACTUATION TRIGGER
• When using the bump action trigger,
be careful of unin tentional double fires
resulting from tool recoil. Unwanted
fasteners may be driven if the contact trip is
allowed to accidentally re-contact the work
surface. (Fig. T)
TO AVOID DOUBLE FIRES:
• Do not engage the tool against the work
surface with a strong force.
• Allow the tool to recoil fully after each
actuation.
• Use sequential action trigger.
• When bump actuating the nailer, always
keep tool in control. Inaccurate placement
of tool can result in misdirected discharge of a
fastener.
SEQUENTIAL ACTION TRIGGER
• When using the sequential action trigger,
do not actuate the tool unless the tool is
placed firmly against the workpiece.
• DEPTH ADJUSTMENT: To reduce risk of
serious injury from accidental actuation when
attempting to adjust depth, ALWAYS;
• Lock OFF trigger.
• Disconnect air supply.
• Avoid contact with trigger during adjustments.
• Do not drive nails blindly into walls, floors
or other work areas. Fasteners driven into
live electrical wires, plumbing, or other types of
obstructions can result in injury. (Fig. U)
• Stay alert, watch what you are doing and
use common sense when operating a power
tool. Do not use tool while tired or under the
influence of drugs or alcohol. A moment of
inattention while operating power tools may result
in serious personal injury.
WARNING: Some dust created by power sanding,
sawing, grinding, drilling, and other construction
activities contains chemicals known to the State
of California to cause cancer, birth defects or
other reproductive harm. Some examples of these
chemicals are:
• lead from lead-based paints,
• crystalline silica from bricks and cement and
other masonry products, and
• arsenic and chromium from chemically-treated
lumber.
Your risk from these exposures varies, depending
on how often you do this type of work. To reduce
your exposure to these chemicals: work in a well
ventilated area, and work with approved safety
equipment, such as those dust masks that are
specially designed to filter out microscopic particles.
FIG. I
FIG. J
FIG. K
FIG. L
FIG. M
FIG. N
FIG. Q
FIG. R
FIG. S
FIG. T
FIG. P
FIG. U
FIG. H
FIG. O
• Débrancher l’outil de la source d’alimentation
en air lorsqu’il n’est pas utilisé et retirer les
attaches qui se trouvent dans le chargeur
avant de quitter la zone de travail ou de
remettre l’outil à un autre opérateur. Ne pas
transporter l’outil vers une autre zone de
travail qui comprend des échafaudages, des
marches, des échelles, etc., avec la source
d’alimentation en air raccordée. Ne pas
effectuer de réglages, retirer le chargeur,
effectuer un entretien ou débloquer des
attaches coincées alors que l’outil est
raccordé à la source d’alimentation en air. Un
déclenchement intempestif pourrait se produire
lors du réglage du déclencheur si l’outil est
raccordé à la source d’alimentation en air en
présence de clous dans le chargeur. (fig. G)
• Brancher l’outil à la source d’alimentation
en air avant de charger les attaches afin de
prévenir qu’une attache soit éjectée au cours
du branchement. Le mécanisme d’entraînement
de l’outil peut être mis en cycle lorsque l’outil est
branché à la source d’alimentation en air. Ne pas
enfoncer la détente ou le mécanisme de sécurité
lors du chargement des attaches pour prévenir un
clouage par inadvertance.
• Ne pas retirer, modifier ou rendre inutilisable,
l’outil, la détente ou le déclencheur de quelque
façon que ce soit. Ne pas appliquer de ruban
ou d’attaches sur la détente ou le déclencheur
pour l’un ou l’autre maintenir en position de
marche. Ne pas retirer le ressort du déclencheur.
Inspecter quotidiennement le bon fonctionnement
de la détente et du déclencheur. Une décharge
non contrôlée pourrait survenir.
• Inspecter l’outil avant de l’utiliser. Ne pas
utiliser un outil si une partie quelconque de
l’outil, de la détente ou du déclencheur n’est
pas fonctionnelle, est débranchée, modifiée
ou ne fonctionne pas correctement. Les
fuites d’air ainsi que les pièces endommagées
ou manquantes devraient être réparées ou
remplacées avant utilisation. Se reporter à la
rubrique « Réparations ». (fig. H)
• Ne jamais modifier ni altérer l’outil. (fig. I)
• Toujours présumer que l’outil contient des
attaches.
• Ne jamais pointer l’outil sur des collègues ou
sur soi-même. Pas de bousculades! Travailler en
toute sécurité! Traiter l’outil comme un instrument
essentiel de travail. (fig. J)
• Éloigner les curieux, les enfants et les visiteurs
lors de l’utilisation d’un outil électrique.
Une distraction pourrait vous en faire perdre la
maîtrise. Verrouiller l’outil dans un endroit sûr,
hors de la portée des enfants lorsqu’il n’est pas
utilisé.
• Enlever le doigt de la détente lorsque
vous n’enfoncez pas d’agrafes. Ne jamais
transporter l’outil avec le doigt sur la détente.
Utiliser le bouton de verrouillage de la détente
pour empêcher une décharge intempestive. La
non-utilisation du bouton pourrait se solder par
une décharge intempestive.
• Ne pas trop tendre les bras. Conserver
son équilibre en tout temps. Une perte
d’équilibre risque d’entraîner une blessure
corporelle. (fig. K)
• S’assurer que le tuyau est exempt d’obstruction
ou d’anomalies. Des tuyaux enchevêtrés ou
bouclés peuvent vous faire perdre l’équilibre.
• Utiliser l’outil uniquement pour les travaux
pour lesquels il a été conçu. Ne pas décharger
les attaches à l’air libre ou dans des matériaux
trop durs comme le béton, la pierre, le bois
très dur, les nœuds ou toute autre matière
trop difficile à pénétrer. Ne pas utiliser le corps
de l’outil ou son couvercle supérieur comme
marteau. Les attaches éjectées peuvent suivre
une trajectoire inattendue et provoquer des
blessures. (fig. L)
• Toujours prendre soin d’éloigner les doigts
du déclencheur par contact pour prévenir une
blessure en cas d’éjection intempestive de
clous. (fig. M)
• Se reporter à la rubrique « Entretien» et
«Réparations » pour obtenir de plus amples
renseignements sur l’entretien approprié de
l’outil.
• Toujours utiliser l’outil dans un endroit propre
et éclairé. S’assurer que la surface de travail
est exempte de débris et prendre soin de ne
pas perdre l’équilibre lors de travaux en hauteur,
comme sur un toit.
• Ne pas enfoncer d’attaches près du bord de la
pièce. La pièce risque de se fendre, faire ricocher
l’attache et blesser l’opérateur ou un collègue de
travail. Il est possible que le clou suive le fil du
bois et sorte inopinément sur le côté de la pièce.
Enfoncer le clou perpendiculairement au fil du
bois pour réduire le risque de blessures. (fig. N)
• Ne pas enfoncer de clous sur les têtes d’autres
attaches ou avec l’outil à un angle trop aigu.
Ceci pourrait causer une blessure corporelle
provoquée par un recul, un coincement d’attache
ou un ricochet de clou. (fig. O)
• S’informer de l’épaisseur du matériau lorsque
vous utilisez la cloueuse. Un clou en saillie
peut causer des blessures.
• Être conscient que lorsque l’outil est utilisé
à des pressions du côté élevé de sa plage
de fonctionnement, les clous peuvent passer
complètement à travers un matériau mince
ou très souple. S’assurer que la pression dans
le compresseur est réglée de façon à ce que
les clous soient fixés dans le matériau et non
poussés entièrement dans celui-ci. (fig. P)
• Garder les mains et les parties du corps
éloignées de la zone immédiate de travail.
Le cas échéant, tenir la pièce à l’aide de serres
pour protéger les mains et le corps de dangers
potentiels. S’assurer que la pièce est bien
fixe avant d’appuyer la cloueuse contre celle-
ci. La force du déclencheur peut entraîner le
déplacement inopiné de la pièce. (fig. Q)
• Ne pas utiliser d’outil en présence de
poussières, de gaz ou d’émanations
inflammables. L’outil peut générer une étincelle
qui risque d’enflammer les gaz, provoquant ainsi
un incendie. Une étincelle pourrait également être
produite si un clou est enfoncé sur un autre clou.
(fig. R)
• Tenir le visage et le corps à l’écart de l’arrière
du couvercle de l’outil lors de travaux dans
des endroits d’accès limité. En effet, un recul
inopiné peut entraîner un impact sur le corps,
particulièrement lors d’un clouage dans une
matière dure ou dense. (fig. S)
• Saisir l’outil fermement pour en garder la
maîtrise tout en lui permettant de reculer hors
de la surface de travail lorsque l’attache est
enfoncée. En « mode de détente actionnée par
coup » (mode d’actionnement par contact), si le
déclencheur touche la pièce de nouveau avec la
détente enfoncée, la cloueuse se déclenchera.
• Le choix de la méthode de déclenchement est
important. Consulter le manuel pour connaître
les options de déclenchement.
MODE DE DÉTENTE ACTIONNÉE PAR COUP
OU PAR CONTACT
• Lors de l’utilisation de la détente par coup,
prendre garde aux doubles déclenchements
intempestifs provoqués par le recul de
l’outil. On peut enfoncer involontairement des
clous si le déclencheur touche de nouveau la
pièce inopinément. (fig. T)
• Desconecte la herramienta del suministro de
aire cuando no se la utilice. Desconecte siempre
la herramienta del suministro de aire y retire
los clavos de la fuente antes de dejar el área o
de pasarle la herramienta a otro operador. No
lleve la herramienta a otra área de trabajo en
la que el cambio de ubicación involucre el uso
de andamios, escalones, escaleras, etc., con
el suministro de aire conectado. No realice
ajustes, extraiga la fuente, efectúe tareas de
mantenimiento, ni retire los clavos atascados
mientras el suministro de aire está conectado.
Si el activador por contacto se ajusta cuando
la herramienta está conectada al suministro de
aire y hay clavos cargados, puede ocurrir una
descarga accidental. (Fig. G)
• Conecte la herramienta al suministro de aire
antes de cargar los clavos, para evitar que
uno de ellos se dispare durante la conexión.
El mecanismo impulsor de la herramienta
puede presentar ciclos cuando se conecta la
herramienta al suministro de aire. Para evitar el
disparo involuntario, no cargue clavos si el gatillo
o el seguro están presionados.
• No retire nada de la herramienta ni trate
de forzarla, ya que puede provocar que la
herramienta, el gatillo o el activador por
contacto dejen de funcionar. No sujete con
cinta ni ate el gatillo o el activador por contacto en
la posición de encendido. No retire el resorte del
activador por contacto. Inspeccione diariamente
para ver si el gatillo y el activador por contacto
se mueven libremente. Podría producirse una
descarga no controlada.
• Revise la herramienta antes de usarla. No
opere una herramienta si alguna parte de
ésta, el gatillo o el activador por contacto no
funciona, está desconectado o alterado, o no
funciona correctamente. Deberán repararse
las pérdidas de aire y deberán repararse o
reemplazarse las piezas dañadas o faltantes
antes del uso. Consulte la sección Reparaciones.
(Fig. H)
• No altere ni modifique la herramienta de
ninguna forma. (Fig. I)
• Siempre dé por sentado que la herramienta
contiene clavos.
• No apunte la herramienta hacia sus
compañeros de trabajo ni hacia usted en
ningún momento. No juegue con la herramienta.
Trabaje en forma segura. Respete la herramienta
como un elemento de trabajo. (Fig. J)
• Mantenga a espectadores, niños y visitantes
alejados de la herramienta eléctrica en
funcionamiento. Las distracciones pueden
provocar la pérdida de control. Cuando la
herramienta no esté en uso, debe guardarse en
un lugar seguro, fuera del alcance de los niños.
• Quite el dedo del gatillo cuando no esté
colocando clavos. Nunca transporte la
herramienta con el dedo en el gatillo. El uso del
bloqueo del gatillo evitará la descarga accidental.
Podría producirse una descarga accidental.
• No se estire. Conserve el equilibrio y párese
adecuadamente en todo momento. La pérdida
del equilibrio podría provocarle una lesión.
(Fig. K)
• Asegúrese de que la manguera esté libre de
obstrucciones o dobleces. Las mangueras
enredadas o enmarañadas pueden provocar la
pérdida del equilibrio o del punto de apoyo de los
pies.
• Utilice la herramienta sólo para la función
para la que fue diseñada. No descargue los
clavos al aire, hormigón, piedra, madera muy
dura, nudos o cualquier material demasiado
duro para que lo penetren. No utilice el cuerpo
de la herramienta o la tapa superior como un
martillo. Los clavos descargados podrían hacer
un camino inesperado y causar una lesión. (Fig.
L)
• Mantenga siempre los dedos lejos del
activador por contacto para evitar que se
produzcan lesiones por el disparo inadvertido
de clavos. (Fig. M)
• Consulte las secciones Mantenimiento
y Reparaciones para obtener información
detallada sobre el mantenimiento correcto de
la herramienta.
• Opere siempre la herramienta en un área limpia
e iluminada. Asegúrese de que la superficie de
trabajo está libre de cualquier residuo y tenga
cuidado de no perder el equilibrio cuando trabaja
en lugares altos, como techos.
• No clave clavos cerca de los bordes del
material. La pieza de trabajo puede partirse y
hacer que el clavo rebote y lo lesione a usted
o a un compañero de trabajo. Tenga en cuenta
que el clavo podría seguir la veta de la madera
y sobresalir en forma inesperada del costado del
material de trabajo. Coloque el clavo en forma
perpendicular a la veta, para reducir el riesgo de
lesiones. (Fig. N)
• No coloque clavos sobre otros clavos o
con la herramienta en un ángulo demasiado
pronunciado. Podría producirse una lesión
personal a causa de un fuerte retroceso, el
atascamiento o rebote de los clavos. (Fig. O)
• Conozca el espesor del material cuando
utilice la clavadora. Un clavo que sobresale
puede provocar una lesión.
• Tenga en cuenta que cuando se utiliza la
herramienta a presiones altas cercanas
al límite de operación, los clavos pueden
atravesar completamente los materiales
delgados o muy blandos. Asegúrese de que
la presión del compresor esté definida para que
los clavos se introduzcan en el material y no lo
traspasen completamente. (Fig. P)
• Mantenga las manos y las partes del cuerpo
fuera del área de trabajo inmediata. Sostenga
la pieza de trabajo con abrazaderas cuando sea
necesario para mantener las manos y el cuerpo
alejados de daños potenciales. Asegúrese de que
la pieza de trabajo esté bien sujetada antes de
presionar la clavadora en el material. El activador
por contacto puede hacer que el material de
trabajo se mueva en forma inesperada. (Fig. Q)
• No utilice la herramienta en presencia de
polvo, gases o vapores inflamables. La
herramienta puede producir una chispa que haga
combustión con los gases y provocar un incendio.
Clavar un clavo sobre otro clavo también puede
producir una chispa. (Fig. R)
• Mantenga la cara y las partes del cuerpo
alejadas de la parte posterior de la tapa
de la herramienta cuando trabaje en áreas
restringidas. Un retroceso repentino puede
ocasionar un impacto al cuerpo, especialmente
al clavar en materiales duros o densos. (Fig. S)
• Agarre la herramienta con firmeza para
mantener el control pero permita que la
herramienta retroceda de la superficie de
trabajo cuando se clava el clavo. En el modo de
accionamiento por tope (modo de accionamiento
por contacto) si se permite que el activador por
contacto vuelva a tocar la superficie de trabajo
antes de que se suelte el gatillo, se disparará un
clavo innecesario.
• La elección del método de disparo es
importante. Verifique las opciones de disparo en
el manual.

SEQUENTIAL ACTION TRIGGER - (GRAY)
The sequential action trigger’s intended use is for intermittent nailing where very careful and
accurate placement is desired.
To operate the nailer in sequential action mode:
1. Depress the contact trip firmly against the work surface.
2. Depress the trigger.
WARNING: A nail will fire each time the trigger is depressed as long as the contact trip
remains depressed.
BUMP ACTION TRIGGER -
(BLACK)
The bump action trigger’s intended use is for rapid nailing on flat, stationary surfaces.
Using the bump action trigger, two methods are available: place actuation and bump
actuation.
To operate the tool using the PLACE ACTUATION method:
1. Depress the contact trip against the work surface.
2. Depress the trigger.
To operate the tool using the BUMP ACTUATION method:
1. Depress the trigger.
2. Push the contact trip against the work surface. As long as the trigger is depressed, the
tool will fire a nail every time the contact trip is depressed. This allows the user to drive
multiple nails in sequence.
WARNING: Do not keep trigger depressed when tool is not in use. Keep the lock-off
switch rotated to the right (OFF) when the tool is not in use.
Adjusting Depth (Fig. 5)
WARNING: To reduce risk of serious injury from accidental actuation when
attempting to adjust depth, ALWAYS:
• Lock OFF trigger.
• Disconnect air supply.
• Avoid contact with trigger during adjustments.
The depth that the fastener is driven can be adjusted using the depth adjustment next to
the trigger of the tool.
1. To drive the nail shallower, rotate the depth setting wheel (M) to the right.
2. To drive a nail deeper, rotate the depth setting wheel (M) to the left.
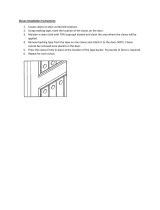
Clearing a Jammed Nail (Fig. 4)
WARNING: Lock off trigger, disconnect air line from tool and remove fasteners
from magazine before making adjustments or personal injury may result.
If a nail becomes jammed in the nosepiece, keep the tool pointed away from you and follow
these instructions to clear:
1. Lock OFF trigger.
2. Disconnect the air supply from the tool.
3. Open the door (K).
4. Open the canister door (H).
5. Remove the jammed nail.
6. Correct any deformation that may have occurred to the nail coil.
NOTE: Should nails continue to jam frequently in nosepiece, have tool serviced by an
authorized D
EWALT service center.
Rafter Hook
The DEWALT framing nailers include an integrated rafter hook and can be rotated to either
side of the tool and can be folded out of the way when not in use.
If the hook is not desired at all, it can be removed from the tool.
Cold Weather Operation
When operating tools at temperatures below freezing:
1. Make sure compressor tanks have been properly drained prior to use.
2. Keep tool as warm as possible prior to use.
3. Make certain all fasteners have been removed from canister.
4. Put 5 to 7 drops of D
EWALT Pneumatic Tool Oil in the air inlet.
5. Lower air pressure to 80 psi or less.
6. Reconnect air and and load nails into canister.
7. Actuate the tool 5 or 6 times into scrap lumber to lubricate O-rings.
8. Turn pressure up to operating level (not to exceed 120 psi) and use tool as normal.
9. Re-lubricate at least once daily.
10. Always drain the compressor tanks at least once a day.
Hot Weather Operation
Tool should operate normally. However, keep tool out of direct sunlight as excessive heat can
deteriorate bumpers, O-rings and other rubber parts resulting in increased maintenance.
MAINTENANCE
WARNING: Lock off trigger, disconnect air line from tool and remove fasteners
from magazine before making adjustments or personal injury may result.
Daily Maintenance Chart
ACTION Lubricate tool with 5-7 drops of DEWALT Pneumatic Tool Oil
WHY Prevents failure of o-rings
HOW Insert drops into air fitting on end cap of tool
ACTION Drain compressor tanks and hoses daily
WHY Prevents accumulation of moisture in compressor and nailer
HOW Open petcocks or other drain valves on compressor tanks. Allow any accumulated
water to drain from hoses
ACTION Clean canister, feed piston area and contact trip mechanism.
WHY Permits smooth operation, reduces wear, and prevents jams
HOW Blow clean with compressed air. The use of oils or solvents is not recommended
as they tend to attract debris
ACTION Before each use, check to ensure all screws, nuts and fasteners are tight and
undamaged
WHY Prevents jams, leaks and premature failure of tool parts
HOW Tighten loose screws or other fasteners using the appropriate hex wrench or
screwdriver
Cleaning
WARNING: Never use solvents or other harsh chemicals for cleaning the non-metallic
parts of the tool. These chemicals may weaken the materials used in these parts. Use a
cloth dampened only with water and mild soap. Never let any liquid get inside the tool; never
immerse any part of the tool into a liquid.
Repairs
To assure product SAFETY and RELIABILITY, repairs, maintenance and adjustment
(including brush inspection and replacement) should be performed by a D
EWALT factory
service center, a D
EWALT authorized service center or other qualified service personnel.
Always use identical replacement parts. Refer to the Troubleshooting Guide at the end
of this section.
Accessories
WARNING: Since accessories, other than those offered by DEWALT, have not been
tested with this product, use of such accessories with this tool could be hazardous. To
reduce the risk of injury, only D
EWALT, recommended accessories should be used with this
product.
Recommended accessories for use with your tool are available at extra cost from your
local dealer or authorized service center. If you need assistance in locating any accessory,
please contact D
EWALT Industrial Tool Co., 701 East Joppa Road, Baltimore, MD 21286,
call 1-800-4-D
EWALT (1-800-433-9258) or visit our website www.DEWALT.com.
Three Year Limited Warranty
DEWALT will repair, without charge, any defects due to faulty materials or workmanship
for three years from the date of purchase. This warranty does not cover part failure due
to normal wear or tool abuse. For further detail of warranty coverage and warranty repair
information, visit www.D
EWALT.com or call 1-800-4-DEWALT (1-800-433-9258). This
warranty does not apply to accessories or damage caused where repairs have been made
or attempted by others. This warranty gives you specific legal rights and you may have other
rights which vary in certain states or provinces.
In addition to the warranty, D
EWALT tools are covered by our:
1 YEAR FREE SERVICE
D
EWALT will maintain the tool and replace worn parts caused by normal use, for free,
any time during the first year after purchase. Nailer wear items, such as o-rings and driver
blades, are not covered.
90 DAY MONEY BACK GUARANTEE
If you are not completely satisfied with the performance of your D
EWALT Power Tool, Laser,
or Nailer for any reason, you can return it within 90 days from the date of purchase with a
receipt for a full refund – no questions asked.
LATIN AMERICA: This warranty does not apply to products sold in Latin America. For
products sold in Latin America, see country specific warranty information contained either
in the packaging, call the local company or see website for warranty information.
FREE WARNING LABEL REPLACEMENT: If your warning labels (Fig. 6) become illegible
or are missing, call 1-800-4-D
EWALT for a free replacement.
WARNING: Use of this tool can generate and/or disburse dust, which may cause serious
and permanent respiratory or other injury. Always use NIOSH/OSHA approved respiratory
protection appropriate for the dust exposure. Direct particles away from face and body. Always
operate tool in well-ventilated area and provide for proper dust removal. Use dust collection
system wherever possible.
WARNING: ALWAYS USE SAFETY GLASSES. Everyday eyeglasses are NOT safety
glasses. Also use face or dust mask if operation is dusty. ALWAYS WEAR CERTIFIED
SAFETY EQUIPMENT:
• ANSI Z87.1 eye protection (CAN/CSA Z94.3),
• ANSI S12.6 (S3.19) hearing protection,
• NIOSH/OSHA respiratory protection.
BEFORE OPERATING THIS TOOL, CAREFULLY READ AND UNDERSTAND ALL
INSTRUCTIONS IN IMPORTANT SAFETY INSTRUCTIONS.
ASSEMBLY
WARNING: Lock off trigger, disconnect air line from tool and remove fasteners from
magazine before making adjustments or personal injury may result.
Trigger
WARNING: Keep fingers AWAY from trigger when not driving fasteners to avoid accidental
firing. Never carry tool with finger on trigger. In bump action mode (contact actuation mode)
tool will fire a fastener if safety is bumped while trigger is depressed.
In accordance with the ANSI Standard SNT-101-2002, the D
EWALT Nailers are assembled
with a sequential action trigger. However, a bump action trigger kit is included and attached
to the tool. For a replacement trigger contact your authorized service center or call
1-800-4-D
EWALT.
The gray trigger with
imprinted on the side, (Cat.# D510002 kit) is the single sequential
action trigger and causes the tool to operate in this mode.
The black trigger with
imprinted on the side, (Cat.# D510004 kit) is the bump action trigger
and permits the tool to be actuated in this manner.
For defining the use of the sequential action trigger and bump action trigger, see the Actuating
Tool section of this manual.
TRIGGER REMOVAL (FIG. 1)
1. Lock off trigger.
2. Remove air from the tool.
3. Remove rubber grommet (A) from end of dowel pin (B).
4. Remove dowel pin.
5. Remove trigger assembly from trigger cavity under the handle of the tool housing.
TRIGGER INSTALLATION (FIG. 2)
1. Select either the sequential or bump trigger to be installed on the tool. Both triggers are
included in the tool packaging.
2. Insert the trigger subassembly into trigger cavity.
3. Ensure that trigger spring (C) is placed around the trigger valve stem (D).
4. Align the holes of the trigger with the housing holes (E), then insert the dowel pin (B)
through the entire assembly as shown.
5. Push the rubber grommet (A) onto the end of the dowel pin as shown.
Air Fitting
The DEWALT framing nailers have a standard 3/8" pipe thread for the air fitting. The tool is
assembled with a 3/8" to 1/4" adapter installed in the end cap.
TO INSTALL AN AIR FITTING
1. Wrap the male end of the fitting with thread seal tape prior to assembly to eliminate air
leaks.
2. To install a 1/4" fitting: screw the fitting into the 3/8" to 1/4" adapter in the end cap of the
tool and tighten firmly.
3. To install a 3/8" fitting: screw it directly into the end cap. If an adapter is in the end cap,
remove it prior to inserting the fitting.
OPERATION
Preparing the Tool
WARNING: Read the section titled Important Safety Instructions for Pneumatic Tools at
the beginning of this manual. Always wear eye and ear protection when operating this tool.
Keep the nailer pointed away from yourself and others. For safe operation, complete the
following procedures and checks before each use of the nailer.
CAUTION: To reduce the risk of damage to the tool, only use D
EWALT Pneumatic Tool Oil
or a non-detergent S.A.E. 20 weight oil. Oil with additives or detergent will damage tool parts.
1. Before you use the nailer, be sure that the compressor tanks have been properly
drained.
2. Lubricate tool:
a. Use D
EWALT Pneumatic Tool Oil or a non-detergent S.A.E. 20 weight oil. DO NOT use
detergent oil or additives as they will damage O-rings and rubber parts.
b. Use a filter and regulator when possible.
c. Add 5 to 7 drops of oil in the air fitting a least twice a day.
3. Wear eye and ear protection.
4. Ensure canister is empty of all fasteners.
5. Check for smooth and proper operation of contact trip. Do not use tool if assembly is not
functioning properly. NEVER tamper with the contact trip. NEVER use a tool that has the
contact trip restrained in the actuated position.
6. Check air supply: Ensure air pressure does not exceed recommended operating limits; 70
to 120 psi, (4.9 to 8.3 bar, 5 to 8.5 kg/cm
2
).
7. Keep tool pointed away from yourself and others.
8. Lock off trigger.
9. Connect air hose.
10. Check for audible leaks around valves and gaskets. Never use a tool that leaks or has
damaged parts.
WARNING: To reduce the risk of personal injury, disconnect tool from air supply
before performing maintenance, clearing a jammed fastener, leaving work area, moving
tool to another location or handing the tool to another person.
Using the Lock-off (Fig. 3)
WARNING: To reduce the risk of injury, ALWAYS wear proper eye [ANSI Z87.1 (CAN/CSA
Z94.3)] and hearing protection [ANSI S12.6 (S3.19)] when operating this tool.
WARNING: Do not keep trigger depressed when tool is not in use. Keep the lock-off switch
rotated to the right (OFF) when the tool is not in use. Serious personal injury may result.
WARNING: Lock off trigger, disconnect air line from tool and remove fasteners from
magazine before making adjustments or personal injury may result.
Each D
EWALT nailer is equipped with a trigger lock-off switch (F) which when rotated to
the right, prevents the tool from actuating. When the switch is centered, the tool will be fully
operational. The trigger should always be locked off whenever any adjustments are made or
when tool is not in use.
Loading the Tool (Fig. 4)
WARNING: Keep the tool pointed away from yourself and others. Serious personal injury
may result.
WARNING: Never load nails with the contact trip or trigger activated. Personal injury may
result.
1. Lock OFF trigger.
2. Disconnect the air supply from the tool.
3. Pull the door latch (L) to open the door (K).
4. Rotate the canister door (H) open.
5. Adjust the nail platform (I) to properly accommodate the nail length being used.
Pull up on the nail platform (I) for shorter nails.
Push in the nail platform adjustment button (G) and push down on the nail platform (I) for
longer nails.
6. Place the coil on the nail platform (I).
7. Uncoil enough nails [approximately 3" (8 cm)] to reach the nose of the tool.
8. Insert the first nail into the nose and the second nail between the two rails of the feed
pawl (J).
NOTE: Be careful not to deform the coil of nails during the loading process. Otherwise, the nail
guide door will not close and the nails might not feed consistently.
9. Close the canister door (H) completely.
10. Close the door (K) making sure the door latch (L) is completely engaged.
Actuating Tool
WARNING: To reduce the risk of injury, ALWAYS wear proper eye [ANSI Z87.1 (CAN/CSA
Z94.3)] and hearing protection [ANSI S12.6 (S3.19)] when operating this tool.
The tool can be actuated using one of two modes: single sequential action trigger mode and
bump action trigger mode. The trigger installed on the tool as described in the Trigger section
of this manual determines the mode of operation.
A
B
E
D
B
C
FIG. 1
FIG. 2
A
FIG. 5
M
F
FIG. 3
FIG. 4
K
G
H
I
L
J

TROUBLESHOOTING GUIDE
MANY COMMON PROBLEMS CAN BE SOLVED EASILY BY UTILIZING THE CHART BELOW. FOR MORE SERIOUS OR PERSISTENT PROBLEMS,
CONTACT A DEWALT SERVICE CENTER OR CALL 1-(800)-4-DEWALT (1-800-433-9258).
WARNING: To reduce the risk of serious personal injury, ALWAYS disconnect air from tool before all repairs.
Trigger valve housing leaks O-ring or valve stem failure Replace valve using: Trigger Valve Kit: Cat.# D510008
Top cap leaks air Loose cap screws Tighten cap screws using appropriate hex wrench
Damaged or worn gasket or o-ring Replace gasket/o-rings using: O-ring Repair Kit: Cat. # D518551
Exhaust leaks Main seal or o-ring damaged, debris in tool Replace gasket/o-rings using: O-ring Repair Kit: Cat. # D518551
Air leaks around nose when tool is at rest
(Driver blade in up position)
Damaged or worn o-rings Replace gasket/o-rings using: O-ring Repair Kit: Cat. # D518551
Air leaks around nose when tool is in actuated
position. (Driver blade in down position)
Damaged or worn bumper Replace bumper using: Bumper Kit: Cat. # D518016
Tool does not cycle in cold weather Tool not receiving air Check air supply
Valve may be frozen Warm up tool
Damaged or worn o-rings Replace gasket/o-rings using: O-ring Repair Kit: Cat. # D518551
Broken or damaged driver blade Replace Driver Blade Kit: Cat. # D518552
Lack of power; sluggish Low air pressure Check air supply
Lack of lubrication Lubricate tool using approved pneumatic tool oil.
Damaged or worn o-rings Replace gasket/o-rings using: O-ring Repair Kit: Cat. # D518551
Exhaust port blocked or clogged Disconnect air, remove exhaust plate from top of tool, clean port
Skipping fasteners; intermittent feed Air restricted Check air supply and couplers
Lack of lubrication Lubricate tool using approved pneumatic tool oil.
Nosepiece screws loose Tighten nosepiece screws using appropriate hex wrench
Wrong size/angle fasteners Use only recommended fasteners
Dirty canister Clean canister track and nosepiece
Worn canister Replace canister
Broken or damaged driver blade Replace Driver Blade Kit: Cat. # D518552
Trigger valve o-ring worn or damaged Replace valve using: Trigger Valve Kit; Cat. # D510008
Worn piston o-ring Replace piston o-ring using: O-Ring Repair Kit: Cat. # D518551
Worn or damaged feed piston spring Replace spring
Canister loose Check that canister screws are holding firmly
Nail platform at incorrect setting Set nail platform to proper nail setting
Feed piston O-ring worn or damaged Replace feed piston O-ring using: O-Ring Repair Kit, Cat. # D518551
Fasteners jam in tool Driver channel in nose piece worn Replace nosepiece
Wrong size/angle fasteners Use only recommended fasteners
Canister loose Check that canister screws are holding firmly
Worn driver blade Replace Driver Blade Kit: Cat. # D518552
Nosepiece screws loose Tighten nosepiece screws using appropriate hex wrench
Fasteners not feeding properly Ensure fasteners are feeding properly into nose
GUÍA DE SOLUCIÓN DE PROBLEMAS
MUCHOS PROBLEMAS COMUNES PUEDEN RESOLVERSE FÁCILMENTE CON LA AYUDA DEL SIGUIENTE CUADRO. PARA PROBLEMAS MÁS SERIOS O
PERSISTENTES, LLAME AL CENTRO DE SERVICIO DEWALT O AL 1-(800)-4-DEWALT (1-800-433-9258).
ADVERTENCIA: Para reducir el riesgo de lesiones personales graves, desconecte SIEMPRE el suministro de aire de la herramienta antes realizar cualquier reparación.
La carcasa de la válvula del gatillo gotea Avería en la junta tórica o en la varilla de
la válvula
Sustituya la válvula con el juego de válvula del gatillo: Cat. # D510008
La tapa superior pierde aire Tornillos sueltos en la tapa Ajuste los tornillos de la tapa con la llave hexagonal adecuada
Empaque o junta tórica gastada o dañada Sustituya los empaques o las juntas tóricas con el juego de reparación de junta tórica:
Cat. # D518551
Fugas en la aspiración Sello principal o junta tórica dañados, residuos
en la herramienta.
Sustituya los empaques o las juntas tóricas con el juego de reparación de junta tórica:
Cat. # D518551
Pérdidas de aire por la boquilla cuando la
herramienta está en reposo
(Hoja del impulsor en posición superior)
Juntas tóricas dañadas o gastadas Sustituya los empaques o las juntas tóricas con el juego de reparación de junta tórica:
Cat. # D518551
Pérdidas de aire por la boquilla cuando la
herramienta está en posición de funcionamiento
(Hoja de la guía en posición inferior).
Protector dañado o gastado Sustituya el protector con: Cat. # D518016
La herramienta no trabaja en ciclos en
condiciones climáticas frías
La herramienta no recibe aire Compruebe el suministro de aire
La válvula puede haberse congelado Caliente la herramienta.
Juntas tóricas dañadas o gastadas Sustituya los empaques o las juntas tóricas con el juego de reparación de junta tórica:
Cat. # D518551
Hoja del impulsor dañada o rota Sustituya la hoja del impulsor: Cat. # D518552
Falta de potencia; lentitud Presión de aire baja Compruebe el suministro de aire
Falta de lubricación Lubrique la herramienta con aceite aprobado para herramientas neumáticas
Juntas tóricas dañadas o gastadas Sustituya los empaques o las juntas tóricas con el juego de reparación de junta tórica:
Cat. # D518551
Puerto de aspiración bloqueado o tapado Desconecte el aire, extraiga la placa de escape de la parte superior de la herramienta, limpie el puerto
Faltan clavos; alimentación intermitente Obstrucción en el suministro de aire Compruebe el suministro de aire y los acoples
Falta de lubricación Lubrique la herramienta con aceite aprobado para herramientas neumáticas
Los tornillos de la boquilla están sueltos Ajuste los tornillos de la boquilla con la llave hexagonal adecuada
Sujetadores de ángulo o tamaño inadecuado Utilice solamente sujetadores recomendados
Recipiente sucio Limpie la vía del recipiente y la tobera
Recipiente gastado Cambie el recipiente
Hoja del impulsor dañada o rota Sustituya la hoja del impulsor: Cat. # D518552
Junta tórica de la válvula del gatillo gastada o
dañada
Sustituya la válvula con el juego de válvula del gatillo: Cat. # D510008
Junta tórica del pistón gastada Sustituya la junta tórica con el juego de reparación de junta tórica de la clavadora:
Cat. # D518551
El resorte del pistón de alimentación está
desgastado o dañado.
Sustituya el resorte
Recipiente suelto Compruebe que el pestillo del recipiente esté firmemente asegurado
Plataforma de clavos en configuración inadecuada Coloque la plataforma en la configuración adecuada
Anillo tórico del pistón de alimentación gastado o
dañado
Cámbielo con el kit de reparación de anillos tóricos, Cat. # D518551
Sujetadores atascados en la herramienta Canal del impulsor de la boquilla gastado Sustituya la boquilla
Sujetadores de ángulo o tamaño inadecuado Utilice solamente sujetadores recomendados
Recipiente suelto Revise que los tornillos del recipiente estén ajustados
Hoja del impulsor gastada Sustituya la hoja del impulsor: Cat. # D518552
Los tornillos de la boquilla están sueltos Ajuste los tornillos de la boquilla con la llave hexagonal adecuada
Los clavos no se alimentan adecuadamente Compruebe que los clavos entren bien a la boquilla
GUIDE DE DÉPANNAGE
PLUSIEURS PROBLÈMES COURANTS PEUVENT ÊTRE FACILEMENT RÉGLÉS EN CONSULTANT LE TABLEAU CI-DESSOUS. PAR CONTRE, EN PRÉSENCE D’UN PROBLÈME
PLUS GRAVE OU PERSISTANT, ON DOIT COMMUNIQUER AVEC UN CENTRE DE SERVICE DEWALT OU COMPOSER LE 1-800-433-9258 (1-800-4-DEWALT).
AVERTISSEMENT : pour réduire le risque de blessures personnelles graves, TOUJOURS débrancher l’arrivée d’air de l’outil avant toutes réparations.
Fuite du boîtier de la soupape de détente Défaillance du joint torique ou de la tige de
soupape
Remplacer la soupape à l’aide de la trousse de soupape de détente : nº cat. D510008
Fuites d’air du couvercle supérieur Vis de couvercle desserrées Serrer les vis du couvercle à l’aide d’une clé hexagonale appropriée
Garniture ou joint torique endommagé(e) ou usé(e) Remplacer les garnitures/joints toriques à l’aide de : Trousse réparation des joints toriques :
n° cat. D518551
Fuites d’échappement La garniture principale ou le joint torique est
endommagé(e), des débris ont pénétré dans l’outil
Remplacer les garnitures/joints toriques à l’aide de : Trousse de réparation des joints toriques :
Fuites d’air près de l’embout quand l’outil n’est pas
utilisé
(Lame d’entraînement en position levée.)
Joints toriques endommagés ou usés Remplacer les garnitures/joints toriques à l’aide de : Trousse de réparation des joints toriques :
n° cat. D518551
Fuites d’air près de l’embout quand l’outil est actionné
(Lame d’entraînement en position abaissée)
Amortisseur endommagé ou usé Remplacer l’amortisseur à l’aide de la : Trousse d’amortisseur : n° cat. D518016
L’outil ne fonctionne pas par temps froid L’outil ne reçoit pas d’air Vérifier l’alimentation pneumatique
La soupape peut être gelée Réchauffer l’outil
Joints toriques endommagés ou usés Remplacer les garnitures/joints toriques à l’aide de : Trousse de réparation des joints toriques :
n° cat. D518551
Lame d’entraînement brisée ou endommagée Remplacer avec la Trousse de lame d’entraînement : n° cat. D518552
Manque de puissance; lenteur Basse pression d’air Vérifier l’alimentation pneumatique
L’outil n’est pas suffisamment lubrifié Lubrifier l’outil au moyen d’une huile pour outils pneumatiques approuvée
Joints toriques endommagés ou usés Remplacer les garnitures/joints toriques à l’aide de : Trousse de réparation des joints toriques :
n° cat. D518551
Orifice d’échappement bloqué ou encrassé Débrancher l’arrivée d’air, retirer la plaque d’échappement du dessus de l’outil, nettoyer le port
Saut de clous; alimentation intermittente Alimentation en air restreinte Vérifier l’alimentation pneumatique et les raccords.
L’outil n’est pas suffisamment lubrifié Lubrifier l’outil au moyen d’une huile pour outils pneumatiques approuvée
Vis de l’embout desserrées Serrer les vis de l’embout à l’aide d’une clé hexagonale appropriée
Attaches de dimension/angle inappropriés Utiliser uniquement des attaches recommandées
Le boîtier est sale Nettoyer le rail du magasin et l’embout
Le boîtier est us Remplacer le boîtier
Lame d’entraînement brisée ou endommagée Remplacer avec la Trousse de lame d’entraînement : n° cat. D518552
Joint torique de la soupape de détente usé ou
endommagé
Remplacer la soupape à l’aide de la : Trousse de soupape de détente : n° cat. D510008
Joint torique du piston usé Remplacer le joint torique du piston à l’aide de la : Trousse de réparation des joints toriques :
n° cat. D518551
Ressort du piston de distribution usé ou
endommagé
Remplacer le ressort
Le boîtier n’est pas bien fixé S’assurer que les vis du boîtier sont bien serrées.
La plate-forme des clous n’est pas réglée correcte-
ment
Régler la plate-forme correctement selon la longueur des clous
Le joint torique du piston d’alimentation est usé ou
endommagé
Remplacer le joint torique du piston d’alimentation au moyen de la trousse des joints toriques
(no de catalogue D518551)
Attaches coincées dans l’outil Canal de la lame d’entraînement usée dans
l’embout
Remplacer l’embout
Attaches de dimension/angle inappropriés Utiliser uniquement des attaches recommandées
Le boîtier n’est pas bien fixé S’assurer que les vis du boîtier sont bien serrées.
Lame d’entraînement usée Remplacer avec la Trousse de lame d’entraînement : n° cat. D518552
Vis de l’embout desserrées Serrer les vis de l’embout à l’aide d’une clé hexagonale appropriée
Les clous ne sont pas alimentés adéquatement S’assurer que les clous sont bien introduits dans le nez
/