Intenso Video Jumper Owner's manual
- Category
- MP3/MP4 players
- Type
- Owner's manual
This manual is also suitable for
Page is loading ...
Page is loading ...
Page is loading ...
Page is loading ...
Page is loading ...
Page is loading ...
Page is loading ...
Page is loading ...
Page is loading ...
Page is loading ...
Page is loading ...
Page is loading ...
Page is loading ...
Page is loading ...

Page 1 of 13 GB
1. Table of contents
1. Table of contents ................................................................................................... 1
2. Instructions............................................................................................................. 2
3. Functions ............................................................................................................... 2
4. Package content .................................................................................................... 2
5. Before use.............................................................................................................. 3
6. Operation ............................................................................................................... 5
7. Music playback ...................................................................................................... 5
8. Photos .................................................................................................................... 7
9. Videos .................................................................................................................... 7
10. Radio ..................................................................................................................... 8
11. Speech recording ................................................................................................... 9
12. Search all files ...................................................................................................... 10
13. System settings .................................................................................................... 11
14. Troubleshooting ................................................................................................... 11
15. Technical data ...................................................................................................... 12
16. Please observe what follows ................................................................................ 13

Page 2 of 13 GB
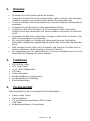
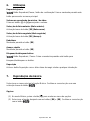
2. Instructions
Avoid a strong collision of the device.
Do not use the device in extremely cold, hot, humid or dusty places. Do not expose
it to direct insolation.
Carry out frequent data backups to avoid a possible data loss.
Avoid the use in strong magnetic fields.
Protect the device from humidity. If humidity penetrates the device, please switch it
off immediately and clean and dry the device.
Please do not use chemical solutions to clean the device. In this case please use a
dry cloth.
We are not responsible for damages or data loss in case of a failure malfunction
caused by a faulty operation, the reparation of the device by one’s own hand or the
battery change.
Please do not decompose the device into smaller parts and do not try to repair it by
yourself, because in this case the guarantee expires.
If you use earphones or headsets on full blast you could cause a durable damage to
your hearing.
3. Functions
MP3 & WMA Player
MTV Video Player
Picture display in JPEG / BMP
FM Radio
Folder navigation
Rechargeable Li-polymer battery
Customized setting
Removable medium
4. Package content
Please check the package content for completeness
Intenso Video Player
Stereo headset
Conversion software (MTV-format)
USB cable
Instruction manual + guarantee certificate

Page 3 of 13 GB
5. Before use
Connect with the PC
With the operating systems Windows 98/SE please install a driver before you connect the
player with the PC. (The download is available on the following website: www.intenso.de).
For the operating systems WIN 2000/XP/ME/Vista/Windows 7 the installation of the driver
is not needed.
Please go ahead as follows:
(1) Connect the player with the USB connection of the PC.
(2) The window “Intenso” will open. Now you can save the data from your hard disk on
the removable medium.
Safe removal from the PC
For Windows 2000/XP/ME/Vista/Windows 7:
Click with the right mouse button down right in the task bar on the symbol “Remove
hardware securely”. In the displayed context menu please select the point “Remove USB
mass storage device driver“ with the left mouse button. Please make sure that the data
transmission has been completed.
Now you can remove the device.
For Windows 98/SE:
Select the device in the „device manager“ with the left mouse button. Now click on the
menu point “Remove“. Make sure also here that the data transmission has been
completed.
Now the device can by disconnected from the computer.
Battery charge:
The device is equipped with an integrated li-polymer battery. The battery is charged by the
USB connection with your PC.
At the first use of the device please pay attention that the battery is completely charged, in
general this process takes 4 hours.
To charge the battery please connect the device with the PC by the USB cable. The
charging process starts automatically.
If you would like to know the actual status of the charging process, please disconnect the
device from the PC. On the display top right you can see a battery symbol. If the symbol
flashes green, the battery is completely charged.
Instruction: To achieve an optimal performance the li-polymer battery must be regularly
used. If this is not the case, charge the battery completely at least once per month.

Page 4 of 13 GB
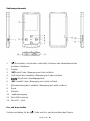
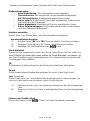
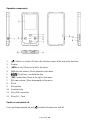
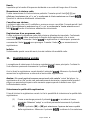
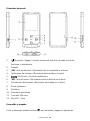
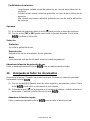
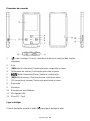
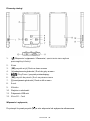
Operation components
1. [ ] Switch on / switch off / leave the selection menu of the respective functions
2. Display
3. []Back key | Move to the left in the menu
4. [+] Raise the volume | Move upwards in the menu
5. [ ] Play/Pause / confirmation key
6. [] Forward key | Move to the right in the menu
7. [-] Lower volume | Move downwards in the menu
8. Reset
9. Microphone
10. Headset entry
11. Mini USB connection
12. Micro SD - Card
Switch on and switch off,
Press and keep pressed the key [ ] to switch the player on and off.

Page 5 of 13 GB
6. Operation
Play/Pause
[ ] Play/Pause / confirmation key. Press and keep pressed this key to enter the main
menu.
Volume of the playback of music and video
Press the key [+] or [-] to adjust the volume.
Selection of the previous track (previous title)
Short activation of the key [] (backwards).
Selection of the next track (next title)
Short activation of the key [] (onwards).
Rewind
Keep the key []pressed.
Fast-forward
Keep the key [] pressed.
Lock / unlock keys
[ ] Play/Pause key. Press and keep pressed this key in order to remove the key lock.
Reset
Please confirm the reset key, if the player does not react to any entry.
7. Music playback
Select the function music in the main menu. Confirm your selection by shortly activating
the key [ ].
Options
(1) Press the key [FUNC] in the music mode to call up the option menu.
(2) With the key [] or [] you can select the desired function. With the key [ ]
you confirm your selection.

Page 6 of 13 GB
Selection
All songs:
Selection of a certain song. Playback of all songs according to the random selection.
Repetition mode:
o No repetition: All songs are played only once.
o Repeat title: The selected song is played repeatedly.
o Repeat all titles: Repeats all saved songs.
o Simple folder: Repeats the titles of a selected folder once and then stops
the playback.
o Repeat folder: Repeats all the titles of the actual folder.
o Folder random playback: All the songs saved in the folder are played
according to the random principle.
Select equalizer
Normal, rock, pop, classic, bass, jazz, customized equalizer
Customized equalizer
(1) Press the key [] or [] to select the adjustment of the EQ.
(2) Activate the key [+] or [-] to set up the values.
(3) Confirm your entries with the key [ ].
Music library
Order the saved songs according to genre, artist, album and title. If you use this function
for the first time, select “Music library“ and then “YES“. After having carried out the
sortation you can select your sortation in this menu.
3D
With this function you can give a local sound to the music.
Backwards
By selecting this menu point you get back to the music menu.
Lyric (song texts)
This player can display lyric texts during the play back of a song. To assign a lyric to a
song, you have to proceed as follows:
(1) Save the lyric text and the corresponding song in the same register.
(2) Name the lyric file and the corresponding song exactly in the same way.
Exit the music function
Press and keep pressed the key [ ] to enter the main menu.

Page 7 of 13 GB
8. Photos
Select the function photo in the main menu. Confirm your selection by shortly pressing the
key [ ].
With the key [+] / [-] you can select the favored image from the list or choose the
designated folder. With the key [ ] you confirm your selection. With the key [] you
get back to the previous menu.
During the reproduction of the photos you can:
- Page forward / back with the key [+] or [-]
- Call up the option menu with the key [FUNC]
Selection
Diashow
Reproduction of the saved images in a diashow.
Reproduction of single images
Reproduction of a single image. With the key [+] or [-] you can page forward / back.
Back
By selecting this menu point you get back to the photo menu.
Activation of the photo function
Press and keep pressed the key [ ] to get to the main menu.
9. Videos
Selection the function video in the main menu. Confirm your selection by shortly pressing
the key [ ].
With the key [+] / [-] you can select the designated video from the list or from the
designated folder. With the key [ ] you confirm your selection. With the key [] you
get back to the previous menu.
During the play back of the videos you can:
- Stop and continue the video: Press the key [ ] to stop the play back. To
continue the play back, press the key [ ] again.
- With the key [] or [] you can go to the previous / next video.

Page 8 of 13 GB
- To rewind / fast-forward quickly within a video press and keep pressed the key
[] or [].
- With the key [+] / [-] you can adjust the volume.
- To exit the play back of a video, press and keep pressed the key [ ].
Options
(1) Press the key [ ] in the video mode and confirm it by pressing the key [ ] to
adjust the desired repetition mode.
(2) By pressing the key [] or [] you can select the desired mode. By pressing the
key [ ] you can confirm your selection.
Exit of the video function
Press and keep pressed the key [ ] to get to the main menu.
10. Radio
In the Main Menu please select the “FM-Radio” option. Confirm your selection by pressing
the [ ] - button.
While listening to a radio station you can:
- turn up / down the volume using the [+] / [-] – buttons.
- start the options-menu using the [ ] – button.
- stop the radio mode using the [ ] button. Press and hold this button.
Options
(3) In the music mode please press the [ ] – button to enter the options-menu.
(4) Using the [] or [] – button you can select your desired function. Using the
[ ] – button you can confirm your selection.
Selection:
Automatic station scanning
Your player searches automatically for radio stations within the wave band selected. If it
finds a radio station, the scanning process stops for a little while and the station found is
stored. Thereafter, it continues searching until the end of the wave band has been
reached. Now, all stations available within your tuning range are stored. By pressing the
[ ] – button you can stop the scanning process at all times and the player stores all
stations found so far.
Manual scanning
By pressing the [] or [] – button shortly, the search process leaps into the desired
direction in the wave band by 0.1 units. Hold the [] or [] – button shortly and the
scanning process leaps to the next station available in the desired wave band direction.

Page 9 of 13 GB
Band
Here, you can adjust the desired wave band according to your respective location.
Storing radio stations
You can store all of your favourite stations. To do so, please press the [+] / [-] – buttons to
choose from “Yes” or “No” and confirm you selection using the [ ] - button. This is the
station currently adjusted.
Deleting radio stations
Stations which you don’t like may be deleted. To do so, please press the [+] / [-] – buttons
to choose from “Yes” or “No” and confirm you selection using the [ ] - button. This is
the station currently adjusted.
Recording radio programmes
It is possible to record the radio programme of the station currently adjusted. Please
confirm your selection using the [ ] – button; now the recording window pops up and
the recording process starts automatically. By pressing the [ ] – button you can pause
the recording process and, by repeatedly pressing the [ ] – button, you can continue
recording your programme. Please press the [ ] – button to store your recording.
Back
By selecting this menu item you will get back into the radio mode.
11. Speech recording
Select the function recording in the main menu. Confirm your selection by shortly pressing
the key [ ].
Start and stop the speech recording with the key [ ]. With the key [ ] you can save
the recording and get back to the recording menu.
Instruction: The recorded voice files are saved in the folder “Voice“ of the player. The
recording of a voice file is automatically exited and saved if the player has no memory
capacity of if the battery has not enough performance.
Setting up the recording quality
Before you start with the speech recording, you have the opportunity to set up the
recording quality.
(1) Press and keep pressed the key [ ] to get to the main menu. Select
“Setup” and confirm by shortly pressing the key [ ].
(2) With the key [] or [] you can select the menu point recording quality.
With the key [ ] you confirm your selection.

Page 10 of 13 GB
Menu items:
- Long Time: normal recording quality with low consumption of the memory
capacity.
- Normal quality: good recording quality with low consumption of the memory
capacity.
- High quality: very good recording quality with high consumption of the
memory capacity.
Options
(1) Press the [FUNC] key in the recording mode to call up the option menu.
(2) With the key [] or [] you can select the desired function. With the key [ ]
you confirm your selection.
Selection
Recording
Start the speech recording.
Play back
Play back of the recorded voice files.
Back
By selecting this menu point you get to the recording menu.
Exit the function speech recording
Press and keep pressed the key [ ] to get to the main menu.
12. Search all files
Select the function folder in the main menu. Confirm your selection by shortly pressing the
key [ ].
(1) With the key [+] / [-] you can move from one file and/or folder to the other. With the
key [ ] you can open a file or a folder.
(2) By pressing the key [FUNC] the dialogue whether you would like to delete the
selected file is displayed. Confirm your selection with the key [ ].
Exit the function folder
Press and keep pressed the key [ ] to get to the main menu.

Page 11 of 13 GB
13. System settings
Select the function settings in the main menu. Confirm your selection by shortly pressing
the key [ ].
Adjust the settings:
(3) Select the desired menu point with the key [] or []. Confirm your selection by
pressing the key [ ].
(4) With the key [+] / [-] you can pass from a value to another.
(5) With the key [ ] you confirm your selection. With the key [] you get back to
the previous menu without making any changes.
Setting possibilities
- Time: setting of the actual time and the valuable time zone.
- Switch off: setting of the time: if not used the player switches off automatically
after that.
- Language: selection of the designated language.
- Display settings: selection of the brightness and the illumination duration of the
display.
- Recording quality: setting of the recording quality during a speech recording.
- System settings: delete a file, format the player, reset the player, system
information, update the music library and sort files.
- Key lock: time setting: after that the key lock is activated.
- Back: exit the menu.
14. Troubleshooting
Problem – possible causes – problem solving
There is nothing on the display.
(1) The battery is empty.
Charge the battery.
(2) The keys are locked.
Unlock the key lock as described in the paragraph „6. Operation“.
The device does not react, if you press the play key.
(1) The keys are locked.
Unlock the key lock as described in the paragraph „6. Operation“.
There is no sound during the play back.
(1) The volume is too low.
Raise the volume in the volume menu.
(2) The audio file is damaged
Please transfer the files again

Page 12 of 13 GB
There is no connection with the PC.
(1) The driver was not installed correctly
Install the driver again.
(2) Please carry out an update of the main board
(In this context, observe the instructions of the main board producer)
The displayed time value always changes.
(1) The bit rate of the MP3 files changes during the play back.
Please use a unified bit rate for the compression.
The PC displays an error message during the connection with the device
(1) The player was disconnected from the PC during the data transmission.
Please do not disconnect the device during the data transmission in any case.
The device memory indicated does not correspond to the real memory.
(1) A part of the memory is used for software, formatting and display
characteristics.
The MP3 files are not reproduced properly.
(1) The MP3 files were compressed in a wrong format, for example in MPEG 1 or
2.
Delete the file formats if they are not supported.
Video data cannot be reproduced.
(1) The format is not supported.
The video format must be MTV. If this is not the case, please convert it. Pay
attention on the format size 128x128 Pixel.
(2) The video file is damaged.
Transfer your video file again.
The photos are not displayed.
(1) The file format is not supported.
Please convert the photo into JPG or BMP format.
15. Technical data
Battery type
Rechargeable li-polymer battery
Battery duration
~ 8 hours
LCD
Display of 1,8“ inch
Headset
5mW+5mW
Video format
MTV 160x128 Pixel

Page 13 of 13 GB
Audio formats
MP3, WMA, WAV
Photo format
JPEG, BMP
Bit rate
MP3: 8-320kbps;
WMA:5-320kbps
SNR
80dB
USB port
USB 2.0
Operational between
0 Celsius ~ +40 Celsius
Operational at a relative air moisture of
< 85%
Fit for storage at a relative air moisture of
< 90%
16. Please observe what follows
(1) Plug & Play is possible only with Windows 2000/XP/Vista/Windows 7.
With 98/SE please install the driver.
(2) Please unlock the key lock in order to work with the device.
(3) Please charge the battery if it is indicated on the display.
(4) Please disconnect the device from the PC only as indicated in order to avoid an
eventual data loss.
(5) If the file to be recorded is too big, the charge of the file takes longer.
(6) Support software per Windows 2000, Windows XP, Windows Vista, Windows 7.
(INTENSO)
®
49377 Vechta
Germany
www.intenso.de
Page is loading ...
Page is loading ...
Page is loading ...
Page is loading ...
Page is loading ...
Page is loading ...
Page is loading ...
Page is loading ...
Page is loading ...
Page is loading ...
Page is loading ...
Page is loading ...
Page is loading ...
Page is loading ...
Page is loading ...
Page is loading ...
Page is loading ...
Page is loading ...
Page is loading ...
Page is loading ...
Page is loading ...
Page is loading ...
Page is loading ...
Page is loading ...
Page is loading ...
Page is loading ...
Page is loading ...
Page is loading ...
Page is loading ...
Page is loading ...
Page is loading ...
Page is loading ...
Page is loading ...
Page is loading ...
Page is loading ...
Page is loading ...
Page is loading ...
Page is loading ...
Page is loading ...
Page is loading ...
Page is loading ...
Page is loading ...
Page is loading ...
Page is loading ...
Page is loading ...
Page is loading ...
Page is loading ...
Page is loading ...
Page is loading ...
Page is loading ...
Page is loading ...
Page is loading ...
Page is loading ...
Page is loading ...
Page is loading ...
Page is loading ...
Page is loading ...
Page is loading ...
Page is loading ...
Page is loading ...
Page is loading ...
Page is loading ...
Page is loading ...
Page is loading ...
Page is loading ...
Page is loading ...
Page is loading ...
Page is loading ...
Page is loading ...
Page is loading ...
Page is loading ...
Page is loading ...
Page is loading ...
Page is loading ...
Page is loading ...
Page is loading ...
Page is loading ...
Page is loading ...
-
 1
1
-
 2
2
-
 3
3
-
 4
4
-
 5
5
-
 6
6
-
 7
7
-
 8
8
-
 9
9
-
 10
10
-
 11
11
-
 12
12
-
 13
13
-
 14
14
-
 15
15
-
 16
16
-
 17
17
-
 18
18
-
 19
19
-
 20
20
-
 21
21
-
 22
22
-
 23
23
-
 24
24
-
 25
25
-
 26
26
-
 27
27
-
 28
28
-
 29
29
-
 30
30
-
 31
31
-
 32
32
-
 33
33
-
 34
34
-
 35
35
-
 36
36
-
 37
37
-
 38
38
-
 39
39
-
 40
40
-
 41
41
-
 42
42
-
 43
43
-
 44
44
-
 45
45
-
 46
46
-
 47
47
-
 48
48
-
 49
49
-
 50
50
-
 51
51
-
 52
52
-
 53
53
-
 54
54
-
 55
55
-
 56
56
-
 57
57
-
 58
58
-
 59
59
-
 60
60
-
 61
61
-
 62
62
-
 63
63
-
 64
64
-
 65
65
-
 66
66
-
 67
67
-
 68
68
-
 69
69
-
 70
70
-
 71
71
-
 72
72
-
 73
73
-
 74
74
-
 75
75
-
 76
76
-
 77
77
-
 78
78
-
 79
79
-
 80
80
-
 81
81
-
 82
82
-
 83
83
-
 84
84
-
 85
85
-
 86
86
-
 87
87
-
 88
88
-
 89
89
-
 90
90
-
 91
91
-
 92
92
-
 93
93
-
 94
94
-
 95
95
-
 96
96
-
 97
97
-
 98
98
-
 99
99
-
 100
100
-
 101
101
-
 102
102
-
 103
103
-
 104
104
-
 105
105


Intenso Video Jumper Owner's manual
- Category
- MP3/MP4 players
- Type
- Owner's manual
- This manual is also suitable for
Ask a question and I''ll find the answer in the document
Finding information in a document is now easier with AI
in other languages
- italiano: Intenso Video Jumper Manuale del proprietario
- français: Intenso Video Jumper Le manuel du propriétaire
- español: Intenso Video Jumper El manual del propietario
- Deutsch: Intenso Video Jumper Bedienungsanleitung
- русский: Intenso Video Jumper Инструкция по применению
- português: Intenso Video Jumper Manual do proprietário
- polski: Intenso Video Jumper Instrukcja obsługi
Related papers
-
Intenso Video Rider User manual
-
-
Intenso Video Rocker Operating instructions
-
-
Intenso Video Driver 2 0 Owner's manual
-
Intenso Music Runner Owner's manual
-
Intenso Music Twister User manual
-
Intenso Video Shooter Owner's manual
-
Intenso 4GB Video Driver Specification
-