CEM Explorer Fume Cabinet Retrofit Operating instructions
- Type
- Operating instructions

ExplorerFumeCabinetRetrofitInstructions
Parts Required:
Retrofit Kit - 730099
140010 – Adapter Plate (2)
BR800191 – M4 x 14 Screw (2)
BR800191 – M4 x 16 Screw (2)
BR800048 – M3 x 14 Screw (2)
BR869000 – 2.5mm Hex Key
BR869018 – 3mm Hex Key
In order to mount the CEM Fume Cabinet onto an existing Explorer, an adapter plate must be installed on the bottom of
the Explorer-48 base. The following instructions explain the installation of the plate and subsequently the installation of the
Fume Cabinet.
1. Figure 1 illustrates the holes in the base of the Explorer that will be used to mount the plates on each side of the
base. These holes will not be visible from the top of the unit.
Figure 1
2. Secure the left plate to the base using two M4x14 screws in the front and one M3x14 screw in the back. Secure
the right plate, including the calibration tool holder, with two M4x16 screws in the front and one M3x14 screw in
the back.
Figure 2 Figure 3
Retrofit Instructions
RI0150
Rev. 4
6/27
/
14

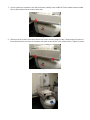
3. Once the plates are secured on each side of the base, partially insert the M5x16 Teflon coated screws provided
with the fume cabinet into back hole of each plate.
Figure 4
4. Slide the slots in the back of the fume cabinet over the two screws installed in step 3. Align the two front holes of
fume cabinet with the front holes of the plates and install the two M5x16 Teflon coated screws. Tighten all screws.
Figure 5
Figure 6
-
 1
1
-
 2
2


CEM Explorer Fume Cabinet Retrofit Operating instructions
- Type
- Operating instructions
Ask a question and I''ll find the answer in the document
Finding information in a document is now easier with AI
Related papers
Other documents
-
 Miniature Aircraft USA MA1031-3 Assembly Instructions Manual
-
Quick Quickie EP User manual
-
Power Fist 8107674 Owner's manual
-
Johnson Controls CMS-1655 Installation guide
-
-
-
APRILIA RS4 50 2011 Workshop Manual
-
 Labconco Protector Airo 184310000 Series User manual
-
Miller FILTAIR SWX-S Owner's manual
-

