Page is loading ...

RETRACTABLE AWNINGS
For Technical Support visit us at www.sunseer.com/ownerscorner
or Call Toll Free 800-670-7071 • Fax 877-224-4944
©SunSeer Products, a Massachuses Limited Partnership, 184 Charles Street, Malden, MA 02148
Wireless Wind Sensor
Installaon and Operaon Instrucons
CAUTION: Be sure that no object or persons can come in contact with the Awning as it closes, while
unaended.
Note: The Wireless Wind Sensor is a wireless radio transmier compable to work only with SunSeer
Awnings operated by a Remote Transmier. This is a low voltage baery operated device that enables the
Awning to be closed automacally when it is being shaken up and down by the wind.
A video of the installaon of the Wireless Wind Sensor is included in your installaon DVD and on the
SunSeer Owners Corner at www.sunsetter.com/ownerscorner.
Before Starng: Familiarize yourself with the components of the sensor as shown in Figure 1.
Housing
Programming Buon
Mounng Plate
Two (2) AAA
Baeries
Potenometer or
Sensivity Adjuster
Magnet
Locaon Slot
Magnet
Figure 1
+
-
WARNINGS:
• FAILURE TO FOLLOW THESE INSTRUCTIONS CAN RESULT IN PERSONAL INJURY! PLEASE READ THESE
INSTRUCTIONS IN ITS ENTIRETY BEFORE ATTEMPTING TO COMPLETE THIS PROCESS.
• THE WIRELESS WIND SENSOR WILL NOT PREVENT RAIN WATER FROM POOLING ON THE FABRIC
WHICH COULD RESULT IN THE COLLAPSE OF THE AWNING. YOU MUST CLOSE YOUR AWNING IF RAINY
CONDITIONS ARE EXPECTED. FAILURE TO DO SO COULD RESULT IN PERSONAL INJURY.
• STRONG UNEXPECTED WIND GUSTS COULD TIP OVER THE SUNSETTER FREE STANDING OASIS AWNING,
WITHOUT ENOUGH TIME FOR THE WIND SENSOR TO REACT AND RETRACT THE AWNING. YOU MUST
KEEP THE FREE STANDING OASIS AWNING RETRACTED WHEN UNATTENDED OR IN WINDY CONDITIONS.
FAILURE TO DO SO COULD RESULT IN THE UNIT TIPPING OVER WHICH COULD RESULT IN PERSONAL
INJURY.

2
1. Make sure that the
Lower Buon on the
Remote Transmier
is the buon that
OPENS your Awning.
See Figure 2.
Note: If the Lower
Buon does not OPEN your Awning but, instead
CLOSES your Awning, you will need to complete the
steps for Changing the Direcon of Motor Rotaon.
2. Slide the Mounng Plate o of the Sensor Housing.
See Figure 3. Note: Verify that the Magnet is axed
to the inside of the Mounng Plate. See Figure 1.
Note: All le and right references are as you are
facing the house with the Awning fully opened.
3. With the Awning fully open, install the Mounng
Plate on the inside of the Lateral Arm, on the Motor
side of the Awning, as follows.
3a. Clean the Lateral Arm with a cloth and an
alcohol based solvent. (Preferred installaon
temperature of 70 degrees).
3b. Aach one side of the double-sided foam tape
to the base of the Mounng Plate.
3c. Aach the Mounng Plate to the Lateral Arm
approximately 4 inches from the end of the Lateral
Arm, where the Arm connects to the Front Bar.
Make sure the Arrow on the Mounng Plate is
facing UP. See Figure 4.
Note: The Mounng Plate when installed will face
toward the inside of the Awning.
CAUTION: Incorrect placement of the Mounng Plate
may damage the SENSOR when the Awning closes.
Front Bar
4”
Valance
Mounng Plate
Magnet
Lateral Arm
Closest to Motor
4. Remove the Sensor from the Housing using a small
at blade screwdriver. See Figure 5.
Figure 5
Figure 4
Figure 3 Mounng Plate
Sensor Housing
Sensor
Housing
Screwdriver
Figure 2
Lower Buon
must OPEN
the Awning
• If your Motor has a Square, Black Housing
(See Figure 2a), follow Appendix A on Page 6,
“Changing the Direcon of Motor Rotaon for the
RTS Motor Only.”
• If your Motor has a Round, Silver Housing
(See Figure 2b), follow Appendix B on Page 7,
“Changing the Direcon of Motor Rotaon for the
Sunea Motor Only”
Once you have veried that the lower buon on the
Remote OPENS your Awning, connue with Step 2.
For this type motor,
use Appendix A to
change direcon of
motor rotaon.
Figure 2a
RTS Motor
Figure 2b
For this type
motor, use
Appendix B to
change direcon
of motor rotaon.
Sunea Motor
Note: If you have a MulChannel Remote, ensure
the correct Channel is selected.

3
CAUTION: Never use rechargeable baeries to
power the Sensor. It is recommended baeries be
changed annually.
5. Install the Baeries into the Sensor, following the
polarity indicated in the baery cavity. A red LED
will come on briey for approximately 1 second
to conrm that the baeries have been properly
installed. See Figure 5a.
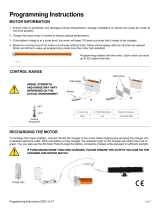
6. Press the Programming Buon (See Figure 6)
on the back of the Remote Transmier that was
supplied with the Awning unl the Motor “jogs”.
A “jog” is a short back and forth movement of the
motor.
Note: The detecon of windy condions corresponds
to sensing the movement up and down of the
Front Bar and the Lateral Arms of the Awning. The
reacon of the Sensor to this movement depends
on the sensivity threshold set on the Sensivity
Potenometer (or Adjuster). See Figure 7.
The Sensivity Potenometer can be set from 1 to 9
using a small at screwdriver.
A seng of 1 is equal to a high sensivity which
means light winds will cause the Awning to close.
A seng of 9 is equal to a low sensivity which means
stronger winds will cause the Awning to close.
Note: Do not set the Potenometer to zero (0).
8. If not already accomplished, set the Sensivity
Potenometer dial to two (2).
9. Put the Sensor Unit back into the Housing. See
Figure 5.
Figure 7
Potenometer, or
Sensivity Adjuster
10. Slide the Housing back onto the Mounng Plate
that you mounted on the Lateral Arm in Step 3c. If
you are using a ladder to install the Wireless Wind
Sensor, prior to tesng the Sensor, move the ladder
away from the Awning.
Note: The Wind Sensor will not funcon unless it
is properly assembled to the Mounng Plate as
outlined in Step 10.
To check that the Wind Sensor communicates
properly with your Motor:
11. Shake the Awning Front Bar up and down (li
the Front Bar approximately one foot, then drop it)
quickly 3 - 5 mes in a row (for approximately 12
seconds) to simulate the eect of strong wind; this
should cause the Awning to automacally close.
2 AAA
Baeries
Figure 5a
Polarity Indicators
are located under
Baeries and at
end of unit.
+
_
7. Press the Programming Buon located on the
Sensor (See Figure 6) unl the Motor “jogs,” then
release. The red LED will come on briey again.
Note: If the Motor does not respond with a jog or
movement, ensure the LED lights up when pressing
the Programming Buon on the Wireless Wind
Sensor. If this does not occur, check placement of the
baeries. Refer back to Step 5 and Figure 5a.
Figure 6
Remote Transmier
Wind Sensor
THEN, press the
Programming Buon
inside the Wireless
Wind Sensor.
FIRST, press the
Programming Buon
inside small opening
on back of Remote.

4
12. If the Awning automacally closes, this means the
sensor is set correctly.
Note: The Awning Motor will not accept a command
from the Remote Transmier for up to 1 minute
aer the Wireless Wind Sensor has retracted the
Awning.
13. If the Awning does not close automacally, repeat
Step 11 by strongly shaking the Front Bar up and
down quickly 3 to 5 TIMES IN A ROW. To shake the
Front Bar, li the Bar unl strong resistance is met,
then allow the Bar to drop freely. Repeat quickly. If
the Awning sll does not close automacally, slide
the Wind Sensor o the Mounng Plate and repeat
Steps 4 to 13 with a NEW SET OF BATTERIES. If the
Awning sll does not close automacally, remove the
Wind Sensor from the Mounng Plate; then delete it
from the Motor memory (see steps below) and call
Customer Service at 800-670-7071.
WARNING: YOU MUST BE CERTAIN THAT
THE WIRELESS WIND SENSOR IS INSTALLED,
PROGRAMMED AND OPERATING PROPERLY.
FAILURE TO DO SO MAY RESULT IN THE WIRELESS
WIND SENSOR NOT BEING ABLE TO CLOSE YOUR
AWNING DURING WINDY CONDITIONS, WHICH
COULD CAUSE DAMAGE AND PERSONAL INJURY. IF
THE MOTOR DIRECTION IS REVERSED THE SENSOR
WILL EXTEND (OPEN) THE AWNING IN WINDY
CONDITIONS, INSTEAD OF CLOSING IT.
The Wireless Wind Sensor should now be installed
and funconing properly. If not, please see the list
of potenal problems, causes, and acons on the
following page.
DELETING THE WIRELESS WIND SENSOR
FROM THE MOTOR MEMORY:
1. Remove the Wireless Wind Sensor from the
Mounng Plate; then remove the Sensor Unit from
the Housing, using a small at blade screwdriver.
2. Press the Programming Buon (See Figure 6) on
the back of the Remote that was supplied with your
Awning unl the motor “jogs.” A “jog” is a short
back and forth movement of the Motor.
3. Press the Programming Buon located on the
inside of the Sensor (See Figure 6) unl the Motor
“jogs,” then release.
Tesng the Wireless Wind Sensor;
• When tesng the Wireless Wind Sensor, li the
Front Bar of the Awning at least one foot, then let
it drop under its own weight. Repeat quickly 3 to 5
mes. The Awning should close.
• The process to add the Wireless Wind Sensor to
the Awning Motor’s memory is idencal to the
process of removing the Wireless Wind Sensor
from the Awning Motor’s memory.
Therefore, it is possible to add the Wireless Wind
Sensor to the Motor’s memory, then remove it
from memory, unintenonally, by pressing the
Programming buons a second me. If tesng
the Wireless Wind Sensor repeatedly fails to
retract the Awning, repeat Steps 5, 6, and 7.
• Verify the Wireless Wind Sensor is mounted to
the inside of the Lateral Arm, close to the Front
Bar, on the Motor side of the Awning. Do not
mount the Wireless Wind Sensor to the Lateral
Arm on the opposite side of the Awning from
where the Motor is located. This is important
because the operang range is about 20 feet.
Recommended Annual Maintenance for the
Wireless Wind Sensor
Baeries: The Wireless Wind Sensor is connuously
communicang with the Awning Motor, therefore
the baeries lose power. It is recommended for
best results, that the two AAA baeries be changed
once a year. Do not use rechargeable baeries in the
Wireless Wind Sensor.

5
Problem Cause Acon
The LED does not light up aer:
• inserng the baeries or
• pressing the Programming
buon.
The baeries may be incorrectly
ed or, the baeries may not
work.
1. Review the polarity of the
baeries and the direcon in
which they are installed.
2. Try fresh new baeries.
Wind Sensor does not funcon. Check the magnet in Figure 1.Ensure the magnet is in place.
Awning closes every 15 minutes,
without windy condions.
The baeries are low. Replace the baeries.
Awning closes every 60 minutes,
without windy condions.
The Wind Sensor may have been
removed from the Awning.
The Wind Sensor may be
incorrectly inserted into the
Mounng Plate.
Incorrect baery placement.
Delete the Wind Sensor from the
Motor’s memory, see Page 4.
Remove the Sensor from the
Mounng Plate, then engage the
Sensor back into the Mounng
Plate by sliding it from le to right.
Awning closes automacally during
light winds.
The Sensivity is adjusted to a
lower number than needed.
Remove the Wind Sensor from
the Mounng Plate. Remove the
Sensor from the Housing and set
the Sensivity Potenometer
to one number higher than the
current seng. For example, if
the dial is set to 2, set it to 3. See
Figure 7.
Awning does not automacally
close during strong winds.
The Sensivity is adjusted to a
higher number than needed.
The strong winds do not create
strong up and down movement of
the Front Bar of the Awning.
Check the Motor direcon by
pressing the up arrow on the
Remote Transmier.
Check locaon of Wind Sensor
Remove the Wind Sensor from
the Mounng Plate. Remove the
Sensor from the Housing and set
the Sensivity Potenometer
to one number lower than the
current seng. For example, if the
dial is set to 2, set it to 1. Do not
set it to zero (0). See Figure 7.
If the Front Bar does not move up
and down very much, the Awning
may not need to close.
If the Motor rotaon is incorrect,
the Wind Sensor will open the
Awning when it should close it.
See Appendix A (for RTS Motor
with mechanical sengs) or B
(for Sunea Motor) to change the
direcon.
See Step 3 for detailed locaon.
Awning does not close in during
windy condions even with the
sensivity set to 1.
The baeries may be dead.
The Wind Sensor may have been
removed from Motor memory.
Replace Baeries.
Repeat Step 6 and test the Wind
Sensor.
Awning closes but will not open. Check Motor using the Remote. Wait for 1 minute me-out period.

6
Appendix A
Changing the Direcon of Motor Rotaon for the RTS Motor ONLY.
The RTS Motor can be idened by the Black Motor with a Square Case and
Mechanical Stops.
This procedure describes the acons needed to change the direcon of Motor
rotaon, and should only be performed when installing a Wireless Wind Sensor if the
lower buon on your Remote is not the buon that opens your Awning.
Review the steps below to familiarize yourself with the procedure before aempng
to complete them.
1. Verify that the red light on the exisng Remote Transmier comes on when you
press a buon. If the red light does not come on at all or stays on for less than ve
(5) seconds, you will need to replace the baery.
2. Make sure your Awning is retracted against the house (closed).
3. Press the my (middle) buon on the Remote Transmier.
4. Unplug the power cord from the wall.
5. Insert the Crank Wand into the Override Crank on the Motor and manually open the Awning approximately
three (3) feet but do not completely open the Awning.
6. Plug the power cord back into the wall and make sure that there is electricity available. Let the Awning sit
for one minute, undisturbed, without pressing a buon on the Remote Transmier or unplugging the power
cord from the wall.
7. Unplug the power cord from the wall for two (2) seconds.
8. Plug the power cord back in for ten (10) seconds.
9. Unplug the power cord for two (2) seconds.
10. Plug the power cord back in and leave it plugged in.
Note: The Motor may rotate approximately two (2) feet in one direcon and stop.
11. When the Motor stops, press and hold the Programming Buon on the back of the Remote Transmier for
5 seconds unl the motor ‘jogs’, then release. (A ‘jog’ is a short back and forth movement of the Motor).
12. Acvate the Transmier by pressing the OPEN and CLOSE buons at the same me, the Motor will jog.
13. Press the my (middle) buon on the front of the Remote Transmier unl the motor jogs, then release.
14. Press the Programming buon on the back of the Remote Transmier unl the motor jogs and release.
The direcon of the Motor rotaon has been changed.
Test the Awning for proper operaon. Make sure that the lower buon on the Remote extends the Awning
out.
Mechanical Stops
Black Motor with
a Square Case

7
APPENDIX B
Changing the Direcon of Motor Rotaon for the Sunea Motor ONLY.
The Sunea Motor can be idened by the Silver Motor with a Round Case.
Note: These instrucons will erase previous Motor stops for the Open and
Closed posions, as well as allow the user to reverse direcon of the Motor.
These instrucons must be followed accurately and completely.
Note: Select the appropriate Channel on the MulChannel Remote, if applicable.
1. Read these instrucons FIRST, completely and thoroughly.
2. Press and Hold the my buon; the red LED light should blink for at least 5 seconds.
3. Disconnect Power for 2 full seconds.
4. Connect Power for 10 full seconds.
5. Disconnect Power for 2 full seconds.
6. Connect Power. The Awning should move, then stop.
7. Press and hold the Programming buon for ten seconds, watching for two separate jogs
back and forth, several seconds apart.
A single jog is dened as a quick two-direcon movement of the motor.
8. Press and Hold the CLOSE and OPEN buons together, release when the Awning jogs.
9. Press the CLOSE buon to check the direcon of the motor.
The fabric should roll onto the top of the Roller Bar, closing the Awning.
10. If the direcon is incorrect, change direcon by Holding the my buon unl the motor jogs.
Press the CLOSE buon again, to check for the correct direcon of the motor.
Programming
Rear View
OPEN
Front View
my
CLOSE
Channel
Indicator
Lights
11. Move the Awning to the desired Closed posion.
12. Press and Hold the my and OPEN buons together, release when the Awning begins to OPEN.
13. Press the my buon to Stop the Awning at the desired Open seng.
14. Use the CLOSE and OPEN buons to make desired adjustments to the Open posion.
15. Press and Hold the my and CLOSE buons simultaneously, releasing them when the Awning
begins to close. The Awning will stop on its own, at the Closed posion set in step 11.
SET PROPER DIRECTION OF MOTOR ROTATION
SET THE CLOSED AND OPEN POSITIONS
PREPARE MOTOR
16. Press and Hold the my buon; releasing when the Awning jogs. This step stores the Open
and Close posions.
17. Press and Hold the Programming buon, wait for jog. This completes the procedure.
18. Test the Awning for correct one-touch operaon, using the Open and Closed buons.
FINALIZE PROGRAMMING OF MOTOR
Silver Motor with
a Round Case
To ADD an addional Control Device (second Remote, All Weather Remote or Wireless Switch).
• Press the Programming buon on the back of the Transmier that was supplied with the EasyShade
unl the motor “jogs.”
• On the addional Control Device, press the Programming buon unl the motor “jogs,” then release
To DELETE a Control Device, repeat the two steps listed above and the addional Control Device is removed.
To Add or Delete a Control Device (Transmier)
Channel
Selector
Buon

SunSeer Products, a Massachuses Limited Partnership, 184 Charles Street, Malden, MA 02148
December 8, 2014 Wireless_Wind_Sensor
Thank you for Choosing SunSetter
/