Page is loading ...

8' HOT S
HOT ARCADE BALL TABLE
ASSEMBLY INSTRUCTIONS
NG2015
Please Do Not Hesitate to
Contact Our Consumer Hotline
at
800-759-0977
with
Any Questions That May
Arise During
Assembly or
Use of This Product!
Ver. 1116

THANK YOU!
Thank you for purchasing this product. We work around the clock and around the globe to ensure
that our products maintain the highest possible quality. However, in the rare case of issues during
assembly or use of this product, please contact our Consumer Hotline at 800-759-0977 for immediate
assistance before contacting your retailer. Please read the warranty information at the back of these
assembly instructions for further details.
2
CARE AND USE
1. This
product is intended for INDOOR use only.
2. Do NOT drag the table when moving it, as this will damage the legs.
ASSEMBLY TIPS
1. Find a clean, level surface to begin the assembly of your game table. We recommend that two adults
work together to assemble this game. You may want to carefully cut or tear the four corners of the box
so that the bottom of the box can be used as your work surface.
2. Remove all of the contents from box and verify that you have all of the parts shown on the Parts
List before you begin assembly. Note: Some parts may be pre-installed or pre-assembled.
3. Some figures or drawings may not look exactly like product.
4. When installing parts that have more than one screw or bolt, hand tighten all screws or bolts
in place before final tightening with screwdriver or wrench.
5. Electric screwdrivers may be helpful during assembly; however, please set a low torque and use
extreme caution because screws may be stripped or overtightened, resulting in damaged parts, if the
electric screwdriver’s torque is set too high.
WARNINGS!
READ AND FOLLOW ALL ASSEMBLY, OPERATION AND SAFETY INSTRUCTIONS CAREFULLY.
CHOKE HAZARD - THIS ITEM MAY CONTAIN SMALL BALLS AND PARTS
NOT SUITABLE FOR CHILDREN UNDER 3 YEARS OF AGE.
IMPORTANT! PLEASE READ THESE ASSEMBLY INSTRUCTIONS
IN ENTIRETY BEFORE ASSEMBLING YOUR PRODUCT.

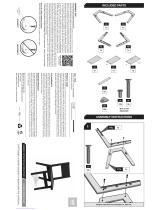
8’ HOT SHOT ARCADE
BALL TABLE - NG2015
Parts List
PARTS
P1L NGP5856
P1R NGP5857 P2L NGP5858 P2R NGP5859 P3L NGP5860 P3R NGP5861 P4 NGP5862
P5 NGP5863 P6L NGP5864 P6R NGP5865 P7L NGP58661 P7R NGP58671 P8 NGP5868
FRONT END
APRION
P9 NGP5870
P10 NGP5871
P11 NGP5872 P12 NGP5873 P13 NGP5874
BACK UPPER
PANEL
LEFT FRONT LEG
RIGHT BACK
LEG
FRONT BOTTOM
PANEL
LEFT BACK LEG
SPREADER
LEFT FRONT
SIDE APRON
LEFT BACK
SIDE APRON
RIGHT BACK
SIDE APRON
CROSSBEAM
NET FRAME
FRONT
FRONT TOP
PANEL
CONNECT HINGE
SET
BACK BOTTOM
PANEL
P16 NGP5877
TARGET BOARD
P14 NGP5875
BACKBOARD
P15 NGP5876
ELECTRONIC
SCORER
7/15
P17 NGP5878
P18 NGP5879 P19 NGP5880 P20 NGP5881
NET
NET FRAME
BACK
P21 NGP5882
NET SPACER
BAR
RIGHT FRONT
LEG
LEFT MIDDLE
LEG
RIGHT MIDDLE
LEG
RIGHT FRONT
SIDE APRON
P23 NGP58831P22 NGP5884
SUPPORT PANEL
BALL
“L” SUPPORT
PANEL
P24 NGP58851 A1 NGP5886
P13
P17
P15
P7R
P6R
P6L
P24
P3L
P2L
P1L
P11
P9
P5
P1R
P16
P4
P10
A1
P2R
P3R
P4
P14
P20
P18
P19
P23
RESET SWITCH
NGP5888
RUBBER
GEAR HINGE
NGP5890
REAR APRON
TRIANGULAR
INSERT
P7L
NGP58761*
TARGET BOARD
WIRING HARNESS
NGP58762*
TARGET BOARD
FLIP SWITCH
*Pre-assembled
on Target Board
P25 NGP5885
COVER PANEL
Illustrations Not to Scale
For replacement parts please call 800-759-0977.

H1 H2 H3 H4 H5 H6
5/16” BOLT
5/16” WASHER
1-1/4” SCREW
H8
ADDITIONAL EQUIPMENT
REQUIRED:
PHILLIPS HEAD
SCREWDRIVER
H11 T1
H9
ALLEN WRENCH
1/4” FLAT
WASHER
1/4”X1-1/4” BOLT
1/4”X1” BOLT
H7
1/4” FLAT
WASHER
3/4” SCREW
3/8” SCREW
3/4” FLAT
SCREW
HARDWARE PACK - NGP5887
T2 NGP58763
POWER
ADAPTER
H10
1-1/4” FLAT
SCREW
7/15
4
Illustrations Not to Scale

ASSEMBLY INSTRUCTIONS
5
Unfinished Side Up
Black Side Down
P10
H8
P21
Figure 1
1. Find a clean, level place to begin the assembly of your game. We recommend building the unit on the shipping carton to
protect the parts during assembly. Note: The two main units are assembled upside down then turned over for final assembly.
2. Attach the SUPPORT PANEL, P21, to the FRONT BOTTOM PANEL, P10, using (3) SCREWS, H8, through the two
outer holes as shown in Figure 1. Note: The P10 panel and P21 support panel both have pre-drilled holes for screws.
3. Place the LEFT FRONT SIDE APRON, P6L, and RIGHT FRONT SIDE APRON, P6R, upside down and approx. 2 feet
apart, as shown in Figure 2.
4. Insert FRONT TOP PANEL, P9, with finished white side down, into lower grooves of SIDE APRONS, P6L and P6R.
Make sure the end of P9 with the cutouts is on the same end as gear hinge as shown in Figure 2. Slide P9 forward until
the end with cutouts is flush with SIDE APRON ends above gear hinges. With help from another adult, hold this assembly
firmly and attach pieces together using (2) SCREWS, H1, and pre-drilled holes on each side.
5. Attach FRONT END APRON, P5, with groove facing in, using (2) SCREWS, H1, and pre-drilled holes on each side.
Note: Don’t tighten screws all the way until you complete Step 6. This will make it easier to get P10 into P5 groove.
6. Insert FRONT BOTTOM PANEL, P10, with unfinished side up, into upper grooves of SIDE APRONS, P6L and P6R.
Slide P10 forward until the end is flush with SIDE APRON ends above gear hinges, even with panel P9. Tighten P5 Screws.
Note: This unit is assembled
upside down.
P5
H1
H1
P6L
Note: Location
of gear hinge
P6R
Note: Location
of gear hinge
Note: Location
of these cutouts
P10
P9
Unfinished
Side Up
Slide both
panels in grooves
White
Side Down
Figure 2

7. Attach CROSSBEAM, P8, with cutout opening facing down and to the left, using (2) SCREWS, H1, and pre-drilled
holes on each side, as shown in Figure 3.
8. Attach LEFT and RIGHT FRONT LEGS, P1L and P1R, using (2) BOLTS, H2, and (2) WASHERS, H3, on each leg, as
shown in Figure 3. Note: Hand tighten for now, and then do final tightening with ALLEN WRENCH, T1, once P4 Spreader
is attached in next step.
9. Attach SPREADER, P4, using (4) SCREWS, H1, as shown in figure 3. Note: Hand place screws in all four pre-drilled
holes to align panel before tightening.
CAUTION:
P4 SPREADER MUST BE CENTERED
CORRECTLY ONTO PRE-DRILLED HOLES
IN LEGS BEFORE ATTACHING WITH H1
SCREWS.
Figure 3
NOTE: Location
of gear hinge
H1
H1
H1
H2
H3
P4
P8
P1L
P1R
ASSEMBLY INSTRUCTIONS (CONT.)
6

10. Attach the SUPPORT PANEL, P21, to the FRONT BOTTOM PANEL, P10, using (3) SCREW, H8, through the
three holes as shown in Figure 4. Note: The P12 panel and P21 support panel both have pre-drilled holes for screws.
Unfinished Side Up
Black Side Down
P12
H8
P21
Figure 4
Figure 5
THANK YOU!ASSEMBLY INSTRUCTIONS (CONT.)
7
P7L
P7R
P23
P8
H1
H1
H1
H1
H1
H1
11. Attach REAR APRON, P23,and CROSSBEAM, P8, to the LEFT BACK SIDE APROS,P7L, and RIGHT BACK SIDE
APROS, P7R using (4) SCREW, H1 as shown in Figure 5.

Figure 6
ASSEMBLY INSTRUCTIONS (CONT.)
8
Slide both
panels in grooves
Note: Location
of gear hinge
Note: Location
of these cutouts
P12
P11
12. Insert BACK BOTTOM PANEL, P12, with unfinished side down, into lower grooves of SIDE APRONS, P7L and P7R.
Slide P12 forward until the end is flush with SIDE APRON ends below gear hinges, as shown in Figure 6.
White side up
13. Insert BACK TOP PANEL, P11, with finished white side up, into upper grooves of SIDE APRONS, P7L and P7R.
Make sure the end of P11 with the cutouts is on the same end as gear hinge as shown in Figure 6. Slide P11 forward until
the end with cutout is flush with SIDE APRON ends above gear hinges. With help from another adult, hold this assembly
firmly and attach pieces together using (3) SCREWS, H1, and pre-drilled holes on each side.
H1
P7L
P7R

ASSEMBLY INSTRUCTIONS (CONT.)
9
Figure 7
14. Assemble LEFT and RIGHT MIDDLE LEGS, P2L and P2R, together with SPREADER, P4, using (4) SCREWS, H1,
as shown in Figure 7. Note: Hand place screws in all four pre-drilled holes to align panel before tightening. Attach “L”
SUPPORT PANEL, P22, in same manner using (6) SCREWS, H10, as shown.
15. Attach Middle Leg Assembly between assembled sides, P7L and P7R, using (2) BOLTS, H2, and (2) WASHERS, H3,
on each leg, as shown in Figure 7. Note: Velcro will be used as wire harness in future step.
16. Attach LEFT and RIGHT BACK LEGS, P3L and P3R, using (2) BOLTS, H2, and (2) WASHERS, H3, on each leg, as
shown in Figure 7. Note: Hand tighten for now, and then do final tightening with ALLEN WRENCH, T1, once P4 Spreader
is attached in next step.
17. Attach SPREADER, P4, between Legs using (4) SCREWS, H1, as shown in Figure 7.
Note: Hand place screws in all four pre-drilled holes to align panel before tightening.
CAUTION:
P4 SPREADER MUST BE CENTERED
CORRECTLY ONTO PRE-DRILLED HOLES
IN LEGS BEFORE ATTACHING WITH H1
SCREWS.
P4
P3L
P3R
H2
H3
H1
Note: Correct location
Velcro
P22
H2 H3
P4
P2L
P2R
H1
H10
P22
of Support Panel to Legs

ASSEMBLY INSTRUCTIONS (CONT.)
10
Figure 8
H5 Bolt
H7
Washer
P15
Note: Hinge Gear Assemblies Must Mesh
Note: This Hinge is Threaded and Must Be on Inside
CAUTION:
Pinch Point
CAUTION:
Pinch Point
P5
P5
Reset Button
Reset
Button
No Gap
No Gap
Ligature
Bundle of
White Wire
P16
Hinge Set
P16
Hinge Set
P7R
Back Side
Apron
P6R
Front Side
Apron
Note: This Hinge is NOT Threaded
and Must Be on Outside
H7
Washer
18. With the help of another adult, set both completed assemblies upright and position so gears face each other as shown
in Figure 8. Using (2) HINGE SETS, P16, connect assemblies using BOLT, H5, and Washer, H7, as shown in Figure 8.
The bolts should be snug, but NOT over tightened as this is a pivot area. Note: Hinge gear assemblies must mesh together,
per diagram, and there should be no gap between playfields. Also, only one hinge plate per set is threaded and must be
installed on the inside of each playfield side.
20. Place TARGET BOARD, P15, with red hole at the top, into position with the sides resting in the grooves of the braces
on the side panels and against the front of the ramp.
21. Attach the RESET BUTTON, with the long white wire, through the hole in the FRONT END APRON, P5, by removing
the washer and nut on the back of the Reset Button, feeding the Reset Button and wire through the hole from the front and
re-attaching the washer and nut. Note: Be careful not to damage or break wire connections while attaching Reset Button.
Reset Button -
(this ships
pre-wired to
Target Board)
P24
P24
19. Attach TRIANGULAR PATCH, P24, on each side aprons using (2) BOLTS, H4, and (2) WASHERS, H6, on each patch,
as shown in Figure 8.
H4
H6

ASSEMBLY INSTRUCTIONS (CONT.)
11
22. Feed the long white wire through the cutouts in all CROSSBEAMS, P8, and the Velcro on P22, toward the
back and up through the hole in the BACK BOTTOM PANEL, P12. This will connect to the short white wire on the wiring
harness.
23. Feed the Target Board’s Wiring Harness through the round hole in the BACKBOARD, P13, and attach the Backboard
between the TTRIANGLE PATCH using (4) SCREWS, H1, as shown in figure 9. Note: Hand place screws in all four
pre-drilled holes to align panel before tightening.
24. Attach ELECTRONIC SCORER, P14, to Backboard using (4) SCREWS, H9, as shown. Connect the Wiring Harness
from the Electronic Scorer to the Target Board’s Wiring Harness.
26. Plug in the AC Power Adapter (DO NOT use batteries with adapter), or install four (4) “AA” batteries (not included),
into the backside of the Electronic Scorer, P14. Remove protective plastic film from face of Electronic Scorer.
P14
H1
Figure 9
H9
P13
H11
P25
25. Attach COVER PANEL, P25, over Wiring Harness and to Backboard using (4) SCREWS, H11, as shown in Figure 9.

FINAL SET-UP & HOW TO PLAY
1. Using two adults, set the unit in a suitable location in your game room.
2. Plug in the AC Power Adapter (DO NOT use batteries with adapter), or install four (4) “AA”
batteries (not included), into the backside of the Electronic Scorer, P14
3. Turn the power switch to the ON position.
4. When all “zeroes” are showing on the score board, press the reset button on the front of the
unit. You are now ready to play.
5. Each player rolls six (6) balls per game trying to reach the highest score. If a ball is rolled
and it doesn’t score, you may roll that ball again. The player with the highest score wins.
6. After both players have rolled their six balls, press the Reset Button to play again.
7. Turn the power OFF when not in use.
CAUTION: DO NOT THROW the ball at the target board as this may cause damage to the
game. The correct and safe way is to always ROLL the ball along the runway.
P17
Net
H4
H6
P20
Spacer Bars
P19
Frame
Back
(Smaller)
H4
P18
Frame
Front
(Larger)
H6
H4
ASSEMBLY INSTRUCTIONS (CONT.)
12
Figure 10
27. Loosely attach NET FRAME FRONT, P18, and NET FRONT BACK, P19, to the Back Side Aprons and Triangle Patch
using (4) BOLTS, H4, and WASHERS, H6, through the eye hole at the bottom of the frames.
28. Attach (2) NET SPACER BARS, P20, between the Front and Back Frames, on either side, by inserting the curved
ends into the frame receptacle as shown in Figure 10.
29. Drape the NET, P17, over the frame with the longest side, and corner rivets, running side to side. The net will angle
down toward the front. Now remove Bolts loosely attached in Step 27, one at a time, and re-insert Bolt through Corner
Rivets and back through Frame Eye Hole until all four are securely attached. Use Velcro on Net to secure Net to Frame.

180-DAY LIMITED WARRANTY
1
3
This product is warranted to the original purchaser to be free from defects in material or workmanship
for a period of 180 days from the date of the original retail purchase.
This warranty does not cover defects or damage due to improper installation, alteration, accident or
any other event beyond the control of the manufacturer. Defects or damage resulting from misuse,
abuse or negligence will void this warranty. This warranty does not cover scratching or damage that
may result from normal usage.
This product is not intended for institutional or commercial use; the manufacturer does not assume
any liability for such use. Institutional or commercial use will void this warranty.
This warranty is nontransferable and is expressly limited to the repair or replacement of the defective
product. During the warranty period, the manufacturer shall repair or replace defective parts at no
cost to the purchaser. Shipping charges and insurance are not covered and are the responsibility of
the purchaser. Labor charges and related expenses for removal, installation or replacement of the
product or components are not covered under this warranty.
The manufacturer reserves the right to make substitutions to warranty claims if parts are unavailable
or obsolete.
The manufacturer shall not be liable for loss of use of the product or other consequential or incidental
costs, expenses or damages incurred by the consumer of any other use. The user assumes all risk of
injury resulting from the use of this product.
This warranty is expressly in lieu of all other warranties, expressed or implied, including warranties of
. Neither the manufac-
turer nor any of its representatives assumes any other liability in connection with this product.
All warranty claims must be made through the retailer where the product was originally
purchased. A purchase receipt or other proof of date of purchase will be required to process
all warranty claims. The model number and part numbers found within the assembly
instructions will be required when submitting any parts requests or warranty claims.
For further warranty information or inquiries, please call 800-759-0977

Ver. 1116
TABLE DE BALLON D'ARCADE
HOT SHOT 2,43 m
INSTRUCTIONS D’ASSEMBLAGE
NG2015
Contactez
notre
service à la clientèle au
800-759-0977
avec des questions sur le montage
ou l'utilisation de ce produit.

MERCI!
Merci d’avoir acheté notre produit. Nous travaillons 24 heures sur 24, partout dans le monde, à garantir
que nos produits sont de la meilleure qualité possible. Toutefois, dans les rares cas de problèmes lors
du montage ou de l'utilisation de ce produit, se il vous plaît communiquer avec notre service à la clientèle
au 800-759-0977 pour une aide immédiate avant de contacter votre revendeur. Pour obtenir de plus amples
renseignements, veuillez lire l'information relative à la garantie au verso de ce guide d’instructions.
2
ENTRETIEN ET USAGE
1. Ce produit doit être utilisé À L’INTÉRIEUR seulement.
2. NE JAMAIS déplacer la table en la traînant, cela pourrait endommager
les pieds.
INSTRUCTIONS D’ASSEMBLAGE
1. Trouver une surface propre et plane, pour commencer le montage de votre table de jeu. La table
s’assemble à l’envers pour être ensuite retournée sur ses pieds, une fois l’assemblage complété.
Cette table est lourde et nécessite au moins deux adultes forts pour la soulever et la retourner.
2. Retirez le contenu de la boîte, avant de commencer l’assemblage, assurez-vous d’avoir toutes
les pièces telles que listées et illustrées au tableau d’identification. Avis : certaines pièces sont
préassemblées ou préinstallées.
3. Certaines illustrations ou dessins peuvent ne pas ressembler au produit que vous avez acheté.
4. Quand vous fixez en place une pièce avec plus d’une vis ou écrou, veuillez, en premier, les
visser à la main et terminer la fixation avec un tournevis ou une clé.
5. Un tournevis électrique peut être utile lors de l’assemblage, mais veuillez le régler à basse torque
et l’utiliser avec prudence; si la torque est trop élevée, la vis peut se défaire ou être trop serrée.
AVERTISSEMENTS!
LIRE TOUTES LES INSTRUCTIONS D’ASSEMBLAGE ET LES CONSIGNES DE SÉCURITÉ ATTENTIVEMENT.
RISQUE D’ÉTOUFFEMENT – CERTAINS ÉLÉMENTS DU PRODUIT CONTIENNENT
DE PETITES PIÈCES - NE CONVIENT PAS À UN ENFANT DE MOINS DE TROIS ANS.
IMPORTANT! VEUILLEZ LIRE, EN ENTIER, TOUTES LES
INSTRUCTIONS AVANT D’ASSEMBLER VOTRE PRODUIT.

TABLE DE BALLON D'ARCADE HOT SHOT 2,43 m - NG2015
Liste des pièces
PIED
GAUCHE AVANT
ÉCARTEUR
PIED
DROIT AVANT
PIED
GAUCHE CENTRE
PIED
DROIT CENTRE
PIED
GAUCHE ARRIÈRE
PIED
DROIT ARRIÈRE
TABLIER AVANT
TABLIER
GAUCHE AVANT
TABLIER
AVANT DROIT
TABLIER
ARRIÈRE GAUCHE
TABLIER
ARRIÈRE DROIT
TRAVERSE
PANNEAU
SUPÉRIEUR AVANT
PANNEAU
INFÉRIEUR AVANT
PANNEAU
SUPÉRIEUR ARRIÈRE
PANNEAU
INFÉRIEUR ARRIÈRE
PANNEAU
ARRIÈRE
MARQUEUR
ÉLECTRONIQUE
PANNEAU CIBLE
ENSEMBLE
DE CHARNIÈRE
FILET
CADRE
AVANT FILET
CADRE
ARRIÈRE FILET
ÉCARTEUR
POUR FILET
PANNEAU
DE SOUTIEN
TABLIER ARRIÈRE
PANNEAU DE
SOUTIEN EN ῝L῝
INSÉRER
TRIANGULAIRE
BALLON
VITESSE
CHARNIÈRE
COMMUTATEUR DE
RÉINITIALISATION
P1L NGP5856
P1R NGP5857 P2L NGP5858 P2R NGP5859 P3L NGP5860 P3R NGP5861 P4 NGP5862
P5 NGP5863 P6L NGP5864 P6R NGP5865 P7L NGP58661 P7R NGP58671 P8 NGP5868 P9 NGP5870
P10 NGP5871
P11 NGP5872 P12 NGP5873 P13 NGP5874
P16 NGP5877
P14 NGP5875
P15 NGP5876
P17 NGP5878
P18 NGP5879 P19 NGP5880 P20 NGP5881 P21 NGP5882
P23 NGP58831P22 NGP5884
P24 NGP58851 P25 NGP5885
P13
P17
P15
P7R
P6R
P6L
P24
P3L
P2L
P1L
P11
P9
P5
P1R
P16
P4
P10
A1
P2R
P3R
P4
P14
P20
P18
P19
P23
P7L
PIÈCES
7/15
*pré-assemblé sur panneau cible
FAISCEAU DE CÂBLAGE INTERRUPTEUR BASCULE
PANNEAU CIBLEPANNEAU CIBLE
A1 NGP5886 NGP5888 NGP5890 NGP58761* NGP58762*
PANNEAU DE
COUVERTURE
illustrations non à l'échelle
Pour commander une pièce de remplacement,
veuillez téléphoner au 1 800 759-0977

H1 H2 H3 H4 H5 H6
VIS 3,1 cm
H8
H11 T1
H9
H7
TROUSSE DE QUINCAILLERIE – NGP5887
BOULON 0,79 cm RONDELLE 0,79 cm
BOULON
3,1 cm x 0,64 cm
BOULON
2,5 cm x 0,64 cm
RONDELLE
PLATE 0,64 cm
RONDELLE
PLATE 0,64 cm
VIS 1,90 cm VIS 0,95 cm VIS 1,8 cm
CLÉ HEXAGONALE
TOURNEVIS
CRUCUFORME
ÉQUIPEMENT
ADDITIONNEL REQUIS :
T2 NGP58763
ADAPTATEUR
SECTEUR
H10
VIS 3,18 cm
7/15
illustrations non à l'échelle
Pour commander une pièce de remplacement,
veuillez téléphoner au 1 800 759-0977
4

INSTRUCTIONS D’ASSEMBLAGE
5
Côté non fini vers le haut
Côté noir en dessous
P10
H8
P21
Figure 1
1. Commencez d’assembler votre table de jeu dans un lieu propre et lisse et de niveau. Il est conseillé de le monter sur les
cartons d’expédition afin de ne pas abîmer les pièces lors de l’assemblage. Avis : Les deux structures principales sont
assemblées à l’envers et ensuite retournées pour terminer l’assemblage.
2. Fixez le PANNEAU DE SUPPORT (P21) au PANNEAU INFÉRIEUR AVANT (P10) en insérant trois VIS (H8) dans les
ouvertures extérieures tel qu’illustré à la Figure 1. Avis : le panneau (P10) et le panneau de support (P21) sont dotés de
trous prépercés pour y insérer les vis.
3. Placez le TABLIER LATÉRAL GAUCHE AVANT (P6L) et le TABLIER LATÉRAL DROIT AVANT (P6R) à l’envers, à
environ 65 cm de distance tel qu’illustré à la Figure 2.
4. Insérez le PANNEAU SUPÉRIEUR AVANT (P9), côté blanc en dessous, dans les rainures inférieures du TABLIERS
LATÉRAL GAUCHE AVANT (P6L) et du TABLIER LATÉRAL DROIT AVANT (P6R). Assurez-vous que les entailles
situées à l’extrémité du panneau P9 soient sur le même côté que la charnière tel qu’illustré à la Figure 2. Faites glisser le
panneau P9 jusqu’à ce que les entailles affleurent les extrémités du TABLIER LATÉRAL par-dessus les charnières. Avec
l’aide d’un adulte, retenez fermement cet assemblage et fixez les pièces ensemble et insérez deux VIS (H1) dans les
ouvertures pré-percées situées sur chacun des côtés.
5. Fixez le TABLIER D’EXTRÉMITÉ AVANT (P5) avec les rainures orientées vers l’intérieur insérez deux VIS (H1) dans
les ouvertures pré-percées situées sur chacun des côtés. Avis : Ne pas serrer les vis complètement jusqu'à ce que vous
accomplissez l’étape 6. Cela facilitera l’insertion du panneau P10 dans les rainures du tablier P5.
6. Insérez le PANNEAU INFÉRIEUR AVANT (P10), avec le côté non fini vers le haut, dans les rainures supérieures du
TABLIER LATÉRAL (P6L) et du TABLIER LATÉRAL (P6R). Faites glisser le panneau P10 vers l’avant jusqu’à ce que les
extrémités affleurent le TABLIER LATÉRAL par-dessus les charnières, égalisez à l’aide du panneau P9. Serrez les vis P5.
Avis : cette table de jeu
s’assemble à l’envers.
P5
H1
H1
P6L
Avis : emplacement
de la charnière
P6R
Avis : emplacement
de la charnière
Avis : emplacement
des entailles
P10
P9
Côté non fini
vers le haut
Insérer les deux
panneaux dans
les rainures
Côté blanc
en-dessous
Figure 2

7. Fixez la TRAVERSE (P8), avec les entailles orientées vers le bas à gauche à l’aide de deux VIS (H1) et des ouvertures
pré-perforées situées sur chacun des côtés, tel qu’illustré à la Figure 3.
8. Fixez le PIED GAUCHE AVANT (P1L) et le PIED DROIT AVANT (P1R) à l’aide de deux BOULONS (H2) et de RON-
DELLES (H13) pour chaque pied, tel qu’illustré à la Figure 3. Avis : pour l’instant, serrez les boulons manuellement et
complétez le serrage à l’aide de la CLÉ HEXAGONALE (T1) dès que l’espaceur (P4) est fixé à la prochaine étape.
9. Fixez l’ÉCARTEUR (P4) à l’aide de quatre VIS (H1), tel qu’illustré à la figure 3. Avis : insérez manuellement les vis à
l’intérieur des quatre ouvertures pré-perforées et alignez le panneau avant de serrer.
Figure 3
Avis : emplacement
de la charnière
H1
H1
H1
H2
H3
P4
P8
P1L
P1R
ATTENTION:
ÉCARTEUR (P4) DOIT ÊTRE BIEN CENTRÉ
CORRECTEMENT DANS DES TROUS
PRÉ-PERCÉS DANS DES JAMBES AVANT
AVANT VIS DE FIXATION (H1).
INSTRUCTIONS D’ASSEMBLAGE (suite)
6

10. Fixez la PANNEAU DE SUPPORT (P21) au PANNEAU INFÉRIEUR AVANT (P10) à l’aide trois VIS (H8) à travers les
trois trous comme illustré à la Figure 4. Avis : le panneau P12 et le PANNEAU DE SUPPORT (P21) sont dotés d’ouvertures
pré-perforées pour les vis.
Côté non fini
vers le haut
Côté noir
en-dessous
P12
H8
P21
Figure 4
Figure 5
P7L
P7R
P23
P8
H1
H1
H1
H1
H1
H1
11. Fixez TABLIER ARRIÈRE, P23, et TRAVERSE, P8, aux TABLIER ARRIÈRE GAUCHE, P7L, et TABLIER
ARRIÈRE DROIT, P7R, utilisant (4) VIS, H1, comme illustré à la Figure 5.
THANK YOU!INSTRUCTIONS D’ASSEMBLAGE (suite)
7
/