Page is loading ...

PORTABLE AM/FM WEATHER BAND CLOCK RADIO
WITH S.A.M.E. WEATHER ALERT
USER MANUAL
SFA1180
PLEASE READ THIS USER MANUAL COMPLETELY BEFORE OPERATING THIS
UNIT AND RETAIN IT FOR FUTURE REFERENCE IT FOR FUTURE REFERENCE
BC

DEAR FIRST ALERT® CUSTOMER
Sound can be deceiving. Over time your hearing "comfort level" adapts to
higher volumes of sound. So what sounds "normal" can actually be loud
and harmful to your hearing. Guard against this by setting your equipment
at a safe level BEFORE your hearing adapts.
Selecting fine audio equipment such as the unit you've just purchased is
only the start of your musical enjoyment. Now it's time to consider how you
can maximize the fun and excitement your equipment offers. This
manufacturer and the Electronic Industries Association's Consumer
Electronics Group want you to get the most out of your equipment by
playing it at a safe level. One that lets the sound come through loud and
clear without annoying blaring or distortion and, most importantly, without
affecting your sensitive hearing.
To establish a safe level:
Start your volume control at a low setting.
Slowly increase the sound until you can hear it comfortably and
clearly, and without distortion.
Once you have established a comfortable sound level:
Set the dial and leave it there.
Taking a minute to do this now will help to prevent hearing damage or
loss in the future. After all, we want you listening for a lifetime.
We Want You Listening For a Lifetime
Used wisely, your new sound equipment will provide a lifetime of fun and
enjoyment. Since hearing damage from loud noise is often undetectable until
it is too late, this manufacturer and the Electronic Industries Association's
Consumer Electronics Group recommend you avoid prolonged exposure to
excessive noise.
Customer's Record:
The serial number of this product is found on its bottom cover. You should
note the serial number of this unit in the space provided as a permanent
record of your purchase to aid in identification in the event of theft of loss.
Model Number: SFA1180 Serial Number: _____________
1

IMPORTANT SAFETY INSTRUCTIONS
When used in the directed manner, this unit has been designed and
manufactured to ensure your personal safety. However, improper use can
result in potential electrical shock or fire hazards. Please read all safety and
operating instructions carefully before installation and use, and keep these
instructions handy for future reference. Take special note of all warnings
listed in these instructions and on the unit.
1. Read these instructions – All the safety and operating instructions should
be read before the appliance is operated.
2. K eep these instructions – The safety and operating instructions should be
kept for future reference.
3.H eed all warnings – All warnings on the appliance and in the operating
instructions should be adhered to.
4. Follow all instructions – All operation and use instructions should be
followed.
5.D o not use this apparatus near water – The appliance should not be used
near water; for example, near a bath tub, washbowl, kitchen sink, laundry
tub, in a wet basement, or near a swimming pool.
6.C lean only with dry cloth – The appliance should be cleaned only as
recommended by the manufacturer.
7.D o not install near any heat sources such as radiators, heat registers,
stoves, or other apparatus (including amplifiers) that produce heat.
8.O nly use attachments / accessories specified by the manufacturer.
9.R efer all servicing to qualified service personnel. Servicing is required
when the apparatus has been damaged in any way, such as power-supply
cord or plug is damaged, liquid has been spilled or objects have fallen into
the apparatus, the apparatus has been exposed to rain or moisture, does
not operate normally, or has been dropped.
10.T his appliance shall not be exposed to dripping or splashing water and
that no object filled with liquids such as vases shall be placed on the
apparatus.
11.P ower Sources – The appliance should be connected to a power supply
only of the type described in the operating instructions or as marked on the
appliance. Do not overload wall outlet.
12.D anger of explosion if battery is incorrectly replaced. Replace only with
the same or equivalent type.
13. Do not attempt to dismantle, open or repair this product yourself. If a fault
occurs, seek advice from your local qualified service technician or contact
the distributor via the telephone number at the back of this instruction
manual.
14.C aution marking and nameplate are located on bottom of product.
2

This device complies with Part 15 of the FCC Rules. Operation is subject to
the following two conditions:
(1) this device may not cause harmful interference, and
(2) this device must accept any interference received, including
interference that may cause undesired operation.
NOTE: This equipment has been tested and found to comply with the limits
for a Class B digital device, pursuant to Part 15 of the FCC Rules. These
limits are designed to provide reasonable protection against harmful
interference in a residential installation. This equipment generates, uses
and can radiate radio frequency energy and, if not installed and used in
accordance with the instructions, may cause harmful interference to radio
communications. However, there is no guarantee that interference will not
occur in a particular installation. If this equipment does cause harmful
interference to radio or television reception, which can be determined by
turning the equipment off and on, the user is encouraged to try to correct the
interference by one or more of the following measures:
Reorient or relocate the receiving antenna.
Increase the separation between the equipment and receiver.
Connect the equipment into an outlet on a circuit different from that to
which the receiver is connected.
Consult the dealer or an experienced radio/TV technician for help.
To prevent any scratching or damage to your furniture, we strongly
recommend that you purchase small self-adhesive felt pads, available at
hardware stores and home improvement centers everywhere, and apply
these pads to the bottom of the unit before you place the product on any fine
wooden furniture.
SPECIAL NOTE
CAUTION: Changes or modifications not expressly approved by the
party responsible for compliance could void the user's
authority to operate the equipment.
COMPLIANCE WITH FCC REGULATIONS
3

LOCATION OF CONTROLS
MODE
VOL.
+
-
VOL.
SELE CT
MSG/S NO OZ E
MENU
WARNI NGWATCH
ADVI SO RY
4
16
17
3
11
12
13
14
15
5
18
1
6
7
8
9
10
2
19
R
DC IN
5V 1. 5A
USB C HARGI NG
5V 1A
RES ET
20
21
24
27
26
28
22
23
25
4

29 30 31 32 33 34 35 36 37 38
1
ADVISORY ALERT INDICATOR
2
WATCH ALERT INDICATOR
3
WARNING ALERT INDICATOR
4
MULTI-FUNCTION LCD DISPLAY
5
POWER On/Standby / USB
Charging Switch Button
6
MOVE RIGHT / TUNE+ Button
7
MOVE UP Button
8
MOVE LEFT / TUNE- Button
9
SELECT / RADIO PRESET
MEMORY Button
10
MOVE DOWN Button
11
VOLUME DOWN (-) Button
12
MODE Button
13
VOLUME UP (+) Button
14
MENU/RADIO PRESET RECALL
Button
15
ALERT MESSAGE / SNOOZE Button
16
Dynamo Hand Crank
17
SPEAKER
18
LED Flashlight
19
Solar Panel
20
TELESCOPIC ANTENNA
21
Flashlight ON/OFF button
22
BATTERY COMPARTMENT DOOR
23
Headphone Out
24
Solar Charging Indicator
25
Reset Button
26
USB Charging Port
27
28
USB/CRANK Charging Indicator
29
Micro USB Battery Charging Port
30
LOW BATTERY INDICATOR
31
FM RADIO MODE INDICATOR
32
AM RADIO MODE INDICATOR
33
WEATHER RADIO MODE INDICATOR
34
MENU MODE INDICATOR
35
VOICE ALERT INDICATOR
36
SIREN ALERT INDICATOR
37
WEATHER ALERT MODE INDICATOR
38
WEATHER BAND SIGNAL
STRENGTH INDICATOR
ALARM INDICATOR
5

POWER SOURCE
IMPORTANT: Before using the SFA1180, you need to remove the battery
insulator tab from the back of the unit by pulling it out of the unit. This will
activate the internal rechargeable battery. If you pull the insulation tab out
and the display does not turn on, or the display comes on, but the radio and
flashlight do not work, you need to reset the unit using the following procedure.
1. Refer to the “Resetting the Unit” instructions located in the CARE AND
MAINTENANCE section of this manual. Press the RESET button located
on the back of the SFA1180, and the unit should return to normal operation.
2.W hen the low battery icon appears on the display, either the internal
battery needs to be recharged, or the “AA” batteries need to be replaced.
3. If the display does not turn on after pressing the RESET button, the level of
the internal battery may be low. If this occurs, lift the hand crank and rotate
it clockwise to generate some power. You can also connect the unit to a
USB charger (not included) or computer USB port for charging.
A) FOUR WAYS TO POWER THE UNIT
1) “DYNAMO” POWER OPERATION
1.T he SFA1180 comes with a preinstalled 3.7V DC rechargeable lithium-ion
battery. You must remove the battery insulator tab from the back of the unit to
activate the battery.
2.P ull the Dynamo Hand Crank out from the side of the unit until it’s fully
extended. Start to turn the Crank in a clockwise direction to charge the internal
battery. The red CHARGING indicator located on the back will flash while
charging.
Hand Crank
6

3. Continue turning the Crank to charge the internal battery. The longer you
turn the hand crank, the more power you are generating to charge the
battery, and the Radio listening time will be extended (Radio reception only).
Notes:
4.P ress the Power On/Standby button to turn on the unit for operation.
Do not burn or bury batteries. Do not puncture or crush. Do not
disassemble.
Recycle Lithium batteries. Do not dispose of in the trash.
If the electrolyte in the cells should get on your skin, thoroughly wash with
soap and water. If in the eyes, rinse thoroughly with cool water. Immediately
seek medical attention.
Use only chargers rated for Lithium cells. Be sure the charger’s voltage and
current settings are correct for the battery pack being charged.
Charge batteries on a fireproof surface away from flammable items or liquids.
Lithium Battery Safety Instructions
Batteries should NEVER be left unattended while charging. Only adults
should charge the batteries.
Follow the manufacturer’s instructions for charging the product and do not
charge longer than recommended. Unplug the charger when the battery is
charged.
The unit may require 5 - 6 minutes of constant cranking if the LCD clock
display and LED light do not work, and the battery is completely drained.
You may need to press the reset button, and turn the hand crank a few
times if battery has been charged, but the radio and/or LED light still
doesn’t work.
NOTE:
The battery compartment features an adjustable terminal, so it can
accommodate 3.7V DC rechargeable batteries of different lengths.
A 3.7V DC / 2200mA (CR 18650) battery is included, but you can replace
this battery with a higher or lower mA capacity CR18650 battery
(not included) if needed.
To insure proper operation and charging, only replace the battery with
a compatible CR 18650 type 3.7V DC lithium-ion battery.
Recycle Rechargeable Batteries
Recycle your old rechargeable batteries at one of the
many collection sites in the U.S. and Canada. To find the
site nearest you, visit www.call2recycle.org or call
toll-free 1-877-2-RECYCLE.
R B R C
7

2) “AA”Battery Operation
1.O pen the Battery Door on the back of the radio.
2.F ollow the markings inside the battery compartment, and insert 3 new
'AA' (UM-3) batteries (not included). Make sure the positive and negative
ends of the batteries are facing the correct direction.
Note: For optimum performance, alkaline-type batteries are recommended.
3.C lose the battery door.
IMPORTANT: Be sure that the batteries are installed correctly. Wrong
polarity may damage the unit.
WARNING:
Be sure that the batteries are installed correctly. Wrong polarity may
damage the unit.
Do not mix old and new batteries.
Do not mix alkaline, standard (carbon-zinc) or rechargeable
(nickel-cadmium) batteries.
Only batteries of the same or equivalent type as recommend are to be
used.
If the unit is not to be used for an extended period of time, remove the
battery. Any old or leaking battery can cause damage to the unit and may
void the warranty.
Do not dispose of batteries in fire, batteries may explode or leak.
Do not try to recharge batteries not intended to be recharged; they can
overheat, rupture and leak (Follow battery manufacturer’s directions).
3) SOLAR POWER / CHARGING
1.M ake sure the rechargeable Lithium-ion Battery is installed.
Note: When "AA" batteries are installed along with the built-in lithium battery,
the build-in rechargeable battery pack will be the primary power source.
2.P ut the unit in direct sunlight (not through a window or in the shade), and
making sure the solar panel of the unit is facing towards the sun. If the
sunlight is strong enough, the yellow solar charging Indicator on the back
will light indicating the unit is charging. The longer you leave the unit in
direct sunlight, the more power you are generating to charge the battery,
and the Radio listening time will be extended (Radio reception only).
Note: If the battery is completely drained (LCD clock display and LED light
do not work), it may require a very long exposure to direct sunlight in
order to charge the battery using the solar panel. You should use one
of the other power modes available if you need to use the radio
immediately.
8

Solar Panel
NOTE: The unit can only be charged using outdoor sunlight. Indoor
incandescent lights and lamps are not strong enough to charge the
rechargeable battery properly.
4) USB POWER / CHARGING
The unit has a micro USB port on the back of the unit under the Rubber Dust
Cover.
Use a standard USB to micro USB cable (not included), and plug one end of
the USB cable into a computer USB port. Plug the other end with micro USB
into the micro USB port located on the back of the unit. The internal battery
of the SFA1180 will begin to charge automatically when your computer is ON.
Charge the unit a minimum of 7 to 8 hours prior to using, and the radio should
not be used while charging with your computer.
NOTE: A USB power adaptor with 5V DC, 1500mA output (not included), the
same type commonly used with smartphones, can also be used for
charging the internal battery of the SFA1180. A USB to micro USB
cord (not included) is also required for charging the unit via the micro
USB port located on the back of the unit.
LOW BATTERY INDICATOR
When operating the unit using battery power, and the battery power becomes
weak, the low battery icon will appear on the display and flash. We
recommend you replace the exhausted batteries immediately.
NOTE: 1.) If you set the display backlight to always on, the display backlight
may blink when the battery power becomes weak even if the low
battery indicator isn’t showing. If this occurs, set the backlight to
NORMAL in setup menu to save battery power or recharge internal
battery or replace all AA batteries with fresh ones.
2.) The speaker in this unit is not magnetically shielded and may cause
color distortion on the screen of some TVs or video monitors. To
avoid this, you may need to move the unit further away from the TV
or monitor if unnatural color shifts or image distortion occurs.
9

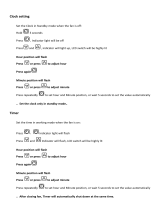
CLOCK and DATE SETTING
When the unit is in standby mode:
SETTING 12/24 HOUR FORMAT
1. Tap the MENU button, and “COUNTY CODE” is shown on the display.
2.T ap the button until “TIME SET” is showing on the display.
CHARGING LED INDICATORS
LEDs ARE LOCATED ON BACK OF UNIT
Battery Charging via USB
LED flashes Red during charging.
LED lights Red when fully charged.
Battery Charging via Crank
LED flashes Red during charging.
Battery Charging via Solar Power
Solar charging LED lights yellow.
CHANGE DISPLAY BACKLIGHT TIME
SETTING THE LCD BACKLIGHT TIME
1. In standby mode, press the MENU button, “COUNTY CODE” is shown on
the display.
2.Tap the button until “BACKLIGHT SET” is showing on the display.
3. Tap the SELECT button to show the current backlight setting.
4.Tap the button to choose “NORMAL” or “ON” to select Backlight turn
on time.
ON will keep the backlight on at all times, and NORMAL will automatically
turn off the display backlight after 10 seconds.
5. Press the SELECT button to save your BACKLIGHT time setting.
6. Press MENU button to exit set up mode.
3.T ap the SELECT button to enter clock setting mode, 12 hour format
(12 HR) flashing.
4.T ap the button to select 12 hour (12HR) or 24 hour (24HR) format,
then press the MOVE RIGHT button to confirm. Hour digits flashing to
prompt for input.
SETTING THE CLOCK
5. Tap the button repeatedly to set the hour value. Press and hold the
buttons to speed up the forward or reverse scanning of the digits.
10

Note: Make sure the hour is set so that the AM or PM indicators are
displayed correctly.
SETTING THE DATE
6. Press the button after the hour is set, Minute digits flashing to prompt
for input.
7. Tap the button to set the minute digit(s). Press and hold the buttons to
speed up the forward or reverse scanning of the digits.
8. Press the button to confirm. Month digits flashing to prompt for input.
9. Tap the buttons to set the month. Press the button after the month is
set, Date digits flashing to prompt for input.
10. Tap the button to set the date. Press and hold the buttons to speed up
the forward or reverse scanning of the digits.
11. Press the button after the date is set, Year digits flashing to prompt for
input.
12. Tap the button to set the year. Press the SELECT button to finish the
setting mode back to main menu.
13. Tap the MENU button to exit the set up mode.
Note: If the unit was reset or the batteries go dead, you need to set the
clock again.
ALARM SETTING
SETTING THE ALARM TIME
1. In standby mode, tap the MENU button once, and “COUNTY CODE” is
shown on the display.
2. Tap the button until “ALARM SET” is showing on the display.
3. Tap the SELECT button to enter alarm setting mode, the default alarm time
AM 12:00 is displayed and hour digits is flashing to prompt for input.
4. Tap the button repeatedly to set the hour value. Press and hold the
buttons to speed up the forward or reverse scanning of the digits.
Note: Make sure the hour is set so that the AM or PM indicators are
displayed correctly.
5. Press the button after the hour is set, Minute digits flashing to prompt
for input.
6. Tap the button to set the minute digit(s). Press and hold the buttons to
speed up the forward or reverse scanning of the digits.
7. Press the button after the minute is set, alarm wake up source flashing
to prompt for input.
8. Tap the button to select beeping alarm, wake to radio or turn off the
alarm.
11

9. Tap the SELECT button to confirm. Alarm indicator appears on display if
beeping alarm or wake to radio is selected.
10. Tap the MENU button to exit set up menu.
Wake to ALARM or WEATHER RADIO
1. The Alarm or radio will automatically turn on when alarm time is reached.
The volume level of radio alarm increases gradually until it reaches the
factory preset level. The Alarm or radio sounds for 60 minutes and then turn
off automatically if the SNOOZE button is not pressed.
Note: 1.) Beeping alarm sounds a factory preset level.
2.) The VOLUME+ or VOLUME- buttons will adjust the FM, AM and
Weather radio volume levels, but not the alarm level.
2. To stop the Alarm (or FM, AM, Weather radio) immediately, tap the POWER
button once to turn it off, and will reset it for the next day.
Notes:
You select the radio station you want to be woken up to(AM, FM or
Weather) before starting to set the alarm time and selecting wake up
mode.
The selected wake alarm will ring again at the same time each day unless
it’s disabled.
SNOOZE FUNCTION
When the alarm sounds, it can be temporarily stopped by pressing the
SNOOZE button. The Alarm indicator will be flashing.
The alarm will be silenced for 8 minutes and then come again.
This manual snooze operation can be repeated again and again when
the selected alarm is sounding.
To turn off the snooze function immediately, tap the POWER button
once.
SLEEP OPERATION
The sleep timer allows you to automatically turn the unit off after a designated
time is reached.
1. To activate the sleep timer, turn the unit on and tap the MODE button to
select AM, FM or Weather band radio.
2. Tap the SELECT button twice and the sleep time “SLP OFF” appears on
the display and OFF is flashing.
3. Repeatedly tap the button to select a sleep time. The unit will turn off
after 10, 20, 30, 40, 50, 60, 70, 80, 90, 100, 110 or 120 minutes. Tap the
SELECT button to confirm the selection, display will change to show clock
and “zZ” after 10 seconds, the unit will play for the selected length of time
then automatically turn off.
12

4. To cancel the sleep timer, tap the SELECT button twice in clock display
mode, remained sleep time will flash. Tap the button until timer shows
“OFF”. Tap the SELECT button, sleep timer indicator “zZ” will disappear
from display immediately.
5. To turn the unit off before the selected length of time, press the POWER
button at any time.
Notes:
1.) To check the remaining sleep time, tap the SELECT button once in clock
display mode.
2.) If you select sleep time in weather band mode, the sleep timer will turn the
unit into Weather Alert mode instead of power off (standby) mode.
LISTENING TO THE RADIO
1. Tap the POWER button to turn on the unit.
2. Tap the MODE button repeatedly to select AM, FM or Weather band. The
radio indicator displays in the sequence below.
3. To manually tune to a desired station, repeatedly tap the tuning button.
FM AM WB ( WB )Alert
4. To automatically search for stations with strong signals, press and hold the
tuning button until the frequency digits on the display begin to scan,
then release the button. The tuner will stop on the first strong signal it finds.
5. Press the VOLUME+ / - button to obtain the desired sound level.
6. Tap the button on the unit to turn unit into standby mode after listenning.
Notes:
Use manual tuning to select weaker stations that might be skipped
during automatic tuning.
If the automatic tuning does not stop on the exact frequency of the
station, for example, it stops on 88.9 MHz instead of 88.8 MHz, use the
manual tuning method to "fine tune" to the exact frequency of the desired
station.
HINTS FOR BEST RECEPTION:
The AM antenna is located inside the cabinet of the unit. If AM reception
is weak, change the position of unit until the internal antenna picks up
the strongest signal.
To insure maximum FM tuner reception, the Telescopic Antenna should
be fully extended and rotated to obtain the best possible station
reception.
13

PRESET RADIO STATIONS
This unit has 10 preset memories for the AM radio and 10 preset for FM.
1. Tap the button to turn the unit ON.
2. Tap the MODE button repeatedly to select AM or FM mode.
3. Tune to the desired radio station either by “manually” or “automatically”
tuning method.
4. Press and hold the memory SELECT button to enable the program function.
The radio preset number “M1” will show on the LCD display and flash.
5. Tap the button to select the preset number you want to assign the
station to.
6. Tap the SELECT button to save the station, preset channel number stops
flashing.
7. Repeat above steps 3-6 to store other stations.
Note: If you select an existing preset memory, the new radio station
frequency will replace the existing one.
RECALLING PRESET MEMORY CHANNELS
1. In AM or FM radio mode, tap the MENU button, memory preset number
appears in display.
2. Tap the button to select the preset memory.
WEATHER BAND
1) Weather Radio
1. Tap the button to turn on the unit.
2. Tap the MODE button to select weather band, the "WB" icon will show on
the display.
3. Tap the tuning button to select the weather band channel for your area.
Note: Weather band channels can only be selected in WB mode but not
Alert mode.
4. Press the VOLUME+/ - button to obtain the desired sound level.
5. To turn the radio off, tap the button.
Weather Band Channel Frequency Table
CHANNEL
CH1
CH2
CH3
CH4
CH5
CH6
CH7
FREQUENCY(MHz)
162.400
162.425
162.450
162.475
162.500
162.525
162.550
14

Note: With regard to the NOAA Weather Band: You need to identify which
channel receives your local weather report. When you change locations
either to another city or state, you may need to choose a different band
to get the local report in that location.
HINTS FOR BEST RECEPTION:
To insure maximum weather band reception, the Telescopic Antenna
should be fully extended and rotated to obtain the best possible station
reception.
Note: 1.) The radio will continue to drain the battery if it's left in Weather
Standby Mode, so it is highly recommended that you use USB
adaptor(not included) to prevent the battery from completely
draining and turning the radio off while in use.
2.) NOAA Weather band is a service broadcast of the U.S.
Government and available in all 50 states, Puerto Rico and the
U.S. Virgin Islands.
3.) The NOAA Weather Service broadcasts a test alert every
Wednesday between 11 am and Noon. To receive the
broadcasts, the radio must be within the range of the local
broadcast site, 10 - 40 miles, depending on terrain and
obstructions.
To learn more:
Or find the weather band channel for your area, go to:
http://www.nws.noaa.gov/nwr/ for NOAA (National Oceanic & Atmospheric
Administration) and http://www.ec.gc.ca/ for Environment Canada.
USING THE NWR S.A.M.E. Function
The S.A.M.E (Specific Area Message Encoder) function allows you to
receive alerts for specific counties, or for certain types of watches,
advisories or warnings, and screen out alerts that are not specific to
your area.
To use the S.A.M.E. function, you must program your county, parish,
independent city or marine area into the radio. Do NOT program your radio for
a louder or clearer station not designated as a S.A.M.E. channel. You will not
receive alerts. Once programmed, your NWR will then alert you only of
weather and other emergencies for the county(s)/ area(s) you chose. NWR
receivers with SAME, alert for emergencies anywhere within the coverage
area of the NWR transmitter, typically several counties, even though the
emergency could be well away from the listener.
When an NWS office broadcasts a warning, watch or non-weather
emergency, it also broadcasts a digital S.A.M.E. code that may be heard
as a very brief static burst, depending on the characteristics of the
receiver. This SAME code contains the type of message, county(s)
affected, and message expiration time.
15

A programmed NWR S.A.M.E. receiver will turn on for that message,
with the listener hearing the 1050 Hz warning alarm tone as an attention
signal, followed by the broadcast message.
At the end of the broadcast message, listeners will hear a brief digital
end-of-message static burst followed by a resumption of the NWR
broadcast cycle.
S.A.M.E. is also used in the Emergency Alert System (EAS). Using S.A.M.E.,
broadcasters may receive NWR warning messages for rebroadcast in
accordance with EAS rules.
To learn more about the S.A.M.E. feature:
Go to: http://www.nws.noaa.gov/nwr/same.htm
County Codes for Programming Your Receiver
To program NWR S.A.M.E. receivers with the proper county(s) and marine
area(s) of choice, you need to know the 6-digit SAME code number. Then
follow the directions in your radio's user's manual. You can get your SAME
number two ways:
Online at the website: http://www.nws.noaa.gov/nwr/indexnw.htm
By telephone at 1-888-NWR-SAME (1-888-697-7263) for a voice menu
PROGRAMMING YOUR S.A.M.E. COUNTY CODES
The SFA1180 Weather Alert Radio is preset to receive “ALL” alerts and
transmissions that are broadcast. If you want to receive all the alerts that are
broadcasting by NOAA, leave the “COUNTY” setting on “ALL”. For more
options, follow the menu selections below.
Note: All programming can only be done when unit is in standby mode.
Customizing the S.A.M.E County Code settings
For “ALL” S.A.M.E. Code (Receive All Counties)
1. Tap the MENU button, and “COUNTY CODE” is shown on the display.
2. Tap the SELECT button to select county code, the default setting is “ALL”,
and should be displayed.
3. Tap the or button to select “ALL” if “SINGLE” or “MULTIPLE” is showing.
4. Once “ALL” is showing, tap the SELECT button to save your setting.
5. Tap the MENU button to exit.
6. The SFA1180 will alert anytime when there is a warning/watch/advisory for
all the counties covered by the NOAA broadcast you are monitoring.
IMPORTANT:
1.) You must to have the S.A.M.E. County Codes for the area you want to
monitor prior to setting the “SINGLE” or “MULTIPLE” codes below.
Please read the “County Codes for Programming Your Receiver”
section of this manual for information on how to obtain the codes
before proceeding.
16

2.) Unit will not receive any weather alert if the unit is in the power off
(standby mode), if the wake up alarm is sounding or if snooze mode is
activated.
For “SINGLE” S.A.M.E. Code (Receive One County)
1. Tap the SELECT button in COUNTY CODE set up menu, current county
code setting displays.
2. If current county code is not in single mode, tap the or button to
select “SINGLE”. Tap the SELECT button, and the display will show digit
county code. The first digit space will start blinking.
3. Tap the button to scroll through digits 0-9 to input the first digit; it should
always be set to “0”.
4. Tap the button to save each digit and move to next digit setting until all
six digits have been set.
5. Tap the SELECT button to save your “SINGLE” county code, then tap the
MENU button to exit.
6. The SFA1180 will only alert you when there is a warning/watch/advisory for
the one county you entered the S.A.M.E. code for, as long as it is within the
area covered by the NOAA broadcast you are monitoring.
For “MULTIPLE” S.A.M.E. Code (Receive Multiple Counties)
1. Tap the SELECT button in COUNTY CODE set up menu, current county
code setting displays.
2. If current county code is not in multiple mode, tap the or button to
select “MULTIPLE”.
3. Tap the SELECT button, and the display will show CODE 01 and blinking.
4. Tap the button to program your 6 digit county code for the first county
you want to add. The first digit space will start blinking.
5. Use the arrow to scroll through digits 0-9 to input the first digit, it should
always be set to “0”.
6. Tap the button to save each digit and advance to next digit until all six
digits have been set.
7. Tap SELECT button to save your “MULTIPLE” code to CODE 01. CODE 02
is blanking. tap the or button to select code location to program or edit
if necessary.
8. Repeat above steps 4-7 to program another county code. You can program
up to 23 county codes.
9. Press SELECT button to save your S.A.M.E code.
10. Tap the MENU button to exit.
11. The SFA1180 will only alert you when there is a warning/watch/advisory
for the individual counties you entered the S.A.M.E. codes for, as long as
it is within the area covered by the NOAA broadcast you are monitoring.
Note: The display will automatically revert to standby mode if no button if
pressed within 30 seconds.
17

Helpful Tips:
The S.A.M.E code is created using the following method:
The first digit is the sub-county code, 0 in most areas.
The second two digits represent the state code.
The last three digits represent the county code.
CHOOSE AN ALERT TYPE (DISPLAY, VOICE or SIREN)
1. Press the MENU button, and “COUNTY CODE” is shown on the display.
2. Tap the or button repeatedly until “ALERT MODE” is shown on the
display.
3. Tap the SELECT button to enter the alert selection mode.
4. Tap the or button to select “DISPLAY”, “VOICE” or “SIREN” alert
mode and then tap the SELECT button again to confirm.
6. When an alert is received you are able to silence the alert manually by
tapping the MSG/SNOOZE button. The unit will sound again the next time
an alert is received.
ALERT TYPE OPTIONS
“DISPLAY” Alert = No audible sound will be heard when an alert is
received, and only a text alert will scroll on the display.
EXCEPTION: When the SFA1180 is set to “DISPLAY” Alert, the alert
tone siren will still sound if one of the alerts marked with an asterisk “ * ”
on the “SELECTABLE ALERT REFERENCE CHART” below is received.
“VOICE” Alert = The alert tone siren will sound for 8 seconds, and
then automatically switch to the NOAA weather broadcast. The NOAA
broadcast will continue until the NWR end-of-message code is
received.
“SIREN” Alert = The alert tone siren will sound for 5 minutes or until
you press any button to silence it. The volume of alert tone siren is
fixed and cannot be adjusted with the VOLUME +/- control button.
ALERT INDICATOR LIGHTS
The Alert indicator lights on front panel of the unit will flash whenever an alert
is received and then stay on solid for the duration of the alert. The indicators
will light in different colors based on the type of alert received.
WARNING Alert received – the Alert indicator lights flash RED, and then
stay lit while the warning is in effect.
ADVISORY Alert received – the Alert indicator lights flash YELLOW,
and then stay lit while the advisory is in effect.
WATCH Alert received – the Alert indicator lights flash ORANGE, and
then stay lit while the watch is in effect.
After an alert is received, tap any button on the unit to stop LED flashing. LED
changes to light steadily. Tap the MSG/SNOOZE button repeatedly to view
activating alerts if any. you can temporarily turn off the indicator lights by
press and hold the MSG/SNOOZE button on the unit for 3 seconds. The alert
message will continue to scroll on the display until the alert expires. The Alert
indicator lights will turn on again when another alert is received.
18
5. Tap the MENU button to exit.

DEFEATING AN ALERT TONE
1. Press the MENU button, and “COUNTY CODE” is shown on the display.
2. Tap the or button repeatedly until “DEFEAT SIREN” is displayed.
3. Tap the SELECT button to enter selection mode.
4. Tap the or button to scroll through pre-defined event codes.
5. Tap the button to choose an event code that is relevant to your area, and
that you want to manually “ENABLE” or “DISABLE”.
“ENABLE” will turn that event alert ON.
“DISABLE” will turn that event alert OFF.
6. Repeat above steps 4-5 if there are more event codes you want to modify.
7. Tap the SELECT button to save the change.
8. Tap the MENU button to exit.
Note: The DEFEAT ALERT TONE feature relates to an event, which may
occur in your specific area, but might not be relevant to where you live.
Example: SMW= Special Marine Warning. If you live in an area near a large
body of water, and you are far enough away that those conditions will not
affect your area, you can choose to DISABLE that alert. When disabled, the
SFA1180 will ignore Special Marine Warnings that are broadcast by NOAA.
See the “SELECTABLE ALERT REFERENCE CHART” section in this
manual for a list of the pre-defined events loaded in this radio. The list is in
alphabetical order to determine which events can be disabled. Events
marked with an asterisk “ * ” on the “SELECTABLE ALERT REFERENCE
CHART” cannot be disabled.
NOAA WEEKLY ALERT TESTS
The default setting for the weekly NOAA alert test signal is “OFF (DISABLED)”.
If you wish to receive the weekly test alert signal from NOAA, you need to
manually “ON (ENABLE)” the “Required Weekly Test” (RWT) setting under the
“DEFEAT SIREN” menu. See the “DEFEATING AN ALERT TONE” section in
this manual for more information on how to ENABLE the setting. See the
“SELECTABLE ALERT REFERENCE CHART” section in this manual for more
information on other settings available.
TESTING THE ALERT TONE SIREN
1. Press the MENU button, and “COUNTY CODE” is shown on the display.
2. Tap the or button until “TEST” is displayed.
3. Tap the SELECT button to sound the alert tone siren.
4. Tap the SELECT again to silence the alert tone siren.
5. Tap the MENU button to exit.
19
/