Page is loading ...

TwisterPro
AUDIO / VIDEO / DATA / IR TWISTED PAIR
(COVERS ALL TPRO TRANSMITTER AND RECEIVER MODELS)
INSTALLATION AND OPERATING GUIDE
LIT1284
43942
2
PROPRIETARY INFORMATION
All information in this manual is proprietary to and the
property of FSR inc. This publication is protected by the Federal
Copyright Law, with all rights reserved. No part of this document
may be reproduced, transcribed, or transmitted, in any form or by
any means, without prior explicit written permission from FSR
Inc.
Operators Safety Summary
The general safety information in this summary is for operating
personnel.
Read Instructions Read and understand all safety and operating
instructions before using this equipment. Keep the instructions
handy.
Do Not Remove Covers or Panels There are no user-serviceable
parts within the unit. Removal of the top cover will expose
dangerous voltages. To avoid personal injury, do not remove the
top cover. Do not operate the unit without the cover installed.
Power Source This product is intended to operate from the
specifi ed wall plug-in transformer. Do not use any other power
source.
Use the Proper Power Cord Use only the power cord and
connector specifi ed for your product. Use only a power cord that is
in good condition. Refer cord and connector changes to qualifi ed
service personnel.
Do Not Operate in Explosive Atmospheres To avoid explosion,
do not operate this product in an explosive atmosphere.

3
INTRODUCTION
The TwisterPro™ UTP Transmitter / Receiver System allows video, ste-
reo audio, RS-232 data and IR signal transmission over ordinary low cost
CAT-5, 5e and 6 cable. This system offers the highest level of signal
integrity. These high quality devices ensure reliable, error free transmis-
sion that is immune to interference from electrical noise. Cable runs of
up to 1000 feet are within the capabilities of the system.
There are wall plate style transmitters (1 gang and 2 gang) and receiv-
ers (2 gang) offered in three colors; black, white, and ivory. Matching
Decora™ trim rings are included for stand alone use or the units can be
populated along with FSR’s IPS component and plates for a complete
interface solution. There are also “brick” style housing versions that can
be used on any surface, or rack mounted using the accessory rack kits if
preferred. (See TwisterPro™ accessories and ordering info).
TPRO receivers with skew compensation adjustments are optional and
help adjust for mis-convergence of the red, green and blue video signals
that can occur as a result of inherent delay caused by differences in cable
twist lengths.
The system can be powered at either the transmitter or receiver end by
the optional power supply(s). If a TPRO- HUB is used, the hub with it’s
included power supply, will power the other components in the system.
This 1 in 8 out hub allows full expandability for demanding applications.
Multiple hus can be cascaded to achieve a maximum of 512 outputs.
FEATURES
RGB Video Transmission
• HD-15 female connectors for video input and output
• CAT-5 connections are via RJ-45 Connectors (EIA/TIA-568B)
• Video resolutions up to 1920 x 1080 (1080p)
• Cable skew compensation adjustments on -S model receiver
• Adjustable gain control on front panel
4
RS-232 Data Transmission
• DB-9 female connectors (3 pin Phoenix on brick models) for the
inputs and male for outputs (optional for TPRO-TX wallplate
models)
• UTP connections are via RJ-45 Connectors (EIA/TIA-568B)
• Compatible with RS-232 standards
• UL and CSA approved external power source (wall plug-in)
• Simplex RS-232 up to 19.2k baud
• LED indication of RS232 data activity
IR Control Data Transmission
• Compatible with most IR devices
• Custom carrier frequencies are available per customer request
• Extends IR control up to 1000 feet
• Normal and high output emitter power level settings
• High output power level settings up to 60mW allows for multiple
emitter connections.Emitters sold seperately
• Transmitters feature an integrated IR sensor in addition to hard-
wired input option
• LED indication of IR data activity
General
• Units can be powered at either end or through optional hub
• Over-current sensing with LED indication
• Video, RS-232 and IR LED indicators
• Optional 1 in 8 out TPRO-HUB with power supply available
APPLICATIONS
• Boardrooms • Houses of Worship• Control Rooms
• Classrooms• Staging and Rental •Libraries
ACCESSORIES
• RK-1 Rack mounting kit
• RK-2 Rack mounting shelf

5
T-PRO SERIAL
ADAPTER
REAR PANEL CONNECTION
POWER INPUT
INPUT
STEREO AUDIO INPUT
OUTPUT
STEREO AUDIO
OUTPUT IR OUTPUT
UTP Input
to TPRO
Receiver
UTP
PWR
OUT
Red =
Overload
Local Monitor Out
Computer Video In
Power 24VDC
.09A+TPRO-RX
Audio In
L Gnd R
IR
In Gnd In
RS232
OUTPUT
STEREO AUDIO
IR OUTPUT
OUTPUT
STEREO AUDIO
IR OUTPUT
OUTPUT
STEREO AUDIO
IR OUTPUT
OUTPUT DEVICE
EXTERNAL IR
(BY CUSTOMER)
INPUT FOR
RS-232 OUTPUT
RS-232
OUTPUT
RS-232
OUTPUT
RS-232
RS-232
REAR PANEL
POWER
24VDC, 2.7A MAX.
UTP Input
from TPRO
Transmitter
UTP
PWR
OUT
Red =
Overload
Serial Out
Computer Video Out
Power 24VDC
.19A+TPRO-TX
Out
L Gnd R
Audio Out
IR
UTP Input
from TPRO
Transmitter
UTP
PWR
OUT
Red =
Overload
Serial Out
Computer Video Out
Power 24VDC
.19A+TPRO-TX
Out
L Gnd R
Audio Out
IR UTP Input
from TPRO
Transmitter
UTP
PWR
OUT
Red =
Overload
Serial Out
Computer Video Out
Power 24VDC
.19A+TPRO-TX
Out
L Gnd R
Audio Out
IR
MONITOR
RECEIVER
MONITOR
RECEIVER
MONITOR
RECEIVER
MONITOR
RECEIVER TPRO-HUB
TPRO-HUB
PC
(POWERS ALL DEVICES)
HUB POWER SUPPLY
(POWERS ALL DEVICES)
HUB POWER SUPPLY
TRANSMITTER
NO MORE THAN 3 HUBS DEEP
INPUT FOR
OPTIONAL - FSR P/N
(REAR PANEL)
PS-24DC-500MA
OPTIONAL - FSR P/N
POWER INPUT (REAR PANEL)
PS-24DC-500MA
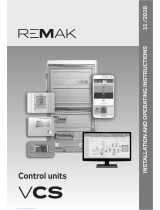
Typical application with TPRO single Transmitter and Receiver
Typical application using multiple TPRO-HUB's
VIDEO
RS-232
(SEE SPECS FOR
CABLE LENGTHS)
PROJECTOR
PROJECTOR
STEREO AUDIO OUTPUT
IR-EC2-6
OPTIONAL
EMITTER
TPRO-TXWP TPRO-RXWP
CAT5 CABLE
UTP Input
from TPRO
Transmitter
UTP
PWR
OUT
Red =
Overload
Serial Out
Computer Video Out
Power 24VDC
.19A+TPRO-TX
Out
L Gnd R
Audio Out
IR Woodland Park,
NJ 07424
244 Bergen Blvd.
Model
TPRO-HUB
12 4
35678
OUTPUT INPUT POWER
24VDC, 2.7A MAX.
Woodland Park,
NJ 07424
244 Bergen Blvd.
Model
TPRO-HUB
12 4
35678
OUTPUT INPUT
COMPUTER VIDEO IN
POWER/
VIDEO
DATA
AUDIO IN IR SENSOR
COMPUTER
VIDEO OUT
SERIAL OUT
LR
AUDIO OUT
POWER/
VIDEO DATA
IR OUT
S
E
L
E
C
T
G
A
I
N
B
O
O
S
T
O
N
V
IR
VIDEO
AUDIO
PC/LAPTOP
CONTROL
IR REMOTE
OR
RS-232 OUTPUT DEVICE
EXTERNAL IR
(BY CUSTOMER)
OPTIONAL
6
Installation and Operation
Mount the units as appropriate for the particular installation.
TPRO Brick style models:
There are #6-32` tapped holes on the top and bottom of the TPRO for
mounting. Use #6-32 screws that protrude through no longer than 1/2".
There are also rack kits available from FSR for mounting in a standard
19” rack mount. See “accessories” section for FSR part numbers and
ordering information.
TPRO Wallplate style models:
The TPRO resembles a decora style duplex outlet shape and will mount
into a standard gang box. Connect the RJ-45 jack and power supply
leads BEFORE mounting the unit in the gang box. Always check for
cable clearance while mounting.
The input power connector is polarity sensitive and depending on the
installation, should be connected to the transmitter, receiver or hub. Do
not plug in the supplies until all cables are tested.
Cabling Installation details:
RECOMMENDED
TRANSMISSION RANGE
0-1000 ft with a single power supply (Up
to 600’ when powered at transmitter. Up
to 1000’ when powered at receiver)
When using a TPRO-HUB with included
power supply:
The maximum distance to a
transmitter is 1000’
The maximum distance to a receiver
is 600’ *
* A distance of up to 1000’ can be
achieved by adding an additional power
supply at the receiver
Install and terminate the UTP cable, taking note of the following:
The cable must be terminated using the EIA/TIA-568B standard pairing.

7
Where possible, the use of pre terminated, pretested cables is highly rec-
ommended. If fi eld termination is required, be sure to use a commercially
available cable tester to confi rm the proper wiring.
While Cat 5/5E cables are the most commonly used with the system,
other types of UTP cable can be used successfully. One of the most im-
portant cable parameters affecting the image quality of component video
systems (RGB/RGBHV/YUV, etc.) transmitted over the Twister is delay
skew. Delay skew in a cable will result in a loss of color convergence at
the display.
The use of generic CAT 5/5E/6 cable will generally give acceptable
results in short to medium length applications (up to 300’). For longer
distances, or where the highest image quality is paramount, use the skew
compensated model receivers. USE OF BELDEN NANOSKEW OR
OTHER NON-CATEGORY CABLE IS NOT RECOMMENDED. The
crosstalk on these types of cables is very high resulting in poor color
isolation, and video noise from the audio transport channel.
Once the interconnect cables are tested, connect the system as per the
diagram and perform the fi nal operation check.
LED SIGNAL STATUS INDICATION (TRANSMITTERS AND
RECEIVERS)
POWER/VIDEO
GREEN: Unit receives power, on-board
voltage regulator is operational, unit
receives video signal.
AMBER: Unit receives power, on-board
voltage regulator is operational, no video
source is connected or source is off.
(RGBHV sources only))
DATA GREEN: RS232 activity (blinking)
YELLOW: IR activity (blinking)
POWER FAULT
OFF: Unit receives power from the remote
source.
GREEN: Unit receives power from the
local source.
RED: Power supply overload possibly due
to the miswired UTP cable. Check and
correct UTP connection.
8
RS-232 Installation
Connect the RS-232 output of the PC or control system to the TPRO
transmitter module to the “SERIAL IN” port. Connect the peripheral to
the TPRO “SERIAL OUT” DB-9 male port. (See pinout).
IR Control Installation
Confi rm and observe polarity on all external devices before proceed-
ing.
An integrated IR sensor is provided on all TPRO transmitter models. If
an external IR input from a control system is required, connect the IR
output device to the 3.5mm jack or 3 pin pluggable screw down terminal
connector (depends on model) on the TPRO Transmitter using the wiring
diagram provided.
Connect the IR emitter(s) to the 3.5mm jack or 3 pin pluggable screw
down terminal connector (depends on model) on the TPRO Receiver us-
ing the wiring diagram provided. Emitters are available from FSR. (Use
FSR IR-EC1-6 single or IR-EC2-6 dual emitter accessory.)
Once the interconnect cables are tested, power up the link and perform a
fi nal operation check.
Audio wiring:
See the pinouts for wiring details.
Connect the audio source to the TPRO Transmitter via the 3.5mm stereo
audio jack or 3 pin pluggable screw down terminal (depends on model)
on the face of the unit. Connect the TPRO Receiver’s 3 pin pluggable
screw down terminal or RCA jacks (depends on model) audio output to
the house sound system.
System Calibration and Adjustments
Setting the Boost Switch:
The Boost” switch is located on the right front of the TPRO receiver unit.
For Cat5 cable runs less than 200’, leave the “Boost” dip switch in the
OFF (UP) position. For 200-1000’ runs place the “Boost” dip switch in
the ON (DOWN) position.
System Calibration setup:
For best results the following test patterns will be required:
• A crosshatch pattern with one pixel wide vertical and one pixel

9
high horizontal lines.
•Standard SMPTE color bars.
•A full width one on/one off burst pattern.
These test patterns will need to be output from the source equipment
(computer, DVD player, etc.) that you intend to connect to the TPRO
Transmitter.
If possible, perform a display calibration without the TPRO by connect-
ing the source directly to the display device using a short (less than 25
foot) video cable. Use the burst pattern to set the display size, phase and
pitch as per the display manufacturers instructions. Most displays will
have an “auto sync” function that will get you close, but might require
some additional fi ne-tuning.
Once the display is set, connect the source and display to the TPRO sys-
tem components.
GAIN adjustment:
Set the GAIN adjustment to the minimum (full CCW) setting. If using
the TPRO skew compensated receiver, make sure the delay settings for R,
G, and B are all at “0”.
Using the crosshatch test pattern, slowly increase the GAIN setting until
the vertical lines are nearly as bright as the horizontal lines. In general,
you will have to set the vertical lines a little dimmer than the horizontal
or you will have too much peaking.
You can check for over peaking by using the SMPTE color bars and
looking for two or three overly bright vertical lines at the beginning of
each color transition. If this occurs, back the GAIN pot off slightly.
Once you are happy with the EQ setting, set the delay skew if available.
SKEW adjustments (Skew models only):
The object of the delay skew adjustment is to merge the separate red,
green, and blue vertical lines into a solid white line.
Using the crosshatch test image, identify the left most color in each verti-
cal line of the image.
10
Select the “Next” push buttons on the TPRO to “toggle” to this color.
The LED for the selected color will light.
Now use the “Left” and “Right” push buttons as needed to merge this
color with the right most vertical line in the image. The color LED will
begin to fl ash when the left or right push button reaches the end of it’s
range. Setting are automatically stored after 5 seconds of no changes.
Then adjust the remaining color line to merge with the fi rst two lines.
Once you have adjusted the skew, use the burst pattern to fi ne-tune the
display’s phase adjustment.
These last two steps may be repeated to optimize the image quality.

11
HD-15 Connector Pinout
HD15 connector
1.Red / Pr / R-Y
2.Green / Y
3.Blue / Pb / B-Y
4.ID2 (Grounded)
5.NC
6.GND (Red)
7.GND (Green)
8.GND (Blue)
9.NC
10.GND
11.GND
12.NC
13.H sync (or composite sync for RGBS)
14.V sync
15.NC
Audio Pinout
LEFT
GROUND
RIGHT
LEFT
RIGHT
GROUND
AUDIO IN IR SENSOR
LEFT
GROUND
RIGHT
Power 24VDC
.09A+TPRO-RX
Power 24VDC
.19A+TPRO-TX
Out
L Gnd R
Audio Out
IR
LEFT
GROUND
RIGHT
AUDIO OUT
LR
Wall plate style Transmitter Wall plate style Receiver
Brick style Transmitter Brick style Receiver
Audio In
L Gnd R
IR
In Gnd In
RS232
15
1115 6
HD-15 Input Connector Pinout
(as viewed from rear of unit)
12
IR
EMITTER
(CUSTOMER
PROVIDED)
IR OUT
1/8” MINI JACK CONNECTOR
ON BRICK OR WALLPLATE STYLE
RECEIVERS
1 W/Orange
2 Orange
3 W/Green
4 Blue
5 W/Blue
6 Green
7 W/Brown
8 Brown
EIA/TIA568B
Wiring Standard
RJ-45 JACK FRONT VIEWS
Use the EIA / TIA 568B wiring standard only. Do not use a cross-
over type cable. A mis-wired cable could destroy the unit and void
the warranty.
External IR Sensor and Emitter Pinout
TX
IR INPUT
+5
GND
IR
CONTROL SYSTEM
(CUSTOMER PROVIDED)
IR CONTROL SYSTEM
OUTPUT IR CONTROL SYSTEM
OUTPUT
CONNECTOR ON REAR OF ONE GANG
WALL PLATE STYLE TRANSMITTER
CONNECTOR ON BRICK STYLE TRANSMITTER
IR
In Gnd In
RS232
1 W/Orange
2 Orange
3 W/Green
4 Blue
5 W/Blue
6 Green
7 W/Brown
8 Brown

13
DIMENSIONS
1.70
4.09
1.12.27
COMPUTER VIDEO IN
POWER/
VIDEO
DATA
AUDIO IN
2.72
.95
.27
4.09
3.56
IR SENSOR
2.69
Computer A/V, IR, RS-232 Receiver
Power/
Video Data Gain Boost
Vid IR
On
Gain Boost
Vid IR
On
Computer A/V, IR, RS-232 Receiver Computer A/V, IR, RS-232 Transmitter
Power/
Video Data
Power/
Video Data
Picture Adjust
Skew Compensation
Left Right Next Channel
UTP Input
from TPRO
Transmitter
UTP Input
from TPRO
Transmitter
UTP
PWR
OUT
Red =
Overload
UTP
PWR
OUT
Red =
Overload
Serial Out
Computer Video Out
Serial Out
Computer Video Out
Power 24VDC
.19A+TPRO-TX
Out
L Gnd R
Audio
Power 24VDC
.12A+TPRO-TX
Out
L Gnd R
Audio Out
IR
Out
IR
TPRO-TXWP TPRO-RXWPD/TPRO-RXWPDS
4.22
1.59
APPROXIMATE DEPTH: 4.25
TPRO-RXD
4.22
1.59
4.22
1.59
APPROXIMATE DEPTH: 4.25
TPRO-RXDS
APPROXIMATE DEPTH: 4.25
TPRO-TXD
UTP Input
to TPRO
Receiver
UTP
PWR
OUT
Red =
Overload
Local Monitor Out
Computer Video In
Power 24VDC
.09A+TPRO-RX
Audio In
L Gnd R
IR
In Gnd In
RS232
14
RGB VIDEO INPUT
Connector 1-HD-15 female connector
Signal Type 1 RGBHV, RGBS, RGsB, RsGsBs,Component, S-video or Composite
Maximum Resolution 1920 X 1080 (1080P)
Impedance 75Ω
Level (nominal) Analog 0.7V p-p
Level (maximum) +-1.0 V
RGB VIDEO OUTPUT
Connector 1-HD-15 female connector (Brick models have an additional HD-15 loopback connector)
Signal Type Same as input
Gain Unity
Impedance 75Ω
Sync output 5V into Hi Z, 2.2V into 75Ω
AUDIO INPUT
Connector 1-3.5 mm stereo mini jack (wallplates), 3 pin Phoenix plug (bricks)
Signal type Stereo unbalanced
Level (nominal) 0.25V RMS -10dBm
Level (maximum) 1.1V RMS, +3dBm
Impedance 50 kΩ
Encoding Full stereo 24 bit, 96kHz sample rate
Frequency response 20Hz-15kHz +-0.5dB
AUDIO OUTPUT
Connector Wallplate model receivers 2 RCA jack connectors
Brick model receivers 3 pin pluggable screw terminals
Signal type Stereo unbalanced
Impedance 50Ω(Intended to drive a 600Ωor greater load)
Gain Unity +- 1.5dB
CONTROL ADJUSTMENTS
Delay Adjust Independent for R, G and B delay (Skew models only)
Delay range 0-62 ns (Skew models only)
Video Boost Switch Dip switch (OFF 0-800’/ON 200-1000’)
Gain control Manual combined control for RGB
RS-232 DATA INPUT
Number/Type
One DB-9 female connector. (3 pin Phoenix plug on brick models) DCE type connection for
direct connection to a PC serial port included on two gang transmitters only. Must order
TPRO-Serial DB-9 accessory harness for one gang transmitters.
Handshaking Local loopback only (Models with DB-9 connectors only)
RS-232 type Unidirectional (data transmission from transmitter to receiver only)
RS-232 DATA OUTPUT
Number/Type One DB-9 male connector. DTE type connection for direct connection to peripheral.
Data Rate 0-19.2k baud
INFRARED INPUT
Number/Type
Both models have internal sensor logically OR’d with hardwired input.
T-PRO TX brick models One 4 pin pluggable Phoenix connector
T-PRO-TX wallplate models One C-grid SL 5-pin connector on the back of the unit.
Compatibility Compatible with most IR outputs designed to drive an IR emitter LED.
INFRARED OUTPUT
Number/Type One3.5 mm mini jack, center positive. All TPRO-RX models
(Use FSR IR-EC1-6 single or IR-EC2-6 dual emitter accessory.)
Output Switch Dip switch (Normal 12 mW/High 60mW)
Carrier Range 40 kHz, custom frequencies available per request.
POWER REQUIREMENTS
TPRO-TX Transmitters [email protected]
Power supplies are optional. Use FSR PS-24DC-500MA
MECHANICAL
Model Dimensions (inches) Shipping weight lbs.
Transmitter enclosure Brick 4.22 X 1.59 X 4.10
Wall plate 1.70 X 4.09 X 1.46
Receiver enclosure Brick 4.22 X 1.59 X 4.10
Wall plate 3.56 X 4.09 X 1.29
GENERAL
UTP cable wiring standard/ type EIA / TIA-568B CAT5, 5E, 6
0-1000 ft with a single power supply (Up to 600’ when powered at transmitter. Up to 1000’
Recommended transmission range when powered at receiver. When using a TPRO-HUB with included power supply:
The maximum distance to a transmitter is 1000’. The maximum distance to a receiver is 600’ *
* A distance of up to 1000’ can be achieved by adding an additional power supply at the receiver
TECHNICAL SPECIFICATIONS
3

15
REGULATORY COMPLIANCE
The Power Adapter has been tested for compliance with: UL, CSA and CE.
WARRANTY POLICY
This product is warranted against failures due to defective parts or faulty workmanship for a period of
one year after delivery to the original owner. During this period, FSR will make any necessary repairs or
replace the unit without charge for parts or labor. Shipping charges to the factory or repair station must
be prepaid by the owner, return-shipping charges, via UPS / FedEx ground, will be paid by FSR.
This warranty applies only to the original owner and is not transferable. In addition, it does not apply
to repairs done by other than the FSR factory or Authorized Repair Stations.
This warranty shall be cancelable by FSR at its sole discretion if the unit has been
subjected to physical abuse or has been modifi ed in any way without written authorization from FSR.
FSR’s liability under this warranty is limited to repair or replacement of the defective unit.
FSR will not be responsible for incidental or consequential damages resulting from the use or misuse
of its products. Some states do not allow the exclusion of incidental or consequential damages, so the
above limitations may not apply to you. This warranty gives you specifi c legal rights, and you may also
have other rights which vary from state to state.
Warranty claims should be accompanied by a copy of the original purchase invoice
showing the purchase date (if a Warranty Registration Card was mailed in at the time of purchase, this
is not necessary). Before returning any equipment for repair, please read the important information
on service below.
SERVICE
Before returning any equipment for repair, please be sure that it is adequately packed and cushioned
against damage in shipment, and that it is insured. We suggest that you save the original packaging and
use it to ship the product for servicing. Also, please enclose a note giving your name, address, phone
number and a description of the problem.
NOTE: All equipment being returned for repair must have a Return Authorization (RMA)
Number. To get a RMA Number, please call:
FSR Service Department (973-785-4347).
Please display your RMA Number prominently on the front of all packages.
Contact Information:
FSR Inc.
244 Bergen Boulevard,
Woodland Park, NJ 07424
Tel: (973) 785-4347 · Fax: (973) 785-4207
E-Mail: [email protected] · Web: http://www.fsrinc.com
/