Page is loading ...

Universal Mount Kitty Sill with Hood™
Care & Instructions
Thank you for purchasing the Universal Mount Kitty Sill with Hood™ designed by K&H Pet Products®.
When used correctly, your Kitty Sill should provide hours of comfort and window viewing for your cat.
REV0_04-04-18
Made in China
K&H Pet Products, Central Garden & Pet
Colorado Springs, CO
www.khmfg.com | (719) 591-6950
Figure 1
Figure 4
Figure 5
Finished
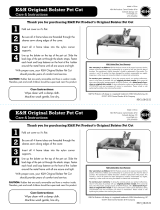
Lay all parts out on a at surface. Locate the 3 suction cups and
clean them to ensure proper adhesion to your window.
Now locate the 3 clear plastic locking pins and nd the 3 open
holes in the frame located on the back of the Kitty Sill.
Insert a suction cup into one of the open holes. Holding the suction
cup in place, insert a plastic locking pin into the side of the suction
cup as shown. See Figure 1. Push the pin all the way through the
hole until it locks into place. Once the pin is locked into place you
should not be able to remove it from the suction cup. The suction
cup is now locked into place on the Kitty Sill frame.
Repeat the above steps with the remaining two suction cups until
all 3 are installed onto the frame of your Kitty Sill.
Next, turn the Kitty Sill upside down and locate the two legs.
See Figure 2 for the direction in which the legs should be
installed on the bottom. Also, make sure the elastic strap is placed
under the Kitty Sill to keep your cover in place. See Figure 2.
Insert the pegs into the holes and pull toward you until the leg snaps
snuggly into place. See directional arrow in Figure 3. You should
hear a resounding snap. Repeat these steps with the second leg
making sure to use the same hole placement as the rst side.
Next, hold the Kitty Sill up to your window to be sure that it's level.
If the Kitty Sill is not level, snap the legs into another position.
Make sure the leg is facing in the correct direction with its 3 pegs
facing toward you and the back of the Kitty Sill facing away from
you. See Figure 2 and Figure 3.
VERY IMPORTANT: Using glass cleaner, thoroughly clean
and dry the window that will accommodate your Kitty Sill.
Press each of the 3 suction cups attached to the base rmly
against the window. See Figure 4. Re-adjust them if needed.
Lastly, bring the hood up to the window as shown and rmly press
its two suction cups against the glass. See Figure 5. Re-adjust
if needed. At this time, make any further adjustments to the legs,
hood and suction cups to achieve a level surface for your kitty.
Congratulations! You have now given your kitty an innovative K&H
Kitty Sill that will provide them with hours of comfort and enjoyment
for many years to come.
1
2
3
4
5
6
7
8
9
10
11
USE INSTRUCTIONS
Please read all instructions carefully before installation.
INSTALLING YOUR KITTY SILL ONTO A WINDOW:
Figure 2
Back of Kitty Sill
Figure 3
Pull leg
towards you
3 pegs facing
towards you
Caution: As with any suction cup, debris, temperature changes, sunshine and excessive
use can weaken the holding power. We recommend removing the suction cups at least
once per month to clean the window area, clean the suction cups and then re-install
them for optimal strength.
Care Instructions:
Remove cover. Hand wash only & line dry.
Back of Kitty Sill
Elastic strap
Back of Kitty Sill facing
away from you
/