Page is loading ...

www.vmacair.comwww.vmacair.com
Installation Manual for VMAC
System
V400018
2020+ Ford Transit Connect
2.0 L Gas (I4)


VMAC - Vehicle Mounted Air Compressors
VMAC Technical Support: 888-241-2289
VMAC Knowledge Base: kb.vmacair.com
1
Table of Contents
Safety ..............................................................3
Warranty ...........................................................4
General Information ................................................6
Preparing for Installation ............................................ 8
Installing the Main Bracket, Compressor, and Drive Belts ...........13
Installing the Bulkhead Fittings .................................... 17
Hose Requirements ............................................... 22
Connecting the Hoses ............................................ 23
Installing the Waste Heat Air Separator Package (WHASP) Tank .. 28
Adding Oil to the System ......................................... 34
Installing the Control System ...................................... 35
Air Receiver Tank ................................................. 50
Recommended Accessories ........................................51
Completing the Installation ....................................... 52
Testing the Installation ............................................ 54
Performance Testing and System Adjustments .................... 57
Digital Throttle Control Operation and Adjustments ............... 58
Accessory Products from VMAC ................................... 60
Warranty Registration ............................................ 68

VMAC - Vehicle Mounted Air Compressors
VMAC Technical Support: 888-241-2289
VMAC Knowledge Base: kb.vmacair.com
2
Document: 1930447
Changes and Revisions
Revision Revision Details Revised by
Checked by
Implemented
Eng. Tech. Qual.
Mech. Elec.
AInitial Release MSP CAM AJH RB LPH 8 June 2021
B ECN: 22-012 Update pressure switch instructions MSP N/A AJH RB N/A 25 Jan. 2022
Additional Application Information
• Use of an air receiver tank (minimum 6 USG) is required with this application.
• 2019+ Ford Transit Connect 2.0 L gas (I-4).
• Not compatible with 2.5 L engine.
Important Information
The information in this manual is intended for certified VMAC installers who
have been trained in installation and service procedures and/or for anyone with
mechanical trade certification who has the tools and equipment to properly and
safely perform the installation or service. Do not attempt installation or service
without the appropriate mechanical training, knowledge and experience.
Follow all safety precautions. Any fabrication for correct fit in modified vehicles
must follow industry standard “best practices”.
Notice
Copyright © 2021 VMAC Global Technology Inc. All Rights Reserved. These
materials are provided by VMAC for informational purposes only, without
representation or warranty of any kind, and VMAC shall not be liable for errors
or omissions with respect to the materials. The only warranties for VMAC
products and services are those set forth in the express warranty statements
accompanying such products and services, if any, and nothing herein shall be
construed as constituting an additional warranty. Printing or copying of any page
in this document in whole or in part is only permitted for personal use. All other
use, copying or reproduction in both print and electronic form of any part of this
document without the written consent of VMAC is prohibited. The information
contained herein may be changed without prior notice.
Printed in Canada
Registered Trademarks
All trademarks mentioned in this manual are the property of their respective
owners. VMAC’s use of manufacturers’ trademarks in this manual is for
identification of the products only and does not imply any affiliation to, or
endorsement of said companies.
Torx® is a registered trademark of Acument Intellectual Properties, LLC
Lisle® is a registered trademark of the Lisle Corporation.
Loctite®, Loctite® 242 and Loctite® 567 are registered trademarks of Henkel AG &
Company KGaA.
Eaton Aeroquip® is a registered trademark of EATON AEROQUIP INC.
Ford® is a registered trademark of Ford Motor Company.

VMAC - Vehicle Mounted Air Compressors
VMAC Technical Support: 888-241-2289
VMAC Knowledge Base: kb.vmacair.com
3
Important Safety Notice
The information contained in this manual is based on sound engineering principles,
research, extensive field experience and technical information. Information
is constantly changing with the addition of new models, assemblies, service
techniques and running OEM changes. If a discrepancy is found in this manual,
contact VMAC Technical Support prior to initiating or proceeding with installation,
service or repair. Current information may clarify the issue. Anyone with knowledge
of such discrepancies, who proceeds to perform service and repair, assumes all
risks.
Only proven service procedures are recommended. Anyone who departs from the
specific instructions provided in this manual must first ensure that their safety and
that of others is not being compromised, and that there will be no adverse effects
on the operational safety or performance of the equipment.
VMAC will not be held responsible for any liability, consequential damages, injuries,
loss or damage to individuals or to equipment as a result of the failure of anyone
to properly adhere to the procedures set out in this manual or standard safety
practices.
Safety should be the first consideration when performing any service operations.
If there are any questions concerning the procedures in this manual, or more
information is required, please contact VMAC Technical Support prior to beginning
work.
Safety Messages
This manual contains various warnings, cautions and notices that must be
observed to reduce the risk of personal injury during installation, service or repair
and the possibility that improper installation, service or repair may damage the
equipment or render it unsafe.
Safety
This symbol is used to call attention to additional instructions or
special emphasis on a specific procedure.
This symbol is used to call attention to instructions on a specific
procedure that if not followed may damage or reduce the useful life
of the compressor or other equipment.
This symbol is used to call attention to instructions concerning
personal safety. Watch for this symbol; it points out important
safety precautions, it means, “Attention, become alert! Your
personal safety is involved”. Read the message that follows and
be aware of the possibility of personal injury or death. As it is
impossible to warn of every conceivable hazard, common sense and
industry standard safety practices must be observed.

VMAC - Vehicle Mounted Air Compressors
VMAC Technical Support: 888-241-2289
VMAC Knowledge Base: kb.vmacair.com
4
VMAC Standard Warranty (Limited)
For complete warranty information, including both VMAC Standard
Warranty (Limited) and VMAC Lifetime Warranty (Limited)
requirements, please refer to our current published warranty located
at: www.vmacair.com/warranty
If you do not have access to a computer, please contact us and we
will be happy to send you our warranty.
VMAC’s warranty is subject to change without notice.
VMAC Lifetime Warranty (Limited)
A VMAC Lifetime Limited Warranty is offered
on the base air compressor only and only on
UNDERHOOD, Hydraulic Driven, Transmission
Mounted, Gas and Diesel Engine Driven Air
Compressors, Multifunction Power Systems, and
other products as defined by VMAC, provided that
(i) the purchaser fully completes and submits a
warranty registration form within 3 months of purchase, or 200 hours of operation,
whichever occurs first; (ii) services are completed in accordance with the Owner’s
Manual; (iii) proof of purchase of applicable service kits are made available to
VMAC upon request.
The VMAC Lifetime Warranty is applicable to new products shipped on or after
1 October, 2015.
Warranty Registration
The VMAC warranty registration form is located near the back of this manual. This
warranty registration form must be completed and sent to VMAC at the time of
installation for any subsequent warranty claim to be considered valid.
There are 4 ways the warranty can be registered with VMAC:
www.vmacair.com/warranty
warranty@vmacair.com
(877) 740-3202
VMAC - Vehicle Mounted Air Compressors
1333 Kipp Road, Nanaimo, BC, Canada V9X 1R3
LIFETIME
A
I
R
I
N
N
O
V
A
T
E
D
T
R
U
S
T
S
E
R
V
I
C
E
V
A
L
U
E
WARRANTY
Warranty

VMAC - Vehicle Mounted Air Compressors
VMAC Technical Support: 888-241-2289
VMAC Knowledge Base: kb.vmacair.com
5
VMAC warranty work must be pre-authorized by VMAC. Claims are
processed via our dealer network. If you are not a VMAC dealer,
please select one to work with via our Dealer Locator:
https://www.vmacair.com/dealer-locator/
1. Communicate with VMAC Technical Support at 1-888-241-2289 or
tech@vmacair.com to help diagnose/troubleshoot the problem prior to repair.
VMAC technical support will require the VMAC System ID, hours on the
compressor and mileage on the vehicle.
2. VMAC will provide direction for repair or replacement of the failed components.
3. If requested, failed parts must be returned to VMAC for evaluation.
4. Dealers may login to the VMAC website to view the "VMAC Labour Time Guide"
(under “Agreements”) to see the allowable warranty labour times.
5. Warranty invoices must include the Service Ticket number, VMAC System ID#,
hours on the compressor, and a detailed description of the work performed.
6. VMAC Warranty does not cover consequential damages, overtime charges,
mileage, travel time, towing/recovery, cleaning or shop supplies.
7. Dealers submit warranty claims on behalf of the Vehicle Owner/End User
affected by the defective part(s). The dealer ensures that all warranty credits
are refunded back to the Vehicle Owner/End User who made the initial warranty
claim.
VMAC Product Warranty Policies & Warranty Registration can be found on the
VMAC website (see previous page for URL).
VMAC Warranty Claim Process
In order to qualify for Lifetime Warranty (Limited), the completed
warranty registration form must be received by VMAC within 3
months of the buyer receiving the Product(s), or 200 hours of
operation, whichever occurs first.
If the completed warranty registration form has not been received
by VMAC within 3 months of the buyer receiving the Product(s),
or 200 hours of operation, the warranty period will be deemed to
commence 30 days from the date of shipment from VMAC.
Failure to follow the warranty claim process may result in denial of
the warranty claim.

VMAC - Vehicle Mounted Air Compressors
VMAC Technical Support: 888-241-2289
VMAC Knowledge Base: kb.vmacair.com
6
General Information
Optional Equipment Compatibility
While VMAC strives to design systems compatible with optional OEM equipment
(such as running boards), it is impractical to develop systems that accommodate
every OEM and aftermarket option or add-on. Whenever possible, VMAC
endeavors to advise of compatibility issues in the “Additional Application
Information” section of the manual. Even when specific optional equipment is
determined by VMAC to be incompatible, it does not preclude the vehicle upfitter
or end user from modifying the optional equipment to make it compatible with
the installed VMAC system. VMAC does not warranty or accept responsibility or
liability for the fitment, function or safety of any products modified in any way not
expressly outlined in the installation manual.
Before Starting
Read this manual prior to beginning the installation to ensure familiarity with the
components and how they will fit on the vehicle. Identify any variations from the
application list such as vehicle model, engines, or optional equipment (e.g., dual
alternator, active steering assist, etc.).
Open the package, unpack the components and identify them using the Illustrated
Parts List (IPL) included in the Fastener Pack.
Hose Information
Depending on other installed equipment, it might be necessary to move the air/oil
separation tank from its intended location. The hoses used in VMAC compressor
systems have a specific inner liner that is compatible with VMAC compressor oil.
Use of hoses other than those supplied or recommended by VMAC may cause
compressor damage and may void your warranty. Please contact VMAC for
replacement hoses and further information.
Ordering Parts
To order parts, contact a VMAC dealer. The dealer will ask for the VMAC serial
number, part number, description and quantity. Locate the nearest dealer online at
www.vmacair.com/dealer-locator or call 1-877-912-6605.
Note and label all parts that are removed from the vehicle as many
of the OEM parts will be reused during the installation of the VMAC
system.

VMAC - Vehicle Mounted Air Compressors
VMAC Technical Support: 888-241-2289
VMAC Knowledge Base: kb.vmacair.com
7
Table 1 — Torque Table
Standard Grade 8 National Coarse Thread
Size (in) 1/4 5/16 3/8 7/16 1/2 9/16 5/8 3/4
Foot pounds (ft•lb) 918 35 55 80 110 170 280
Newton meter (N•m) 12 24 47 74 108 149 230 379
Standard Grade 8 National Fine Thread
Size (in) 3/8 7/16 1/2 5/8 3/4
Foot pounds (ft•lb) 40 60 90 180 320
Newton meter (N•m) 54 81 122 244 434
Metric Class 10.9
Size (mm) M6 M8 M10 M12 M14 M16
Foot pounds (ft•lb) 4.5 19 41 69 104 174
Newton meter (N•m) 625 55 93 141 236
Special Tools Required
• Stretch Belt Remover / Installer (Lisle 59370 or equivalent).
• Torx driver set.
• Trim removal tools.
Torque Specifications
All fasteners must be torqued to specifications. Use manufacturers’ torque values
for OEM fasteners.
The torque values supplied in Table 1 are intended for VMAC supplied components,
or for use as a guide in the absence of a torque value provided by an OEM.
Torque values are with Loctite applied unless otherwise specified.
Apply Loctite 242 (blue) to all fasteners (except nylon lock nuts)
unless otherwise stated.

VMAC - Vehicle Mounted Air Compressors
VMAC Technical Support: 888-241-2289
VMAC Knowledge Base: kb.vmacair.com
8
Preparing for Installation
☐ Determine the distance from the (×5) bulkhead fittings in the floor to the
desired WHASP tank location (refer to “Installing the Bulkhead Fittings” on
page 17). Include sufficient additional length to account for the width of the
sub floor as well as routing around any upfitter accessories such as cabinets,
benches or shelving.
• The kit includes sufficient hose to connect the compressor to the
recommended bulkhead location.
• For optimum performance, the hose length should be minimized.
• Contact a VMAC dealer to order the custom length of discharge hose, oil
return hoses and the scavenge tube.
☐ Remove the lower engine cover. This cover uses a mixture of (×6) Torx bolts and
(×2) push fasteners.
Due to the variety of possible WHASP tank installation locations,
VMAC cannot specify a mounting location for the WHASP tank. This
VMAC kit includes 50 in of hose to run from the bulkhead fittings to
the WHASP tank. If your application requires longer hoses, refer to
“Hose Requirements” on page 22.
Preparation for installation is very important. Missing a step
or an item can cause problems in the installation or damage to
components.
☑
Check off each item as it is completed so that no steps are
missed.
To remove the dashboard later in the installation, the shifter will
need to be moved to the rear most position. The battery will need to
be connected to allow the shifter to move. Ensure the vehicle wheels
are properly chocked and the park brake is applied to prevent the
vehicle from moving.
When dissembling engine components, cover the openings to
prevent debris from entering the system.
Apply Loctite 242 (blue) to all fasteners (except nylon lock nuts)
unless otherwise stated.
☐ With the vehicle wheels chocked and the park brake engaged, shift the gear
selector into the rear most position.
☐ Disconnect the battery.
☐ Raise the front of the vehicle and support it on jack stands.
Ensure the vehicle is supported safely with appropriately rated jack
stands.

VMAC - Vehicle Mounted Air Compressors
VMAC Technical Support: 888-241-2289
VMAC Knowledge Base: kb.vmacair.com
9
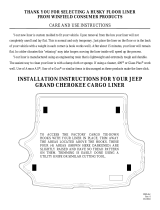
☐ Reconnect the coolant hose (Figure 1).
☐ Remove the passenger side front wheel.
☐ Remove the fasteners securing the front of the passenger side fender liner.
☐ Fold the front of the fender liner back to expose the stretch belt.
☐ Remove the OEM stretch belt and set it aside for use later.
☐ Remove and discard the FEAD tensioner cover and fastener.
☐ If equipped: Remove the lifting eye (this will not be reused in the installation)
(Figure 2).
Remove clip
Disconnect
hose
☐ Drain the engine coolant into a clean container and set it aside for reuse later
(Figure 1).
Disconnect
hose
Figure 1 — Drain coolant
Lifting eye
Figure 2 — Disconnect coolant hose
☐ Disconnect the barbed clip securing the coolant hose to the intake manifold
(Figure 2).
☐ Disconnect the coolant hose from the degas bottle (Figure 2)

VMAC - Vehicle Mounted Air Compressors
VMAC Technical Support: 888-241-2289
VMAC Knowledge Base: kb.vmacair.com
10
Disconnect
☐ From the mount point in the middle of the intake manifold, measure
approximately 3 in along the hose, toward where the degas bottle is mounted,
and cut the hose (Figure 3).
Figure 3 — Modify upper degas hose
Approximately
3 in
☐ Using the supplied precut length of hose, barbed fittings, and gear clamps, join
the upper degas hose together.
☐ Fold the lengthened hose toward the driver side, out of the way.
☐ Using a clean container to catch the remaining coolant, disconnect the lower
degas hose (Figure 4).
Figure 4 — Disconnect lower degas hose assembly

VMAC - Vehicle Mounted Air Compressors
VMAC Technical Support: 888-241-2289
VMAC Knowledge Base: kb.vmacair.com
11
☐ Apply coolant to the barbs and insert the (×2) barbed fittings into the hose
sections, leaving approximately 1 1/2 in of the fittings showing (Figure 6).
☐ Rotate the hose as required to ensure the hose retains the same overall shape,
and secure it in place using the supplied gear clamps (Figure 6).
☐ Attach the lower degas hose to the degas bottle.
☐ Position the degas bottle in place in the engine bay, and press firmly down until
the degas bottle clicks into place.
☐ Re-connect both hoses at the “Y” and at the degas bottle.
☐ Remove the degas bottle and lower degas hose assembly.
☐ Note the orientation of the hose assembly.
☐ Remove the degas hose from the degas bottle.
☐ Leaving the anti abrasion sheath in place, cut the hose along the straight
section indicated. Each section of hose should provide approximately 1 1/4 in
for the barbed fittings to be inserted (Figure 5).
Figure 5 — Modify lower degas hose
Approximately
1 1/4 in
Figure 6 — Modify lower degas hose
Cut
Applying coolant to the hoses will assist in inserting the barbed
fittings.

VMAC - Vehicle Mounted Air Compressors
VMAC Technical Support: 888-241-2289
VMAC Knowledge Base: kb.vmacair.com
12
☐ Release the belt tension and remove and discard the OEM main belt.
☐ Remove the OEM tensioner (Figure 7).
Figure 7 — Remove OEM tensioner
☐ Remove the ribbed idler from the OEM tensioner and set it aside.
☐ Using the OEM fastener and dust shield, install the supplied back idler (in cases
where there is a fender washer attached to the idler, cut the cable tie and
discard the larger washer) (Figure 8).
Figure 8 — Mount back idler

VMAC - Vehicle Mounted Air Compressors
VMAC Technical Support: 888-241-2289
VMAC Knowledge Base: kb.vmacair.com
13
Installing the Main Bracket, Compressor,
and Drive Belts
☐ Install the main bracket, leaving the fasteners finger tight (Figure 9).
Figure 9 — Install main bracket
Figure 10 — Install tensioner onto bracket
M10×1.5×45
M8×1.25×50
M8×1.25×25
☐ Once the fasteners are installed and the bracket fits snug, torque the (×3)
fasteners to specification (Figure 9).
☐ Using the OEM fasteners, install the OEM tensioner onto the tensioner bracket
(Figure 10)
OEM fasteners
☐ Torque the tensioner fasteners to specification.

VMAC - Vehicle Mounted Air Compressors
VMAC Technical Support: 888-241-2289
VMAC Knowledge Base: kb.vmacair.com
14
☐ Using the supplied fasteners, install the idler (removed from the tensioner
earlier) onto the VMAC main bracket (Figure 11).
M8×1.25×25
Fender
washer
☐ Using the (×3) supplied M8 fasteners, mount the compressor and pressure
switch bracket onto the main bracket and torque to specification (Figure 12).
Figure 11 — Install idler
Figure 12 — Mount compressor

VMAC - Vehicle Mounted Air Compressors
VMAC Technical Support: 888-241-2289
VMAC Knowledge Base: kb.vmacair.com
15
☐ Install the VMAC belt on the inside track of the crank pulley. Two clutch ribs
should be visible on each side of the belt (Figure 13).
Figure 13 — VMAC belt routing
Two ribs visible
on each side
☐ Install the compressor intake air filter assembly (Figure 14)*.
☐ *Attach the hose to the air filter spigot.
☐ *Slide the gear clamps onto the hose.
☐ *Attach the hose onto the compressor inlet spigot, then rotate the bracket
into place.
☐ *Attach the bracket to the compressor (do not over tighten).
☐ Secure the gear clamps.
Figure 14 — Intake air filter
Do not over
tighten

VMAC - Vehicle Mounted Air Compressors
VMAC Technical Support: 888-241-2289
VMAC Knowledge Base: kb.vmacair.com
16
Figure 15 — Secure upper degas hose
☐ Attach the OEM hose clip to the air filter bracket. (Figure 15).
Secure upper
degas hose
☐ Using the supplied P-clip and fasteners, secure the upper degas hose to the air
filter bracket (Figure 15).
☐ Connect the hose to the degas bottle.
Attach OEM
hose clip
Figure 16 — Install pressure switch
☐ Using the supplied fasteners and P-clip, mount the pressure switch on the
bracket (Figure 16).
To prevent the pooling/accumulation of water in the switch, and
subsequent damage from freezing, mount the pressure switch as
close to vertical as possible.

VMAC - Vehicle Mounted Air Compressors
VMAC Technical Support: 888-241-2289
VMAC Knowledge Base: kb.vmacair.com
17
(×4) bulkhead fittings are supplied with the system (Figure 17):
• (×3) bulkhead fittings are used to pass the compressor discharge and oil
supply hoses, and the scavenge tube, into the body of the vehicle.
• (×1) bulkhead fitting is used to locate the blowdown muffler outside of the
vehicle.
This kit includes hoses of a fixed length to run from the compressor to the
bulkhead fittings, and from the fittings to the WHASP Tank.
To maximize compressor performance, hose lengths should be kept as short as
possible; if longer hoses are required please follow the hose requirements listed on
page 22 of this manual.
Figure 17 — Bulkhead fittings
Installing the Bulkhead Fittings
Good judgment must be used during installation. Prior to drilling any
holes in the vehicle, confirm the installation location of the WHASP
Tank and the bulkhead fittings. Confirm that the supplied hoses will
reach from the compressor to the bulkhead fittings, and from the
bulkhead fittings to the WHASP Tank. Also ensure that there are no
wires, hoses, or other components on the other side of the panel
that may be damaged when drilling holes.

VMAC - Vehicle Mounted Air Compressors
VMAC Technical Support: 888-241-2289
VMAC Knowledge Base: kb.vmacair.com
18
☐ Remove the weather stripping from the plastic step in the passenger side
sliding door well (Figure 18).
☐ Remove the plastic step to provide access to the sub floor (Figure 19).
Figure 19 — Access the sub floor
Figure 18 — Remove plastic step
Remove weather
stripping
/