Page is loading ...

BANISTER & STAIR WOOD GATE
WITH DUAL INSTALLATION KIT
INSTRUCTION MANUAL
Operating Instructions
OPENING THE GATE:
SQUEEZE!
CLOSING THE GATE:
Please read the following instructions
and warnings carefully.
Keep this instruction manual
and save for future reference.
For technical support contact us at 1-401-671-6551 or
www.summerinfant.com/contact.
For use with children from 6 to 24 months.
Adult assembly required.
Keep small parts away from children.
D0000000823 9.20
Colors and styles may vary.
MADE IN CHINA.
Summer Infant (USA), Inc.
1275 Park East Drive
Woonsocket, RI 02895 USA
1-401-671-6551
© 2020 Summer Infant (USA), Inc.
WARNING
•
ALWAYS
install and use gate as directed, using all required parts.
• Install according to manufacturer’s instructions.
•
STOP
using when a child can climb over or dislodge the gate.
• Use only with the locking/latching mechanism securely engaged.
•
NEVER
use a gate to keep child away from pool.
•
NEVER
leave child unattended.
•
ALWAYS
close and lock the gate behind you.
• This product will not necessarily prevent all accidents. Proper adult supervision is
required at all times.
• Do not use if any components are missing or damaged.
• Adult assembly required.
• Exercise care when unpacking and assembling product.
• Intended for use with children from 6 months through 24 months.
• Do not mount to spindles less than 2 in. in diameter.
• Check daily that banister brackets are securely attached and gate is securely
anchored to banisters and/or wall.
Children have died or been seriously injured when gates are not securely installed.
click!
click!
SQUEEZE!
8
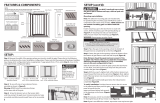
REMOVING THE GATE:
®

wrench
x4 x6 x7
Gate Assembly
Latch Assembly
Hinge Assembly
Hinge Assembly
Support Foot Assembly
Hardware
Components
Gate ts openings 33” to 46” (84 cm to 117 cm)
!
1. Regularly check bolts and hinge assembly to ensure
the gate is securely in place.
2. Do not use gate if any components are damaged
or missing.
3. Wipe surface with a damp cloth or sponge using mild
detergent and warm water.
Maintenance
Tools required (not included)
Phillips head Screwdriver
WALL MOUNT OPTION ONLY: Drill with 7/32” drill bit
WOOD MOUNT OPTION ONLY: Pre-drill with 1/8” drill bit
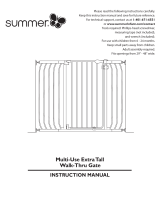
3. Gate Assembly
IMPORTANT: Place the gate on top landing at a distance of 2 in. from the
end of the stairs or the furthest it can be placed based on the size and
locations of your banisters.
While the gate is o the wall
or banister mounts, use the
wrench to tighten or loosen
the bolt to extend the gate to
reach the latch.
Depending on your wall you
may need to adjust the top
and bottom bolts to make
sure the gate is aligned
properly and reaches the latch
assembly.
x1
x1 x1
27
adjustment
nut
0-3in
0-7.62cm
IMPORTANT NOTE:
Never exceed 3” for a gap on
hinge side or bottom of gate.
IMPORTANT NOTE:
Gate can be horizontally
leveled by rotating upper or
lower adjustment nut (in or
out) with supplied Wrench.
tighten all
nuts when
complete!

align!
bottom
top
align!
SAFETY
WARNING
If installing gate
at top of stairs,
DO NOT mount
into wallboard.
Latch Assembly is identical to Hinge
Assembly. Choose which of the two
options best ts your needs.
Repeat
Assembly
Option A
Repeat
Assembly
Option B
Square Top
Banister
Wall
Mounted
IMPORTANT
NOTE: When
mounting into any
wood (molding),
a pre-drilled
hole is required.
Pre-drill a hole
in the wood,
using an 1/8’ or 3mm
drill bit approximately
1 inch deep.
Mount the Door Stopper
to the top of the gate, with
the Short Screw.
x 1
!
IMPORTANT: Be sure to
install the door stopper
when using at the top
of stairs!
Door Assembly
3
6
Use the width of the Wrench
provided to determine where
to mount the Door Stopper
on the top of the gate door.
Close the gate door
to the locked position.
Door Stopper

2. Latch Assembly
5
x4
x1
x3
Pre drill holes using
7/32” (5.5mm) drill
bit. Use pre-existing
holes in your
banister bracket as
your guide. Insert
Wall Anchors into
the hole with a
hammer, tap gently
on end until the Wall
Anchor is ush with
the wall.
!
!
wallboard
wood wall
Wall Mount
or
Pre-drill a
hole using a
1/8” or
3mm.
Option B:
x3
x3
stud
x3
!
!
wallboard with baseboard
wood wall with baseboard
or
x 3
x 3
IMPORTANT:
If baseboard exists,
use spacer. If there is
no baseboard, attach
to wall directly.
!
IMPORTANT:
If baseboard exists,
use spacer. If there is
no baseboard, attach
to wall directly.
!
x1
x1
Pre-drill a hole using a 1/8” or 3mm.
1. Hinge Assembly
4
To allow gate to
latch, hook is on
bottom when
installed.
!
IMPORTANT: Be sure to
install the door stopper
when using at the top of
stairs! It should stop the
gate from going over the
stairs.
top
bottom
x1
Support Foot Assembly:
IMPORTANT NOTE: Adjust
foot to be just touching oor
when gate is locked closed.
/