Page is loading ...

WARNING:
For vehicles equipped with a Supplemental
Restraint (Air Bag) System:
D Service on and around the air bag system
components or wiring must be performed
only by an authorized SUZUKI dealer.
Refer to “Air Bag System Components and
Wiring Location View” under “General De-
scription” in air bag system section in order
to confirm whether you are performing ser-
vice on or near the air bag system compo-
nents or wiring. Please observe all WARN-
INGS and “Service Precautions” under “On-
Vehicle Service” in air bag system section
before performing service on or around the
air bag system components or wiring. Fail-
ure to follow WARNINGS could result in
unintentional activation of the system or
could render the system inoperative. Either
of these two conditions may result in severe
injury.
D If the air bag system and another vehicle
system both need repair, SUZUKI recom-
mends that the air bag system be repaired
first, to help avoid unintended air bag sys-
tem activation.
D Do not modify the steering wheel, instru-
ment panel or any other air bag system com-
ponent (on or around air bag system compo-
nents or wiring). Modifications can adverse-
ly affect air bag system performance and
lead to injury.
D If the vehicle will be exposed to tempera-
tures over 93_C (200_F) (for example, during
a paint baking process), remove the air bag
system components (air bag (inflator) mod-
ule, sensing and diagnostic module (SDM),
seat belt pretensioner (if equipped) before-
hand to avoid component damage or unin-
tended activation.
IMPORTANT
WARNING/CAUTION/NOTE
Please read this manual and follow its instructions
carefully. To emphasize special information, the
words WARNING, CAUTION and NOTE have spe-
cial meanings. Pay special attention to the messages
highlighted by these signal words.
NOTE:
Indicates special information to make mainte-
nance easier or instructions clearer.
WARNING:
Indicates a potential hazard that could result
in death or injury.
CAUTION:
Indicates a potential hazard that could result
in vehicle damage.
WARNING:
This service manual is intended for authorized
SUZUKI dealers and qualified service me-
chanics only. Inexperienced mechanics or
mechanics without the proper tools and
equipment may not be able to properly per-
form the services described in this manual.
Improper repair may result in injury to the me-
chanic and may render the vehicle unsafe for
the driver and passengers.

(
x
)
(
x
)
FOREWORD
This manual is a supplement to SQ416/SQ420/SQ625 SERVICE MANUAL. It has been pre-
pared exclusively for the following applicable model.
Applicable model: SQ420WD (GRAND VITARA RHZ Diesel engine model) on and after the
following VIN No.
JSAFTD82V00100001 X
It described only different servicing information of SQ420WD RHZ engine model as compared
with SQ416/SQ420/ SQ625.
Therefore, whenever servicing SQ420WD, consult this service manual first.
And for any section, item or description not found in this service manual, refer to the related
manuals below.
When replacing parts or servicing by disassembling, it is recommended to use SUZUKI genuine
parts, tools and service materials (lubricant, sealants, etc.) as specified in each description.
All information, illustrations and specifications contained in this literature are based on the latest
product information available at the time of publication approval. And used as the main subject
of description is the vehicle of standard specifications among others.
Therefore, note that illustrations may differ from the vehicle being actually serviced.
The right is reserved to make changes at any time without notice.
RELATED MANUALS:
Manual Name
Manual No.
SQ416/SQ420/SQ625 Service Manual
(Volume 1 and 2)
99500-65D10-XXX
GRAND VITARA SUPPLEMENTARY SERVICE
MANUAL
99501-65D30-XXX
SQ416/SQ420/SQ625 Unit Repair Manual
(For Manual Transmission, Automatic Transmission,
Transfer and Differential.)
99501-65D01-XXX
SQ416/SQ420/SQ625 Wiring Diagram Manual 99512-65D11-015
SQ420WD Supplementary Wiring Diagram Manual 99512-68D10-015
COPYRIGHT SUZUKI MOTOR CORPORATION 2002

0A
0B
1A
3B1
3E
4A2
4B
6
6A3
6B
6C
6E3
6G
6H
6K
7A2
7B1
7C1
7E
7F
8C
8G
1B
6-1
ENGINE
Engine General Information and
Diagnosis (RHZ Engine With
Single-connector ECM)
Engine General Information and
Diagnosis (RHZ Engine With
Triple-connector ECM)
Engine Mechanical (RHZ engine)
Engine Cooling
Engine Fuel
Engine and Emission Control System
(RHZ engine)
Cranking System (2.0 kw Reduction
Type)
Charging System
Exhaust System
HEATING AND AIR CONDITIONING
Heater and Ventilation
Air Conditioning
BODY ELECTRICAL SYSTEM
Instrumentation/Driver Information
Immobilizer Control System
TABLE OF CONTENTS SECTION
GENERAL INFORMATION
General Information
Maintenance and Lubrication
STEERING, SUSPENSION, WHEELS
AND TIRES
Power Steering (P/S) System
Rear Suspension
DRIVE SHAFT/PROPELLER SHAFT
Front Drive Shaft/Shaft Bearing,
Oil Seal
Propeller Shafts
0A
0B
1B
3B1
4A2
6
6A3
6B
6C
6E3
6G
6H
6K
7A2
7C1
7F
8C
8G
TRANSMISSION, CLUTCH AND
DIFFERENTIAL
Manual Transmission
Automatic Transmission
Clutch (Hydraulic Type)
Differential (Front)
Differential (Rear)
3E
4B
7B1
7E
1A
6-1

0A
GENERAL INFORMATION 0A-1
SECTION 0A
GENERAL INFORMATION
NOTE:
For the descriptions (items) not found in this section, refer to the same section of the Service Manual men-
tioned in FOREWORD of this manual.
CONTENTS
PRECAUTIONS 0A- 2. . . . . . . . . . . . . . . . . . . . . . . . . . . . . . . . . . . . . . . . . . . . . . . . . . . . . . . . . . . . . . . . . . . . . . . . . . . .
General Precautions 0A- 2. . . . . . . . . . . . . . . . . . . . . . . . . . . . . . . . . . . . . . . . . . . . . . . . . . . . . . . . . . . . . . . . . . . . . .
IDENTIFICATION INFORMATION 0A- 5. . . . . . . . . . . . . . . . . . . . . . . . . . . . . . . . . . . . . . . . . . . . . . . . . . . . . . . . . . . .
Vehicle Identification Number 0A- 5. . . . . . . . . . . . . . . . . . . . . . . . . . . . . . . . . . . . . . . . . . . . . . . . . . . . . . . . . . . . . .
Engine Identification Number 0A- 5. . . . . . . . . . . . . . . . . . . . . . . . . . . . . . . . . . . . . . . . . . . . . . . . . . . . . . . . . . . . . . .
Transmission Identification Number 0A- 5. . . . . . . . . . . . . . . . . . . . . . . . . . . . . . . . . . . . . . . . . . . . . . . . . . . . . . . . .
WARNING, CAUTION AND INFORMATION LABELS 0A- 6. . . . . . . . . . . . . . . . . . . . . . . . . . . . . . . . . . . . . . . . . .
FASTENER INFORMATION 0A- 7. . . . . . . . . . . . . . . . . . . . . . . . . . . . . . . . . . . . . . . . . . . . . . . . . . . . . . . . . . . . . . . . .
Metric Fasteners 0A- 7. . . . . . . . . . . . . . . . . . . . . . . . . . . . . . . . . . . . . . . . . . . . . . . . . . . . . . . . . . . . . . . . . . . . . . . . .

0A-2 GENERAL INFORMATION
PRECAUTIONS
GENERAL PRECAUTIONS
The WARNING and CAUTION below describe some general precautions that you should observe when servicing
a vehicle. These general precautions apply to many of the service procedures described in this manual, and they
will not necessarily be repeated with each procedure to which they apply.
WARNING:
D Whenever raising a vehicle for service, be sure to follow the instructions under “VEHICLE LIFTING
POINTS” on SECTION 0A.
D When it is necessary to do service work with the engine running, make sure that the parking brake
is set fully and the transmission is in Neutral (for manual transmission vehicles) or Park (for automatic
transmission vehicles). Keep hands, hair, clothing, tools, etc. away from the fan, belts and fuel line
between high pressure fuel pump and injectors when the engine is running.
D When it is necessary to run the engine indoors, make sure that the exhaust gas is forced outdoors.
D Do not perform service work in areas where combustible materials can come in contact with a hot
exhaust system. When working with toxic or flammable materials (such as gasoline and refrigerant),
make sure that the area you work in is well-ventilated.
D To avoid getting burned, keep away from hot metal parts such as the radiator, exhaust manifold, tail-
pipe, muffler, etc.
D New and used engine oil can be hazardous. Children and pets may be harmed by swallowing new or
used oil. Keep new and used oil and used engine oil filters away from children and pets.
Continuous contact with used engine oil has been found to cause [skin] cancer in laboratory animals.
Brief contact with used oil may irritate skin. To minimize your exposure to used engine oil, wear a
long-sleeve shirt and moisture-proof gloves (such as dishwashing gloves) when changing engine oil.
If engine oil contacts your skin, wash thoroughly with soap and water. Launder any clothing or rags
if wet with oil, recycle or properly dispose of used oil and filters.
D Make sure the bonnet is fully closed and latched before driving. If it is not, it can fly up unexpectedly
during driving, obstructing your view and resulting in an accident.
CAUTION:
D Before starting any service work, cover fenders, seats and
any other parts that are likely to get scratched or stained dur-
ing servicing. Also, be aware that what you wear (e.g, but-
tons) may cause damage to the vehicle’s finish.
D When performing service to electrical parts that does not re-
quire use of battery power, disconnect the negative cable of
the battery.

GENERAL INFORMATION 0A-3
“A”
D When removing the battery, be sure to disconnect the nega-
tive cable first and then the positive cable. When reconnect-
ing the battery, connect the positive cable first and then the
negative cable, and replace the terminal cover.
D When removing parts that are to be reused, be sure to keep
them arranged in an orderly manner so that they may be rein-
stalled in the proper order and position.
D Whenever you use oil seals, gaskets, packing, O-rings, lock-
ing washers, split pins, self-locking nuts, and certain other
parts as specified, be sure to use new ones. Also, before
installing new gaskets, packing, etc., be sure to remove any
residual material from the mating surfaces.
D Make sure that all parts used in reassembly are perfectly
clean.
D When use of a certain type of lubricant, bond or sealant is
specified, be sure to use the specified type.
“A”: Sealant 99000-31150
D Be sure to use special tools when instructed.
Special Tool
(A): 09917-98221
(B): 09916-58210

0A-4 GENERAL INFORMATION
D When disconnecting vacuum hoses, attach a tag describing
the correct installation positions so that the hoses can be re-
installed correctly.
D After servicing fuel, oil, coolant, vacuum, exhaust or brake
systems, check all lines related to the system for leaks.
D For vehicles equipped with fuel injection systems, never dis-
connect the fuel line between the fuel pump and injector
within 30 sec. after engine stop, or fuel can be sprayed out
under pressure.

4-speed A/T
M/T
GENERAL INFORMATION 0A-5
IDENTIFICATION INFORMATION
VEHICLE IDENTIFICATION NUMBER
The number is punched on the chassis inside the tire housing on the
right front side.
ENGINE IDENTIFICATION NUMBER
The number is punched on the cylinder block.
TRANSMISSION IDENTIFICATION NUMBER
The number is located on the transmission case.

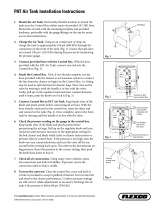
NOTE:
Air bag CAUTION / WARNING labels are attached on
the vehicle equipped with air bag system only.
1. Air bag label
2. Smoke level label
3. Air bag label on sun visor
4. Radiator cooling fan label
5. Degassing tank cap (radiator cap) label
6. Transfer label
7. Air bag label on wire harness
8. Air bag label on passenger air bag
(inflator) module
9. Seat belt pretensioner label on retractor
10. Air bag label on SDM
11. Air bag label on driver air bag
(inflator) module
12. Air bag label on combination switch
and contact coil assembly
13. Air bag label on steering column
0A-6 GENERAL INFORMATION
WARNING, CAUTION AND INFORMATION LABELS
The figure below shows main labels among others that are attached to vehicle component parts.
When servicing and handling parts, refer to WARNING/CAUTION instructions printed on labels.
If any WARNING/CAUTION label is found stained or damaged, clean or replace it as necessary.

1. Diameter
2. Pitch
GENERAL INFORMATION 0A-7
FASTENER INFORMATION
METRIC FASTENERS
Most of the fasteners used for this vehicle are metric fasteners.
When replacing any fasteners, it is most important that replacement
fasteners be the correct diameter, thread pitch and strength.
CAUTION:
Note that both ISO and JIS type bolts and nuts are used for
the engine assembly and related parts. Even when the diam-
eter of the thread is the same, its pitch may vary between
these two types. Installing a mismatched bolt or nut will
cause damage to the thread. As the first step, make sure to
tighten it by hand temporarily and if it feels tight, check the
thread pitch for correct matching.

0B
MAINTENANCE AND LUBRICATION 0B-1
SECTION 0B
MAINTENANCE AND LUBRICATION
WARNING:
For vehicles equipped with Supplemental Restraint (Air Bag) System:
D Service on and around the air bag system components or wiring must be performed only by an autho-
rized SUZUKI dealer. Refer to “Air Bag System Components and Wiring Location View” under “Gener-
al Description” in air bag system section in order to confirm whether you are performing service on
or near the air bag system components or wiring. Please observe all WARNINGS and “Service Precau-
tions” under “On-Vehicle Service” in air bag system section before performing service on or around
the air bag system components or wiring. Failure to follow WARNINGS could result in unintentional
activation of the system or could render the system inoperative. Either of these two conditions may
result in severe injury.
D Technical service work must be started at least 90 seconds after the ignition switch is turned to the
“LOCK” position and the negative cable is disconnected from the battery. Otherwise, the system may
be activated by reserve energy in the Sensing and Diagnostic Module (SDM).
NOTE:
For the descriptions (items) not found in this section, refer to the same section of the Service Manual men-
tioned in FOREWORD of this manual.
CONTENTS
MAINTENANCE SCHEDULE 0B- 2. . . . . . . . . . . . . . . . . . . . . . . . . . . . . . . . . . . . . . . . . . . . . . . . . . . . . . . . . . . . . . . .
Maintenance Schedule Under Normal Driving Conditions 0B- 2. . . . . . . . . . . . . . . . . . . . . . . . . . . . . . . . . . . . . .
Maintenance Recommended Under Severe Driving Conditions 0B- 4. . . . . . . . . . . . . . . . . . . . . . . . . . . . . . . . .
MAINTENANCE SERVICE 0B- 5. . . . . . . . . . . . . . . . . . . . . . . . . . . . . . . . . . . . . . . . . . . . . . . . . . . . . . . . . . . . . . . . . .
Engine 0B- 5. . . . . . . . . . . . . . . . . . . . . . . . . . . . . . . . . . . . . . . . . . . . . . . . . . . . . . . . . . . . . . . . . . . . . . . . . . . . . . . . . .
Fuel System 0B- 9. . . . . . . . . . . . . . . . . . . . . . . . . . . . . . . . . . . . . . . . . . . . . . . . . . . . . . . . . . . . . . . . . . . . . . . . . . . . .
Chassis and Body 0B-11. . . . . . . . . . . . . . . . . . . . . . . . . . . . . . . . . . . . . . . . . . . . . . . . . . . . . . . . . . . . . . . . . . . . . . . .
RECOMMENDED FLUIDS AND LUBRICANTS 0B-13. . . . . . . . . . . . . . . . . . . . . . . . . . . . . . . . . . . . . . . . . . . . . . . .

0B-2 MAINTENANCE AND LUBRICATION
MAINTENANCE SCHEDULE
MAINTENANCE SCHEDULE UNDER NORMAL DRIVING CONDITIONS
Interval:
This interval should be jud
g
ed b
y
This table includes services as scheduled up to 90,000 km (54,000 miles)
mileage. Beyond 90,000 km (54,000 miles), carry out the same services
at the same intervals respectively.
jg y
odometer reading or months,
Km (x 1,000) 15 30 45 60 75 90
whichever comes first.
Miles (x 1,000) 9 18 27 36 45 54
Months 12 24 36 48 60 72
1. ENGINE
1-1. Accessory drive belt – – I – – R
1-2. Camshaft timing belt Replace every 150,000 km (90,000 miles).
1-3. Engine oil and oil filter Replace every 20,000 km (12,000 miles) or
16 months.
1-4. Engine coolant – – R – – R
1-5. Exhaust system – I – I – I
1-6. Heater (Glow) plugs Inspect every 120,000 km (72,000 miles) or
96 months.
3. FUEL SYSTEM
3-1. Air cleaner filter I I R I I R
3-2. Fuel lines – I – I – I
3-3. Fuel filter
Replace every 60,000 km (36,000 miles).
Drain water every 20,000 km
(12,000 miles).
3-4. Fuel tank – – I – – I

MAINTENANCE AND LUBRICATION 0B-3
Interval:
This interval should be
j
ud
g
ed b
y
This table includes services as scheduled up to 90,000 km
(54,000 miles) mileage. Beyond 90,000 km (54,000 miles), carry
out the same services at the same intervals respectively.
This
interval
should
be
judged
by
odometer reading or months,
Km (x 1,000) 15 30 45 60 75 90
g
whichever comes first.
Miles (x 1,000) 9 18 27 36 45 54
Months 12 24 36 48 60 72
CHASSIS AND BODY
6-1. Clutch (pedal and fluid level) – I – I – I
6-2.
Brake discs and pads (thickness, wear, damage) I I I I I I
Brake drums and shoes (wear, damage) – I – I – I
6-3. Brake hoses and pipes (leakage, damage, clamp) – I – I – I
6-4. Brake fluid – R – R – R
6-5. Brake lever and cable (damage, stroke, operation) Inspect at first 15,000 km (9,000 miles)
only
6-6. Tires (wear, damage, rotation) I I I I I I
6-7. Wheel discs (damage) I I I I I I
6-8. Suspension system (tightness, damage, rattle, breakage) – I – I – I
6-9. Propeller shafts and drive shafts – – I – – I
6-10.Manual transmission oil (leakage, level)
(I: 1st 15,000 km only)
I – R – – R
6-11.Automatic transmission
Fluid level – I – I – I
Fluid change Replace every 165,000 km
(99,000 miles)
Fluid hose – – – R – –
6-12.Transfer oil (leakage, level) I – I – I –
6-13.Differential oil (leakage, level) (R: 1st 15,000 km only) R or I – I – I –
6-14.Steering system (tightness, damage, breakage, rattle) – I – I – I
6-15.Power steering (if equipped) I I I I I I
6-16.All latches, hinges and locks – I – I – I
6-17.Air conditioning filter (if equipped) – I R – I R
NOTES:
“R”: Replace or change
“I” : Inspect and correct, replace or lubricate if necessary
Some maintenance items are required to be serviced at times other than the regular maintenance times
shown at the top of above table. These items can be serviced at an earlier service opportunity according
to customer’s maintenance convenience. Their next maintenance service should be done within the speci-
fied period.

0B-4 MAINTENANCE AND LUBRICATION
MAINTENANCE RECOMMENDED UNDER SEVERE DRIVING CONDITIONS
If the vehicle is usually used under the conditions corresponding to any severe condition code given below, it is rec-
ommended that applicable maintenance operation be performed at the particular interval as given in the chart below.
Severe condition code
A – Repeated short trips F – Leaded fuel use
B – Driving on rough and/or muddy roads G – Town use /Towing a trailer/Sustained high speed
C – Driving on dusty roads driving/Hot climates, frequently above 30_C(86_F)/
D – Driving in extremely cold weather Cold climates, frequently below –15_C (5_F)/Low
and/or salted roads quality lubricants or fuel
E – Repeated short trips in extremely H – Trailer towing (if admitted)
cold weather
Severe
Condition Code
Maintenance
Maintenance
Operation
Maintenance Interval
– BCD– – – –
ITEM 1-1
I
Every 15,000 km
(9,000 miles) or 12 months
–
B
C
D
– – – –
Accessory drive belt (V-rib belt)
R
Every 45,000 km
(27,000 miles) or 36 months
A – C D E – G –
ITEM 1-2
Camshaft timing belt
R
Every 120,000 km
(72,000 miles)
A – C D E F G H
ITEM 1-3
Engine oil and oil filter
R
Every 5,000 km
(3,000 miles) or 4 months
– B – – – – – –
ITEM 1-5
Exhaust pipe mountings
I
Every 15,000 km
(9,000 miles) or 12 months
– – C – – – – –
ITEM 3-1
I
Every 2,500 km
(1,500 miles)
– –
C
– – – – –
Air cleaner filter*1
R
Every 30,000 km
(18,000 miles) or 24 months
– – C – – – G –
ITEM 3-3
Fuel filter
R
Every 10,000 km
(6,000 miles) or 8 months
– B C D – – – H
ITEM 6-7
Wheel bearing
I
Every 15,000 km
(9,000 miles) or 12 months
– B – – – – – –
ITEM 6-8
Suspension bolts and nuts
T
Every 15,000 km
(9,000 miles) or 12 months
– B – D E – – H
ITEM 6-9
Propeller shafts and drive shafts
I
Every 15,000 km
(9,000 miles) or 12 months
– B – – E – – H
ITEM 6-10, 6-12, 6-13
Manual transmission,
transfer and differential oil
R
Every 30,000 km
(18,000 miles) or 24 months
– B – – E – – H
ITEM 6-11
Automatic transmission fluid
R
Every 30,000 km
(18,000 miles) or 24 months
– – CD– – – –
ITEM 6-17
Air conditioning filter
*
2
I
Every 15,000 km
(9,000 miles) or 12 months
– –
C
D
– – – –
Air
conditioning
filter
2
(if equipped)
R
Every 45,000 km
(27,000 miles) or 36 months
NOTES:
“I” : Inspect and correct, replace or lubricate if necessary
“R” : Replace or change
“T” : Tighten to the specified torque
*1 : Inspect or replace more frequently if necessary.
*2 : Clean or replace more frequently if the air from the air conditioning decreases.

3. Zero wear mark
MAINTENANCE AND LUBRICATION 0B-5
MAINTENANCE SERVICE
ENGINE
ITEM 1-1
Accessory Drive Belt Inspection and Replacement
WARNING:
All inspection and replacement are to be performed with
ENGINE NOT RUNNING.
Inspection
1) Disconnect negative cable at battery.
2) Inspect belt for cracks, cuts, deformation, wear and cleanliness
using mirror under enough lighting.
If any defect exists, replace.
3) Check that belt wear check mark (1) (tension indicator) is within
range “a” using mirror (4) under enough lighting.
If wear check mark (1) is aligned with maximum wear mark (2)
or out of range “a” passing mark (2), replace accessory drive belt
with a new one.
4) Connect negative cable to battery.
Replacement
Replace belt with a new one referring to GENERATOR in section
6H.

1. Oil filter
0B-6 MAINTENANCE AND LUBRICATION
ITEM 1-2
Camshaft Timing Belt Replacement
Replace belt with new one. Refer to “Timing Belt” in SECTION 6A3
for replacement procedure.
CAUTION:
D Do not bend or twist timing belt.
D Do not allow timing belt to come into contact with oil, wa-
ter, etc.
ITEM 1-3
Engine Oil and Oil Filter Change
It is recommended to use the following engine oil or higher quality
level oils.
5W-30 : API CF (except CF-2) or ACEA B3-98
15W-40: API SG/CF (except CF-2) or ACEA B2-96
Select the appropriate oil viscosity according to the left chart.
Before draining engine oil, check engine for oil leakage. If any evi-
dence of leakage is found, make sure to correct defective part be-
fore performing the following work.
1) Drain engine oil by removing drain plug (1).
2) After draining oil, wipe drain plug clean. Reinstall drain plug, and
tighten it securely as specified below.
Tightening Torque
(a): 34 N
.
m (3.4 kg-m, 25.0 lb-ft)
3) Loosen oil filter by using oil filter wrench (Special tool).
Special Tool
(A): 09915-46510

1. Oil filter
1. LOW level mark
2. FULL level mark
MAINTENANCE AND LUBRICATION 0B-7
4) Apply engine oil to new oil filter O-ring.
5) Screw new filter on oil filter stand by hand.
6) Tighten filter to specified torque.
Special Tool
(A): 09915-46510
Tightening Torque
(a): 14 N
.
m (1.4 kg-m, 10.5 lb-ft)
7) Replenish oil until oil level is brought to FULL level mark on dip-
stick. (about 4.75 liters or 10.0/8.4 US/Imp pt.).
NOTE:
Note that amount of oil required when actually changing oil
may somewhat differ from this data depending on various
conditions (temperature, viscosity, etc.)
8) Start engine and run it for three minutes. Stop it and wait another
5 minutes before checking oil level. Add oil, as necessary, to
bring oil level to FULL level mark on dipstick.
9) Check oil filter and drain plug for oil leakage.

0B-8 MAINTENANCE AND LUBRICATION
ITEM 1-4
Engine Coolant Change
WARNING:
To help avoid danger of being burned, do not remove degas-
sing tank cap while engine and radiator are still hot. Scald-
ing fluid and steam can be blown out under pressure if cap
is taken off too soon.
CAUTION:
When changing engine coolant, use mixture of 50% water
and 50% ethylene-glycol base coolant (Anti-freeze/Anti-
corrosion coolant) for the market where ambient tempera-
ture falls lower than – 16_C (3_F) in winter and mixture of
70% water and 30% ethylene-glycol base coolant for the
market where ambient temperature doesn’t fall lower than
–16_C (3_F).
Even in a market where no freezing temperature is antici-
pated, mixture of 70% water and 30% ethylene-glycol base
coolant should be used for the purpose of corrosion protec-
tion and lubrication.
1) Remove degassing tank cap when engine is cool.
2) Loosen radiator drain plug (1) to drain coolant.
3) Tighten drain plug securely.
4) Fill cooling system with specified coolant through degassing
tank filler inlet, up to “FULL” level mark (2) on degassing tank (1).
5) Loosen bleed screw on thermostat cap to bleed air and tighten
it after confirmation of overflow.
6) Run engine with replenishing coolant, until radiator upper hose
is hot.
7) Add coolant as necessary until coolant reaches “FULL” level
mark on degassing tank.
Reinstall degassing tank cap (3).
Refer to SECTION 6B of this manual for
“Coolant Capacity”.

1. Heater (Glow) plug
MAINTENANCE AND LUBRICATION 0B-9
ITEM 1-5
Exhaust System Inspection
WARNING:
To avoid danger of being burned, do not touch exhaust sys-
tem when it is still hot.
Any service on exhaust system should be performed when
it is cool.
Check exhaust system as follows:
D Check rubber mountings for damage and deterioration.
D Check exhaust system for leakage, loose connections, dents,
and damages.
If bolts or nuts are loose, tighten them to specification.
Refer to SECTION 6K for torque specification of bolts and nuts.
D Check nearby body areas for damaged, missing or mispositioned
parts, open seams, holes, loose connections or other defects
which could permit exhaust fumes to seep into vehicle.
D Make sure that exhaust system components have enough clear-
ance from underbody to avoid overheating and possible damage
to floor carpet.
D Any defects should be fixed at once.
ITEM 1-6
Heater (Glow) Plugs Inspection
Check for external damage such as deformation, scratch, crack,
etc.
FUEL SYSTEM
ITEM 3-1
Air Cleaner Filter Replacement
1) Unclamp air cleaner case clamps.
2) Replace air cleaner filter with new one.
3) Clamp case securely.

0B-10 MAINTENANCE AND LUBRICATION
Air Cleaner Filter Inspection
1) Visually check that air cleaner filter is not excessively dirty, dam-
aged or oily.
2) Clean filter with compressed air from air outlet side of filter (i.e.,
the side facing up when installed).
ITEM 3-2
Fuel Lines and Connections Inspection
1) Visually inspect fuel lines and connections for evidence of fuel
leakage, hose cracking and damage. Make sure all clamps are
secure.
Repair leaky joints, if any.
Replace hoses that are suspected of being cracked.
ITEM 3-3
Fuel Filter Replacement
WARNING:
This work must be performed in a well ventilated area and
away from any open flames (such as gas hot water heaters).
Replace fuel filter in fuel filter assembly (1) with new one referring
to FUEL FILTER in SECTION 6C.
Water Draining of Fuel Filter
Bleed fuel filter of water referring to FUEL FILTER in SECTION 6C.
ITEM 3-4
Fuel Tank Inspection
Check fuel tank for damage, cracks, fuel leakage, corrosion and
tank bolts looseness.
If a problem is found, repair or replace.
/