Tefal GV8925E0 User manual

Category
Irons
Type
User manual
www.tefal.com
Pro Express
Control
*
12
9
d
b
g
a
f
e
c
3
2
* Depending on model
1
CLICK
*
6
5
7
10
9
11
8
4
www.tefal.com
CLICK
1.
Max.
45°
45°
CLICK
1.
www.tefal.com
1.
OK
www.tefal.com
2.
ON
ON
OK
www.tefal.com
2.
ON OFF
www.tefal.com
2. 2.
NO
*
*
×3
* Depending on model
OK OKNO
www.tefal.com
2.
*
8
min
30
min
OFF
AUTO OFF
* Depending on model
www.tefal.com
OFF
Max.
45°
2. 2.
www.tefal.com
ON
45°
CLICK
2.
www.tefal.com
2H
3. 3.
OFF
www.tefal.com
ON
3.
www.tefal.com
3.3.
CLICK
1H
OFF
STOP
*
* Depending on model
www.tefal.com
3.
NO
NO
2H
*
EN
Important recommendations
Safety instructions
Please read these instructions carefully before first use. This
appliance is designed for indoor and domestic household
use only. Any commercial use, inappropriate use or failure
to comply with the instructions, the manufacturer accepts
no responsibility and the guarantee will not apply.
Never unplug the appliance by pulling the power cord.
Always unplug your appliance:
- before filling the water tank or rinsing the boiler,
- before cleaning the appliance,
- after each use,
The appliance must be used and placed on a flat, stable,
heat & water resistant surface. Do not place the base unit
on a soft ironing board cover or any other soft surface. When
you place the iron on the iron rest, make sure that the surface
on which you place it is stable.
This appliance is not intended to be used by persons
(including children) with reduced or impaired physical,
sensory or mental capabilities or persons lacking appropriate
knowledge or experience, unless a person responsible for
their safety provides either supervision or appropriate
instructions concerning use of the appliance prior to its use.
Children should be supervised to ensure they do not play
with the appliance.
Accessories, consumables and end user replaceable parts must
be only purchased from Tefal or an Approved Service Centre.
This appliance may be used by children aged 8 or over
and persons lacking appropriate knowledge or experience
or persons with reduced or impaired physical, sensory or
mental capabilities provided that they have been thoroughly
instructed regarding use of the appliance, are supervised,
and understand the risks involved. Children shall not play with
the appliance. Cleaning and user maintenance shall not be
made by children without supervision. Keep the iron and its
cord out of reach of children less than 8 years of age when
its is energized or cooling down.
The surfaces of your appliance can reach very high
temperatures when functioning, which may cause burns. Do
not touch the hot surfaces of the appliance (accessible metal
parts and plastic parts adjacent to the metallic parts).
Never leave the appliance unattended when it is connected to
the mains. Before storing the appliance, once it is unplugged,
please wait until it has cooled down (around 1 hour).
• Do not use any descaling products (vinegar, industrial
descaling products, etc.) to rinse the boiler: they may damage
the appliance.
Before rinsing the boiler/rinsing the anti-scale valve
(depending on the model), wait until the appliance is
completely cold and has been unplugged for at least
2 hours before unscrewing the boiler rinse cap/ the scale
collector cover.
Be careful: if the boiler cap or the boiler rinse cap (depending
on the model), is dropped or severely knocked, have it replaced
by an Approved Service Centre, as it may be damaged.
When rinsing the boiler, never fill it directly from the tap.
The boiler cap must not be opened during use.
The appliance must not be used if it has been dropped, if it
has any visible damage, if it leaks, or if it functions abnormally
in any way. Do not attempt to dismantle your appliance:
have it examined at an Approved Service Centre to avoid
any danger.
Check the electrical power and steam cords for signs of wear
or damage prior to use. If the electrical power cord or the
steam cord is damaged, it must be replaced at an Approved
Service Centre to avoid any danger.
The appliance will not work without the limescale collector
(depending on model).
For your safety, this appliance conforms to all applicable regulations (Low Voltage Directive, Electromagnetic
Compatibility, Environment, etc).
Your steam generator iron is an electrical appliance: it must be used under normal conditions of use. It is
designed for domestic use only.
It is equipped with 2 safety systems:
- a pressure release valve designed to avoid excessive pressure. In the event of malfunction, the valve releases
excess steam.
- a thermal fuse to avoid overheating.
Check that your power supply voltage corresponds to that shown on the appliance (alternating current
only). Any error in plugging in your appliance may cause irreversible damage and invalidate the guarantee.
The appliance is to be connected to a socket-outlet having an earthing contact.
Given the diverse standards in effect, if the appliance is used in a country other than that in which it is
purchased, have it checked by an Approved Service Agent.
Do not use an extension lead. If you accept liability for doing so, only use an extension lead which is in good
condition, has a plug with an earth connection and is suited to the power rating of the appliance.
Completely unwind the power cord before plugging into an earthed socket.
• Do not leave the power cord close to or in contact with sources of heat or sharp edges.
The sole plate of your iron and the iron rest on the base unit can reach extremely high temperatures, and
can cause burns: do not touch them. Never touch the electrical power cords with the sole plate of the iron.
Always use a vented/mesh ironing board and be careful of hot steam when ironing close to the edges of
the board.
Your appliance emits steam, which can cause burns. Always handle the iron with care, especially when
ironing vertically. Never direct the steam towards people or animals.
Never immerse your steam generator iron in water or any other liquid. Never place it under a running tap.
PLEASE RETAIN THIS INSTRUCTION
BOOKLET FOR FUTURE REFERENCE
Description
Locking system*
Your steam generator is fitted with a retaining hoop to hold the iron onto the base with a locked position for
easy transport and storage:
• Locking. • Unlocking.
To transport your steam generator using the handle of the iron:
- Put the iron on the steam generator iron rest and raise the retaining hoop over the iron until it locks into place (audible click).
- Hold the iron by the handle to transport your steam generator.
Preparation
What water may be used?
• Tap water:
Your appliance has been designed to function using untreated tap water. If your water is very hard, we recommend you
use a mix of 50% untreated tap water and 50% distilled water available in hardware stores.
• Types of water not to use:
Heat concentrates the elements contained in water during evaporation. The types of water listed below may contain organic
waste, mineral or chemical elements that can cause spitting, brown staining or premature wear of the appliance: water from
clothes dryers, scented or softened water, water from refrigerators, batteries, air conditioners, rain water, boiled, filtered or bottled
water. These types of water should not be used in your TEFAL iron. Also only use distilled water as advised above.
Always remember:
Never use rainwater or water containing additives (like starch, fragrance or water from domestic appliances). Such
additives can affect the steam properties and at high temperature, form deposits in the steam generator chamber
which are likely to stain your washing.
Filling the water tank
1 Unplugged the appliance and remove the detachable water tank using the handle (located at the front of the steam
generator). fill it with tap watter without exceeding the MAX level.
2 Push it back into its housing until you hear a “click”.
Switch the steam generator on
• Place the steam generator on a flat, stable, horizontal surface that is heat resistant
• Always ensure that the base unit is positioned close enough to the ironing surface to avoid straining and wear of
the steam cord.
• Completely unwind the power cord and take the steam cord out of its storage space.
• Plug your steam generator into an earthed socket.
• Press the “ON-OFF” button.
• The “ON-OFF” button light remains flashing while the appliance is warming up.
• When you switch on the appliance the NORMAL button light flashes while the iron is warming up..
NOTE: If you wish to begin ironing delicate fabrics first, press the “MIN” button straightaway before the iron has
reached the “normal” temperature setting as this will be too hot.
• The MIN(DELICATES)/ NORMAL/ MAX(JEANS) buttons control the temperature and steam
combinations that are suitable for different types of fabrics. They may be selected at any time.
• When the light of the selected button MIN(DELICATES)/ NORMAL/ MAX(JEANS) remains lit
(after around 2 minutes) the steam generator is ready for use.
1. Steam control button
2. Power cord outlet button (depending on model)
3. Power cord storage space (depending on model)
4. Power Zone button
5. Locking system
6. Handle for removing and replacing the detachable
water tank
7. 1.8 L water tank
8. Boiler (in the base unit)
9. Steam cord
10. Sliding storage space for steam cord
The first time the
appliance is used, there
may be some fumes
and smell but this is
not harmful. They will
not affect use and will
disappear rapidly.
Description
Locking system*
Your steam generator is fitted with a retaining hoop to hold the iron onto the base with a locked position for
easy transport and storage:
• Locking. • Unlocking.
To transport your steam generator using the handle of the iron:
- Put the iron on the steam generator iron rest and raise the retaining hoop over the iron until it locks into place (audible click).
- Hold the iron by the handle to transport your steam generator.
Preparation
What water may be used?
• Tap water:
Your appliance has been designed to function using untreated tap water. If your water is very hard, we recommend you
use a mix of 50% untreated tap water and 50% distilled water available in hardware stores.
• Types of water not to use:
Heat concentrates the elements contained in water during evaporation. The types of water listed below may contain organic
waste, mineral or chemical elements that can cause spitting, brown staining or premature wear of the appliance: water from
clothes dryers, scented or softened water, water from refrigerators, batteries, air conditioners, rain water, boiled, filtered or bottled
water. These types of water should not be used in your TEFAL iron. Also only use distilled water as advised above.
Always remember:
Never use rainwater or water containing additives (like starch, fragrance or water from domestic appliances). Such
additives can affect the steam properties and at high temperature, form deposits in the steam generator chamber
which are likely to stain your washing.
Filling the water tank
1 Unplugged the appliance and remove the detachable water tank using the handle (located at the front of the steam
generator). fill it with tap watter without exceeding the MAX level.
2 Push it back into its housing until you hear a “click”.
Switch the steam generator on
• Place the steam generator on a flat, stable, horizontal surface that is heat resistant
• Always ensure that the base unit is positioned close enough to the ironing surface to avoid straining and wear of
the steam cord.
• Completely unwind the power cord and take the steam cord out of its storage space.
• Plug your steam generator into an earthed socket.
• Press the “ON-OFF” button.
• The “ON-OFF” button light remains flashing while the appliance is warming up.
• When you switch on the appliance the NORMAL button light flashes while the iron is warming up..
NOTE: If you wish to begin ironing delicate fabrics first, press the “MIN” button straightaway before the iron has
reached the “normal” temperature setting as this will be too hot.
• The MIN(DELICATES)/ NORMAL/ MAX(JEANS) buttons control the temperature and steam
combinations that are suitable for different types of fabrics. They may be selected at any time.
• When the light of the selected button MIN(DELICATES)/ NORMAL/ MAX(JEANS) remains lit
(after around 2 minutes) the steam generator is ready for use.
1. Steam control button
2. Power cord outlet button (depending on model)
3. Power cord storage space (depending on model)
4. Power Zone button
5. Locking system
6. Handle for removing and replacing the detachable
water tank
7. 1.8 L water tank
8. Boiler (in the base unit)
9. Steam cord
10. Sliding storage space for steam cord
11. Anti Calc Collector
12. Control panel
a. «ON-OFF» button with light
b. «Water tank empty» light and «OK» button
c. «Anti-Calc» light and «OK» button
d. «NORMAL» button
e. «MIN (DELICATES)» button
f. «MAX (JEANS)» button
g. «ECO» button
The first time the
appliance is used, there
may be some fumes
and smell but this is
not harmful. They will
not affect use and will
disappear rapidly.
PLEASE REFER TO SAFETY INSTRUCTIONS AT THE BEGINNING
OF THIS BOOKLET BEFORE USING YOUR APPLIANCE
Operating the control panel
• The light of the selected button MIN(DELICATES)/ NORMAL / MAX(JEANS) flashes while the appliance is warming up.
• When the red «Water tank empty» light is flashing the water tank is empty. Fill the water tank and press the «OK»
button for the light to switch off. See paragraph «Filling the water tank during use».
• When the orange «Anti-calc» light is flashing : maintenance is required, see paragraph «Maintenance and cleaning».
• Your steam generator comes with an automatic shut-off system which activates after approximately 8 minutes
without use. Only the blue light of the «ON-OFF» button is flashing: the steam generator is on standby. Press the «ON-
OFF» button or the steam shot button to start ironing again. See paragraph «AUTO-OFF» System.
Use
Steam ironing
• We recommend that you use a mesh type ironing board to allow steam to pass through
the garments for better ironing results and also to prevent steam venting sideways.
• To obtain steam, press the steam control button under the iron handle. The steam
will stop when you release the button.
• After approximately one minute, and regularly while it is being used, your steam
generator’s electric pump injects water into the boiler. It makes a noise but this is
quite normal.
• If you are using starch, always spray it onto the reverse side of the fabric to be ironed.
Smart Technology Auto control
Your steam generator is fitted with SMART TECHNOLOGY AUTO CONTROL electronic regulation which gives you a
choice of three optimum temperature and steam combinations.
Do not iron over zips, studs or
other hard or sharp objects which
may damage the soleplate. Do
not place the iron on a metal
support. When taking a break
from ironing, always place the
iron on the iron rest plate of the
unit. It is equipped with non-slip
pads and has been designed to
withstand high temperatures.
Dry ironing
• Do not press the steam control button under the iron handle.
Vertical steam ironing
Hang the garment on a coat hanger and hold the fabric slightly taut with one hand.
As steam is very hot: never attempt to remove creases from a garment while it is
being worn, always hang garments on a coat hanger.
Holding the iron in a vertical position tilted slightly forwards, press repeatedly on the steam
control button (underneath the iron handle) moving the iron from top to bottom.
Power Zone Function
Your appliance includes the Power Zone function: concentrated steam shot at the tip of the soleplate, to be used in
particular to target stubborn creases, detailing and zones that are difficult to access.
• To use this function, press the Power Zone button on top of the iron as often as necessary
Steam boost function
• Your appliance includes the Steam boost: automatic sequential steam for effortless use. To be used in particular for
thick fabrics.
• To obtain this function, press the steam control button under the handle three times in quick succession.
Refilling the tank during use
• When the red «Tank empty» light is flashing, there is no more steam. The water tank is empty.
1. Remove the detachable water tank using the handle (located at the front of the steam generator) and fill it without
exceeding the MAX level.
2. Push it back into its housing until you hear a «click».
3. Press the «OK» button located on the control panel until the light goes out to continue ironing.
Maintenance and cleaning
Cleaning your steam generator
Ultragliss soleplate (depending on model):
While the soleplate is still warm, clean it with a damp non-metallic pad.
Your steam iron is fitted with a Gliss/Glide ProtectTM Autoclean soleplate (depending on model):
Its exclusive active coating allows it to eliminate any impurities that may be regularly generated during normal
conditions of use.
Ironing with an unsuitable program could nonetheless leave traces that require manual cleaning. In this case, we
recommend using a soft damp cloth on the soleplate while it is still warm to avoid damaging the coating.
Warning! Using an abrasive pad will damage the soleplate’s autoclean coating
• Do not use detergent or descaling products for cleaning the soleplate base-unit.
• Never hold the iron or the base unit under the tap.
• Regularly clean the soleplate with a damp, non-metallic washing up pad.
• Clean the plastic parts of the appliance occasionally with a soft cloth.
Easy descaling of your steam generator
To extend the life of your steam generator and avoid scale on your ironing, your steam
generator is equipped with a built-in scale collector. This collector, located in the boiler
tank, automatically removes the scale that forms inside.
Operation:
• An orange «anti-calc» light located on the control panel starts flashing to tell you that the anti-calc collector needs
rinsing.
Important: This operation must not be carried out unless the steam generator has been unplugged for at least two
hours and has cooled down completely. To carry out this operation, the steam generator must be close to a sink as water
may come out of the boiler tank when it is opened.
• Once the steam generator has completely cooled down, lift the tab.
• Fully unscrew the collector - and pull it out of the base unit - it contains the scale that has built up in the boiler tank.
• To clean the collector, simply rinse it under running water to remove any scale it contains .
• You can soak the collector rod in white vinegar (available from hardware stores) or lemon juice for a few hours to
remove any stubborn scale stuck to the rod.
Start w ith the fabrics to be ironed at a low temperature and finish with those that need higher temperature.
If you are in doubt about the type of fabric an item of clothing is made from, check the label.
When you select a higher temperature, you can continue to iron provided that you are not ironing a more delicate
fabric that requires a lower temperature. If you select a button to reduce the temperature you should wait until the
blue iron light has stopped flashing before continuing to iron.
*If you are ironing woollen garments, press repeatedly on the steam shot button without placing the iron on the
garment. This will avoid it becoming shiny.
Warning, fabrics with the symbol are not suitable for ironing.
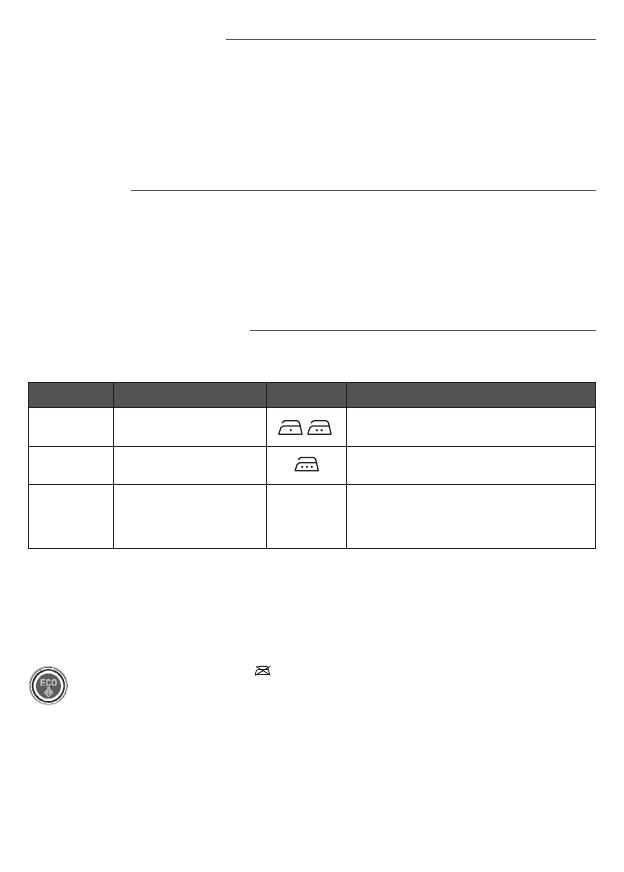
ECO MIN MODE: The ECOmin function reduces energy consumption. Press the ECO button to change to ECO mode and
press the same button again to exit this mode.
During use if you have not used the steam function for a few minutes, press the steam control button several times in a
row. Holding the iron away from your laundry. This will remove the cold water from the steam circuit.
Settings Recommended use Labelling Examples
NORMAL Best for all standard linen
Cotton, wool*, silk, polyester, cashmere, mohair,
viscose and synthetic/cotton mixes.
MAX
(Jeans)
The most effective for thick
or difficult to iron fabrics
Linen, thick cotton, jeans (dark colours)
MIN
(Delicates)
Very gentle, for the most
delicate items and sensitive
colours
Acetate, elastane, polyamide, acrylic and
synthetic mixes.
Note: do not use steam to iron acrylic
or modacrylic fabrics.
1 / 1

Tefal GV8925E0 User manual

Category
Irons
Type
User manual

Ask a question and I''ll find the answer in the document

Finding information in a document is now easier with AI

Ask the document