Page is loading ...

SPARK
Trampoline Manual
READ MANUAL FIRST
A A
B B
C C
D D
E E
F F
G G
H H
12
12
11
11
10
10
9
9
8
8
7
7
6
6
5
5
4
4
3
3
2
2
1
1
DRAWN
CHK'D
APPV'D
MFG
Q.A
UNLESS OTHERWISE SPECIFIED:
DIMENSIONS ARE IN MILLIMETERS
SURFACE FINISH:
TOLERANCES:
LINEAR:
ANGULAR:
FINISH:
DEBURR AND
BREAK SHARP
EDGES
NAME
SIGNATURE
DATE
MATERIAL:
DO NOT SCALE DRAWING
REVISION
TITLE:
DWG NO.
SCALE:1:50
SHEET 1 OF 1
A2
WEIGHT:
N-ASSM_A3 - 10FT
Version 1.0
Weight Limit = 150Kg (330lbs)

1.1 Site Checks
You should setup SPARK in an environment which:
1. is in a visible brightness.
2. is free from strong wind.
3. is clear from walls, structures, fences and anything that will cause injuries.
4. is a flat and firm ground such as grass field, rubber or synthetic compounds
and wood chip.
Site Checks
1
Read all instructions before using SPARK. As the owner of SPARK, you
are responsible to advise all users on the safety instrucons. For more
informaon, contact SPARK Trampolines at 1300 782 661.
2
*If you have any problems by this stage, please do not try to install the trampoline and call 1300 782 661
Safety Distance Guide
*Please make sure you have placed your trampoline in the safety zone
Nothing should be above
Nothing should be under
Keep clear on both sides
1500mm
Keep clear on both sides
1500mm
1
Ellenville, NY 12428
Ph: 845-647-8400
Email: spark@flybar.com
Web: www.flybar.com
Distributed by:
Version 1.0

2
3
Before you start to install a SPARK trampoline, please check all components
and units of the size you purchased. The table on the next page shows all
components and units of dierent sizes. Please make sure you have the
check box cked before you start.
2.1 Preparation
1.
3.
2.
1. Gloves: It is recommend that people who are willing to install the
trampoline should wear gloves to prevent injuries.
2. Number of people: At least two or more people are required for installaon.
3. Ladder: Ladder is recommend to help you install the upper parts of trampoline.
*If you have any problems by this stage, please do not try to install the trampoline and call 1300 782 661
SPARK Installation
2
Ellenville, NY 12428
Ph: 845-647-8400
Email: spark@flybar.com
Web: www.flybar.com
Distributed by:
Version 1.0

4
Frame Tube
Lower Pole
2.2 SPARK Parts
Spring ToolSpring
Jump MatSafety NetSafety Pad
Cross Upper PolesCross Middle Pole
Frame Joiner Support Leg
SPARK Checklist (Parts Per Size)
Structure
Frame Tube
Frame Joiner
Support Leg
Lower Pole
Middle Pole
Cross Upper Poles
Jump Mat
Spring
Safety Enclosure
8 FT
6
6
12
12
12
6
1
48
1
1
6
12
6
18
18
1
10 FT
8
8
16
16
16
8
1
64
1
1
8
16
8
24
24
1
12 FT
10
10
20
20
20
10
1
80
1
1
10
20
10
30
30
1
14 FT
12
12
24
24
24
12
1
96
1
1
12
24
12
36
36
1
Safety Net
Safety Pad
*If you are missing any parts or have problem nding them, please do not try to install the trampoline and call
1300 782 661
Manual
*If you have any problems by this stage, please do not try to install the trampoline and call 1300 782 661
Leg Connector
Leg Bolt (Longer)
Pole Bolt (Shorter)
Nut
Washer
Leg Connector
Tool
Spring Tool
3
Ellenville, NY 12428
Ph: 845-647-8400
Email: spark@flybar.com
Web: www.flybar.com
Distributed by:
Version 1.0
Frame Tube Frame Joiner Support Leg
Lower Pole Cross Middle Pole Cross Upper Pole
Leg Connector Spring Spring Tool
Safety Pad Safety Net Jump Mat
4
Frame Tube
Lower Pole
2.2 SPARK Parts
Spring ToolSpring
Jump Mat
Safety NetSafety Pad
Cross Upper PolesCross Middle Pole
Frame Joiner Support Leg
SPARK Checklist (Parts Per Size)
Structure
Frame Tube
Frame Joiner
Support Leg
Lower Pole
Middle Pole
Cross Upper Poles
Jump Mat
Spring
Safety Enclosure
8 FT
6
6
12
12
12
6
1
48
1
1
6
12
6
18
18
1
10 FT
8
8
16
16
16
8
1
64
1
1
8
16
8
24
24
1
12 FT
10
10
20
20
20
10
1
80
1
1
10
20
10
30
30
1
14 FT
12
12
24
24
24
12
1
96
1
1
12
24
12
36
36
1
Safety Net
Safety Pad
*If you are missing any parts or have problem nding them, please do not try to install the trampoline and call
1300 782 661
Manual
*If you have any problems by this stage, please do not try to install the trampoline and call 1300 782 661
Leg Connector
Leg Bolt (Longer)
Pole Bolt (Shorter)
Nut
Washer
Leg Connector
Tool
Spring Tool

STEP 1: “V” Shape Support Leg Assembly
STEP 2: Middle Safety Pole Assembly
A
<COMPANY NAME>
SCALE:1:20
SIZE
DWG. NO.
A
REV.
MATERIAL
FINISH
--
--
DO NOT SCALE DRAWING
APPLICATION
USED ON
NEXT ASSY
DIMENSIONS ARE IN INCHES
TOLERANCES:
FRACTIONAL
ANGULAR: MACH
BEND
TWO PLACE DECIMAL
THREE PLACE DECIMAL
NAME
DATE
DRAWN
CHECKED
ENG APPR.
MFG APPR.
Q.A.
SHEET 1 OF 1
WEIGHT:
COMMENTS:
THE INFORMATION CONTAINED IN THIS
DRAWING IS THE SOLE PROPERTY OF
<INSERT COMPANY NAME HERE>. ANY
REPRODUCTION IN PART OR AS A WHOLE
WITHOUT THE WRITTEN PERMISSION OF
<INSERT COMPANY NAME HERE> IS
PROHIBITED.
PROPRIETARY AND CONFIDENTIAL
2.3 Installation
It is recommended that you should have at least 2 people to build the
trampoline. Please keep children away and build the trampoline above the
assembly site.
A
<COMPANY NAME>
SCALE:1:20
SIZE
DWG. NO.
A
REV.
MATERIAL
FINISH
--
--
DO NOT SCALE DRAWING
APPLICATION
USED ON
NEXT ASSY
DIMENSIONS ARE IN INCHES
TOLERANCES:
FRACTIONAL
ANGULAR: MACH
BEND
TWO PLACE DECIMAL
THREE PLACE DECIMAL
NAME
DATE
DRAWN
CHECKED
ENG APPR.
MFG APPR.
Q.A.
SHEET 1 OF 1
WEIGHT:
COMMENTS:
THE INFORMATION CONTAINED IN THIS
DRAWING IS THE SOLE PROPERTY OF
<INSERT COMPANY NAME HERE>. ANY
REPRODUCTION IN PART OR AS A WHOLE
WITHOUT THE WRITTEN PERMISSION OF
<INSERT COMPANY NAME HERE> IS
PROHIBITED.
PROPRIETARY AND CONFIDENTIAL
A
<COMPANY NAME>
SCALE:1:10
SIZE
DWG. NO.
A
REV.
MATERIAL
FINISH
--
--
DO NOT SCALE DRAWING
APPLICATION
USED ON
NEXT ASSY
DIMENSIONS ARE IN INCHES
TOLERANCES:
FRACTIONAL
ANGULAR: MACH
BEND
TWO PLACE DECIMAL
THREE PLACE DECIMAL
NAME
DATE
DRAWN
CHECKED
ENG APPR.
MFG APPR.
Q.A.
SHEET 1 OF 1
WEIGHT:
COMMENTS:
THE INFORMATION CONTAINED IN THIS
DRAWING IS THE SOLE PROPERTY OF
<INSERT COMPANY NAME HERE>. ANY
REPRODUCTION IN PART OR AS A WHOLE
WITHOUT THE WRITTEN PERMISSION OF
<INSERT COMPANY NAME HERE> IS
PROHIBITED.
PROPRIETARY AND CONFIDENTIAL
A
<COMPANY NAME>
SCALE:1:10
SIZE
DWG. NO.
A
REV.
MATERIAL
FINISH
--
--
DO NOT SCALE DRAWING
APPLICATION
USED ON
NEXT ASSY
DIMENSIONS ARE IN INCHES
TOLERANCES:
FRACTIONAL
ANGULAR: MACH
BEND
TWO PLACE DECIMAL
THREE PLACE DECIMAL
NAME
DATE
DRAWN
CHECKED
ENG APPR.
MFG APPR.
Q.A.
SHEET 1 OF 1
WEIGHT:
COMMENTS:
THE INFORMATION CONTAINED IN THIS
DRAWING IS THE SOLE PROPERTY OF
<INSERT COMPANY NAME HERE>. ANY
REPRODUCTION IN PART OR AS A WHOLE
WITHOUT THE WRITTEN PERMISSION OF
<INSERT COMPANY NAME HERE> IS
PROHIBITED.
PROPRIETARY AND CONFIDENTIAL
<COMPANY NAME>
SCALE:1:20
SIZE
DWG. NO.
A
REV.
MATERIAL
FINISH
--
--
DO NOT SCALE DRAWING
APPLICATION
USED ON
NEXT ASSY
DIMENSIONS ARE IN INCHES
TOLERANCES:
FRACTIONAL
ANGULAR: MACH
BEND
TWO PLACE DECIMAL
THREE PLACE DECIMAL
NAME
DATE
DRAWN
CHECKED
ENG APPR.
MFG APPR.
Q.A.
SHEET 1 OF 1
WEIGHT:
COMMENTS:
THE INFORMATION CONTAINED IN THIS
DRAWING IS THE SOLE PROPERTY OF
<INSERT COMPANY NAME HERE>. ANY
REPRODUCTION IN PART OR AS A WHOLE
WITHOUT THE WRITTEN PERMISSION OF
<INSERT COMPANY NAME HERE> IS
PROHIBITED.
PROPRIETARY AND CONFIDENTIAL
*Do not fully ghten the bolts
*Do not fully ghten the bolts
5
4
Ellenville, NY 12428
Ph: 845-647-8400
Email: spark@flybar.com
Web: www.flybar.com
Distributed by:
Version 1.0

STEP 3: Hook Safety Net to Jump Mat
A A
B B
C C
D D
E E
F F
G G
H H
12
12
11
11
10
10
9
9
8
8
7
7
6
6
5
5
4
4
3
3
2
2
1
1
DRAWN
CHK'D
APPV'D
MFG
Q.A
UNLESS OTHERWISE SPECIFIED:
DIMENSIONS ARE IN MILLIMETERS
SURFACE FINISH:
TOLERANCES:
LINEAR:
ANGULAR:
FINISH:
DEBURR AND
BREAK SHARP
EDGES
NAME
SIGNATURE
DATE
MATERIAL:
DO NOT SCALE DRAWING
REVISION
TITLE:
DWG NO.
SCALE:1:20
SHEET 1 OF 1
A2
WEIGHT:
N-Mat and Net Step1-1
Safety Net
Jump Mat
5
Ellenville, NY 12428
Ph: 845-647-8400
Email: spark@flybar.com
Web: www.flybar.com
Distributed by:
Repeat this step until the whole safety net is
hooked on to the jump mat
A A
B B
C C
D D
E E
F F
G G
H H
12
12
11
11
10
10
9
9
8
8
7
7
6
6
5
5
4
4
3
3
2
2
1
1
DRAWN
CHK'D
APPV'D
MFG
Q.A
UNLESS OTHERWISE SPECIFIED:
DIMENSIONS ARE IN MILLIMETERS
SURFACE FINISH:
TOLERANCES:
LINEAR:
ANGULAR:
FINISH:
DEBURR AND
BREAK SHARP
EDGES
NAME
SIGNATURE
DATE
MATERIAL:
DO NOT SCALE DRAWING
REVISION
TITLE:
DWG NO.
SCALE:1:20
SHEET 1 OF 1
A2
WEIGHT:
N-Mat and Net Step1
Safety Net
Jump Mat
Version 1.0

A A
B B
C C
D D
E E
F F
G G
H H
12
12
11
11
10
10
9
9
8
8
7
7
6
6
5
5
4
4
3
3
2
2
1
1
DRAWN
CHK'D
APPV'D
MFG
Q.A
UNLESS OTHERWISE SPECIFIED:
DIMENSIONS ARE IN MILLIMETERS
SURFACE FINISH:
TOLERANCES:
LINEAR:
ANGULAR:
FINISH:
DEBURR AND
BREAK SHARP
EDGES
NAME
SIGNATURE
DATE
MATERIAL:
DO NOT SCALE DRAWING
REVISION
TITLE:
DWG NO.
SCALE:1:5
SHEET 1 OF 1
A2
WEIGHT:
N-ASSM_1 - 10FT
A
DETAIL A
SCALE 2 : 5
A A
B B
C C
D D
E E
F F
G G
H H
12
12
11
11
10
10
9
9
8
8
7
7
6
6
5
5
4
4
3
3
2
2
1
1
DRAWN
CHK'D
APPV'D
MFG
Q.A
UNLESS OTHERWISE SPECIFIED:
DIMENSIONS ARE IN MILLIMETERS
SURFACE FINISH:
TOLERANCES:
LINEAR:
ANGULAR:
FINISH:
DEBURR AND
BREAK SHARP
EDGES
NAME
SIGNATURE
DATE
MATERIAL:
DO NOT SCALE DRAWING
REVISION
TITLE:
DWG NO.
SCALE:1:5
SHEET 1 OF 1
A2
WEIGHT:
N-ASSM_1 - 10FT
Frame Segment
Frame Tube
Frame Joiner
A A
B B
C C
D D
E E
F F
G G
H H
12
12
11
11
10
10
9
9
8
8
7
7
6
6
5
5
4
4
3
3
2
2
1
1
DRAWN
CHK'D
APPV'D
MFG
Q.A
UNLESS OTHERWISE SPECIFIED:
DIMENSIONS ARE IN MILLIMETERS
SURFACE FINISH:
TOLERANCES:
LINEAR:
ANGULAR:
FINISH:
DEBURR AND
BREAK SHARP
EDGES
NAME
SIGNATURE
DATE
MATERIAL:
DO NOT SCALE DRAWING
REVISION
TITLE:
DWG NO.
SCALE:1:10
SHEET 1 OF 1
A2
WEIGHT:
N-ASSM_2 - 10FT
Frame Segment
Frame Segment
6
Ellenville, NY 12428
Ph: 845-647-8400
Email: spark@flybar.com
Web: www.flybar.com
Distributed by:
STEP 4: Prepare Frame Segments
STEP 5: Join the Frame Segments and Form a Circle
6
Frame Segment 1 Frame Segment 2
STEP 3: Prepare the FRAME SEGMENTs
Pick up a FRAME JOINER and a FRAME TUBE, and then insert the larger square end
of the FRAME TUBE into the square tube of the FRAME JOINER to form a FRAME
SEGMENT. Please make sure the holes of the FRAME TUBE are facing upward before
you insert it into the FRAME JOINER. Please be aware the round tubes of the FRAME
JOINER should be vercal to the surface and facing outward.
Repeat this process, and prepare all FRAME SEGMENTs.
STEP 4: Join the FRAME SEGMENTs and form a circle
Pick up two FRAME SEGMENTs and Insert the small square end (without the FRAME
JOINER) of one FRAME SEGMENT into the larger square end (with the FRAME
JOINER) of the other FRAME SEGMENT.
Frame Tube Frame Joiner
Frame Segment
*If you have any problems by this stage, please do not try to install the trampoline and call 1300 782 661
*Do not fully ghten the bolts
*Do not fully ghten the bolts
A bit of force might be needed to push the larger ends of
frame tubes into frame joiners at this stage
Version 1.0

7
Ellenville, NY 12428
Ph: 845-647-8400
Email: spark@flybar.com
Web: www.flybar.com
Distributed by:
6
Frame Segment 1 Frame Segment 2
STEP 3: Prepare the FRAME SEGMENTs
Pick up a FRAME JOINER and a FRAME TUBE, and then insert the larger square end
of the FRAME TUBE into the square tube of the FRAME JOINER to form a FRAME
SEGMENT. Please make sure the holes of the FRAME TUBE are facing upward before
you insert it into the FRAME JOINER. Please be aware the round tubes of the FRAME
JOINER should be vercal to the surface and facing outward.
Repeat this process, and prepare all FRAME SEGMENTs.
STEP 4: Join the FRAME SEGMENTs and form a circle
Pick up two FRAME SEGMENTs and Insert the small square end (without the FRAME
JOINER) of one FRAME SEGMENT into the larger square end (with the FRAME
JOINER) of the other FRAME SEGMENT.
Frame Tube Frame Joiner
Frame Segment
*If you have any problems by this stage, please do not try to install the trampoline and call 1300 782 661
*Do not fully ghten the bolts
*Do not fully ghten the bolts
A A
B B
C C
D D
E E
F F
G G
H H
12
12
11
11
10
10
9
9
8
8
7
7
6
6
5
5
4
4
3
3
2
2
1
1
DRAWN
CHK'D
APPV'D
MFG
Q.A
UNLESS OTHERWISE SPECIFIED:
DIMENSIONS ARE IN MILLIMETERS
SURFACE FINISH:
TOLERANCES:
LINEAR:
ANGULAR:
FINISH:
DEBURR AND
BREAK SHARP
EDGES
NAME
SIGNATURE
DATE
MATERIAL:
DO NOT SCALE DRAWING
REVISION
TITLE:
DWG NO.
SCALE:1:20
SHEET 1 OF 1
A2
WEIGHT:
N-ASSM_A1 - 10FT
STEP 6: Prepare and align Safety Net Door
Make sure the Safety Net door is in the middle of two Frame Joiners
A A
B B
C C
D D
E E
F F
G G
H H
12
12
11
11
10
10
9
9
8
8
7
7
6
6
5
5
4
4
3
3
2
2
1
1
DRAWN
CHK'D
APPV'D
MFG
Q.A
UNLESS OTHERWISE SPECIFIED:
DIMENSIONS ARE IN MILLIMETERS
SURFACE FINISH:
TOLERANCES:
LINEAR:
ANGULAR:
FINISH:
DEBURR AND
BREAK SHARP
EDGES
NAME
SIGNATURE
DATE
MATERIAL:
DO NOT SCALE DRAWING
REVISION
TITLE:
DWG NO.
SCALE:1:20
SHEET 1 OF 1
A2
WEIGHT:
N-ASSM_A1 - 10FT
Safety Net Door
Frame
Joiner
Frame
Joiner
Version 1.0
Before forming a full circle, it may be hard to fully insert the
last frame tube into the frame joiner, but don’t worry just
make sure they are attached as the strength of the springs
will pull them together in Step 7
Repeat Step 5 and Form a Circle

A A
B B
C C
D D
E E
F F
G G
H H
12
12
11
11
10
10
9
9
8
8
7
7
6
6
5
5
4
4
3
3
2
2
1
1
DRAWN
CHK'D
APPV'D
MFG
Q.A
UNLESS OTHERWISE SPECIFIED:
DIMENSIONS ARE IN MILLIMETERS
SURFACE FINISH:
TOLERANCES:
LINEAR:
ANGULAR:
FINISH:
DEBURR AND
BREAK SHARP
EDGES
NAME
SIGNATURE
DATE
MATERIAL:
DO NOT SCALE DRAWING
REVISION
TITLE:
DWG NO.
SCALE:1:20
SHEET 1 OF 1
A2
WEIGHT:
N-ASSM_A1 - 10FT
Spring
Jump Mat
STEP 7: Install Springs
Firstly pick up a SPRING, and connect one end
with smaller opening to the triangle hook of the
JUMP MAT. Put 2 springs in every 8th hole so the
mat tension is evenly spread. Use SPRING TOOL
(if necessary)
Smaller
Opening
End
Larger
Opening
End
DETAIL
SCALE 1 : 5
A A
B B
C C
D D
E E
F F
G G
H H
12
12
11
11
10
10
9
9
8
8
7
7
6
6
5
5
4
4
3
3
2
2
1
1
DRAWN
CHK'D
APPV'D
MFG
Q.A
UNLESS OTHERWISE SPECIFIED:
DIMENSIONS ARE IN MILLIMETERS
SURFACE FINISH:
TOLERANCES:
LINEAR:
ANGULAR:
FINISH:
DEBURR AND
BREAK SHARP
EDGES
NAME
SIGNATURE
DATE
MATERIAL:
DO NOT SCALE DRAWING
REVISION
TITLE:
DWG NO.
SCALE:1:20
SHEET 1 OF 1
A2
WEIGHT:
N-ASSM_A1 - 10FT
Springs
Jump Mat
8
Ellenville, NY 12428
Ph: 845-647-8400
Email: spark@flybar.com
Web: www.flybar.com
Distributed by:
Version 1.0
A A
B B
C C
D D
E E
F F
G G
H H
12
12
11
11
10
10
9
9
8
8
7
7
6
6
5
5
4
4
3
3
2
2
1
1
DRAWN
CHK'D
APPV'D
MFG
Q.A
UNLESS OTHERWISE SPECIFIED:
DIMENSIONS ARE IN MILLIMETERS
SURFACE FINISH:
TOLERANCES:
LINEAR:
ANGULAR:
FINISH:
DEBURR AND
BREAK SHARP
EDGES
NAME
SIGNATURE
DATE
MATERIAL:
DO NOT SCALE DRAWING
REVISION
TITLE:
DWG NO.
SCALE:1:20
SHEET 1 OF 1
A2
WEIGHT:
N-ASSM_A1 - 10FT
D
DETAIL D
SCALE 1 : 2
A A
B B
C C
D D
E E
F F
G G
H H
12
12
11
11
10
10
9
9
8
8
7
7
6
6
5
5
4
4
3
3
2
2
1
1
DRAWN
CHK'D
APPV'D
MFG
Q.A
UNLESS OTHERWISE SPECIFIED:
DIMENSIONS ARE IN MILLIMETERS
SURFACE FINISH:
TOLERANCES:
LINEAR:
ANGULAR:
FINISH:
DEBURR AND
BREAK SHARP
EDGES
NAME
SIGNATURE
DATE
MATERIAL:
DO NOT SCALE DRAWING
REVISION
TITLE:
DWG NO.
SCALE:1:20
SHEET 1 OF 1
A2
WEIGHT:
N-ASSM_A1 - 10FT
*Please be careful with the springs while installing
as the spring attachments can cause injury
Use of Spring Tool
Spring
Spring Tool

9
Ellenville, NY 12428
Ph: 845-647-8400
Email: spark@flybar.com
Web: www.flybar.com
Distributed by:
STEP 8: Install Support Legs
A A
B B
C C
D D
E E
F F
G G
H H
12
12
11
11
10
10
9
9
8
8
7
7
6
6
5
5
4
4
3
3
2
2
1
1
DRAWN
CHK'D
APPV'D
MFG
Q.A
UNLESS OTHERWISE SPECIFIED:
DIMENSIONS ARE IN MILLIMETERS
SURFACE FINISH:
TOLERANCES:
LINEAR:
ANGULAR:
FINISH:
DEBURR AND
BREAK SHARP
EDGES
NAME
SIGNATURE
DATE
MATERIAL:
DO NOT SCALE DRAWING
REVISION
TITLE:
DWG NO.
SCALE:1:50
SHEET 1 OF 1
A2
WEIGHT:
N-ASSM_A2 - 10FT
Support Leg
Frame Joiner
Repeat STEP 8
A A
B B
C C
D D
E E
F F
G G
H H
12
12
11
11
10
10
9
9
8
8
7
7
6
6
5
5
4
4
3
3
2
2
1
1
DRAWN
CHK'D
APPV'D
MFG
Q.A
UNLESS OTHERWISE SPECIFIED:
DIMENSIONS ARE IN MILLIMETERS
SURFACE FINISH:
TOLERANCES:
LINEAR:
ANGULAR:
FINISH:
DEBURR AND
BREAK SHARP
EDGES
NAME
SIGNATURE
DATE
MATERIAL:
DO NOT SCALE DRAWING
REVISION
TITLE:
DWG NO.
SCALE:1:50
SHEET 1 OF 1
A2
WEIGHT:
N-ASSM_A2 - 10FT
6
Frame Segment 1 Frame Segment 2
STEP 3: Prepare the FRAME SEGMENTs
Pick up a FRAME JOINER and a FRAME TUBE, and then insert the larger square end
of the FRAME TUBE into the square tube of the FRAME JOINER to form a FRAME
SEGMENT. Please make sure the holes of the FRAME TUBE are facing upward before
you insert it into the FRAME JOINER. Please be aware the round tubes of the FRAME
JOINER should be vercal to the surface and facing outward.
Repeat this process, and prepare all FRAME SEGMENTs.
STEP 4: Join the FRAME SEGMENTs and form a circle
Pick up two FRAME SEGMENTs and Insert the small square end (without the FRAME
JOINER) of one FRAME SEGMENT into the larger square end (with the FRAME
JOINER) of the other FRAME SEGMENT.
Frame Tube Frame Joiner
Frame Segment
*If you have any problems by this stage, please do not try to install the trampoline and call 1300 782 661
*Do not fully ghten the bolts
*Do not fully ghten the bolts
Pick up the Support Legs and plug it into the frame
joiner vertical holes using the push button technology.
Version 1.0

A A
B B
C C
D D
E E
F F
G G
H H
12
12
11
11
10
10
9
9
8
8
7
7
6
6
5
5
4
4
3
3
2
2
1
1
DRAWN
CHK'D
APPV'D
MFG
Q.A
UNLESS OTHERWISE SPECIFIED:
DIMENSIONS ARE IN MILLIMETERS
SURFACE FINISH:
TOLERANCES:
LINEAR:
ANGULAR:
FINISH:
DEBURR AND
BREAK SHARP
EDGES
NAME
SIGNATURE
DATE
MATERIAL:
DO NOT SCALE DRAWING
REVISION
TITLE:
DWG NO.
SCALE:1:50
SHEET 1 OF 1
A2
WEIGHT:
N-ASSM_A2 - 10FT
Support Leg
Frame Joiner
Safety Net
STEP 9: Install Springs
Install the rest of the springs except the ones next to Frame Joiner
6
Frame Segment 1 Frame Segment 2
STEP 3: Prepare the FRAME SEGMENTs
Pick up a FRAME JOINER and a FRAME TUBE, and then insert the larger square end
of the FRAME TUBE into the square tube of the FRAME JOINER to form a FRAME
SEGMENT. Please make sure the holes of the FRAME TUBE are facing upward before
you insert it into the FRAME JOINER. Please be aware the round tubes of the FRAME
JOINER should be vercal to the surface and facing outward.
Repeat this process, and prepare all FRAME SEGMENTs.
STEP 4: Join the FRAME SEGMENTs and form a circle
Pick up two FRAME SEGMENTs and Insert the small square end (without the FRAME
JOINER) of one FRAME SEGMENT into the larger square end (with the FRAME
JOINER) of the other FRAME SEGMENT.
Frame Tube Frame Joiner
Frame Segment
*If you have any problems by this stage, please do not try to install the trampoline and call 1300 782 661
*Do not fully ghten the bolts
*Do not fully ghten the bolts
STEP 10: Align Safety Pad and Install Ramaining Springs
A A
B B
C C
D D
E E
F F
G G
H H
12
12
11
11
10
10
9
9
8
8
7
7
6
6
5
5
4
4
3
3
2
2
1
1
DRAWN
CHK'D
APPV'D
MFG
Q.A
UNLESS OTHERWISE SPECIFIED:
DIMENSIONS ARE IN MILLIMETERS
SURFACE FINISH:
TOLERANCES:
LINEAR:
ANGULAR:
FINISH:
DEBURR AND
BREAK SHARP
EDGES
NAME
SIGNATURE
DATE
MATERIAL:
DO NOT SCALE DRAWING
REVISION
TITLE:
DWG NO.
SCALE:1:50
SHEET 1 OF 1
A2
WEIGHT:
N-ASSM_A2 - 10FT
10
Ellenville, NY 12428
Ph: 845-647-8400
Email: spark@flybar.com
Web: www.flybar.com
Distributed by:
Safety Pad
Version 1.0

A A
B B
C C
D D
E E
F F
G G
H H
12
12
11
11
10
10
9
9
8
8
7
7
6
6
5
5
4
4
3
3
2
2
1
1
DRAWN
CHK'D
APPV'D
MFG
Q.A
UNLESS OTHERWISE SPECIFIED:
DIMENSIONS ARE IN MILLIMETERS
SURFACE FINISH:
TOLERANCES:
LINEAR:
ANGULAR:
FINISH:
DEBURR AND
BREAK SHARP
EDGES
NAME
SIGNATURE
DATE
MATERIAL:
DO NOT SCALE DRAWING
REVISION
TITLE:
DWG NO.
SCALE:1:50
SHEET 1 OF 1
A2
WEIGHT:
N-ASSM_A3 - 10FT
Frame Joiner
Lower
Poles
STEP 11: Install Lower Poles
6
Frame Segment 1 Frame Segment 2
STEP 3: Prepare the FRAME SEGMENTs
Pick up a FRAME JOINER and a FRAME TUBE, and then insert the larger square end
of the FRAME TUBE into the square tube of the FRAME JOINER to form a FRAME
SEGMENT. Please make sure the holes of the FRAME TUBE are facing upward before
you insert it into the FRAME JOINER. Please be aware the round tubes of the FRAME
JOINER should be vercal to the surface and facing outward.
Repeat this process, and prepare all FRAME SEGMENTs.
STEP 4: Join the FRAME SEGMENTs and form a circle
Pick up two FRAME SEGMENTs and Insert the small square end (without the FRAME
JOINER) of one FRAME SEGMENT into the larger square end (with the FRAME
JOINER) of the other FRAME SEGMENT.
Frame Tube Frame Joiner
Frame Segment
*If you have any problems by this stage, please do not try to install the trampoline and call 1300 782 661
*Do not fully ghten the bolts
*Do not fully ghten the bolts
STEP 12: Install Cross Middle Poles
A A
B B
C C
D D
E E
F F
G G
H H
12
12
11
11
10
10
9
9
8
8
7
7
6
6
5
5
4
4
3
3
2
2
1
1
DRAWN
CHK'D
APPV'D
MFG
Q.A
UNLESS OTHERWISE SPECIFIED:
DIMENSIONS ARE IN MILLIMETERS
SURFACE FINISH:
TOLERANCES:
LINEAR:
ANGULAR:
FINISH:
DEBURR AND
BREAK SHARP
EDGES
NAME
SIGNATURE
DATE
MATERIAL:
DO NOT SCALE DRAWING
REVISION
TITLE:
DWG NO.
SCALE:1:50
SHEET 1 OF 1
A2
WEIGHT:
N-ASSM_A3 - 10FT
Lower Pole
Cross Middle Pole
11
Ellenville, NY 12428
Ph: 845-647-8400
Email: spark@flybar.com
Web: www.flybar.com
Distributed by:
Pick up the lower poles and plug the larger end into
the frame joiner vertical holes using the push button
technology. It should look like the image below when
you finish:
Version 1.0

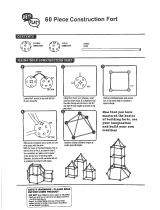
STEP 13: Install Cross Upper Poles
A A
B B
C C
D D
E E
F F
G G
H H
12
12
11
11
10
10
9
9
8
8
7
7
6
6
5
5
4
4
3
3
2
2
1
1
DRAWN
CHK'D
APPV'D
MFG
Q.A
UNLESS OTHERWISE SPECIFIED:
DIMENSIONS ARE IN MILLIMETERS
SURFACE FINISH:
TOLERANCES:
LINEAR:
ANGULAR:
FINISH:
DEBURR AND
BREAK SHARP
EDGES
NAME
SIGNATURE
DATE
MATERIAL:
DO NOT SCALE DRAWING
REVISION
TITLE:
DWG NO.
SCALE:1:50
SHEET 1 OF 1
A2
WEIGHT:
N-ASSM_A3 - 10FT
Cross
Middle Pole
Cross Upper Pole
*If you have any problems by this stage, please do not try to install the trampoline and call 1300 782 661
STEP 10: Install the CROSS MIDDLE POLEs
After installing the LOWER POLEs, now you can plug the CROSS MIDDLE POLEs
into the LOWER POLEs upper hole and it should look like the image below when
you finish:
Cross Middle Pole
STEP 11: Install the CROSS UPPER POLEs
After installing the CROSS MIDDLE POLEs, now pick up one CROSS UPPER POLE
and loosen the screws on the top (image below). Do not take the screws out.
You can now adjust the CROSS UPPER POLE angle and plug it into the CROSS
MIDDLE POLE. The Screw heads should face outward. It should look like the
image on next page. Finally ghten the screws. Congratulaons, you are just one
step away from finish building your personal SPARK.
Screws
1. Loosen the screws
2. Adjust the Angle
3. Plug it into the CROSS MIDDLE POLE
4. Make sure the screw heads are facing
outward
5. Tighten the screws
11
12
Ellenville, NY 12428
Ph: 845-647-8400
Email: spark@flybar.com
Web: www.flybar.com
Distributed by:
After installing the cross middle poles, now pick up one cross upper pole and loosen the screws on
the top (image below). Do not take the screws out. You can now adjust the cross upper pole angle and
plug it into the cross Middle pole. The screw heads should face outward. It should look like the image
below. Finally tighten the screws. Congratulations, you are just one step away from finish building your
personal spark.
Version 1.0

STEP 16: Hook Safety Net Springs to Cross Upper Poles
6
Frame Segment 1 Frame Segment 2
STEP 3: Prepare the FRAME SEGMENTs
Pick up a FRAME JOINER and a FRAME TUBE, and then insert the larger square end
of the FRAME TUBE into the square tube of the FRAME JOINER to form a FRAME
SEGMENT. Please make sure the holes of the FRAME TUBE are facing upward before
you insert it into the FRAME JOINER. Please be aware the round tubes of the FRAME
JOINER should be vercal to the surface and facing outward.
Repeat this process, and prepare all FRAME SEGMENTs.
STEP 4: Join the FRAME SEGMENTs and form a circle
Pick up two FRAME SEGMENTs and Insert the small square end (without the FRAME
JOINER) of one FRAME SEGMENT into the larger square end (with the FRAME
JOINER) of the other FRAME SEGMENT.
Frame Tube Frame Joiner
Frame Segment
*If you have any problems by this stage, please do not try to install the trampoline and call 1300 782 661
*Do not fully ghten the bolts
*Do not fully ghten the bolts
You have successfully installed SPARK trampoline!
A A
B B
C C
D D
E E
F F
G G
H H
12
12
11
11
10
10
9
9
8
8
7
7
6
6
5
5
4
4
3
3
2
2
1
1
DRAWN
CHK'D
APPV'D
MFG
Q.A
UNLESS OTHERWISE SPECIFIED:
DIMENSIONS ARE IN MILLIMETERS
SURFACE FINISH:
TOLERANCES:
LINEAR:
ANGULAR:
FINISH:
DEBURR AND
BREAK SHARP
EDGES
NAME
SIGNATURE
DATE
MATERIAL:
DO NOT SCALE DRAWING
REVISION
TITLE:
DWG NO.
SCALE:1:50
SHEET 1 OF 1
A2
WEIGHT:
N-ASSM_A3 - 10FT
Safety Net
A A
B B
C C
D D
E E
F F
G G
H H
12
12
11
11
10
10
9
9
8
8
7
7
6
6
5
5
4
4
3
3
2
2
1
1
DRAWN
CHK'D
APPV'D
MFG
Q.A
UNLESS OTHERWISE SPECIFIED:
DIMENSIONS ARE IN MILLIMETERS
SURFACE FINISH:
TOLERANCES:
LINEAR:
ANGULAR:
FINISH:
DEBURR AND
BREAK SHARP
EDGES
NAME
SIGNATURE
DATE
MATERIAL:
DO NOT SCALE DRAWING
REVISION
TITLE:
DWG NO.
SCALE:1:50
SHEET 1 OF 1
A2
WEIGHT:
N-ASSM_A3 - 10FT
13
Ellenville, NY 12428
Ph: 845-647-8400
Email: spark@flybar.com
Web: www.flybar.com
Distributed by:
Version 1.0
Weight Limit = 150Kg (330lbs)

Safety Instructions
3
3.1 Instrucons
The Following Informaon Should Be Incorporated In The Addional Instruconal
Materials Of The Informaon Packet:
1. Misuse and abuse of the trampoline is dangerous and can cause serious injuries.
2. Focus your eyes on the edge of the trampoline. This will help control your bounce.
3. Avoid bouncing for too long. Do not bounce when red.
4. Stop your bounce by exing your knees as your feet come in contact with the
trampoline bed. Learn this skill before you aempt any others.
5. Climb on and o the trampoline, do not jump. It is a dangerous pracce to jump
from the trampoline to the oor or ground when dismounng, or onto the
trampoline when mounng. Always use two hands on the frame geng on and o
the trampoline. Never use springs or suspension elements as ‘hand grips’.
6. Learn fundamental bounces and body posions thoroughly before trying more
advanced skills. A variety of trampoline acvies can be carried out by performing
the basic fundamentals in various series and combinaons, or performing one
fundamental aer the other, with or without bounces between them.
7. Avoid bouncing too high. Stay low unl you can control your bounce and repeatedly
land in the centre of the trampoline.
8. Do not use the trampoline as a springboard to other objects. Use the trampoline
only for trampoline style bouncing.
9. Keep objects away that could interfere with the person jumping.
10. For further informaon or addional instruconal materials, contact your nearest
trampoline club.
11. It is advisable not to bounce immediately aer a meal.
12. Do not aempt knee drops as these can cause injury if you aempt this skill
without some experience or personal instrucon.
13. Your clothing should allow plenty of body freedom, but no apping shirts or
skirts to distract your concentraon.
14. No buckles or jewellery should be worn, as these could damage the trampoline
mat and cause injury to you.
15. Do not wear shoes while bouncing on the trampoline.
16.
Do not apply weight more than 150kg.
14
14
Ellenville, NY 12428
Ph: 845-647-8400
Email: spark@flybar.com
Web: www.flybar.com
Distributed by:
Version 1.0
16. Do not apply weight more than 150Kg (330lbs)

Under Mature Supervision Only One Person Should
Use A Trampoline
Do Not Try To Jump O
The Trampoline
Do Not Use/Build A Trampoline
While Under The Inuence Of
Alcohol Or Drugs
No Acvity Allowed
Under The Trampoline
Only Jump In The Middle Of
The Trampoline At All Times
15
15
Ellenville, NY 12428
Ph: 845-647-8400
Email: spark@flybar.com
Web: www.flybar.com
Distributed by:
Version 1.0

Basic Skills
4
4.1 Bouncing
The most important thing about bouncing is that it should be done with control
in the centre of the bed. The basic bounce should always begin low. High, reckless
bouncing should never be allowed.
4.2 The Stop Bounce
This technique allows the user to gain control by stopping quickly. It is achieved by
keeping the feet in contact with the bed, and absorbing the rebound of the trampoline
with the knees and waist. This skill should be the rst skill learnt and should be
employed whenever you feel out of balance, or land away from the center area.
To Learn The Stop Bounce:
1. Stand in centre of the bed with your feet about hip-width apart.
2. Aempt about three easy bounces, keep them low and controlled.
3. Focus your eyes towards the perimeter of the trampoline while bouncing in order
to keep your balance.
4. Stop the bounce by bending at your knees and hips on contact with the bed.
4.3 Arm Acon
Arms are very important for proper control and li. Whenever you go up, your arms
go up. They go up to a set posion about shoulder height and shoulder width. They
should remain in this balanced posion unl you start down. Then they circle down
and slightly behind the hips, ready to li again as you bounce up (see Figure B1).
16
16
Ellenville, NY 12428
Ph: 845-647-8400
Email: spark@flybar.com
Web: www.flybar.com
Distributed by:
Version 1.0

Figure B1 | Arm Acon
4.4 Bounce Variaons
Figures B2, B3 and B4 show three variaons, the tuck, the pike, and the straddle
pike respecvely. These should be assumed at the top of the bounce, before resuming
the normal landing posion on your feet.
Figure B2 | Tuck
Pracce these simple variaons and concentrate on perfect form. Make sure that
your toes are pointed and ngers are straight. These are simple variaons to the basic
bounce and are very important for gaining experience in coordinated movement.
Figure B3 | Pike Figure B4 | Straddle Pike
17
17
Ellenville, NY 12428
Ph: 845-647-8400
Email: spark@flybar.com
Web: www.flybar.com
Distributed by:
Version 1.0

Basic Landing Positions
5
5.1 General
Posions for all drops: seat (see Paragraph 5.2), hands and knees (see Paragraph
5.3), and front (see Paragraph 5.4), should rst be pracced on the ground, then in
a staonary posion, and only then on the trampoline bed. Drops should be
performed aer ‘priming’ the trampoline bed. Priming is done by bending your
knees and pushing down repeatedly on the trampoline bed, thereby seng the bed
in moon. The feet stay in contact with the bed during the enre priming moon.
5.2 The Seat Drop
To Learn The Seat Drop:
1. From the standing posion, prime the bed several mes.
2. Pick up your feet at the top of the last bounce, and sit down. You should land so
that your body is in a sing posion with legs straight out in front and your toes
pointed. Hands should be on the bed next to your hips. Fingers should be together
and pointed toward the toes.
3. Push on the bed with your hands to rebound up to your feet (see Figure B5).
Figure B5 | Seat Drop
18
18
Ellenville, NY 12428
Ph: 845-647-8400
Email: spark@flybar.com
Web: www.flybar.com
Distributed by:
Version 1.0

5.3 The Hands And Knees Drop
To do this drop properly, there should be just as much weight on your hands as on
your knees. Your back should be about approximately parallel to the bed. Knees and
hands should land simultaneously, with the middle of the body landing in the centre
of the trampoline. Hands should be directly under the shoulders. Knees should be
directly under the hips. Your toes should be pointed.
To Learn The Hands And Knees Drop:
1. Get down on your hands and knees on the bed. Make sure you have weight on
both your hands and your knees. Do not sit on your heels.
2. Remain in this posion and try to bounce. Do not rock back and forth between
the hands and knees, but develop an even landing on all four points.
3. From the standing posion, prime the bed several mes. Li upward with your
hips, reach forward with your hands, and land on all fours. Look slightly in front of
your hands on landing. Push to rebound to your feet (see Figure B6).
Figure B6 | Hands & Knees Drop
5.4 The Front Drop
Contact with the trampoline bed should simultaneously take place with your hands,
elbows, chest, stomach, hips, and knees. Knees should be bent. You must come
down level. If the landing is made rst on your chest and arms, they will rebound
before your knees hit which will result in a straining acon on your back. If this type
of landing is made with a travelling, diving approach there is a chance that your
elbows may become skinned. If the landing is made so that your knees and hips hit
rst, then they will rebound and your shoulders and face will land heavily.
19
19
Ellenville, NY 12428
Ph: 845-647-8400
Email: spark@flybar.com
Web: www.flybar.com
Distributed by:
Version 1.0
/