Page is loading ...

Classic
Building Instructions Classic sports boat
1
Building Instructions
Classic sports boat
Order no. 3092/00
„aero-naut“ Modellbau
Stuttgarterstr. 18-22
D-72766 Reutlingen / Germany
http://www.aero-naut.com

Classic
Building Instructions Classic sports boat
2
The boat should be assembled following the sequence of stages as described in these instructions;
the finished assembly is always shown in the illustration for the next stage. Check all components
before reaching for the glue, as you may need to trim them slightly. Allow all glued joints to set hard
before moving on to the next stage. We recommend a fast-setting white glue for building this model.
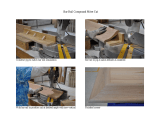
(1) Press out all the die-cut rectangles from the building jig 0, and insert the large rectangle in the long
slot, standing upright. The jig should be placed on a flat surface while the model is being built.
(2) The first step is to cut the glasspaper 65 in half and stick it to the sanding block 66.
Write the part numbers on the die-cut components before carefully pressing them out of the parent
sheets (see die-cut overview at the end of these building instructions). At some points you will need to
cut through the material using a thin, sharp balsa knife. Clean up the edges of the separated parts
using the glasspaper block.
(3) Insert the hull frames 1 - 8 in the slots in the jig 0.
(4) Carefully fit the keel 9 in the notches in the frames 1 - 4, and insert the bow end in the front notch
in the jig; note that the keel 9 must finish flush with the frames 2 - 4. The keel 9 will project by about 2
mm at frame 1.
(5) Insert the two spars 10 in the frames 4 - 8 as shown, and press them carefully into the notches to
their full depth; the spars 10 must not project at all. Press the frame 8 onto the spars 10 from the stern
end.
(6) Apply glue to the corner joints of all parts 1 - 10.
(7) Fit the two bow supports 11 in the notch in the keel 9, and lay the other end on the jig support in
front of frame 1. Note that parts 11 must not project forward beyond the keel 9.
Check that the frame 1, the keel 9 and the jig support are pushed fully into the slots in the jig; the
bottom edge of part 11 should now lie flush with the outside edge of the frame 1. Glue the parts
together, and pin them in place while the glue is setting.
(8) Sand the joint edges of the rear keel sections 12 at an angle, so that they meet neatly in the
centre, and engage in the notches in the frames 5 - 8.
(9) Glue the gunwale rails 13 to the frames 1 - 8.
The rails 13 must be pressed full-depth into the notches in the frames, especially at the frame 1 at the
bow. Pin the rails 13 in place while the glue is setting.
(10) Insert the two chine rails 14 in the keel 9 and the frame 1, keeping the strips on edge and parallel.
Note that the strips must be sanded back (using the sanding block) so that they do not project beyond
the front edge of the keel 9 at the side or forward. Glue the rails to the keel 9 and the frame 1, and
leave the joints to dry out thoroughly.
(11) When the joints have set hard, glue the chine rails 14 in the notches in the frames 2 - 8, and hold
them in place temporarily with pins.
(12) Glue the first hull side 15 to the structure, fixing it in place with spring clamps and pins while the
glue is hardening. Note that the side panels must rest squarely on the support lugs of the frames 1 - 8,
and on the support lug of the keel 9 at the bow. The front edge of the hull side 15 should line up
exactly with the centre of the keel 9 (see front view at top right). Allow the glue to set hard before
attaching the second hull side in the same way. Use pins to fix it to the keel 9 at the bow, and tape it to
the first hull side 15.
(13) Lay the two bottom hull panels 16 flat on the bench, and tape them together temporarily with two
strips of adhesive tape as shown. Don't apply glue at this stage!

Classic
Building Instructions Classic sports boat
3
(14) Lay the taped bottom panels 16 on the hull, and apply more strips of tape as shown, starting from
the right (the stern). Ensure that the cut edges butt up exactly in the centre. At the left end (the bow)
you will have to leave a gap of about 6 mm, as the material is too stiff to conform to the curvature.
(15) Lay the temporarily joined bottom panels on the hull, and tape both sides down to the hull sides.
Leave a small gap open at the extreme bow.
(16) Caution! The next three stages of construction on this page have to be completed before the glue
sets. It is therefore important to check the fit of the bottom hull panels 16 once more before you reach
for the glue bottle.
Remove the hull bottom and apply a fillet of glue along the inside of the central joint. Now move on to
the next stage - 17 - before the glue has time to harden.
(17) Apply glue to the frames 1 - 8, the keel 9, the rear keel sections 12, the spars 10 and the chine
rails 14, and lay the hull bottom 16 on the structure, flush with the side panels 15 at the bow.
(18) Fix the hull bottom 16 to the structure at the bow using pins, then pull the panels 16 down against
the hull sides 15, checking that the panels extend beyond the final frame as far as possible.
(19) Assemble the boatstand as follows: glue parts 17 + 18 together in pairs, and join them with the
spruce rails 19. The finished boatstand. The hull can now be placed in the stand, and left there for the
remainder of the building process.
(20) Apply a thin coat of sanding sealer to all the hull components on the inside to waterproof them.
Caution: don't apply too much, otherwise you could dissolve the glued joints.
(21) Break off the support lugs from the keel 9 and the frames 1 - 8, and sand the broken edges
smooth and flat. Fill the gap between the hull bottom 16 and the chine rails 14 with glue.
Race 400 6V electric motor, Order No. 7000/42, suitable for a drive battery consisting of six sub-C
cells.
(22) Fix the motor to the frame 4 using the self-tapping screws 56.
Slip the propeller shaft (with the propeller 20 attached) through the shaft tube 21, and push the plastic
sleeve 22 on the plain end to act as the shaft coupling.
(23) Slip the shaft tube 21, complete with the propeller shaft 20 and the flexible coupling 22, into the
hull from the underside, and push the coupling sleeve onto the motor shaft. Adjust the propeller shaft
so that it forms a straight line with the motor shaft.
(24) Glue the keel strake 23 between the bottom of the hull 16 and the shaft tube 21. Check that the
strake does not foul the propeller.
Now glue the shaft tube 21 to the hull, applying glue to the inside and outside of the joint.
(25) Glue the battery support rails 24 in the hull.
(26) Glue the cockpit floor support rails 25 in place towards the bow.
(27)Glue the rudder support 26 in the notches of the spars 9 at the stern.
(28)Glue the RC installation plates 27 to the frames 5 - 7.
(29)Glue the deck support rails 28 in the upper notches in frames 3 - 8, clamping them in place while
the glue dries. Press the rails 28 outward against the hull sides 1; see stages 31 + 32.
(30)Glue parts 29 together and sand the edges smooth. Glue the steering column 30 in the steering
wheel 29.
(31) Cut out the dummy instruments (printed on the last page of these instructions) and stick them to
the reverse of the instrument panel 31. Glue the instrument panel 31 to the frame 3 as shown.

Classic
Building Instructions Classic sports boat
4
(32) Glue the deck support stringers 32 and 33 together in pairs, and allow the glue to set hard. Glue
these parts in the top notches in the frames 1 - 3 and the bow supports 11 at the bow. Drill out the
hole in the instrument panel at an angle, and glue the steering wheel in the hole.
(33) Glue the rear facing bulkhead 34 (the transom) to the outside of the hull.
(34) De-grease the brass rudder bush 35 and glue it to the hull; the tube must project out of the
underside of the hull by about 3 mm.
(35) Slip the rudder 36 through the sleeve 3, and fit the first self-locking nut 37 on the top end; adjust it
so that the rudder swivels smoothly, but without lost motion. Fit the tiller 38 on top, and secure it with
the second self-locking nut (37). Tighten the second self-locking nut well, so that the tiller is clamped
securely between the two nuts.
(36) Carefully press the boat deck sections 40 into the front deck panel 39; you may have to sand
back the straight edges of parts 40 slightly. Apply glue to the joint lines on the reverse of the deck.
Allow the glue to set hard, then sand the top surface smooth and flush.
(37) Apply strips of fabric tape 41 to the underside of the deck joints after sanding.
(38) Glue the doublers 45 and 46 to the deck 39.
(39) Trim the boat deck sections 43 to fit in the rear deck panel 42, and sand the edges slightly if
necessary. Glue the central strip 44 to the parts 43; part 42 just serves as a template at this point;
don’t glue it to the other panels.
(40) Tape the front and rear deck sections 39 + 40 together as shown. Apply glue to all the joint faces
of the hull, i.e. where the deck 39 - 42 makes contact. Glue the whole deck to the hull and tape it in
place as shown. It is important that the deck should make proper contact all round, but especially at
the frames 3, 5 and 8.
(41) Stick Velcro (hook-and-loop) tape to the underside of the rudder servo and the servo plate 27.
Connect the rudder pushrod 47 to the tiller 38 and the servo output arm. Fix the servo to part 27 using
the Velcro tape, with the rudder 36 straight and the servo at centre.
(42) Glue the spruce support rail 49 to the cockpit floor 48; note the 20 mm spacing.
(43) Round off the edges of the seat 50 and glue it to the cockpit floor 48 and the rail 49; the seat
should end flush with the floor 48 at the rear.
(44) Place the seat backrest 51 vertically in the hull, resting on the cockpit floor rails 25, and mark the
camber of the deck 42 on the backrest 51 using a felt-tip pen. Sand the backrest down to follow the
rounded shape. Sand all the edges of the backrest 51 to a smooth, rounded profile.
(45) Lay the cockpit floor 48 / seat 50 in the hull, and slide it forward until the floor rests against the
frame 3. Glue the backrest 51 to the seat (50) at the rear.
(46) Weight down part 52 with a bottle so that it rests flat. Glue the hatch frames 53 + 54 to it as
shown.
(47) Lay the assembly 52 - 54 on the frames 6 + 7. Apply glue to the cambered edges of the frames
53 and 54, and lay the prepared hatch cover consisting of parts 43 + 44 on them. Tape the parts to the
hull so that the hatch takes up the camber of the deck 42.
(48) Glue the locating tab 55 to the underside of the hatch 43.
(49) Cut the rubbing strakes 64 to a length of 200 mm, and glue them to both sides of the hull at a
point 10 mm above the bottom chine.

Classic
Building Instructions Classic sports boat
5
(50) At this point all the wooden parts can be sanded smooth, and the whole model given several
coats of sanding sealer, Order No 7666/02. Allow the sealer to dry thoroughly after each coat, and rub
the model down with fine glasspaper before applying the next. Now place the boat in water to check
that everything is watertight. As soon as all the surfaces look smooth and glossy, you can start
applying the colour finish by painting the underwater hull and the seat.
(51) Pin the windscreen 57 to the deck support rails 28 at both ends, pushing the windscreen forward
as far as it will go.
(52) Fold the windscreen up at the front, and apply cyano-acrylate glue to the edge of the doubler 46.
Fold the screen down again, and pin it at the front while the glue is hardening.
(53) Now glue the windscreen 57 to the rails 28 on both sides.
(54) Glue the reinforcement 58 to the rear of the deck 42, and drill a 2 mm Ø hole in it for the flagstock
59. Cut out the flag 60 (printed on the last page), glue it to the flagstock 59 and glue the flagstock in
the reinforcement 58.
These three parts should now be protected with a coat of sanding sealer.
(55) Complete the model by gluing the cleats 62 and the fairleads 61 to the deck using two-pack
adhesive. Apply the trim stripes to the hull sides and the top edge of the windscreen. Stick the gold-
coloured cover at the point of the bow.
Part Part Material No Size and type
No. off
0 Jig Depron 1 Die-cut
1 Hull frame Plywood 1 Die-cut
2 Hull frame Plywood 1 Die-cut
3 Hull frame Plywood 1 Die-cut
4 Hull frame Plywood 1 Die-cut
5 Hull frame Plywood 1 Die-cut
6 Hull frame Plywood 1 Die-cut
7 Hull frame Plywood 1 Die-cut
8 Hull frame Plywood 1 Die-cut
9 Front keel section Plywood 1 Die-cut
10 Spar Plywood 2 Die-cut
11 Bow support Plywood 2 Die-cut
12 Rear keel section Plywood 2 Die-cut
13 Gunwale rail Spruce 2 1.5 x 5 x 480 mm
14 Chine rail Spruce 4 1.5 x 2.5 x 495 mm
15 Hull side Mahogany 2 Die-cut
16 Bottom hull section Birch plywood 2 Die-cut
17 Boatstand, front Mahogany 2 Die-cut
18 Boatstand, rear Mahogany 2 Die-cut
19 Boatstand rail Spruce 2 5 x 5 x 250 mm
20 Shaft, one threaded end Metal / plastic 1 Ready made, 205 mm
21 Propeller shaft tube Brass 1 5 / 4 x 180 mm
22 Flexible coupling sleeve Plastic 1 7274/51, 4.5 x 1.5 Ø x 25 mm
23 Keel Plywood 1 Die-cut
24 Battery support rail Spruce 2 5 x 5 x 230 mm
25 Cockpit floor support rail Spruce 2 5 x 5 x 140 mm
26 Rudder support Plywood 1 Die-cut
27 RC installation plate Plywood 2 Die-cut
28 Deck support rail Spruce 2 3 x 3 x 365 mm
29 Steering wheel Plywood 2 Die-cut
30 Steering column Aluminium 2 2.5 x 45 mm

Classic
Building Instructions Classic sports boat
6
31 Instrument panel Mahogany 1 Die-cut
32 Deck support stringer Mahogany 4 Die-cut
33 Deck support stringer Mahogany 2 Die-cut
34 Transom Mahogany 1 Die-cut
35 Rudder bush Brass 1 Ready made, 7024/02
36 Rudder Metal / plastic 1 Ready made, 7024/02
37 M3 self-locking nut Metal / plastic 2 Ready made, 7766/23
38 Tiller Plastic 1 Ready made
39 Front deck Mahogany 1 Die-cut
40 Front deck insert Mahogany / maple 2 Die-cut
41 Fabric tape Cotton 1 12 x 500 mm
42 Rear deck Mahogany 1 Die-cut
43 Battery compartment hatch Mahogany / maple 2 Die-cut
44 Central deck strip Mahogany 1 Die-cut
45 Bow doubler Mahogany 2 Die-cut
46 Windscreen doubler Mahogany 1 Die-cut
47 Rudder pushrod Steel 1 Ready made
48 Cockpit floor Plywood 1 110 x 130 mm
49 Seat support rail Spruce 1 5 x 5 x 130 mm
50 Seat Balsa 1 10 x 50 x 130 mm
51 Seat backrest Balsa 1 10 x 50 x 130 mm
52 Hatch baseplate Plywood 1 Die-cut
53 Hatch former Plywood 1 Die-cut
54 Hatch former Plywood 1 Die-cut
55 Hatch locating tab Mahogany 1 Die-cut
56 Self-tapping screw Metal 2 7769/21, 2.2 x 6.5 mm
57 Windscreen Plastic 1 Die-cut
58 Reinforcement Mahogany 1 Die-cut
59 Flagstock Aluminium rod 1 2 x 60 mm
60 Flag Paper 1 Printed
61 Fairlead Metal 4 Ready made
62 Cleat Metal 4 Ready made
63 Instruments Paper 1 Printed
64 Rubbing strake Mahogany 1 3 x 3 x 200 mm
65 Glasspaper
66 Sanding block
67 Glue
68 Decal sheet Film
/