Page is loading ...

FMI
PR
ODUCT
S,
LLC
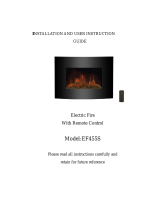
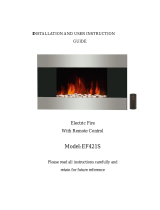
F3610G
36 IN. ELECTIC FIREPLACE
FMI MODEL # LEF36
Mounting Base Feet and Wall Mounting
Bracket Included
FMI Products, LLC

TABLE OF CONTENTS
Safety Information ............................................................................................................................
3
Operating Instructions ......................................................................................................................
4
Installation Instructions .....................................................................................................................
7
Maintenance ....................................................................................................................................
9
Troubleshooting ...............................................................................................................................
Illustrated parts breakdown .................................................................................................................
Warranty ...............................................................................................................................
10
11
12
2

!
SAFETY INFORMATION
Please read and understand this entire manual before attempting to assemble, operate or install
the product.
!
WARNING: Any use of this appliance other than that recommended by the manufacturer
in
this owners manual may cause fire, burns, electric shock and/or other serious injuries or death.
When using electrical appliances, basic precautions should always be followed to reduce the risk of fire, electric shock
and injury to persons including the following:
1. Read the manufacturer’s instructions completely before using this appliance.
2. This appliance will become hot when in use. To avoid burns, do not let bare skin touch hot surfaces. The grill at
the top of this heater in particular will become hot when the heater is active. Take special care not to block the
air intake or exhaust vents.
3. Extreme caution is necessary when the appliance is used by or near children or invalids and whenever the heater
is left operating and unattended.
4. Do not operate the heater if the power cord or plug has been damaged or the heater has been damaged or
malfunctioned in any way. Take the appliance to an authorized service facility for examination, electrical or
mechanical adjustment or repair.
5. Do not use outdoors.
6. This heater is not intended for use in bathrooms, laundry areas and similar indoor locations. Never locate heater
where it may fall into a bathtub or other water container.
7. To disconnect the appliance, turn all controls “OFF”, and then remove the plug from the electrical outlet.
8. The appliance comes equipped with a 3 prong-grounding plug. Do not cut the grounding prong. Connect to
properly grounded 120V outlets only.
9. Do not insert or allow foreign objects to enter any ventilation or exhaust openings as this may cause an electric
shock or fire, or damage the appliance.
10. To prevent a possible fire, do not block air intakes or exhausts in any manner. Do not use on soft surfaces, like a
bed, where openings may become blocked.
11. All electrical heaters have hot and arcing or sparking parts inside. Do not use in areas where gasoline, paint, or
flammable liquids are used or stored or where the appliance will be exposed to flammable vapors.
12. Avoid using the appliance with an extension cord. Extension cords may overheat and cause a risk of fire. If an
extension cord MUST be used, the cord must be No. 16AWG minimum size and rated not less than 1875 Watts.
The extension cord must be a 3-prong cord with grounding type plug and cord connection and should not
exceed 20feet (6m) in length.
13. When transporting or storing the heater, take care to keep both the unit and power cord/plug dry, free from
excessive vibration and away from heat sources.
14. Use the heater only as described in this manual. Any other use not recommended by the manufacturer may
cause fire, electric shock, or injury to persons.
15. Do not attempt to burn wood or other materials in this heater.
3

OPERATING INSTRUCTIONS
Read all instructions and warning prior to operating the appliance.
Ensure that all controls are in the position before plugging the appliance in to a properly grounded
electrical outlet.
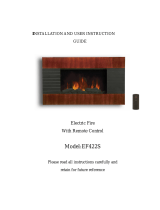
The main control panel is located behind the cover at the top right corner on the front (see Figure 1).
Cont
r
ol
Panel
Figure 1
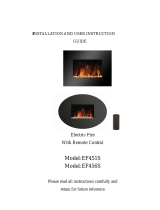
This heater is for use on 120 Volts. The heater has a 3-prong grounded plug (Figure 2.A). If your electrical outlet
has only 2 slots (Figure 2.B), you will have to use an adapter (Figure 2.C) to convert from the 3-prong power cord
to a 2-slot receptacle. The green grounding plug extending from the adapter must be securely connected to a
permanent ground such as a properly grounded outlet box. The adapter should only be used if a proper 3-slot
receptacle is not available.
NOTE:
Adapters
are
not allowed
for
use
in
Canada.
Figure 2
A 15 AMP circuit is required to operate this appliance. If the breaker trips when the appliance is running, you may
need to move the appliance to another location or unplug other appliances that are on the same circuit.
4

OPERATING INSTRUCTIONS
Using the Control Panel: (Locate in Figure 1)
E D C B
POWER
A
(ON/OFF)
INDICATOR
Figure 3
Main Switch (Figure 3.A):
Push button down to “ON” position to start.
Ensure that the control panel is in the “ON” position, then you can push any button to start the related
function.
Heater Control (Figure 3.B):
1. Press once to activate heat high setting.
2. Press second time to activate heat low setting.
3. Press third time to activate auto heat setting (Note: Please use remote control to set desired temperature).
When the room temperature is lower than the set temperature by less than 6 degree Fahrenheit, Insert will
start only one heater element. This is same as pressing “Heat Low” button.
When the room temperature is lower than set temperature by 6 degree Fahrenheit or greater, insert will
start both of the fireplace's heating elements. This is same as pressing “Heat High” button.
When the room temperature is higher than the set temperature, both heating elements will shut
down.
4. Press fourth time to shut heater off.
Simulated Flame Effect (Figure 3.C):
Push button to start simulated flame effect.
Simulated Flame Effect Brightness Control (Figure 3.D & E):
Press to adjust the brightness of the simulated flame effect.
5

OPERATING INSTRUCTIONS
This heater includes a remote control. See below for directions to use the remote control:
Flame On/Off mode:
Press
to
Activate the
flame.
Select a desire temperature
set
mode by pressing up or
down.
Heat On/Off mode:
Press
to
Activate the
heat.
Heat High: Press to start
high
heat . Display
sc
r
een
will show
“1500W”.
Heat Low: Press to start Low
heat
.
Display screen
will
show
“750W”.
Press
to adjust the brightness
of
the simulated flame
effect.
Display screen will show
the
action of increasing
or
decreasing of the flame
effect.
Figure
4
Auto Mode: Press to allow
start
one or two heat
generator(s)
automatically depending on
r
oo
m
temperature and set
temperature
Light bulbs may become loose during shipping. If the simulated flame effect is dim or does not operate properly
When you first turn the heater on, it may emit a slight but harmless odor. This odor results from certain oils or
it will not reoccur after the first operation of the appliance.
NOTE:
This appliance comes equipped with an overheat protection safety device. Should the appliance begin to
overheat for any reason, it will automatically turn all functions of the appliance off. The appliance will have to be
reset prior to continuing use. To reset the overheat protection safety device, turn all controls off and unplug the
appliance. Wait 10 minutes, plug the appliance back in and turn on. If the appliance continuously overheats,
please call our customer service center.
6

INSTALLATION INSTRUCTIONS
CAUTION
* Adult assembly required.
* Assemble on soft and clean surface to prevent damage or scratch.
* Recommended number of people needed for assembly: 2
* Philips screw driver needed but not included.
* This item can be wall mounted or free-standing when assembled.
* Step 1: The screws are attached at the bottom of the product. (See Fig-A)
* Step 2: Use the Philips screw driver to remove the screws. (See Fig-B)
* Step 3: Use the Philips screw driver to assemble the base to the fireplace. (See Fig-C)
7

INSTALLATION INSTRUCTIONS
Wall assembly
Two methods of wall mounting are possible. Either attach the wall mounting bracket by
securing to the wall studs through the 1/4 inch holes provided or follow the instructions below
to use wall anchors.
*Assemble on soft and clean surface to prevent damage or scratches.
1: Take the one-piece wall bracket, select the area where you want the fireplace to be
mounted.
2: Draw the lines. Use 4 sets of nut and bolts specially made (supplied) and secure the
wall bracket to the wall using M8 nuts and Bolts. Note: You must drill 4 holes of 7/16
inch diameter first on the wall.
3: Let the fireplace line up the 4 holes on fireplace bracket with wall bracket insert and let
easily slide down.
4: Inserting 2 M5 screws will secure the fireplace from moving.
8

MAINTENANCE
maintenance
in order to allow all
components
to cool
p
r
operl
y.
Replacing Light Bulbs:
1. Ensure that all controls are off, the appliance is unplugged and bulbs are cool to the touch.
2. Wear latex gloves to ensure that grease/oil from your hands does not transfer to the bulbs.
3. Remove 3 screws on the bulb panel. (Fig-A)
4. Tilt and remove the bulb panel. (Fig-B).
5. You will see three 40W light bulbs below the log set. (Fig-C)
6. Remove the burnt out light bulb and replace with a new 40W small base bulb. WARNING: DO
NOT EXCEED THE RECOMMENDED BULB WATTAGE. Hand tighten the bulbs only_do not over
tighten.
7. Return the bulb panel to the original position and tighten the back panel with 3 screws (Fig A~D).
9

TROUBLESHOOTING
!
WARNING: Turn off the
appliance,
unplug and let cool for at least 10
minutes
before attempting
to service. Only a
qualified professional
should attempt to service or repair the appliance.
Problem Possible Cause
Corrective Action
Flame is dim or not
present
1. Flame not turned ON.
2. Dimmer control button is set too
low.
3. Light bulbs are burned out.
4. “Flame wand” has come loose
from bracket.
5. “Flame wand” motor is not
functioning.
1. Push “FLAME ON/OFF” button
2. Push button E“FLAME HIGH” to
increase light.
3. Inspect light bulbs and replace if
necessary. (see Maintenance
section of this manual)
4. Remove back panel. Secure end
of “flame wand” back into the
support bracket.
5. Call for Technical Service at
1-866-328-4537 .
The appliance turns off
and will not turn back on
1. The overheat protection device in
the appliance has been triggered.
2. House circuit breaker has been
tripped.
1. Turn all controls off, unplug the
appliance, allow to cool for at least
10 minutes, then plug back in and
restart.
2. Reset house circuit breaker.
The appliance does not
turn on when the button is
pushed to “ON”
1. No power to heater
2.The overheat protection device in
the appliance has been triggered.
1. Check to see the heater is plugged
in to 120V receptacle. Check to
see breaker is on.
2. Turn all controls off, unplug the
appliance, allow to cool for at least
10 minutes, then plug back
in and restart.
Remote control does not
work
1. Low batteries.
2. Manual controls on the appliance
must be
“
ON ” before operating the
remote control.
1. Replace all batteries in the
remote control.
2. Push the appliance “ON” using
the manual control panel, then
use remote control to operate.
If using the remote control to
operate the appliance, you must
also turn the appliance “ON”
using the remote control.
10

ILLUSTRATED PARTS BREAKDOWN
MODEL LEF36
NO.
PART NO.
PARTS NAME
QTY
1
126266-01
BACK PANEL
1
2
126267-01
GLASS HOLDER
1
3
126268-01
SIMULATED FIRE LOG
1
4
126269-01
GLASS
1
5
126270-01
PLASTIC PLATE
1
6
126271-01
FAN AND HEATER
1
7
126272-01
LAMP COVER
1
8
126273-01
WALL MOUNTING BRACKET
1
9
126274-01
MOTOR
1
10
126275-01
CONNECTION OF MOTOR
1
11
126276-01
LAMP HOLDER SUPPORT
1
12
126277-01
LAMP
3
13
126278-01
LAMP HOLDER
3
14
126279-01
GLASS LAYERING
2
15
126280-01
SWITCH PCB
1
16
126281-01
PROTECT RING
1
17
126282-01
REFLEX BLOCK PLATE
1
18
126283-01
FLAME ROD ASSEMBLY
1
19
126286-01
BASE FEET
(
INCLUDED SREWS
)
2
20
126285-01
REMOTE CONTROL
1
11

WARRANTY
KEEP THIS WARRANTY
Model (located on product or identification tag)
Date Purchased
Keep receipt for warranty verification.
FMI PRODUCTS, LLC LIMITED WARRANTIES
New Products
Standard Warranty: FMI PRODUCTS, LLC warrants this new product and any parts thereof to be free from defects in
material and workmanship for a period of one (1) years from the date of first purchase from an authorized dealer provided
the product has been installed, maintained and operated in accordance with FMI PRODUCTS, LLC's warnings and
instructions.
For products purchased for commercial, industrial or rental usage, this warranty is limited to 90 days from the date of first
purchase.
Factory Reconditioned
Products
Limited Warranty: FMI PRODUCTS, LLC warrants factory reconditioned products and any parts thereof to be free from
defects in material and workmanship for 30 days from the date of first purchase from an authorized dealer pro- vided the
product has been installed, maintained and operated in accordance with FMI PRODUCTS, LLC's warnings and
instructions.
Terms Common to All
Warranties
The following terms apply to all of the above warranties:
Always specify model number and serial number when contacting the manufacturer. To make a claim under this warranty
the bill of sale or other proof of purchase must be presented.
This warranty is extended only to the original retail purchaser when purchased from an authorized dealer, and only
when installed by a qualified installer in accordance with all local codes and instructions furnished with this product. This
warranty
covers the cost of part(s) required to restore this product to proper operating condition and an allowance for labor
when provided by a FMI
PRODUCTS,
LLC Authorized Service Center or a provider approved by FMI PRODUCTS, LLC.
Warranty parts must be obtained through authorized dealers of this product and/or FMI PRODUCTS, LLC who will
provide original factory replacement parts. Failure to use original factory replacement parts voids this warranty. Travel,
handling,
transportation,
diagnostic, material, labor and incidental costs associated with warranty repairs, unless expressly
covered by this warranty, are not reimbursable under this warranty and are the responsibility of the owner. Excluded from
this warranty are products or parts that fail or become damaged due to misuse, accidents, improper installation, lack of
proper maintenance, tampering, or alteration(s).
This is FMI PRODUCTS, LLC's exclusive warranty, and to the full extent allowed by law; this express warranty excludes any
and all other warranties, express or implied, written or verbal and limits the duration of any and all implied war- ranties,
including warranties of merchantability and fitness for a particular purpose to one (1) years on new products and 30 days
on factory reconditioned products from the date of first purchase. FMI PRODUCTS, LLC makes no other warranties
regarding this product.
FMI PRODUCTS, LLC's liability is limited to the purchase price of the product, and FMI PRODUCTS, LLC shall not be
liable for any other damages whatsoever under any circumstances including indirect, incidental, or consequential
damages.
Some states do not allow limitations on how long an implied warranty lasts or the exclusion or limitation of
incidental
or
consequential damages, so the above limitation or exclusion may not apply to you.
This
warranty
gives you specific legal rights, and you may also have other rights which vary from state to state.
For information about this warranty contact:
FMI
PRODUCTS, LLC
2701 S. Harbor Blvd.
Santa Ana, CA 92704 126555-01
1-866-328-4537 Rev. A
www.fmiproducts.com 03/12
12
/