Page is loading ...

!
!
INSTALLATION AND USER
INSTRUCTION MANUAL
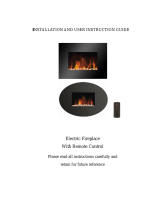
WALL-MOUNT FIREPLACE
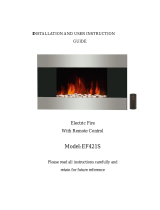
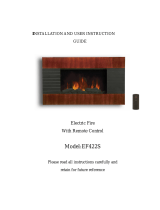
With Remote Control
CH-4170V
DEAR CUSTOMER
Congratulations for your purchase!
Please read this manual carefully, and keep it for future reference.
!
!
Please read all instructions carefully and
retain for future reference
IMPORTANT: THESE INSTRUCTIONS SHOULD BE READ CAREFULLY AND
RETAINED FOR FUTURE REFERENCE.
Measurements indicated below are in millimeters
"

!
!
Important Safety Instructions:
When using this electrical appliance, basic precautions should be followed to reduce
the risk of fire, electric shock and injury to person, including the following:
!This heater must be used on an AC supply only and the voltage marked on the heater
must correspond to the supply voltage.
! Do not switch the appliance on until it is properly installed as described in this manual.
! The heater must not be located immediately below a socket outlet.
! Keep furniture, curtains and other flammable material at least one meter away from
the
appliance.
! Do not leave the appliance unattended during use.
! Do not leave the appliance unattended whilst connected to the mains supply.
! Keep out of reach of children and do not allow them to operate this appliance.
! This appliance is intended for household use and should not be used for industrial
purposes.
! From time to time, check the cord for damage. Never use the appliance if the cord or
any part of the appliance shows signs of damage.
! Do not operate this appliance with a damaged plug or cord, after a malfunction or
after
being dropped or damaged in any way.
! Repairs to electrical appliances should only be performed by a qualified electrician.
Improper repairs may place the user at serious risk.
! Do not run the mains cable under carpets, rugs etc.
! Do not allow the mains cable to hang over sharp edges or come into contact with hot
surfaces.
! Do not cover or obstruct the heater in any way.
! Overheating will result if it is accidentally covered.
!
!
! Never immerse the product in water or any other liquids.
! Do not use this heater in the immediate surroundings of a bath, a shower or a
swimming pool.
! Do not use the appliance outdoors.
! Do not use if you have wet hands.
! Never use the appliance on or near hot surfaces.
! Do not operate with a damaged cord.
! Before cleaning the appliance, ensure it is unplugged from the power and that it is
completely cooled.
! Do not clean the appliance with abrasive chemicals.
! Never use accessories that are not recommended or supplied by the manufacturer. It
could cause danger to the user or damage to the appliance.
! The only user replacement parts are the bulbs. There is no other user replacement
parts. All other servicing should be referred to a qualified electrician.
! This appliance is not intended for use by persons (including children) with reduced
physical, sensory or mental capabilities, or lack of experience and knowledge unless
they have been given supervision or instruction concerning use of the appliance by a
person responsible for their safety.
! Children should be supervised to ensure that they do not play with the appliance.
! Do not lift the appliance by the front panel.
• Keep hot air outlet at least 1 meter away from ceiling.
“
CAUTION: TO PREVENT ELECTRIC SHOCK, MATCH WIDE BLADE OF PLUG TO WIDE SLOT
OF OUTLET; FULLY INSERT.”
AND
“TO RESET TEMPERATURE LIMITING CONTROL, DISCONNECT POWER FOR
FIVE MINUTES USING PLUG CAP OR MAIN SWITCH.”

!
!
Getting Started:
! Remove the appliance from the box.
! Remove any packaging from the product.
! Place the packaging inside the box and either store or dispose of safely.
Contents of Carton:
! Heater.
! Wall installation bracket.
! Installation screws and wall plugs.
! Remote control.
! Instruction Manual.
Helpful Advice Before Installation:
! Please retain all packaging until you have checked and counted all the parts and the
contents of the installation pack against the parts list.
! The installation pack contains small items which should be kept away from young
children.
! We suggest that you open the installation pack and place all the contents into a
container;
therefore, reducing the risk of losing any small pieces.
Installation:
! Do not connect the appliance until properly fixed to the wall and the instructions are
read fully.
! The minimum distances must be observed.
! For installation of the appliance, care must be taken not to damage concealed cables.
! Please be careful while drilling the holes.
!
!
! This appliance is designed to be permanently fixed to a wall at a minimum height of
300 mm (12”). The wall bracket must be fitted horizontally and the cable routed to the
bottom right of the heater.
! A height of 600 mm (24”) from bottom of heater to floor is recommended for optimum
viewing of fuel bed (see Fig.#2 for recommended installation dimensions).
! For optimum viewing, mark the top four screws fixing positions on wall in accordance
with the recommended installation dimensions- see Fig.#2. Drill holes with a 1/8”
(3mm) drill bit.
! Attach the wall bracket using the plug and screws provided .
! Carefully lift the heater up ensuring that the top rear ledge of heater engages the wall
bracket (see Fig.#2 in circle) and is centered.
! Gently bring the heater level with the wall.
! Mark the bottom holes position - see Fig.#3. Remove the heater ensuring that the
bottom installation bracket is rotated up.
! Drill and fit wall plug.
! Refit the heater to the wall installation bracket and rotate the bottom installation
bracket down again and use the screw provided to permanently fix the heater in place.
! Place the front glass surround over the front of the fireplace aligning the slots in the
brackets at each side of the glass panel with the lugs on the sides of the fireplace - see
Fig.#4. Again, two people will be required for this operation.
Instructions for Use:
! The appliance can be operated either by the switches located on the top right hand
side of the fireplace or by supplied remote control.
Manual Operation:
! The switches are located at the top right hand side of the fireplace. The standby
switch must be first switched on.
! Press once the O/I button to turn on the appliance and fire effect. A red indicator light
will appear to indicate that the function is ON. Press the O/I button for three seconds,
this will operate the dimmer mode.

!
!
! Press once the 750W button for the low heat settings; press twice to switch off the
heat setting.
! Press once the 1500W button for the high heat settings; press twice to switch off the
heat setting.
Remote Operation:
! The standby switch located at the top right hand side of the fireplace must be first
switched on.
! It takes some time for the receiver to respond to the transmitter. Do not PRESS the
buttons more than once within two seconds for correct operation.
! Press once the button ON/OFF on the remote control this turns ON/OFF the
appliance and fire effect.
! Press once the 750W button for the low heat settings; press twice to switch off the
heat setting.
! Press once the 1500W button for the high heat settings; press twice to switch off the
heat setting.
! Press the DIMMER button for operate the dimmer mode.
Safety Shut-Off:
! This appliance is fitted with a safety shut-off which will operate if the fireplace
overheats (eg.
due to blocked air vents). For safety reasons, the fireplace will NOT automatically
reset.
! To reset the appliance, disconnect the appliance from the mains supply for at least 15
minutes. Reconnect the supply to the mains and switch on the appliance.
!
!
Troubleshooting:
Symptom Solution
No operation/ no fan.
Check for safety shut-off operation.
No fire effect light.
Check the bulb by replacement.
Replacing the Bulb:
! Warning - Always disconnect from the power supply before removing bulb.
! Warning - The bulbs reach high temperatures during operation. Allow the bulbs to
cool down after switching off the appliance before changing bulbs.
! Note: Two people will be required for this process.
! It is recommended that the fireplace is carefully removed from the wall and laid on its
back
in order to replace the bulb.
! Gently slide the front glass panel towards the top of the fireplace and remove. Store
the
glass safely out of the way whilst the bulb is replaced so that it does not get damaged.
!At the bottom of fireplace, there is a bulb cover fixed by eight screws, remove the eight
screws and lift off the bulb cover - see Fig.#5.
! For access to the bottom bulbs, carefully slide the flexible rotisserie to one side
ensuring that the rubber grommet is not lost-see Fig.#6.
! Remove the defective bulb by unscrewing it.
! Replace with a 40W E12 SES Clear Candle bulb. Take care not to over-tighten the
bulb.
! Refit the rotisserie making sure that the rubber grommet is carefully pushed into the
slotted hole on the axial bracket.
! Lift the fireplace back onto the wall and replace the glass front by fitting onto the lugs
either side of the fireplace.

!
!
Cleaning:
! Warning - Always disconnect from the power supply before cleaning heater.
! For general cleaning use a soft clean duster - never use abrasive cleaners. The glass
viewing screen should be cleaned carefully with a soft cloth. DO NOT use proprietary
glass cleaners.
Technical Specifications:
! Supply: AC110V/60Hz
! Rated power: 1500W
! Lighting: 40W E12 SES Clear Candle bulb
CIRCUIT DIAGRAM
/