Page is loading ...

© 3M 1997 3M
™
Multimedia Projector MP8630
MP8630 Multimedia Projector
Operator's Guide
MP8630 Projecteur multimédia Guide de l'opérateur
MP8630 Multimedia-Projektor Benutzerhandbuch
Proyector de Multimedia MP8630 Manual del Usuario
MP8630 Proiettore Multimediale Manuale dell'operatore
MP8630 Bruksanvisning for multimediaprojektor
MP8630 Multimedia Projector Gebruiksaanwijzing

3M
™
Multimedia Projector MP8630 © 3M 1997
Table of Contents
Warranty .................................................................................................................3
Safeguards .................................................................................................................4
Section 1: Unpack .......................................................................................................5
1.1 Contents of Shipping Box............................................................................................ 5
1.2 Optional Accessories ................................................................................................... 5
1.3 Keep Your Packing Materials ...................................................................................... 5
1.4 What's Next? ................................................................................................................ 5
Section 2: Product Description ..................................................................................6
2.1 Machine Characteristics............................................................................................... 6
2.2 Main Unit Identification .............................................................................................. 7
2.3 System Setup................................................................................................................ 8
2.4 Remote Control Transmitter Identification ................................................................. 9
Section 3: Basic Operations........................................................................................10
3.1 Installation ................................................................................................................... 10
3.2 Using the Projector ...................................................................................................... 11
3.3 Turn Off Power ............................................................................................................ 12
Section 4: Adjustments and Functions......................................................................13
4.1 Menu ............................................................................................................................ 13
4.2 How To Use Foot Adjusters......................................................................................... 14
4.3 SETUP ......................................................................................................................... 15
4.4 INPUT.......................................................................................................................... 16
4.5 IMAGE ........................................................................................................................16
4.6 OPT .............................................................................................................................. 18
Section 5: Connection to Signal Terminals ...............................................................19
5.1 Connection to the Video Signal Terminal.................................................................... 19
5.2 Connection to the RGB Signal Terminal ..................................................................... 19
5.3 Connection to the Control Signal Terminal ................................................................. 21
Section 6: Maintenance...............................................................................................23
6.1 Cleaning the Air Filter ................................................................................................. 23
6.2 Message Table.............................................................................................................. 23
6.3 Lamp ............................................................................................................................ 24
6.4 When You Think Something Is Wrong........................................................................ 25
Section 7: Technical Specifications ............................................................................26
7.1 Specifications...............................................................................................................26
7.2 Accessories ..................................................................................................................26
7.3 Dimension Diagram..................................................................................................... 27
2

© 3M 1997 3M
™
Multimedia Projector MP8630
3
Warranty
THANK YOU FOR CHOOSING 3M
Thank you for choosing 3M
Multimedia Projector equipment. This product has been produced in accordance
with 3M's highest quality and safety standards to ensure smooth and trouble free use in the years to come.
For optimum performance, please follow the operating instructions carefully. We hope you will enjoy using this
high performance product in your meetings, presentations and training sessions.
LIMITED WARRANTY
3M warrants this product against any defects in material and workmanship, under normal usage and storage, for a
period of one year from date of purchase. Proof of purchase date will be required with any warranty claim. In
the event this product is found to be defective within the warranty period, 3M's only obligation and your
exclusive remedy shall be replacement of any defective parts (labor included).
To obtain warranty service, immediately notify the dealer from which you purchased the product of any defects.
The dealer has the option of repairing the product or returning it to 3M for repair or replacement. In the USA
call 1-800-328-1371 for warranty or repair service.
LIMITATION OF LIABILITY
THE FOREGOING WARRANTY IS MADE IN LIEU OF ALL OTHER WARRANTIES, EXPRESSED OR IMPLIED, AND 3M
SPECIFICALLY DISCLAIMS ANY IMPLIED WARRANTY OF MERCHANTIBILITY AND FITNESS. 3M SHALL NOT BE
LIABLE FOR ANY DAMAGES, DIRECT, CONSEQUENTIAL, OR INCIDENTAL, ARISING OUT OF THE USE OR INABILITY
TO USE THIS PRODUCT.
Important: The above warranty shall be void if the customer fails to operate product in accordance with 3M's
written instructions. This warranty gives you specific legal rights and you may have other rights which vary from
state to state.
FCC STATEMENT - CLASS A: This equipment generates, uses and can radiate radio frequency energy, and if
not installed and used in accordance with the instruction manual may cause interference to radio communications.
It has been tested and found to comply with the limits for a Class "A" computing device pursuant to Subpart B of
Part 15 of the FCC Rules, which are designed to provide reasonable protection against such interference when
operated in a commercial environment. Operation of this equipment in a residential area is likely to cause
interference in which case the user at his/her own expense will be required to take whatever measures may be
required to correct the interference.
EEC STATEMENT: This machine was tested against the 89/336/EEC (European Economic Community) for
EMC (Electro Magnetic Compatibility) and fulfills these requirements.
Video signal cables: Double shielded coaxial cables (FCC shield cable) must be used and the outer shield must
be connected to the ground. If normal coaxial cables are used, the cable must be enclosed in metal pipes or in a
similar way to reduce the interference noise radiation.
Video inputs: The input signal amplitude must not exceed the specified level.
IBM is a registered trademark of International Business Machines Corporation. Apple Macintosh and Apple
Powerbook are registered trademarks of Apple
©
Computer, Inc. Microsoft and Windows 95 are registered
trademarks, and Windows and Windows for Work Groups are trademarks of the Microsoft Corporation. All
other products are trademarks or registered trademarks of their respective companies. Toshiba is a registered
trademark of Toshiba Corporation.

3M
™
Multimedia Projector MP8630 © 3M 1997
Safeguards
4
WARNING - Indicates a potentially hazardous situation which, if not avoided, could result
in death or serious injury.
Caution - Indicates a potentially hazardous situation which, if not avoided, could result
in minor or moderate injury. It may also be used to alert against unsafe practices.
2. Close supervision is necessary when any appliance is used by or near children. Do not leave
appliance unattended while in use.
3. Never look directly into the projector lens when the lamp is on. The metal halide lamp produces
a strong light which could damage your eyesight.
4. Care must be taken as burns can occur from touching hot parts.
5. Do not operate appliance with a damaged cord or if the appliance has been dropped or
damaged – until it has been examined by a qualified service technician.
6. Position the cord so that it will not be tripped over, pulled, or contact hot surfaces.
7. If any extension cord is necessary, a cord with a current rating at least equal to that of the
appliance should be used. Cords rated for less amperage than the appliance may overheat.
8. Always unplug appliance from electrical outlet before cleaning and servicing and when not in
use. Grasp plug and pull to disconnect.
9. To reduce the risk of electric shock, do not immerse this appliance in water or other liquids.
10. To reduce the risk of electric shock, do not disassemble this appliance, but take it to a qualified
technician when service or repair work is required. Incorrect assembly can cause electric shock
when the appliance is subsequently used.
11. Connect this appliance to a grounded outlet.
12. This unit is equipped with optical lenses and should not be exposed to direct sunlight.
13. Keep ventilation opening free of any obstructions.
14. Always open the lens shutter when the projection lamp is on.
SAVE THESE INSTRUCTIONS
The information contained in this manual will help you operate and maintain your 3M MP8630
Multimedia Projector.
IMPORTANT SAFEGUARDS
1. Read and understand all instructions before using.
Pay particular attention to areas where this
symbol is shown.
© 3M 1997 3M
™
Multimedia Projector MP8630
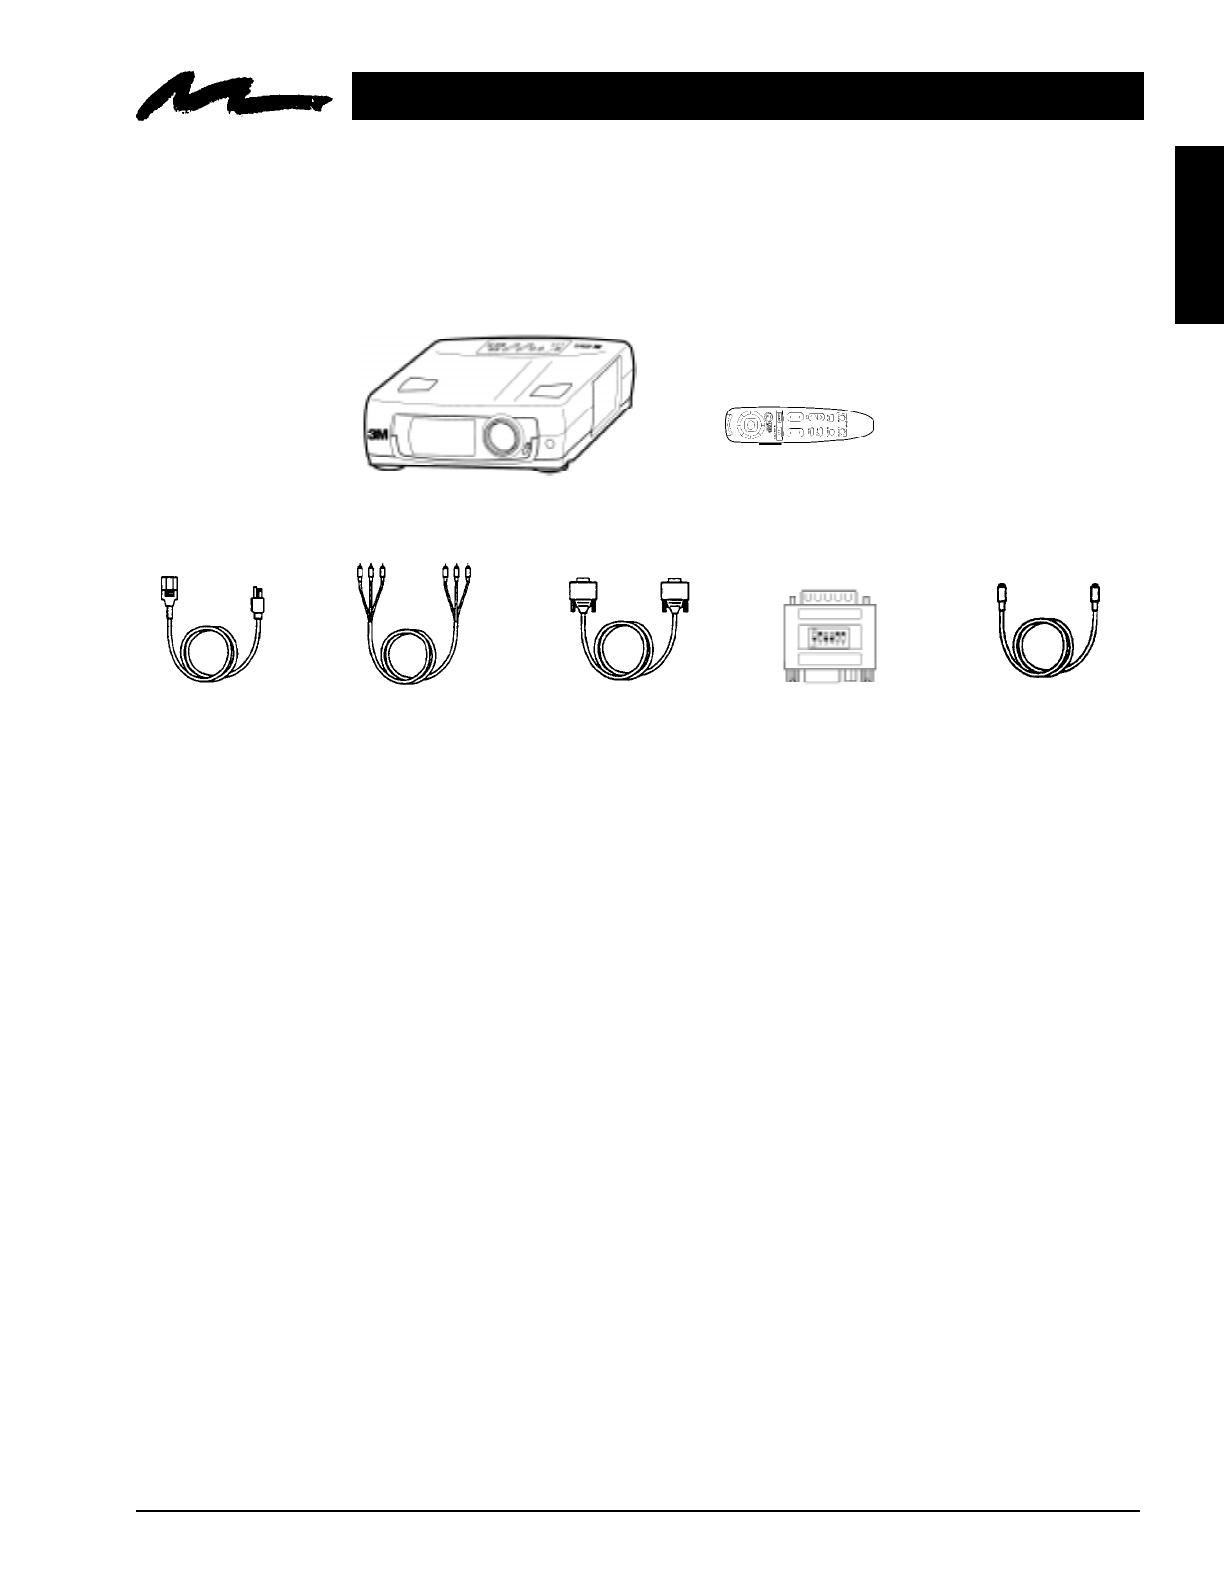
Section 1: Unpack
1.1 Contents of Shipping Box
The 3M
™
MP8630 Multimedia Projector is shipped with the necessary cables required for standard VCR, PC,
MAC
™
II or laptop computer connections. Carefully unpack and verify that you have all of the items shown
below in Figure 1.1.
1.4 What Next?
After you have unpacked the MP8630 system and identified all the parts, you are ready to set up the projector.
5
ENGLISH
MP8630 Multimedia Projector
Remote Control Transmitter
(batteries included)
VGA Cable
(15-15 pin M/M)
3-Conductor
Video/Audio Cable
Adapter
with dip switch
Video Cable
(S-Video mini DIN4-pin)
Figure 1.1 Inventory of Shipping Box
Power Cord
110V – US
220V – UK, Europe
The shipping carton contains the items illustrated in Figure 1.1. In addition, the following items are also
included, but not shown here. If any of these items are missing, please contact your place of purchase.
• PS/2 mouse cable .............. (1)
• ADB mouse cable ............. (1)
• Serial mouse cable ............ (1)
• Stereo mini-jack ................ (1)
1.2 Optional Accessories
• RS232 control cable.......... (1)
1.3 Keep Your Packaging Materials
Important: Save the shipping box and packing materials in the event the MP8630 should require shipping
to a 3M Service Center for repair.

3M
™
Multimedia Projector MP8630 © 3M 1997
Section 2: Product Description
2.1 Machine Characteristics
The
MP8630 Multimedia Projector integrates metal halide lamp and polysilicon LCD display technology into a
single unit. It accepts input from two different computer sources and two video/audio sources and projects a bright,
super crisp image. Switching your presentation from a computer to a video image, and then back to a computer
simply requires the push of a button on the remote control keypad or control panel keypad.
The MP8630 Multimedia Projector offers the following features:
• 500 lumens (A highly efficient optical system with a metal halide lamp ensures high brightness)
• SVGA resolution (3 separate 800 x 600 LCD panels are used for the R, G and B signals)
• XGA compression
• Compact size, light weight for portability
• RGB (computer video) output terminal
• Serial, PS/2 and Apple© Desktop Bus (ADB) mouse emulation
• Power zoom and power focus functions
• Easy to set up and use
• Ability to display 16.7 million colors
• Two computer input connections
• Two video input connections (composite and S-video compatible)
• Full function remote control
• Two built-in stereo speakers (2 watt)
• Horizontal and vertical image inverting function
• Horizontal and vertical image position control
• Fixed keystone correction
• On screen menu with seven languages
• Universal power supply
• IR sensor in front and rear for maximum remote control range
• RS232 control capability
• Optional ceiling mount kit
6
© 3M 1997 3M
™
Multimedia Projector MP8630
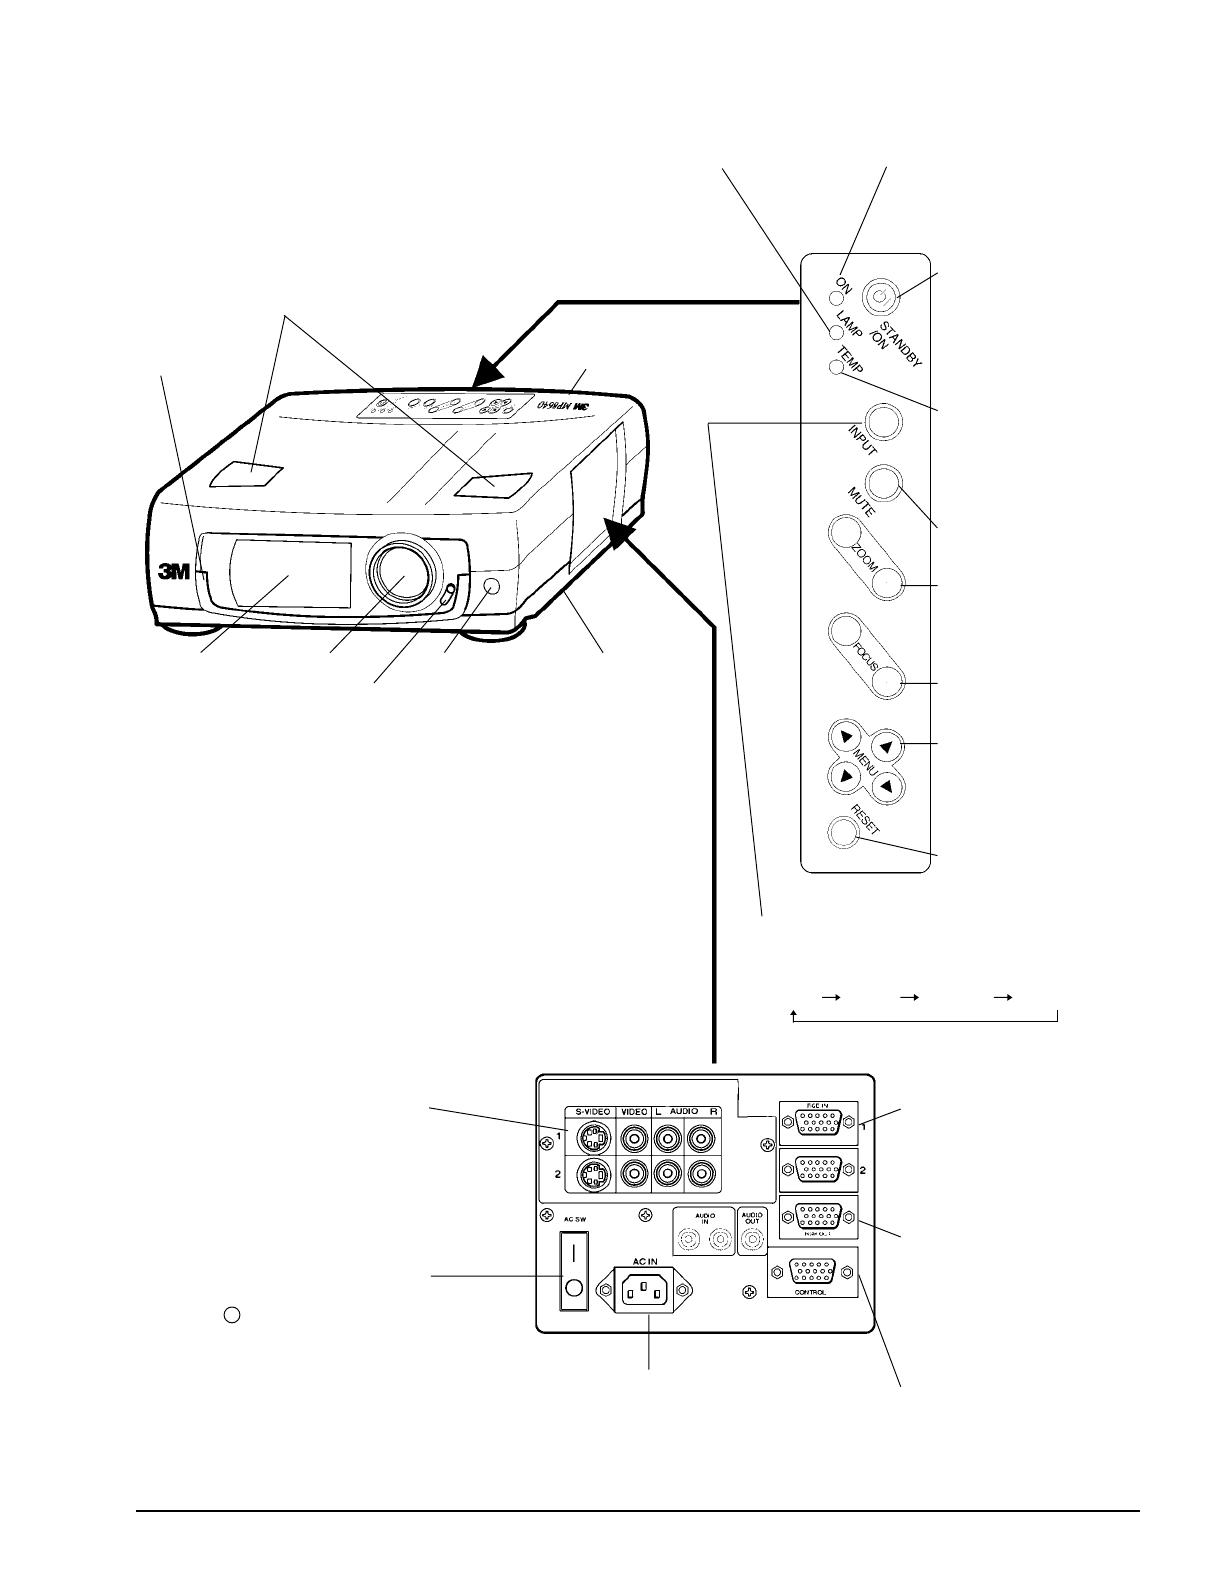
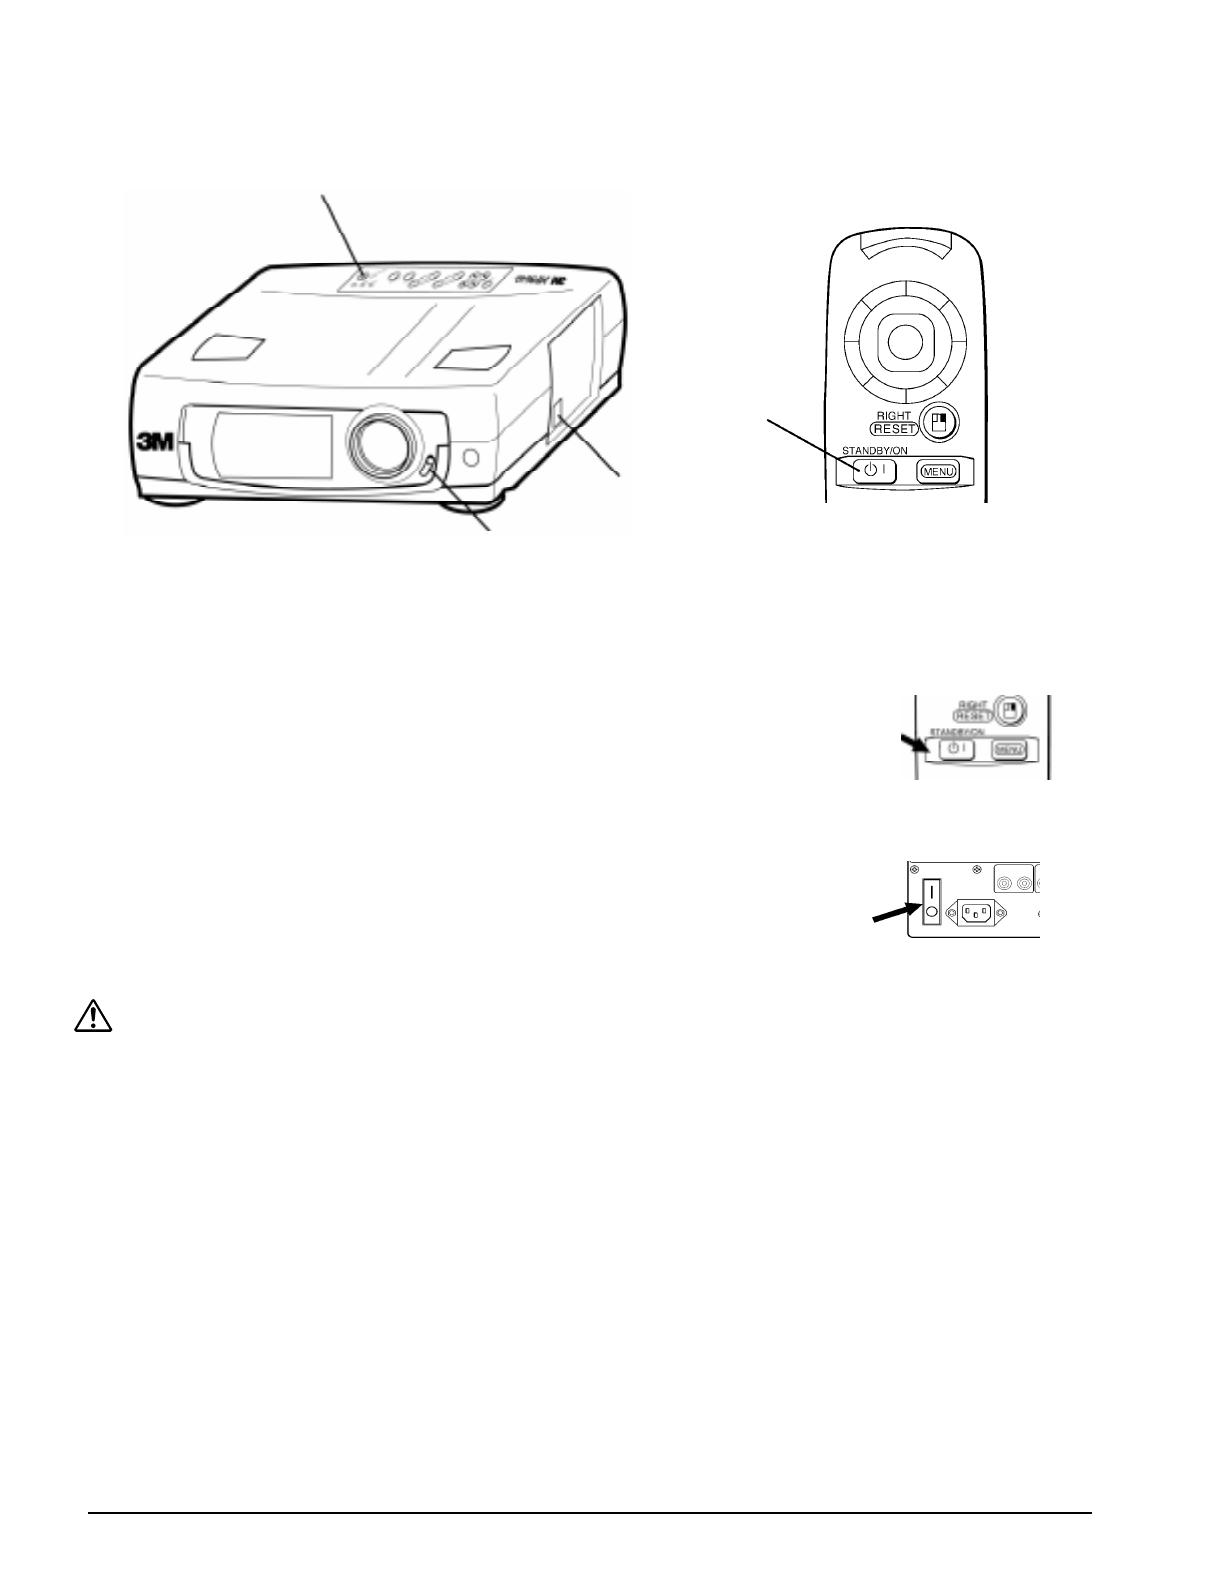
2.2 Main Unit Identification
Speakers
Handle
Cooling fan
(exhaust)
Remote control
sensor
INPUT button
To select the input source.
Each time this button is pressed, the input source
is changed in sequence as shown below.
RGB1 RGB2 VIDEO1 VIDEO2
STANDBY / ON
button
Power ON/OFF button.
OFF sets the unit in
standby mode.
TEMP Indicator
MUTE button.
ZOOM button
Adjusts picture size.
FOCUS button
Adjusts focus.
MENU button
RESET button
Resets unit to factory
settings.
LAMP indicator ON indicator
VIDEO input terminal
S-VIDEO input terminal
VIDEO input terminal
AUDIO L/R input terminal
MAIN POWER switch
Main power ON/OFF switch.
: OFF
:ON
RGB input terminal
RGB input terminal
AUDIO input terminal
Stereo mini jack
RGB output terminal
RGB output terminal
AUDIO output terminal
(RGB/VIDEO)
Stereo mini jack
CONTROL terminal
D-sub 15pin terminal
AC IN socket
Connect the provided power cord.
Cooling fan
(inside)
Remote
control sensor
Lens
7
Lens shutter

3M
™
Multimedia Projector MP8630 © 3M 1997
2.3 System Set Up - connecting various equipment
VCR with S-VHS out
Laptop Computer
Desktop Computer
VCR or Laser Disc
8
AC In Socket
Caution: Turn power off to all devices before making connections. Never plug anything into the
projector or computer while the units are in operation.
The MP8630 must be powered down when making connections. The mouse emulation may
not work if the unit is not powered down after the mouse cable connections are made.
2.3.1 Apple
™
Desktop Mouse - The ADB operating system should recognize the MP8630 as a mouse
without any drivers being loaded.
Virtual Mouse for PCs - Setting up for most personal computers (IBM
™
compatible). When setting up
the virtual mouse function on the projector, the following must be done, if the operating system fails to
recognize the projector as a mouse:
• Change mouse driver information to "Serial Mouse" or "PS/2 Mouse."
Windows
™
95 - Click "Start"; select "Settings"; select "Control Panel". Click on "Mouse"; select the
"General" tab; (see what driver is currently loaded and make note of it); select "Change"; select "Show all
compatible devices"; (make note of the current Manufacturer and Model); select "Standard Mouse Type"
for Manufacturer; then select "Standard Serial Mouse" or "Microsoft™ PS/2 Port Mouse." Click OK to
change and apply the new driver. Restart Windows when prompted.
Windows
™
3.1 - From "Program Manager" click "Main"; then click "Windows Setup", (make note of what
the current mouse driver is); Click "Options"; then "Change Systems Settings". Choose "Mouse". It
should be listed as "Microsoft or IBM PS/2".
Note: Always remember, once all PC settings have been made, turn the projector on FIRST, then turn on
and boot the PC/laptop.
For some laptop computers you may need to disable the internal pointing device (IPD). This is done through
the BIOS level set up of the particular machine, or it could be listed in a "Utilities" program group, i.e.,
"Toshiba Utilities
™
," or "Thinkpad Utilities
™
."
© 3M 1997 3M
™
Multimedia Projector MP8630
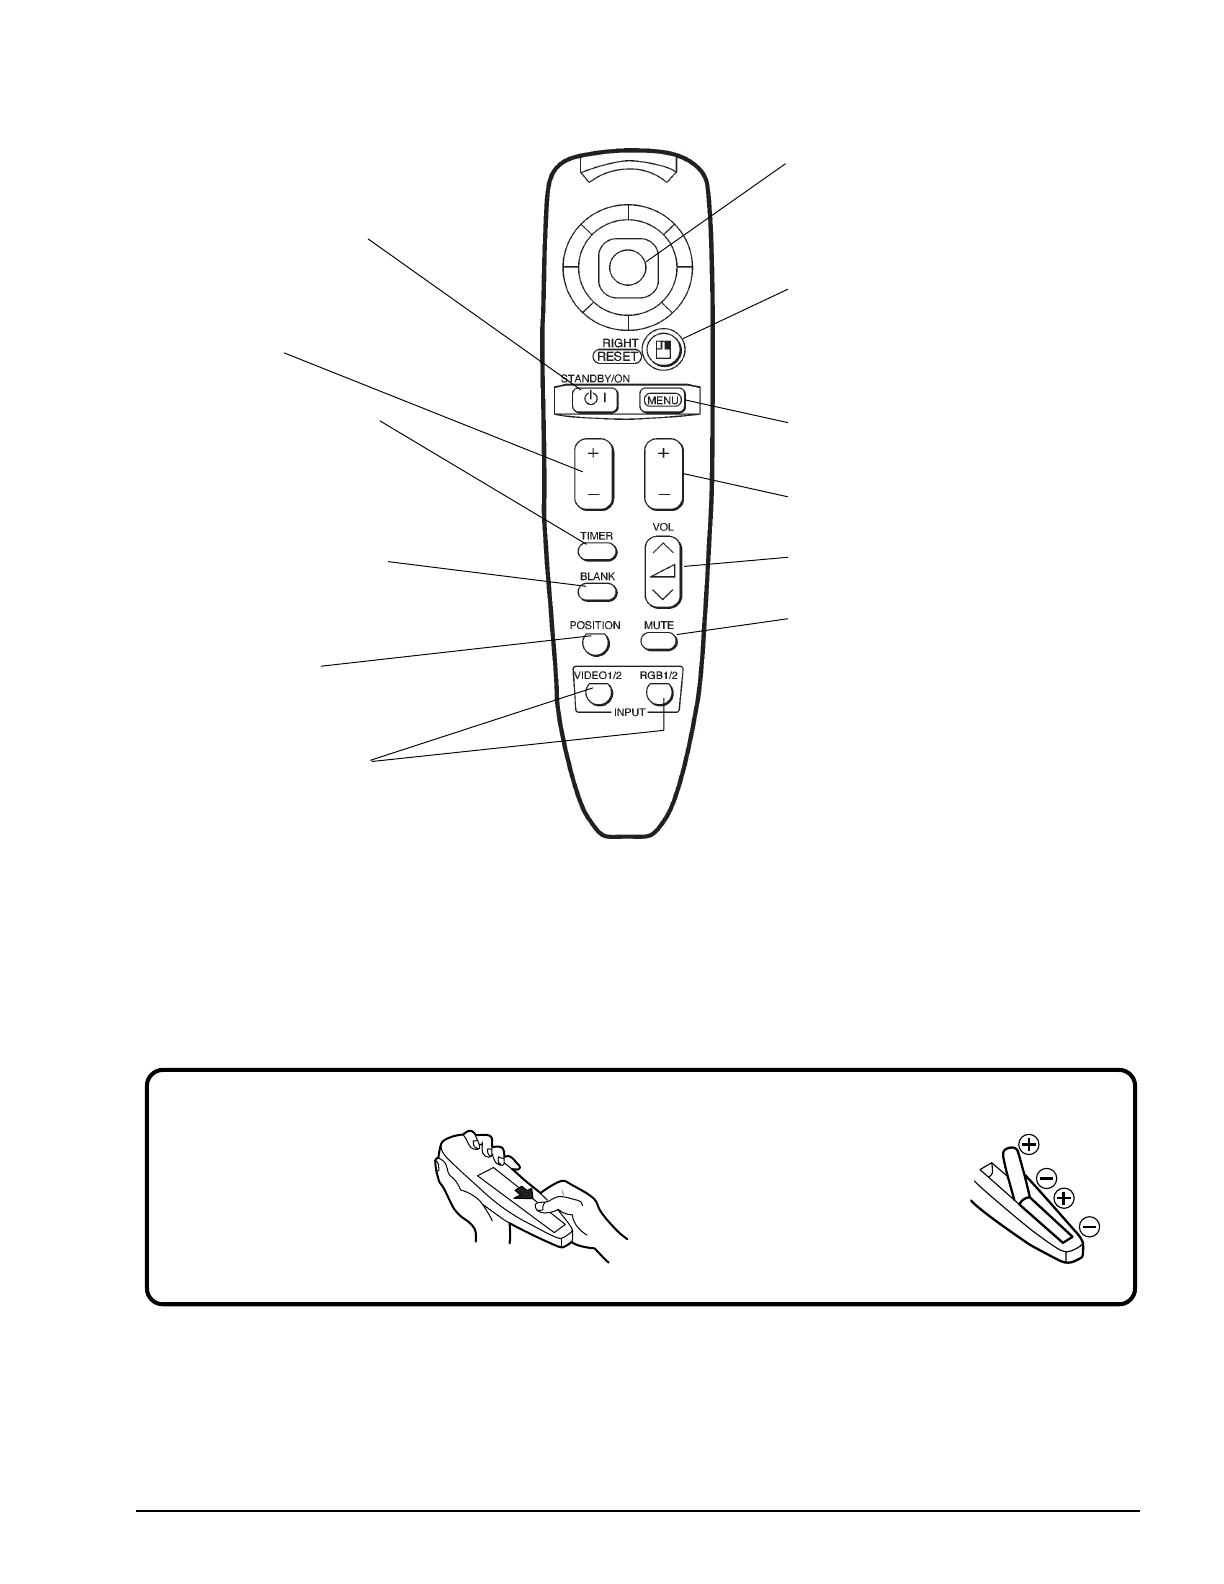
2.4 Remote Control Transmitter Identification
STICK SWITCH
If Menu is on screen, stick switch
controls movement within menu.
If Menu is not displayed, stick switch
is used for mouse emulation, i.e. left
mouse button and cursor movement.
RESET / RIGHT button
If Menu is on screen, button resets
menu to factory default settings.
If Menu is not displayed, button is used
for mouse emulation, i.e. right mouse
button.
MENU ON / OFF button
Displays or removes the on-screen
menus.
FOCUS button
Adjusts focus.
VOLUME button
Adjusts volume.
MUTE button
Disables sound.
STANDBY / ON button
Power ON/OFF button.
OFF sets the unit in standby mode.
ZOOM button
Adjusts picture size.
TIMER ON / OFF button
Displays or removes TIMER.
When the blank screen is displayed,
TIMER can not be displayed.
BLANK ON / OFF button
Blanks the screen. Pull down or left on
stick switch to reveal screen.
POSITION button
Hold this button and move stick switch
to adjust vertical and horizontal image
position.
INPUT SELECT buttons
Selects the input source.
1. Remove the battery
compartment cover.
Slide the battery compartment
cover in the direction of the
arrow while pressing slightly
down on it.
2. Insert the batteries as
illustrated inside the
battery compartment.
3. Replace the cover.
9
How to insert batteries:
Insert the provided batteries (AA or R6P) into the remote control transmitter.

3M
™
Multimedia Projector MP8630 © 3M 1997
Distance
Minimum Image Maximum Image
To Screen Diagonal Width Height Diagonal Width Height
227 cm 102 cm 81 cm 61 cm 153 cm 122 cm 92 cm
(7.4 ft) (40 in.) (32 in.) (24 in.) (60 in.) (48 in.) (36 in.)
341 cm 152 cm 121 cm 91 cm 228 cm 183 cm 137 cm
(11.2 ft) (60 in.) (48 in.) (36 in.) (90 in.) (72 in.) (54 in.)
455 cm 202 cm 162 cm 121 cm 304 cm 243 cm 182 cm
(15 ft) (80 in.) (64 in.) (48 in.) (120 in.) (96 in.) (72 in.)
569 cm 252 cm 202 cm 151 cm 379 cm 303 cm 227 cm
(18.7 ft) (99 in.) (79 in.) (60 in.) (149 in.) (119 in.) (90 in.)
682 cm 302 cm 241 cm 181 cm 454 cm 363 cm 272 cm
(22.4 ft) (119 in.) (95 in.) (71 in.) (179 in.) (143 in.) (107 in.)
853 cm 377 cm 302 cm 226 cm 556 cm 453 cm 340 cm
(28.0 ft) (148 in.) (119 in.) (89 in.) (223 in.) (178 in.) (134 in.)
1137 cm 502 cm 402 cm 301 cm 755 cm 604 cm 453 cm
(37.3 ft) (198 in.) (158 in.) (119 in.) (297 in.) (238 in.) (178 in.)
Section 3: Basic Operations
3.1 Installation
Example of the Multimedia projector and screen installation. Determine picture size and projection distance as
illustrated below.
10
Minimum
Zoom
Maximum
Zoom
DISTANCE
24" 48" 71" 119"
36"
72"
107"
178"
Note: These sizes are
±
1 inch. This is due to variations in the manufacture of the lens. If you are close to one of the
endpoints you should verify with your unit that the image is the proper size at the proper distance.
© 3M 1997 3M
™
Multimedia Projector MP8630
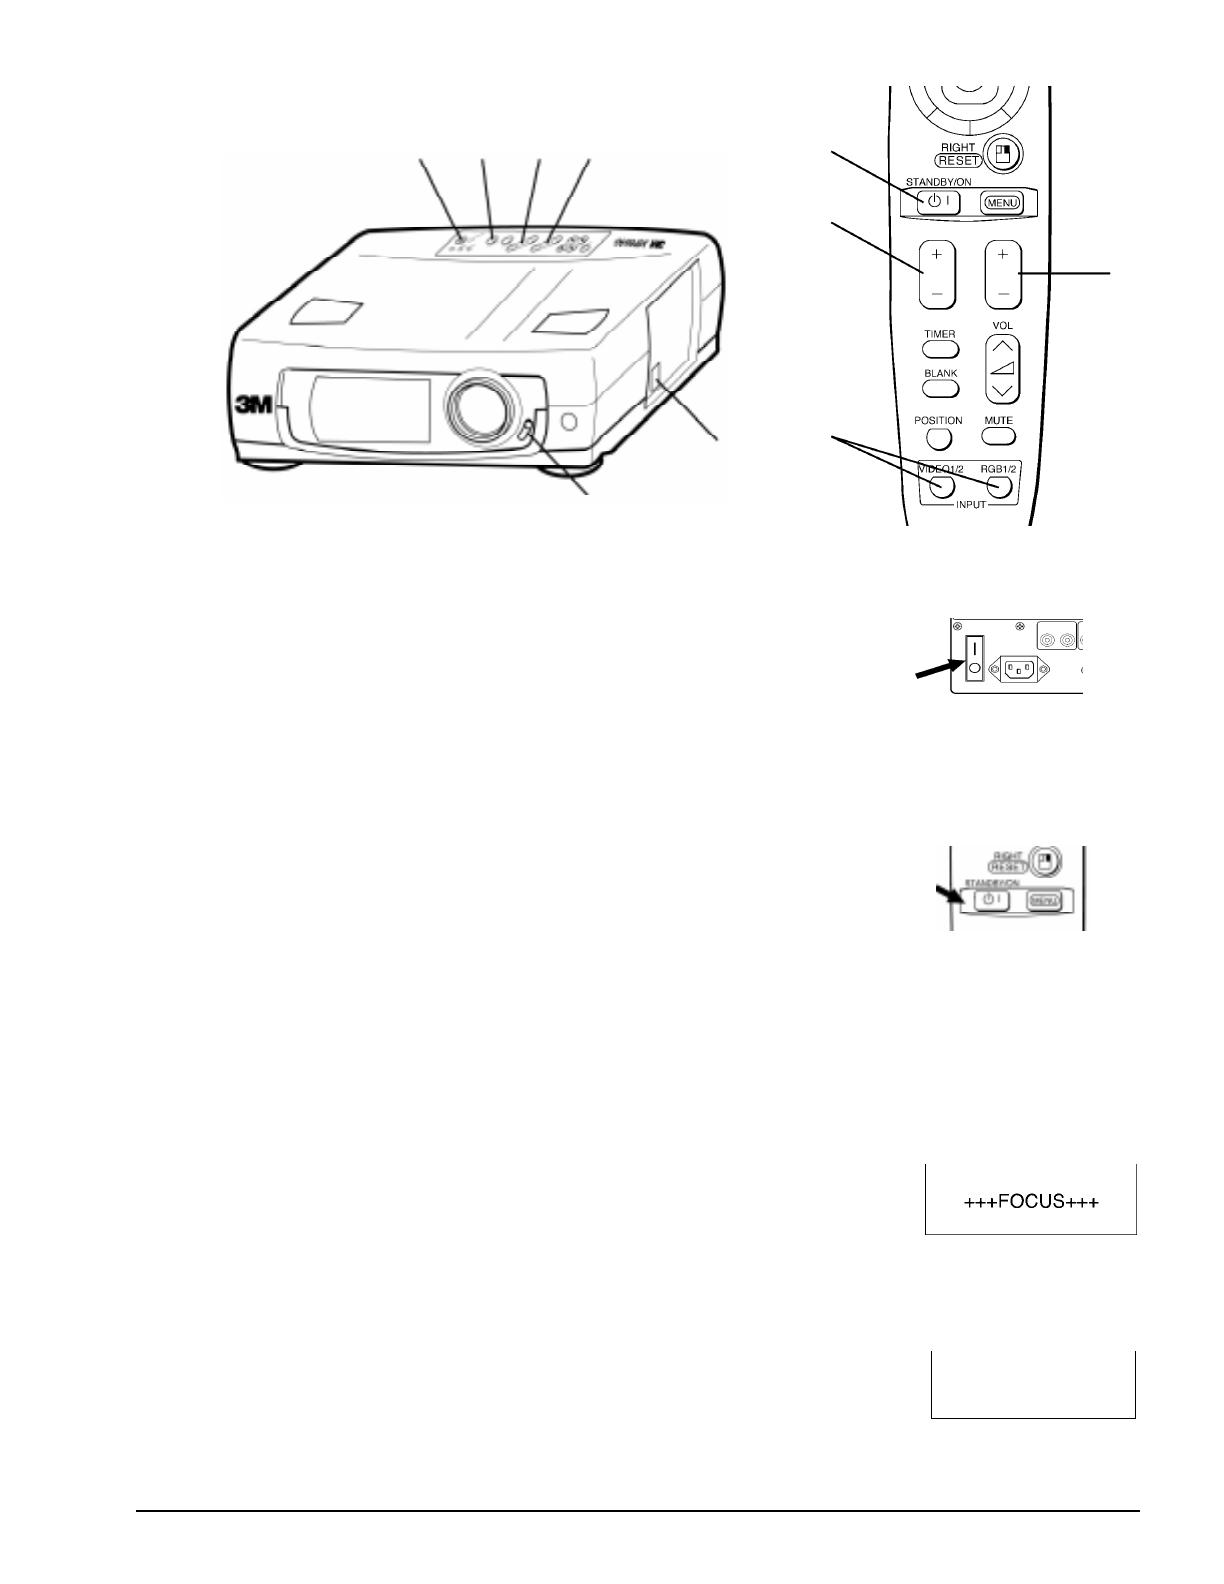
3.2 Using the Projector
1 Turn the MAIN POWER switch of the projector on.
•The ON indicator will light up orange.
2 Open the lens shutter.
•Push down lens shutter switch to open.
3 Press the STANDBY/ON button.
•The ON indicator blinks (green) and then lights (green).
•The ON indicator will blink green during warm-up and lamp ignition.
4 Adjust the screen size using the ZOOM button.
5 Adjust the focus using the FOCUS button.
(1) Press the FOCUS button. The on-screen display shown on the right appears.
(2) Adjust the focus so that the picture is sharp using the FOCUS button.
6 Turn on all connected equipment.
The method of connecting various equipment, see section 2.3.
7 Press the INPUT button on the projector or the INPUT SELECT
(VIDEO or RGB) button on the remote to select the
source of the signal to be projected on the screen.
•The selected signal input is displayed at the bottom right of the screen. The
display will show the last selected input source before power was turned off.
RGB 1
11
45
1
2
7
5
4
2
Example on-screen display
Note: Make all cable connections and line hookups FIRST.
7
3
3M
™
Multimedia Projector MP8630 © 3M 1997
3.3 Turn Off the Power
1
2
1
3
1 Hold the STANDBY/ON button for 3-5 seconds.
• The ON indicator blinks orange and the lamp turns off.
After approximately 1 minute, the fan stops and the indicator stays orange.
2 Turn the MAIN POWER switch of the projector off.
Caution: Do not turn off the MAIN POWER switch before pressing the STANDBY/ON button.
After the STANDBY/ON button is pressed, the fan rotates for about 1 minute to cool the
projector.
3 Close the lens shutter.
• Push up on the lens cover switch to close.
4 Disconnect cables.
12

© 3M 1997 3M
™
Multimedia Projector MP8630
Section 4: Adjustment and Functions
4.1 Menu
1 Press the MENU ( ) buttons on
projector or remote control MENU button.
•On-screen menus are displayed on the screen.
2 Select the menu to be adjusted using the MENU ( ) buttons or
STICK SWITCH.
•Selected Menu is highlighted.
3 Select the item to be adjusted using the MENU ( ) buttons
or STICK SWITCH.
• Highlighted items may be adjusted.
MENU
RESET
1, 2
1
1
2
SETUP INPUT IMAGE OPT.
VOL
BRI
CON
SHA
COL
TIN
RESET ‘SETUP’
DEFAULT
CANCEL
13
Memory function
Individual memory functions are provided for the VIDEO1, VIDEO2, RGB1 and RGB2 input terminals.
Adjustments are saved after power off.
To return to the factory default setting:
√ Highlight SETUP option.
√ To reset the entire SETUP menu
• Press the RESET button.
• Select DEFAULT or CANCEL.
√ To reset a single item from SETUP menu
• Select the adjustment item (brightness, contrast...)
• Press the RESET button. Only the selected item resets.

3M
™
Multimedia Projector MP8630 © 3M 1997
4.2 How To Use Foot Adjusters
Adjust the projection position using the foot adjusters at the bottom of the projector.
Foot adjusters
unlock ←→ lock
Front view
Side view
4.2.1 Lift up the projector, unlock the foot adjusters.
4.2.2 Adjust a viewing angle, and then lock the foot adjusters.
4.2.3 For fine adjustments, rotate the foot adjusters.
14
Caution: Do not unlock the foot adjusters if you do not support the projector.
If the foot adjusters do not lock completely, turn the foot adjusters slightly before locking.

© 3M 1997 3M
™
Multimedia Projector MP8630
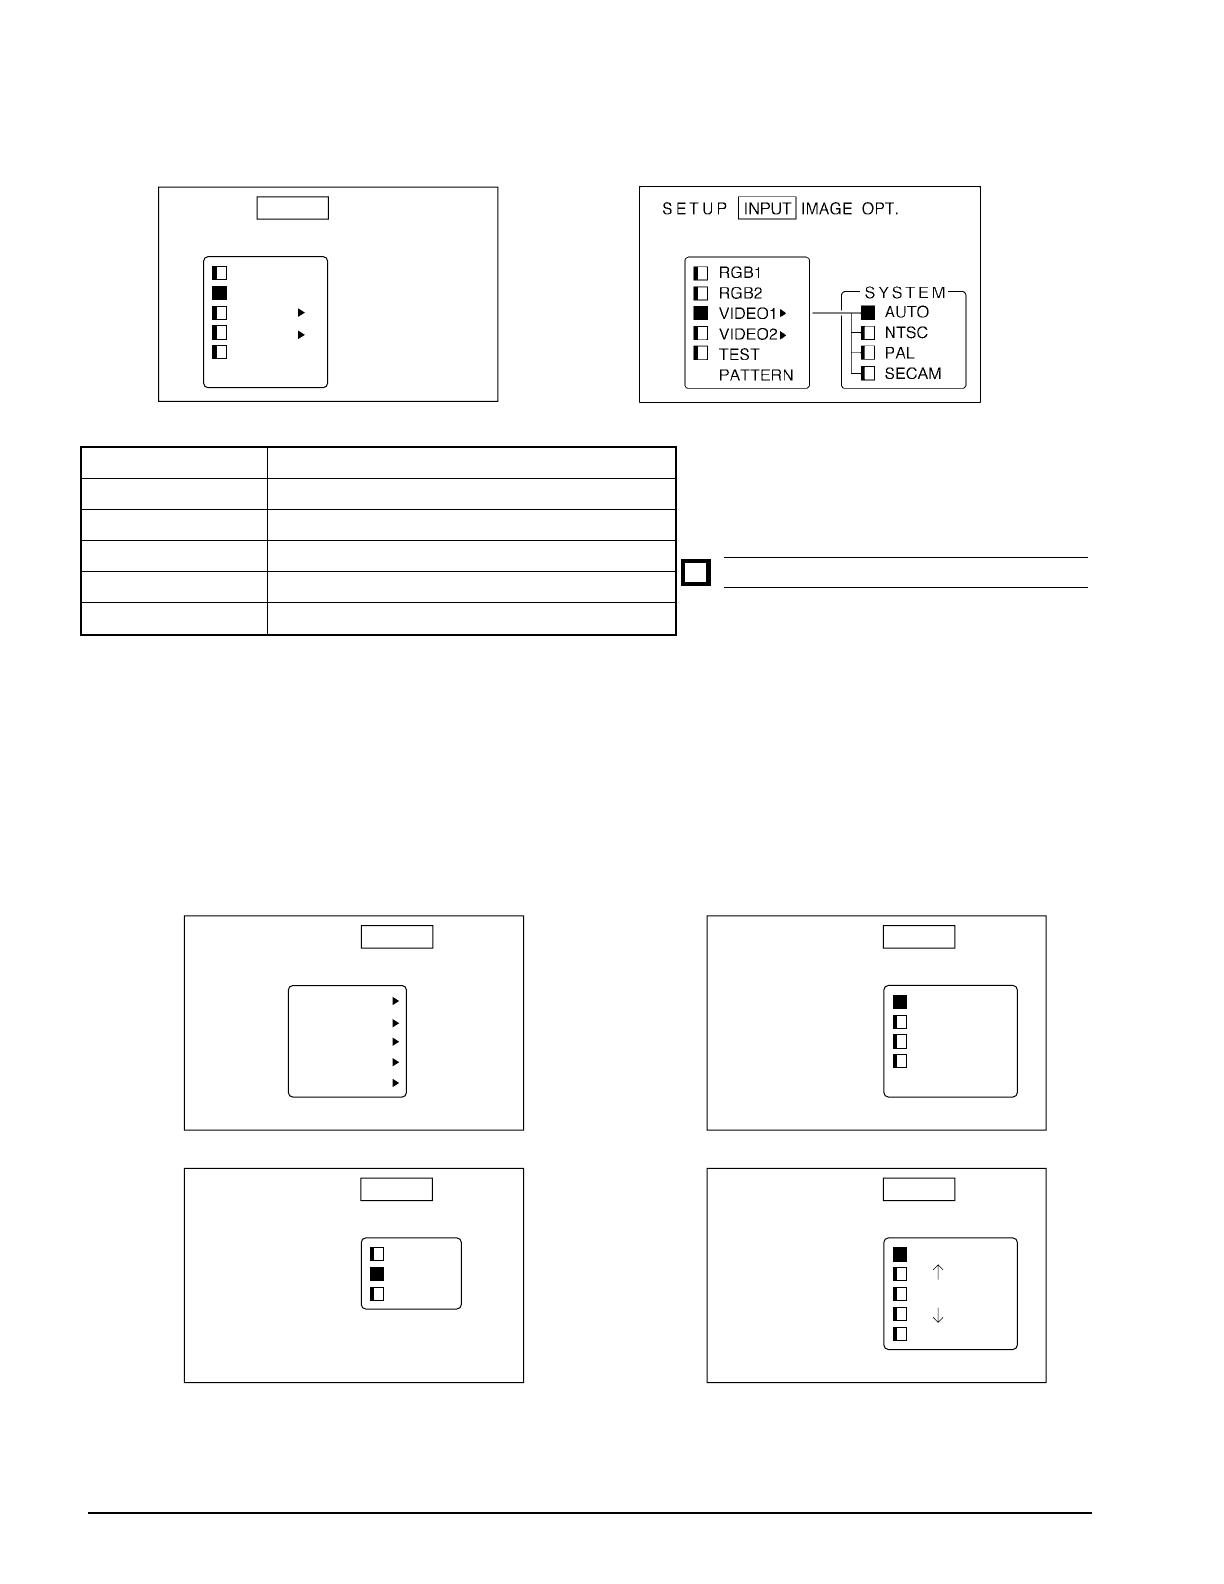
4.3 SETUP
The menu SETUP is used to adjust the image and to move the image position.
RGB signal input Video signal input
Adjustment Item
VOLUME
BRIGHT
(BRIGHTNESS)
CONTRAST
SHARPNESS
COLOR
TINT
V.POSIT
(V.POSITION)
H.POSIT
(H.POSITION)
H.PHASE
H.SIZE
Details of adjustment
Decrease Increase
Dark Bright
Lower
Higher
Soft
Sharp
Less
More
Red
Green
Moves the picture up or down.
Moves the picture left or right.
Decreases the picture flicker.
Widens or Narrows the horizontal size of picture.
Note: • TINT cannot be adjusted with a PAL video signal input.
• TINT, COLOR and SHARPNESS cannot be adjusted with an RGB signal input.
• V. POSIT, H. POSIT, H. PHASE and H. SIZE cannot be adjusted with a VIDEO signal input.
15
3M
™
Multimedia Projector MP8630 © 3M 1997
4.4 INPUT
The menu INPUT is used to select the input source.
SETUP INPUT IMAGE OPT.
RGB1
RGB2
VIDEO1
VIDEO2
TEST
PATTERN
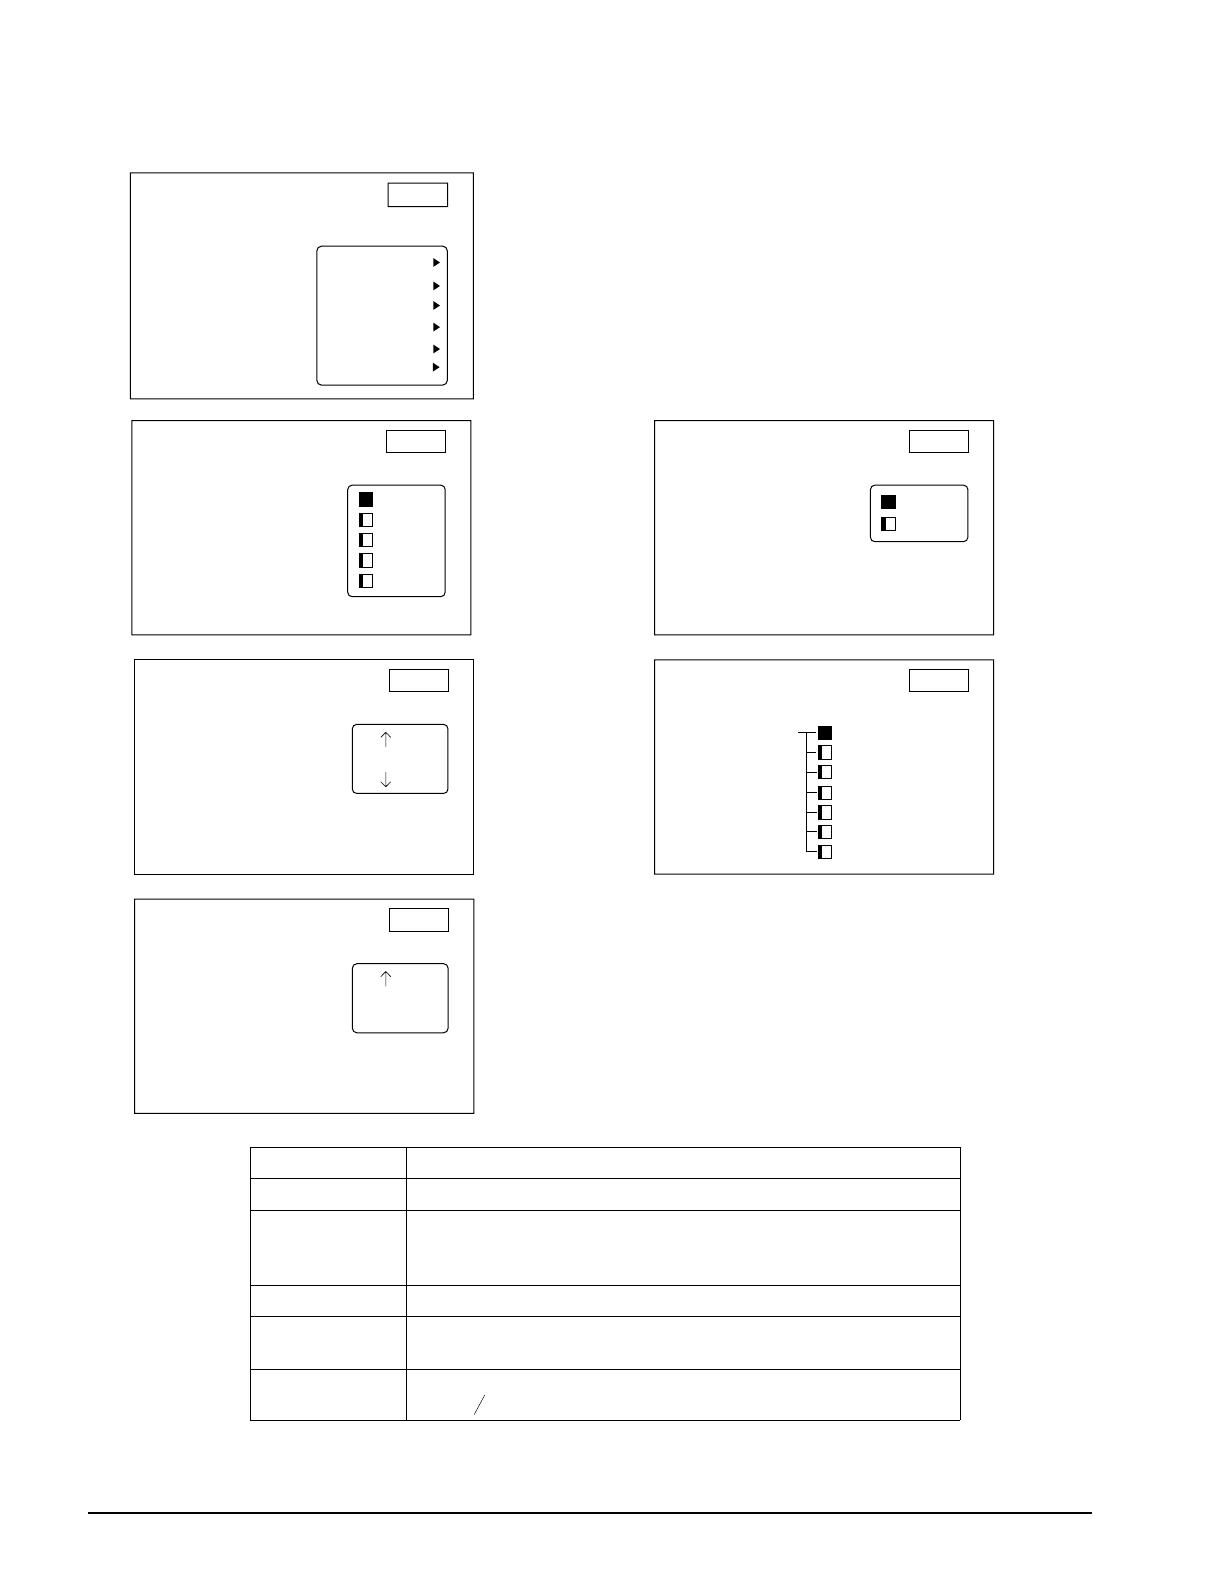
4.5 IMAGE
The IMAGE menu is used to alter the image.
SETUP INPUT IMAGE OPT.
MIRROR
BLANK
REVEAL
DISP. SIZE
MESSAGE
SETUP INPUT IMAGE OPT.
WHITE
BLUE
BLACK
BLANK
SETUP INPUT IMAGE OPT.
NORMAL
H : INVERT
V : INVERT
H&V :
INVERT
MIRROR
SETUP INPUT IMAGE OPT.
FAST
MEDIUM
SLOW
REVEAL
16
Selection
RGB1
RGB2
VIDEO1
VIDEO2
TEST PATTERN
Description
Selects the RGB 1 terminal.
Selects the RGB 2 terminal.
Selects the VIDEO 1 terminal.
Selects the VIDEO 2 terminal.
Selects the TEST PATTERN. (Start up screen.)
SYSTEM Selects the video signal systems.

© 3M 1997 3M
™
Multimedia Projector MP8630
Selection
MIRROR
BLANK
REVEAL
MESSAGE
Description
Inverts the picture horizontally or vertically.
H : INVERT Inverts the picture horizontally.
V : INVERT Inverts the picture vertically.
H&V: INVERT Inverts the picture horizontally and vertically.
Selects the blank color.
Selects the speed of revelation.
Turn off the on-screen message.
Display Size Source Option Description
640 X 480 Normal Displays in 640x480 window centered on screen.
Large Expands 640x480 to full 800x600 screen.
800 X 600 Normal Displays full 800x600.
Large Not available.
1024 X 768 Normal Compresses 1024x786 to 800x600 screen.
Large Displays 800x600 "window" into 1024x768. This
window can be moved with H and V Position or by
holding position button and moving the stick switch.
Video Normal Displays video in a 640x480 window centered on screen.
Large Expands video to fill 800x600 screen.
4.5 IMAGE (continued)
SETUP INPUT IMAGE OPT.
TURN ON
TURN OFF
MESSAGE
17
3M
™
Multimedia Projector MP8630 © 3M 1997
4.6 OPT
The meno OPT. allows you to control communication function.
SETUP INPUT IMAGE OPT.
COM. SPEED
COM. BITS
TIMER
LANGUAGE
AUTO OFF
STARTUP
SETUP INPUT IMAGE OPT.
7N1
8N1
COM. BITS
SETUP INPUT IMAGE OPT.
10 min.
TIMER
SETUP INPUT IMAGE OPT.
ENGLISH
FRANCAIS
DEUTSCH
ESPANOL
ITALIANO
NORSK
NEDERLANDS
LANGUAGE
SETUP INPUT IMAGE OPT.
0 min.
STOP
AUTO OFF
SETUP INPUT IMAGE OPT.
1200
2400
4800
9600
19200
COM. SPEED
(bps)
Selection
COM. SPEED
COM. BITS
TIMER
LANGUAGE
AUTO OFF
18
Description
Selects the data speed of transmission. (For mouse emulation-1200)
Selects the data format of transmission.
7N1... 7 data-bits, No parity, 1 stop bit.
(For mouse emulation-7NI)
8N1... 8 data-bits, No parity, 1 stop bit.
Sets minutes of timer.
Selects the language on-screen menu.
(English, French, German, Spanish, Italian, Swedish, Dutch)
Selects how long projector will stay on, if no input is detected.
Select
0 to disable this function.
© 3M 1997 3M
™
Multimedia Projector MP8630
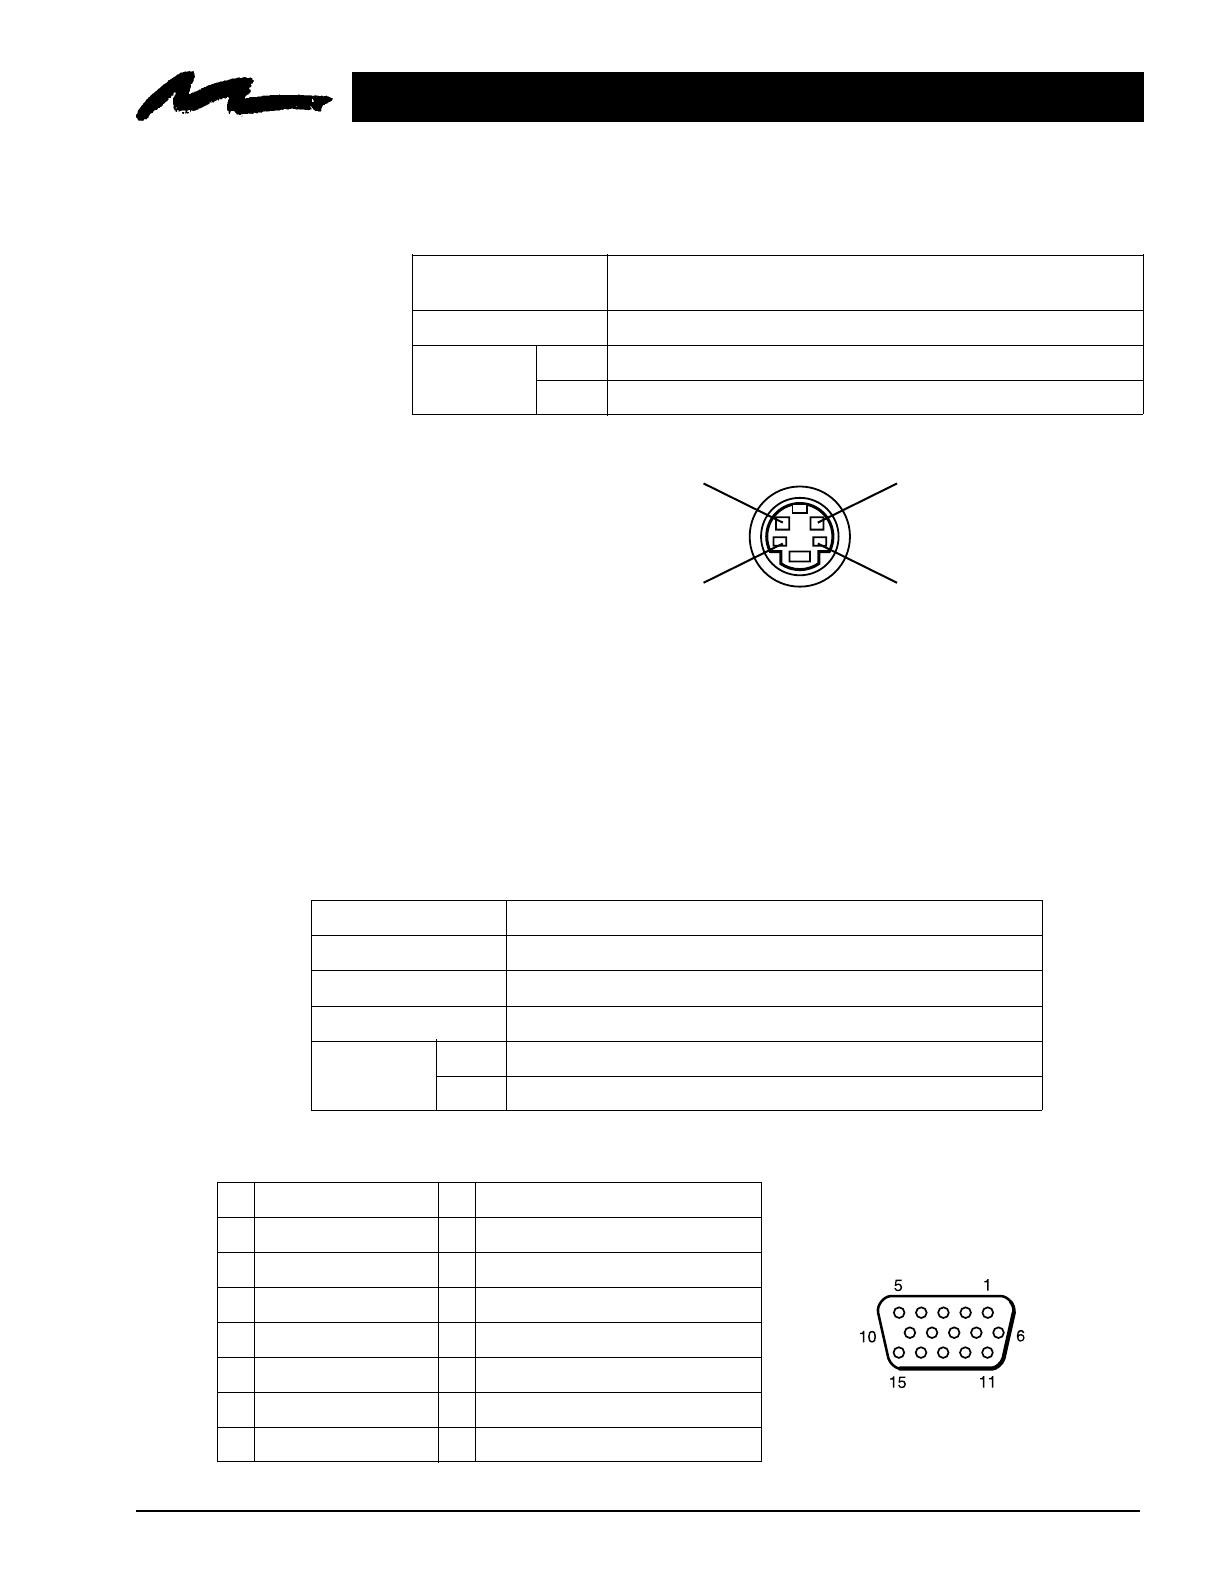
Section 5: Connection to Signal Terminals
5.1 Connection to the Video Signal Terminal
a. Input signal
S-VIDEO signal
VIDEO signal
AUDIO signal
Input
Output
Luminance signal 1.0Vp-p, 75 Ω termination
Chrominance signal 0.286Vp-p (burst signal), 75 Ω termination
1.0Vp-p, 75 Ω termination
200mVrms, 20 k Ω below (MAX 3.0Vp-p)
0~200mVrms, 1k Ω
b. Signal input terminal
Chrominance signal
Ground
S VIDEO input (Mini DIN4 pin)
Luminance signal
Ground
5.2 Connection to the RGB Signal Terminal
Video signal
Horizontal sync signal
Vertical sync signal
Composite sync signal
Audio signal
Input
Output
Analog 0.7Vp-p 75 Ω termination (Positive polarity)
TTL level (Positive/negative polarity)
TTL level (Positive/negative polarity)
TTL level
200mVrms, 20k Ω below (MAX 3.0Vp-p)
0 ∼ 200mVrms, 1k Ω
a. Input signal / Output signal
1
2
3
4
5
6
7
8
Video signal (Red)
Video signal (Green)
Video signal (Blue)
N.C
N.C
Ground (for R)
Ground (for G)
Ground (for B)
9
10
11
12
13
14
15
N.C
Ground
Ground
N.C
Horizontal/Composite sync signal
Vertical sync signal
N.C
D-sub 15pin (Male)
b. Signal input terminal / output terminal
Note: Video input signal terminals have priority in the following order:
1. S-VIDEO input terminal
2. RCA jack (composite) input terminal
19
3M
™
Multimedia Projector MP8630 © 3M 1997
c. Example of computer signal
Computer/Signal source
15kHz RGB
(NTSC)
VGA-1
(IBM
™
compatible)
VGA-2
(IBM
™
compatible)
VGA-3
(IBM
™
compatible)
Macintosh
™
13 inch mode
(Apple
™
)
VESA 72 Hz standards
SVGA
(VESA 60Hz)
SVGA
(VESA 72Hz)
Macintosh
™
16 inch mode
(Apple
™
)
XGA
(VESA 60Hz)
XGA
(VESA 75Hz)
Resolution
H × V
—
640 × 350
640 × 400
640 × 480
640 × 480
640 × 480
800 × 600
800 × 600
832 × 624
1024 × 768
1024 × 768
fH
(kHz)
15.7
31.5
31.5
31.5
35.0
37.9
37.9
48.1
49.7
49.1
60.2
fV
(Hz)
60
70.1
70.1
59.9
66.7
72.8
60.3
72.2
74.5
60.1
75.0
Sync Signal
H, V composite
H, V separate
H: Positive
V: Negative
H, V separate
H: Negative
V: Positive
H, V separate
H: Negative
V: Negative
H, V separate
H: Negative
V: Negative
H, V separate
H: Negative
V: Negative
H, V separate
H: Positive
V: Positive
H, V separate
H: Negative
V: Negative
H, V separate
H: Negative
V: Negative
H, V separate
H: Positive
V: Positive
H, V separate
H: Positive
V: Positive
Interlaced /
Non-interlaced
Interlaced
Non-interlaced
Non-interlaced
Non-interlaced
Non-interlaced
Non-interlaced
Non-interlaced
Non-interlaced
Non-interlaced
Non-interlaced
Non-interlaced
Note 3: Some input sources may not be displayed properly because they are not compatible with the projector.
Note 2: XGA (1024 x 768) will have less resolution, due to compression techniques used to display the image
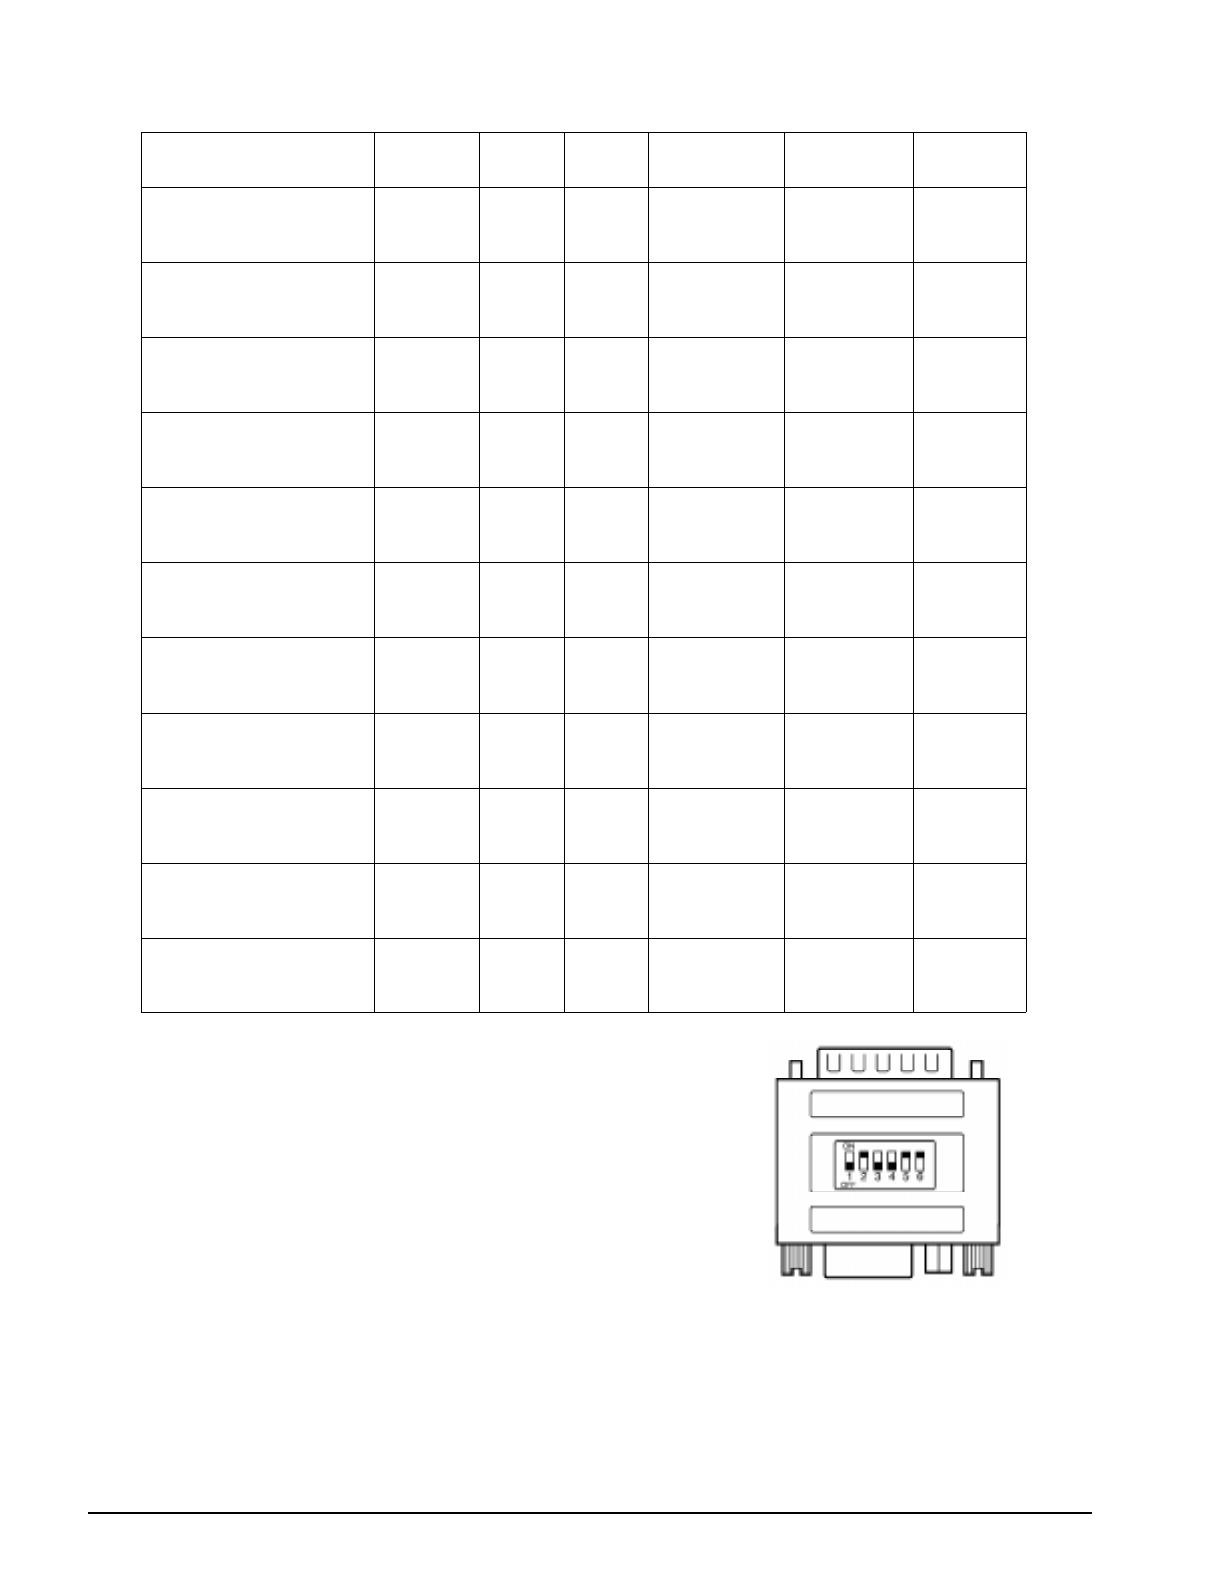
Note 1: MAC adapter is necessary to set the resolution mode.
Projector is compatible with 13 inch mode and 16 inch mode.
Set all dip switches OFF except those indicated in the chart.
For example:
MAC 13" mode = switch 1, 5 and 6 are ON
MAC 16" mode = switch 2, 5 and 6 are ON
20
(Example of 16 inch mode)
Note
Note: 3
Note: 3
Note: 3
Note: 1
Note: 3
Note: 1
Note: 2
Note: 2
/