
4. Windows Add New Hardware Wizard – Third Pass – USB Audio Device
The third pass of the Add New Hardware Wizard detects a USB Audio Device. This portion of the
installation proceeds like the first, but installs “USB Audio Device" instead of “USB Composite
Device”. The Windows drivers have now been installed.
3. Windows Add New Hardware Wizard – Second Pass – USB Human Interface Device
The second pass of the Add New Hardware Wizard detects a USB Human Interface Device. This
portion of the installation proceeds like the first, but installs “USB Human Interface Device" instead of
“USB Composite Device”.
SYSTEM REQUIREMENTS: Your TP100 headset is compatible with Windows 98SE, ME, 2000, XP
and Mac OS 9.2 and higher. INSTALLATION: Before you installation, be sure your computer is
running and that you exit all running applications.
2. Windows Add New Hardware Wizard – First Pass – USB Composite Device
Note: Windows 98 Second Edition Upgrade users may need the Windows 98 Second Edition Upgrade
CD-ROM available.
1.The Add New Hardware Wizard should detect the new “USB Composite Device.” Click Next.
2.The next window asks, “What do you want Windows to do?” Select “Search for the best driver for
your device.” Click Next.
3.The next window asks, “Where do you want Windows to search?” Select the hard drive only with the
default location in the text box (either“C:\Windows” or “C:\Windows\Options\Cabs” depending on your PC).
Click Next.
4.The next window states, “Windows will now install the driver for ‘USB Composite Device’.” Click Next.
5.Click Finish.
NOTE: Windows will prompt you through the New Hardware Wizard with
windows such as the one at right. However in some instances the New
Hardware Wizard windows will not appear while drivers are being installed. In
this case, the drivers install automatically.
1. Connect the USB Headset to the Computer
Insert the USB plug on the headset into the USB port on your computer. As
soon as the USB plug is inserted into the USB port, Windows will detect the
addition of the headset, and the Add New Hardware Wizard will run
automatically as described in steps 2 through 4 below.
WINDOWS USERS
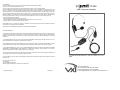
Swivel
White dot or
"TALK" mark
Headset Adjustments
1. The microphone boom can be positioned on either side of your mouth by
rotating the headset and swiveling the boom up and over.
2. Place headset on head. Adjust headband for proper fit.
3. Position the microphone a finger-width away from the corner of your
mouth just below your bottom lip.
4. The microphone has a painted dot or the word TALK embossed on it.
Be sure this mark is facing your mouth (remove cushion).
Using the Pendant Controls:
Microphone Mute Control: Push button down to turn off (mute)
the microphone. Return button to the "up" position and the
microphone will be reactivated.
Receive Volume Control:
To adjust the volume in the earphone,
rotate the volume wheel on the pendant.
Express Disconnect:
To disconnect the lower cord from the
upper assembly, grasp the black modular plug and gently press
on the rounded part to release plug from the pendant.
"Microphone
Off/On"
Receive
Volume
Wheel
Press here to release
MACINTOSH USERS
Procedure to Test for Microphone Transmit and Audio Output (Windows)
1.Select Start/Settings/Control Panel/Multimedia and verify that USB Audio Device is selected as Preferred
Device for Playback and is selected as Preferred Device for Recording.
2. Check “Use only Preferred Devices.”
3. Click OK to close Windows Audio Properties.
4. Select Start/Programs/Accessories/Entertainment/Sound Recorder. Click on the red dot to begin
recording.
5. Activate the microphone and speak into the headset microphone for about 10 seconds. You should
see variations in the green wavelength meter.
6. Click on the square to stop recording.
7. Click on the triangle in the center to playback your recording. You should hear your voice from the
receiver.
8. You have successfully installed your VXI USB Headset.
9. For Internet Telephony Applications, you may need to rerun the AudioSetup Wizard for the VoIP
provider.
10. For speech applications verify that USB Audio Device is selected as input/output source.
NOTE: Plug the TP100 USB connector directly into
the Mac's USB port, not the keyboard USB hub.
1. Configure the Microphone Control Strip.
Click on the microphone icon on the control strip.
In the pop-up menu, click on USB Audio. Do the
same for the speaker icon.
2. Configure the Sound Control Panel.
Open the sound control panel and select "Input".
Verify that USB audio is selected as the sound input
source. If it is not selected, click on USB Audio in the
list.
Do the same for the output for the sound output.
Close the sound control panel.
USB Plug


 1
1
 2
2


VXI Two-Way USB Adapter User manual

