Samsung HX-MU050DA User manual
- Category
- External hard drives
- Type
- User manual
This manual is also suitable for

Samsung Format
Utility
Samsung Format Utility Ver. 1 1

Using the Samsung Format Utility
This program is designed to format your Samsung External
Hard Drive only. It is critically important that you read and
understand the results of formatting your drive.
NOTE: PARTITONING AND FORMATTING YOUR
DRIVE WILL PERMANENTLY ERASE ALL THE
FILES ON THE DRIVE. DO NOT ATTEMPT TO DO
THIS UNLESS ALL OF YOUR FILES HAVE BEEN
BACKED UP AND CHECKED FOR RELIABILITY AND
READABILITY.
This manual describes the features, uses, and instructions
to format a Samsung External Hard Drive and is designed
for the advanced computer user.
Samsung Format Utility Ver. 1 2

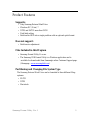
Product Features
Supports:
• Only Samsung External Hard Drive
• Windows XP / Vista / 7
• NTFS and FAT32 more than 32GB
• Disk label setting
• Partition the HDD into a single partition with an optional quick format
Does not support:
• Partition size adjustment
Files Included in this Program
• Samsung Format Utility Vx.x.exe
• The Samsung USB Format Utility is a Windows application and is
available for downloaded from Samsung's online Customer Support page.
(Homepage :
www.samsunghdd.com)
Partitioning and Changing File System Type
The Samsung External Hard Drive can be formatted to three different filing
systems:
• FAT32
• NTFS
• Macintosh
Samsung Format Utility Ver. 1 3

Reformat to FAT32
Use Samsung USB Format Utility to format your Samsung
External Hard Drive to FAT32.
1. Launch Samsung Format Utility Vx.x.exe
2. After you have read the warning message, click OK
Figure 1-1 Format Warning Screen
NOTE: PARTITONING AND FORMATTING YOUR
DRIVE WILL PERMANENTLY ERASE ALL THE
FILES ON THE DRIVE. DO NOT ATTEMPT TO DO
THIS UNLESS ALL OF YOUR FILES HAVE BEEN
BACKED UP AND CHECKED FOR RELIABILITY
AND READABILITY.
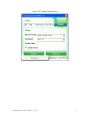
3. From the Drive To Format Pull-Down menu, choose Whole Hard Drive
to format the drive as one partition or, if there is another partition,
choose the desired partition
4. From the File System Pull-Down menu, choose the File System (NTFS
or FAT32)
5. Click the Quick Format box to use the Quick Format option. A check
mark indicates that the option is chosen
6. Enter the Volume Label if applicable
Samsung Format Utility Ver. 1 4

7. Click Start
Figure 1-2 Samsung Format Utility Screen
8. From the Warning screen, click OK
Figure 1-3 Warning before Formatting
The Lower Left window of the Samsung Format Utility changed
from Enumerate Device Success to Running. This will change back
to Enumerate Device Success when the process has completed.
After the process has completed, you will receive a message from
Task Bar indicating OK if the process was successful or Fail if the
process failed.
Samsung Format Utility Ver. 1 5

Figure 1-4 Format Utility Running
Samsung Format Utility Ver. 1 6

Reformat to NTFS
Now that your Samsung External Hard Drive has been formatted,
the drive can now be reformatted with the NTFS.
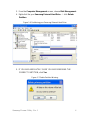
1. Connect the Samsung External Hard Drive to your computer
2. From the Windows Explorer, right-click MyComputer -> Manage
Figure 1-5 Manage option in Windows Explorer
NOTE: PARTITONING AND FORMATTING YOUR
DRIVE WILL PERMANENTLY ERASE ALL THE
FILES ON THE DRIVE. DO NOT ATTEMPT TO DO
THIS UNLESS ALL OF YOUR FILES HAVE BEEN
BACKED UP AND CHECKED FOR RELIABILITY
AND READABILITY.
Samsung Format Utility Ver. 1 7

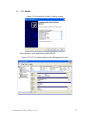
3. From the Computer Management screen, choose Disk Management
4. Right-click the your Samsung External Hard Drive -> click Delete
Partition
Figure 1-6 Partitioning your Samsung External Hard Drive
5. IF YOU ARE ABSOLUTELY SURE YOU ARE REMOVING THE
CORRECT PARTITION, click Yes
Figure 1-7 Delete Partition Warning
Samsung Format Utility Ver. 1 8

6. Once the drive partition has been deleted, right-click the drive to
format -> New Partition
Figure 1-8 New Partition
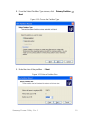
7. From the New Partition Wizard, click Next
Figure 1-9 Partition Wizard
Samsung Format Utility Ver. 1 9

8. From the Select Partition Type screen, click Primary Partition ->
Next
Figure 1-10 Choose the Partition Type
9. Enter the size of the partition -> Next
Figure 1-11 Enter a Partition Size
Samsung Format Utility Ver. 1 10

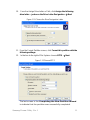
10. From the Assign Drive Letter or Path, click Assign the following
drive letter: -> choose the Drive Letter Designation -> Next
Figure 1-12 Choose the Drive Designation Letter
11. From the Format Partition screen, click Format this partition with the
following settings:
12. In the box to the right of File System: choose NTFS -> Next
Figure 1-13 Choose NTFS
The last screen is the Completing the New Partition Wizard
to indicate that the partition was successfully completed.
Samsung Format Utility Ver. 1 11

13. Click Finish
Figure 1-14 Successful Partition Creation screen
Your drive is now partitioned with NTSF.
Figure 1-15 NTFS Partitioned Drive in the Management screen
Samsung Format Utility Ver. 1 12

Reformat in Macintosh
Following are the instructions for formatting a computer running
the Macintosh OS X:
1. Launch Mac Os X’s Disk Utility tool
2. Open the main drive folder from the desktop
3. Open Applications -> Utilities folder
4. Select the Disk Utility file
5. Select the drive you wish to reformat
6. Select the Erase menu
7. Select Mac OS Externded(Journaled) from the volume format menu
and Click Erase button
8. Once formatting is complete, the drive will appear on your desktop.
NOTE: PARTITONING AND FORMATTING YOUR
DRIVE WILL PERMANENTLY ERASE ALL THE
FILES ON THE DRIVE. DO NOT ATTEMPT TO DO
THIS UNLESS ALL OF YOUR FILES HAVE BEEN
BACKED UP AND CHECKED FOR RELIABILITY
AND READABILITY.
Samsung Format Utility Ver. 1 13
-
 1
1
-
 2
2
-
 3
3
-
 4
4
-
 5
5
-
 6
6
-
 7
7
-
 8
8
-
 9
9
-
 10
10
-
 11
11
-
 12
12
-
 13
13


Samsung HX-MU050DA User manual
- Category
- External hard drives
- Type
- User manual
- This manual is also suitable for
Ask a question and I''ll find the answer in the document
Finding information in a document is now easier with AI
Related papers
-
Samsung 160GB S2 Portable HDD Owner's manual
-
Samsung 640GB S2 Portable User manual
-
-
Samsung HX-MU025DC User manual
-
Samsung HX-DU020EC User manual
-
Samsung 500GB Potrable User manual
-
-
-
Samsung HX-MU050DA Owner's manual
-
Other documents
-
Seagate HM501II Datasheet
-
Rocstor LANCER LX User manual
-
-
Rocstor COMMANDER 3F series User manual
-
Rocstor 3TB ROCPRO 900e User manual
-
-
Rocstor Eagleroc E3 1TB User manual
-
-
-