Canon PIXMA MP620 Owner's manual

Category
Laser/LED printers
Type
Owner's manual

This manual is also suitable for

How to Use This Manual Printing This Manual
MC-3130-V1.00
Basic Guide
Describes the summary of
this product.
Advanced Guide
Describes the detailed
function of this product.
Troubleshooting
Page 1 of 815 pagesMP620 series On-screen Manual
How to Use This Manual
Printing This Manual
MP-2463-V1.00
A
dvanced Guide
Contents
Overview of the Machine
Main Components
How to Navigate Menus on the LCD
Printing from a Memory Card
Printing Photos Saved on the Memory Card
Using Various Functions
Inserting the Memory Card
Copying
Making Copies
Using Various Copy Functions
Printing Photos from Printed Photos
Reprinting Printed Photos
Using Various Functions
Scanning
Saving Scanned Data
Printing from Your Computer
Printing Photos (Easy-PhotoPrint EX)
Printing Documents (Windows)
Printing Documents (Macintosh)
Other Usages
Printing the Notebook or Graph Paper
Printing Photos Directly from Your Mobile Phone
or Digital Camera
Machine Settings
Solution Menu and My Printer
Loading Paper / Originals
Loading Paper
Loading Originals to Copy or Scan
Routine Maintenance
Replacing an Ink Tank
When Printing Becomes Faint or Colors Are
Incorrect
Cleaning the Paper Feed Roller
Cleaning the Pad in the Cassette
Appendix
Safety Precautions
Legal Limitations on Use of Your Product and
Use of Images
Tips on How to Use Your Machine
Page 2 of 815 pagesMP620 series Basic Guide
Advanced Guide
Troubleshooting
Contents
> Overview of the Machine
Overview of the Machine
This section shows the component names of the machine and describes the basic operations you need
to know before using it.
Main Components
Front View
Rear View
Inside View
Operation Panel
How to Navigate Menus on the LCD
Selecting Menus on the HOME Screen
Selecting Setting Items
Other Operations
Page top
Page 3 of 815 pagesOverview of the Machine
Advanced Guide
Troubleshooting
Contents
>
Overview of the Machine
> Main Components
Main Components
Front View
(1)
Document Cover
Open to load an original on the Platen Glass.
(2)
Operation Panel
Use to change the settings of the machine or to operate it.
See
Operation Panel
.
(3)
LCD (Liquid Crystal Display)
Displays messages, menu selections, and the operation status. You can also preview photos on the LCD
before printing.
Note
The LCD will turn off if the machine is not operated for about 5 minutes. To restore the
display, press any button except the
ON
button or perform the print operation.
(4)
Paper Support
Raise and tip back to load paper in the Rear Tray.
(5)
Paper Guides
Slide to align with both sides of the paper stack.
(6)
Rear Tray
Load various sizes or types of paper which you can use on the machine. Two or more sheets of the same
size and type of paper can be loaded at the same time, and fed automatically one sheet at a time.
See
Loading Paper
.
(7)
Card Slot Cover
Open to insert a memory card.
See
Inserting the Memory Card
.
(8)
Direct Print Port
Connect a PictBridge compliant device such as a digital camera or the optional Bluetooth Unit BU-30* when
Page 4 of 815 pagesMain Components
printing directly.
See
Printing Photos Directly from Your Mobile Phone or Digital Camera
.
You can also insert a USB flash drive to this port to save scanned data on it.
See Saving Scanned Data
.
* The Bluetooth Unit is not available in some countries or regions depending on the local laws and
regulations. For details, contact your local Canon service representative.
Warning
Do not connect any equipment other than PictBridge compliant devices, the optional
Bluetooth Unit BU-30, and USB flash drives to the Direct Print Port of the machine. This
may cause fire, electric shock, or damage to the machine.
Caution
Do not touch the metal casing.
(9)
Paper Output Tray
Opens automatically when printing or copying starts and printed papers are ejected.
(10)
Output Tray Extension
Open to support the printouts. Open it when printing or copying.
(11)
Platen Glass
Load an original to copy or scan.
(12)
Cassette
Load A4, B5, A5, or Letter-sized plain paper and insert it into the machine. Two or more sheets of the same
size of paper can be loaded at the same time, and fed automatically one sheet at a time.
See
Loading Paper
.
(13)
Scanning Unit Detection button
Locks the Scanning Unit (Cover) while the Document Cover is open. This button is pressed down when the
Document Cover is closed, so that you can open the Scanning Unit (Cover). (You do not need to touch this
button.)
For information on the Scanning Unit (Cover), see Scanning Unit (Cover)
.
Rear View
Page 5 of 815 pagesMain Components
(14)
USB Port
Plug in the USB cable to connect the machine with a computer.
Caution
Do not touch the metal casing.
Important
Do not plug in or unplug the USB cable while the machine is printing from or scanning
originals to the computer.
(15)
Wired LAN Connector
Plug in the LAN cable to connect the machine to a LAN.
Caution
Do not touch the metal casing.
(16)
Rear Cover
Detach to remove jammed paper.
(17)
Power Cord Connector
Plug in the supplied power cord.
Inside View
(18)
Ink lamp
Lights or flashes red to indicate the ink tank status.
See
Checking the Ink Status
.
(19)
Print Head Lock Lever
Locks the Print Head into place.
Important
Do not raise this lever after installing the Print Head.
(20)
Print Head Holder
Install the Print Head.
(21)
Scanning Unit (Cover)
Scans originals. Open it to replace ink tanks, to check ink lamps, or to remove jammed paper inside the
machine. When opening the Scanning Unit (Cover), lift it with the Document Cover closed.
(22)
Card Slot
Insert a memory card.
See
Inserting the Memory Card
.
(23)
Access lamp
Lights or flashes to indicate the memory card status.
Page 6 of 815 pagesMain Components
See
Inserting the Memory Card
.
Note
For details on installing the Print Head and ink tanks, refer to the printed manual:
Getting
Started
.
Operation Panel
(1)
ON button
Turns the power on or off. Before turning on the power, make sure that the Document Cover is closed.
Important
Disconnecting the power plug
When disconnecting the power plug after turning off the power, be sure to confirm that
the
Power
lamp is not lit. If the power plug is disconnected from the wall outlet while the
Power
lamp is lit or flashing, the machine may become unable to print properly since the
Print Head is not protected.
(2)
Buttons to use when navigating menus on the LCD
See How to Navigate Menus on the LCD
.
(3)
Black button
Starts black & white copying, scanning, etc.
(4)
Color button
Starts color printing, copying, or scanning.
(5)
Stop button
Cancels operation when a print job is in progress.
(6)
Alarm lamp
Lights or flashes orange when an error, such as paper-out or ink-out, occurs.
(7)
[+] [-] buttons
Specifies the number of copies to copy or print.
(8)
Power lamp
Lights green after flashing when the power is turned on.
(9)
OK button
Selects a menu or setting item. See How to Navigate Menus on the LCD
.
Resolves an error when printing is in progress or resumes the machine's normal operation after removing
j
ammed paper.
Page top
Page 7 of 815 pagesMain Components
Advanced Guide
Troubleshooting
Contents
>
Overview of the Machine
> How to Navigate Menus on the LCD
How to Navigate Menus on the LCD
You can use the machine to make copies or various kinds of printings without a computer. You can
operate the machine, using the
Easy-Scroll Wheel
,
(Left),
(Right),
(Up),
(Down) button, or
OK
button on the Operation Panel to navigate menus or select setting items on the LCD.
This section describes the basic operation to navigate menus on the
HOME
screen and to select setting
items necessary for printing.
Selecting Menus on the HOME Screen
The
HOME
screen appears when the power is turned on or when the
HOME
button is pressed.
To start printing photos on a memory card, copying, or scanning, select menus on the
HOME
screen.
1.
Press the
HOME
button (A).
The
HOME
screen appears.
2.
Turn the
Easy-Scroll Wheel
(B) to select the menu to use, and press the
OK
button
(C).
You can also use the (Left) or
(Right) button (D) to select the menu.
The selected menu screen appears.
The following menus are available on the
HOME
screen.
Copy
:
You can change copy scale or copy in various
layouts.
See
Copying
.
You can print photos saved on a memory card of
Page 8 of 815 pagesHow to Navigate Menus on the LCD
Memory card
:
your digital camera.
See
Printing from a Memory Card
.
Easy photo reprint
:
You can scan printed photos and print them
easily. You can also specify the number of
copies for each photo.
See
Printing Photos from Printed Photos
.
Settings
:
You can maintain the condition of the machine,
change settings of the machine, or print the
notebook or graph paper.
See When Printing Becomes Faint or Colors Are
Incorrect
,
Cleaning the Paper Feed Roller
,
Machine Settings
, or
Printing the Notebook or
Graph Paper
.
Photo index sheet
:
You can easily print photos on a memory card
using the Photo Index Sheet.
See
Using Photo Index Sheet to print
.
Scan
:
You can save scanned data on your computer, or
on a memory card or USB flash drive inserted into
the machine, using the Operation Panel.
See
Scanning
.
Note
If you insert a memory card while the
HOME
screen or any screen of the Copy, Easy photo reprint,
and Settings menus appears, the screen changes to the photo selection screen in Select and print
of the Memory card menu.
To select a function other than Select and print, press the
HOME
button and display the
HOME
screen.
Selecting Setting Items
The displayed screen varies depending on the menu you selected, but the operation is the same.
This section describes how to change the print quality, using the example of the print confirmation
screen in Select and print of the Memory card menu.
1.
Use the
Easy-Scroll Wheel
(B) or the
(Up) or
(Down) button (D) to select the
print quality, and press the
OK
button (C).
2.
Use the
Easy-Scroll Wheel
or the (Up) or
(Down) button to select another print
quality, and press the
OK
button.
The screen returns to the print confirmation screen in Select and print.
Page 9 of 815 pagesHow to Navigate Menus on the LCD
Other Operations
Selecting Items at the Bottom of the LCD
You can use the two
Function
buttons (E) to select items displayed at the bottom of the LCD.
You can press the right
Function
button to select the item on the right, and the left
Function
button to
select the item on the left. The item displayed at the bottom of the LCD varies depending on the screen.
Returning to the Previous Screen
You can press the
Back
button (F) to return to the previous screen.
Performing the Frequently-Used Functions with Easy
Operation
You can use the
NAVI
button (G) to perform the frequently-used functions easily, just by following the
instructions displayed on the screen. You can also display the information on the functions or
instructions on how to load paper.
1.
Press the
NAVI
button (G).
The NAVI screen appears.
Note
When you press the
Back
button while the NAVI screen appears, the screen returns to the
HOME
screen.
2.
Use the
Easy-Scroll Wheel
or the (Up) or
(Down) button to select the item,
and press the
OK
button.
Follow the instructions on the LCD.
Canceling Copying or Printing
You can press the
Stop
button (H) to cancel a copy or print job in progress.
Page 10 of 815 pagesHow to Navigate Menus on the LCD
Page top
Page 11 of 815 pagesHow to Navigate Menus on the LCD
Advanced Guide
Troubleshooting
Contents
> Printing from a Memory Card
Printing from a Memory Card
You can preview each shot of your photos taken with the digital camera on the LCD of the machine, and
print the photos.
There are also the useful functions to print thumbnails of photos saved on the memory card onto A4 or
Letter-sized paper and select ones to print, and to print favorite photos in a specified layout.
Printing Photos Saved on the Memory Card
Setting Items
Using Various Functions
Printing Photos in Various Layouts
Changing the Display
Cropping a Part of Photo / Searching Photos by a Specified Date
Correcting Images
Inserting the Memory Card
Before Inserting the Memory Card
Inserting the Memory Card
Removing the Memory Card
Page top
Page 12 of 815 pagesPrinting from a Memory Card
Advanced Guide
Troubleshooting
Contents
> Printing from a Memory Card > Printing Photos Saved on the Memory Card
Printing Photos Saved on the Memory Card
Preview each shot of your photos saved on the memory card on the LCD of the machine, and print the
photos.
This section describes the basic operation, using the settings to print borderless photos on 4" x 6" / 10 x
15 cm paper as an example.
For the operation, see the notes and operation procedure described in the reference page.
You need to prepare:
A
memory card on which photos are saved. See
Before Inserting the Memory Card
.
Paper for printing. See Media Types You Can Use
.
1.
Prepare for printing.
(1)
Turn on the power.
See
Operation Panel
.
(2)
Load paper.
See
Loading Paper
.
Here we load 4" x 6" / 10 x 15 cm photo paper in the Rear Tray.
Page 13 of 815 pagesPrinting Photos Saved on the Memory Card
Note
Load A4 or Letter-sized plain paper in the Cassette. Load other sizes or types of paper in
the Rear Tray.
(3)
Open the Paper Output Tray gently, and open the Output Tray Extension.
2.
Insert a memory card.
(1)
Select Memory card
on the
HOME
screen, and press the
OK
button.
See
Selecting Menus on the HOME Screen
.
(2)
Make sure that Select and print
is selected, and press the
OK
button.
(3)
Insert a memory card WITH THE LABELED SIDE FACING TO THE LEFT into
the Card Slot.
For the types of memory cards you can use and the locations to insert them, see
Inserting the Memory Card
.
The photo selection screen appears.
Note
You can also display the photo selection screen in Select and print by inserting a memory
card while the
HOME
screen or any screen of the Copy, Easy photo reprint, and Settings
menus appears.
You can also select useful printing functions other than Select and print.
See
Using Various Functions.
When Writable from USB PC or Writable from LAN PC is selected in Read/write attribute of
A
dvanced settings under Device settings in the Settings menu, you cannot print image
data on the memory card using the Operation Panel on the machine. Set Read/write
attribute to Not writable from PC.
For details, refer to the on-screen manual:
A
dvanced Guide
.
3.
Select photos to print.
(1)
Use the
Easy-Scroll Wheel
or the (Left) or
(Right) button to display the
photo you want to print.
Note
may appear on the LCD while reading photos. If you use the
Easy-Scroll Wheel
or the
(Left) or
(Right) button to display the photo while
appears on the LCD, the
desired photo may not be selected.
Page 14 of 815 pagesPrinting Photos Saved on the Memory Card
(2)
Press the [
+
] or [
-
] button to specify the number of copies.
(3)
Repeat the procedures of (1) and (2) to specify the number of copies for each
photo.
Note
Other options
To change the display of photos, see
Changing the Display
.
To crop a part of photo (Trimming), see Cropping a Part of Photo / Searching Photos by a
Specified Date.
To search photos by a specified date (Search), see
Cropping a Part of Photo / Searching
Photos by a Specified Date
.
(4)
Press the
OK
button.
The print confirmation screen appears.
4.
Start printing.
(1)
Confirm the page size, media type, print quality, etc.
Here we confirm that 4"x6" (10x15cm) is selected for Page size and the type of loaded photo paper for
Media type.
To change the settings, use the
Easy-Scroll Wheel
or the
(Up) or (Down) button to select the item to
change, and press the
OK
button.
See
Selecting Setting Items
and
Setting Items
.
Note
When Plain paper is selected for Media type and A4 or 8.5"x11" (LTR) for Page size,
Cassette appears for Paper source.
When other sizes or types of paper are selected, Rear tray appears.
Confirm that the selected paper is loaded in the correct paper source.
(2)
Confirm the number of sheets to be used for printing the selected photos.
(3)
Press the right
Function
button (B) to select Check photo, and confirm the
selected photos and number of copies for each photo.
Press the
OK
button to return to the print confirmation screen.
(4)
Press the
Color
button.
The machine starts printing photos.
Note
You can correct photos automatically or manually, if you press the left
Function
button (A) to
select Advanced. By default, the machine is set to correct photos automatically.
See
Using Various Functions
.
Page 15 of 815 pagesPrinting Photos Saved on the Memory Card
Press the
Stop
button to cancel printing.
Printing does not start if you press the
Black
button.
You can display the Memory card menu and select other useful printing functions, if you press
the
Back
button after printing is completed.
If you press the
HOME
button or remove the memory card, the
HOME
screen appears.
To remove the memory card, see
Removing the Memory Card
.
Setting Items
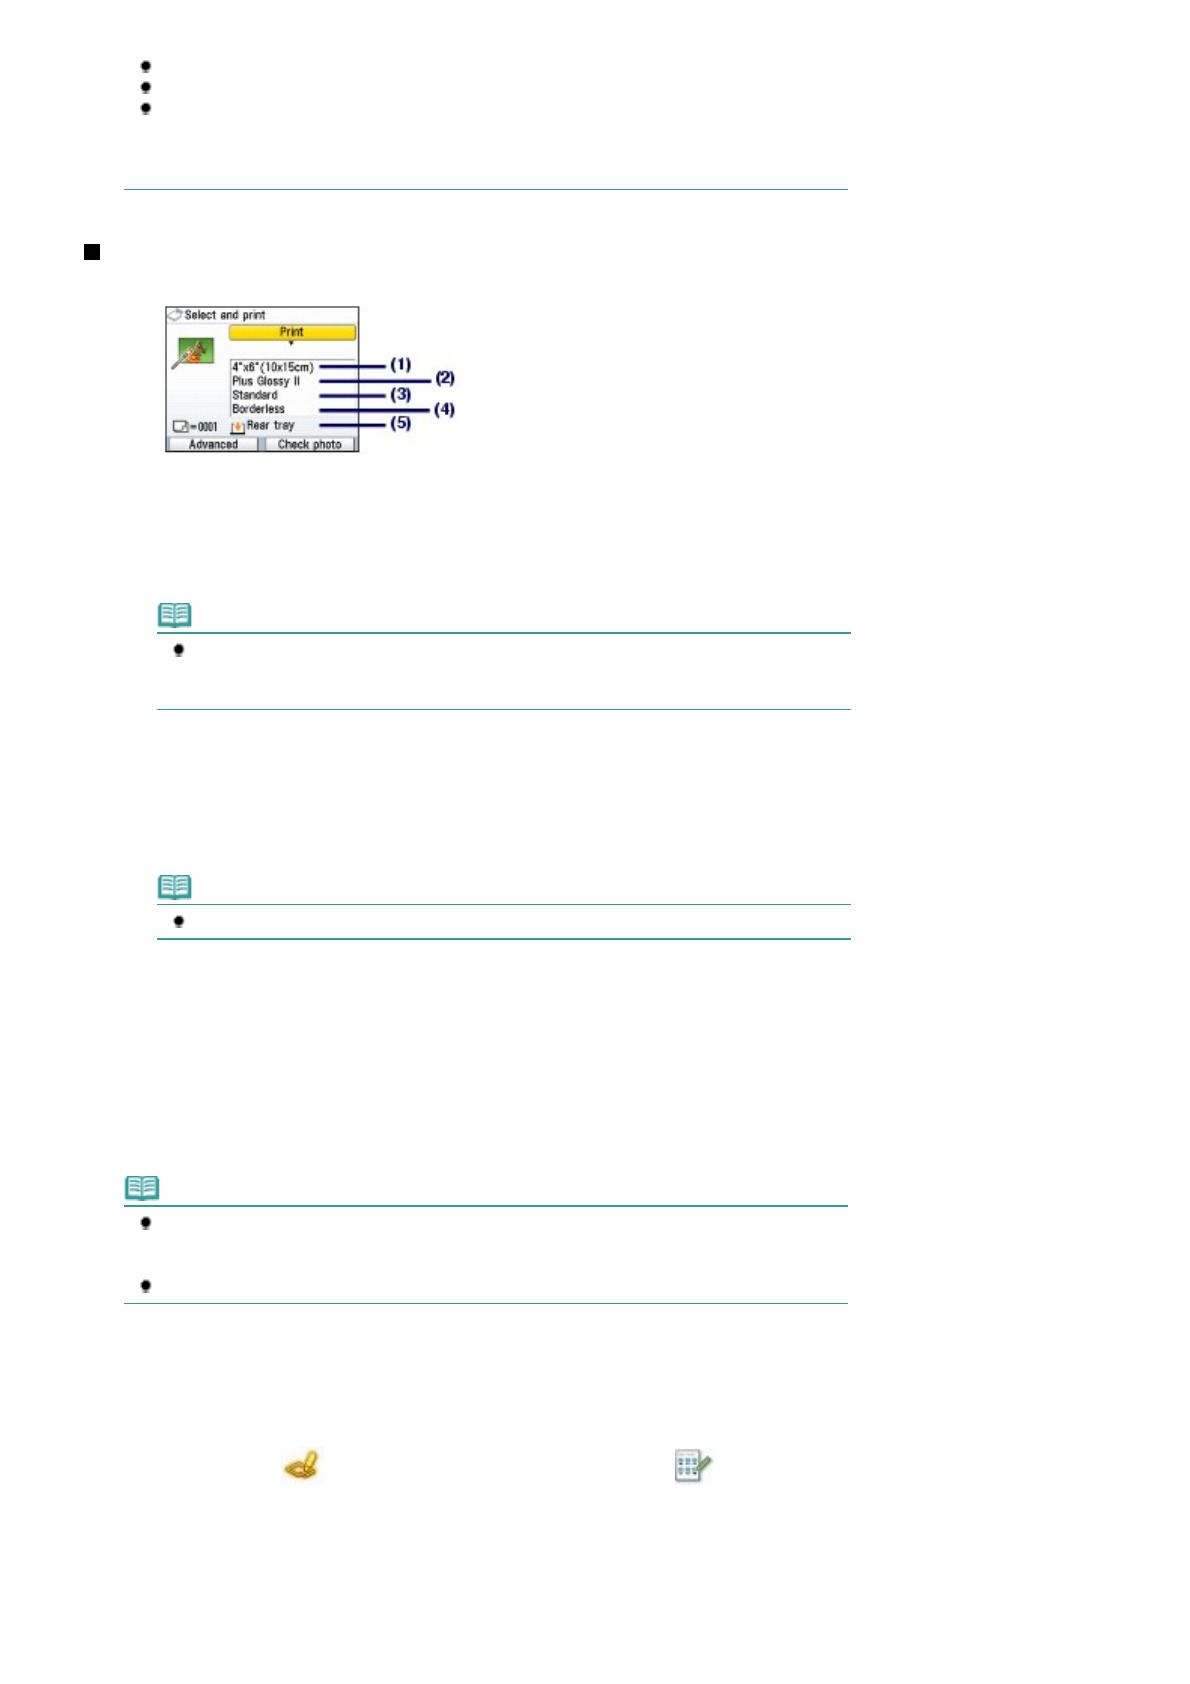
The print confirmation screen in Select and print is shown as below:
(1)
Page size
Select the page size of the paper to print: 4"x6" (10x15cm), A4, etc.
(2)
Media type
Select the media type of the paper to print: Plus Glossy II, Plain paper, etc.
Note
If you do not select the page size and media type correctly, the machine may feed paper
from the wrong paper source or may not print with the proper print quality.
See Paper Source to Load Paper
.
(3)
Print quality
A
djust the print quality: High(quality-priority) or Standard.
(4)
Borderless print
Select bordered or borderless print: Bordered or Borderless.
Note
When Plain paper is selected for Media type, you cannot select Borderless.
(5)
Paper source
The paper source for the selected page size and media type appears on the screen.
When A4 or Letter-sized plain paper is selected, Cassette appears.
When other sizes or types of paper are selected, Rear tray appears.
Confirm that the selected paper is loaded in the paper source displayed on the screen.
For details on the paper source setting, refer to the on-screen manual:
A
dvanced Guide
.
Note
The settings of the page size, media type, print quality, borderless print, image correction, etc.
are retained, and these settings will appear next time when the Memory card menu is selected
even if the power is turned off and on.
Combination of some items cannot be specified depending on the function.
Using Photo Index Sheet to print
Thumbnails of photos on the memory card are printed on A4 or Letter-sized paper (this printed sheet is
called Photo Index Sheet). You can select photos, number of copies, page size, etc. on this sheet, and
print them.
Select Photo index sheet
on the
HOME
screen, and Index sheet print . For details on the
operation, refer to the on-screen manual:
A
dvanced Guide
.
Page 16 of 815 pagesPrinting Photos Saved on the Memory Card
Page top
Page 17 of 815 pagesPrinting Photos Saved on the Memory Card
Advanced Guide
Troubleshooting
Contents
> Printing from a Memory Card
> Using Various Functions
Using Various Functions
This section describes a few of the useful functions of the Memory card menu.
For details, refer to the on-screen manual:
A
dvanced Guide
.
Printing Photos in Various Layouts
You can select various layouts on the Memory card menu screen. You can also select DPOF print.
Layout print Sticker print Captured info print
Photo index print Print all photos
ID photo size print
Calendar print
Changing the Display
You can change the display of photos by pressing the left
Function
button when Change display appears
at the bottom of the screen. You can also select Slide show.
Thumbnail display
Full-screen display
Enlarged display
Cropping a Part of Photo / Searching Photos by a Specified Date
You can specify the function by pressing the right
Function
button when Edit appears at the bottom of the
screen.
Page 18 of 815 pagesUsing Various Functions
Wide (16:9) Standard (4:3)
Trimming
Search
Correcting Images
You can correct images by pressing the left
Function
button when Advanced appears at the bottom of the
screen. You can correct images automatically or manually, such as adjusting brightness, contrast, and
color hue, or add effects to images.
Auto photo fix ON (Default)
Page top
Page 19 of 815 pagesUsing Various Functions
Advanced Guide
Troubleshooting
Contents
> Printing from a Memory Card > Inserting the Memory Card
Inserting the Memory Card
Before Inserting the Memory Card
The following types of memory cards and image data are compatible with the machine.
Important
If you took and saved photos on a type of memory card that is not guaranteed operation to be used
on your digital camera, the image data may be unreadable on the machine or damaged. For
information on memory cards that your digital camera guarantees operation, refer to the instruction
manual supplied with your digital camera.
Format the memory card with a digital camera compliant with the Design rule for Camera File system
(Exif 2.2/2.21 compliant), TIFF (Exif 2.2/2.21 compliant). The memory card may not be usable with
the machine if it is formatted on a computer.
Memory Cards that Do Not Require a Card Adapter
SD Secure Digital memory card
SDHC memory card
MultiMediaCard (ver.4.1)
MultiMediaCard Plus (ver.4.1)
Compact Flash (CF) Card
Supports Type I/II (3.3 V)
Microdrive
Memory Stick
Memory Stick PRO
Memory Stick Duo
Memory Stick PRO Duo
Memory Cards that Require a Card Adapter
Important
Be sure to attach the special card adapters to the following memory cards before inserting to the
Card Slot.
If one of the following memory cards is inserted without the card adapter, you may not be able to
remove the memory card. In this case, refer to "
Troubleshooting
" in the on-screen manual:
A
dvanced Guide
.
miniSD Card
*1
miniSDHC Card
*1
microSD Card
*1
microSDHC Card
*1
xD-Picture Card
*2
xD-Picture Card Type M
*2
xD-Picture Card Type H
*2
RS-MMC (ver.4.1)
*3
Memory Stick Micro
*4
*1
Use the special "SD Card Adapter".
*2
Requires purchase of a separate compact flash card adapter for xD-Picture Card.
*3
Use the special card adapter.
Page 20 of 815 pagesInserting the Memory Card
1 / 1

Canon PIXMA MP620 Owner's manual

Category
Laser/LED printers
Type
Owner's manual
This manual is also suitable for

Ask a question and I''ll find the answer in the document

Finding information in a document is now easier with AI

Ask the document