Brace the posts using 2x4s nailed to both the posts and stakes in the ground. This will keep
themstraightwhiletheconcretesets.Checkforplumb(90°angle)ontwoadjacentsides
prior to pouring concrete. Fill hole with ready-mix concrete following the package instructions.
Tamp the concrete to remove any air pockets. Overfill the holes at the top and slope the
concrete away from the post to keep water from collecting around it. Recheck plumb and
alignment of all posts and allow concrete to cure for 24 to 48 hours.
Cutting Posts to Proper Heights
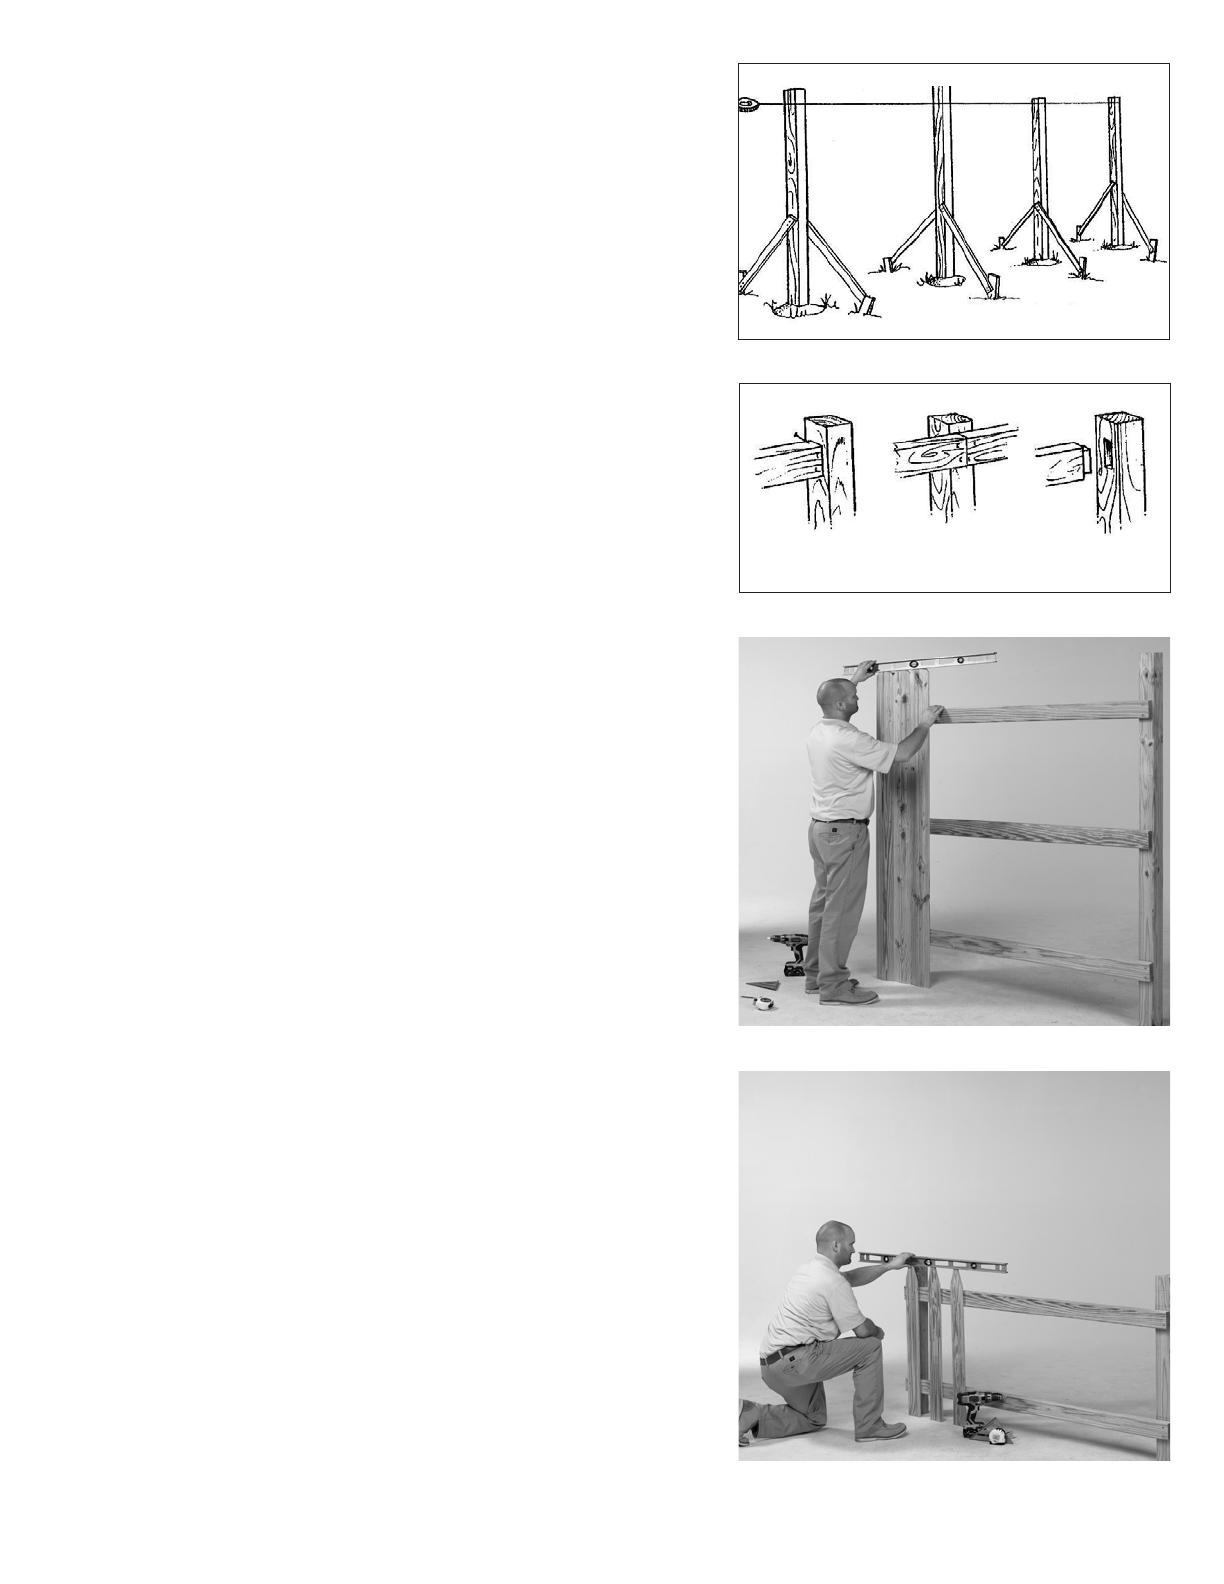
An easy method to ensure your post tops are level is to run a string from corner post to
corner post at the desired height, keeping the string taut (see Figure 3). Mark each post
at the string line and cut off the tops of the posts. Finish off your posts with optional
decorative finial tops.
Connecting Backer Rails to Post
There are many ways to attach the backer rails or stringers to the posts (see Figure 4).
Suggested positions to attach backer rails starting from the bottom of the post:
For a 6x6 Privacy, measure and mark at: 9 ½", 34" and 59"
For a 3x6 Spaced measure and mark at: 5 ½" and 28"
Place the bottom of the rails at these marks. Your finished product will be much more
appealing to the eye if proper attention is given to this detail.
Building Panels
To install loose pickets to backer rails, use 8d or 10d, (1.5"-2.5" in length) box nails. Start at
one end of the rail and check for level and plumb every three or four pickets. If you wish to
build a solid “privacy” fence, abut the pickets without leaving a gap in between (see Figure 5).
To build a spaced picket fence, cut a board the width of the desired gap and use it as a
spacer (see Figure 6). Remember to check for plumb every few pickets.
Use two backer rails for shorter fences, three for fences 6' tall, and four for fences 8' tall.
Backer rails should be attached on edge to prevent sagging.
Gate Installation
•Determinethedesiredswingdirectionofthegate(leftorright-handopen).
•Mounthingehardwaretogateframeattheproperheight,pre-drillingallthescrewholes.
•Mountgatetogateposts,pre-drillingallscrewholes
•Checkforfullgateswingclearance.
•Mountlatchhardware,pre-drillingallscrewholes.
Finishing your Fence
To prolong the life of your fence, applying a protective finish is recommended. Clean your
fence with a cleaner/brightener that contains a mildewcide prior to applying your finish.
•Waterproongsealerisbestforwoodsthatarenotnaturallyresistanttodecayandexposure
to weather. The sealer helps prevent rain and moisture from soaking into the wood. Add a
UV stabilizer to slow the discoloration process.
Care and Maintenance
•Thecontinuouschangesinweatherconditionsarehardonyourfence.Yourmaintenance
plan must be geared by water absorption and loss, mildew growth and UV discoloration.
•First-yearmaintenance-Reapplycleaner/brightenerasdescribedininitialmaintenance,
as well as your method of finish (paint, stain or water sealer).
•Futureperiodicpreventativemaintenance-Dependingonthelocationofyourfencewith
regard to direct sun exposure, foliage coverage, etc., it may be sufficient to clean/brighten
and recoat every two years. A power washer may be necessary to properly clean your fence.
The diagrams and instructions in this brochure are for illustration purposes only and are not meant to replace a
licensed professional. Any construction or use of the product must be in accordance with all local zoning and/or
building codes. The consumer assumes all risks and liability associated with the construction or use of this product.
Theconsumerorcontractorshouldtakeallnecessarystepstoensurethesafetyofeveryoneinvolvedintheproject,
including, but not limited to, wearing the appropriate safety equipment. EXCEPT AS CONTAINED IN THE WRITTEN
LIMITED WARRANTY, THE WARRANTOR DOES NOT PROVIDE ANY OTHER WARRANTY, EITHER EXPRESS OR
IMPLIED, AND SHALL NOT BE LIABLE FOR ANY DAMAGES, INCLUDING CONSEQUENTIAL DAMAGES.
Figure 3
Figure 4
Figure 5
Figure 6
Toe Nailed Face Nailed Mortise & Tenon