Page is loading ...

2X6 FRAMED FENCE PANELS
ASSEMBLY INSTRUCTIONS AND INSTALLATION TIPS
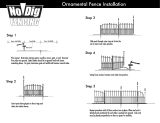
Most yards are relatively
level and will allow for a fairly
simple installation. If your yard
is steeply pitched or very
uneven, be sure to allow for
the required mounting height
of the adjacent panel when
setting your posts. You may
need to “stair step” the panels
in extreme cases (Fig. 1).
Design and Layout – Fence Panels
Installing on Sloped Landscapes – Fence Panels
• Determine the number of posts, panels and gates needed to complete
the job based on total linear footage. Take into consideration post,
panel and gate width when determining the total number of each.
• Adjust the layout to accommodate as many full panels as possible. If
you must use part of a panel, place in the farthest rear corner of the
property.
• Drive stakes into the ground at corners and ends of fence line. Stakes
should be at least 6” inside property boundary.
• Stretch twine or heavy string between stakes and pull tight to mark
layout of your fence line.
• Locate and mark the post placement in the following order along the
string line:
- End/corner posts - Gate posts (if applicable) - Line posts
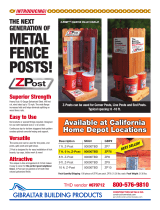
CONTENTS: 1 – 2 ft. x 6 ft. Assembled Fence Panel
• 6x8 Fence Panel
(using four 2x6 panels,
vertical installation only)
• 4x6 Fence Panel (using two 2x6 panels, horizontal installation only)
• Fence or wall topper, decorative accent and more!
• 6x6 Fence Panel
(using three 2x6 panels,
vertical or horizontal installation)
Tools you may need
Materials
• Power saw
• Hammer
• Level
• Posthole digger
• Power drill
• Tape measure
• Carpenter's pencil
• String
• Grade stakes
• Concrete and gravel
• Fence posts
• 2x4s for bracing posts
• Backer rails (if installing
panels in vertical orientation)
• Fasteners*
* Recommended fasteners are hot-dip galvanized screws or other
fasteners required by building codes
Choose your project
Check local ordinances and regulations before building your fence.
Before construction, contact your local utility companies to mark any
underground cables and pipelines. In addition, it is a good idea to
discuss plans with any neighbors along your proposed fence line.
Preparation
Step method
Fig. 1
NOTE: The following instructions are specific to installing posts in the
ground. If you are installing on concrete or other material, use approved
anchors/fasteners to secure posts, following all local building code
guidelines.
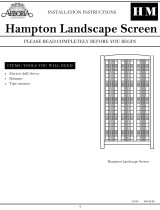
DIGGING POSTHOLES
A general rule of thumb is to place 1/3 of the length of the post in the
ground. Check local regulations for any special requirements or frost
laws. The fence will be stronger
if end, corner and gate posts
are set at least 6" deeper than
needed. Using a posthole digger
or power auger, dig the holes
10-12" wide and 6" deeper than
needed. Backfill the hole with 6"
of gravel to drain water away from
the bottom of the post (see Fig.
2). Keep the height of your fence
panels in mind when digging your
post holes.
SETTING POSTS
Place the two posts for your first panel in the post holes. Brace each
post using 2x4s nailed to the posts and stakes in the ground (see
Fig. 2). This will keep them straight while the concrete sets. Check for
plumb (90-degree angle) on two adjacent sides of the post prior to
pouring concrete.
Fill hole with ready-mix concrete, following the package instructions.
Tamp the concrete to remove any air pockets. Overfill the holes at the
top and slope the concrete away from the post to keep water from
pooling (see Fig. 2).
Follow the steps above to install other posts.
Recheck plumb and alignment of all posts and allow concrete to cure
for 24 to 48 hours (or timeframe established in the manufacturer’s
instructions).
CUTTING POSTS TO PROPER
HEIGHT
Measure and mark the desired
post height on the post. Run a
string from first post to last post
at the desired height, keeping the
string taut (see Fig. 3). Mark each
post at the string line and cut off
the tops of the posts.
Postholes and Posts
Fig. 2
Cement
6" Gravel
10" - 12"
Fig. 3

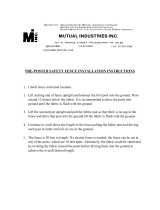
Fence Panel Construction
Fig. 6
Fig. 5
©2017 Universal Forest Products, Inc. All rights reserved.
2801 E. Beltline NE, Grand Rapids, MI 49525 800.332.5724 9704_12/17
www.ufpi.com
THE DIAGRAMS AND INSTRUCTIONS IN THIS BROCHURE ARE FOR ILLUSTRATION PURPOSES ONLY AND ARE NOT MEANT TO REPLACE A LICENSED PROFESSIONAL. ANY CONSTRUCTION OR
USE OF THE PRODUCT MUST BE IN ACCORDANCE WITH ALL LOCAL ZONING AND/OR BUILDING CODES. THE CONSUMER ASSUMES ALL RISKS AND LIABILITY ASSOCIATED WITH THE
CONSTRUCTION OR USE OF THIS PRODUCT. THE CONSUMER OR CONTRACTOR SHOULD TAKE ALL NECESSARY STEPS TO ENSURE THE SAFETY OF EVERYONE INVOLVED IN THE PROJECT,
INCLUDING, BUT NOT LIMITED TO, WEARING THE APPROPRIATE SAFETY EQUIPMENT. EXCEPT AS CONTAINED IN THE WRITTEN LIMITED WARRANTY, THE WARRANTOR DOES NOT
PROVIDE ANY OTHER WARRANTY, EITHER EXPRESS OR IMPLIED, AND SHALL NOT BE LIABLE FOR ANY DAMAGES, INCLUDING CONSEQUENTIAL DAMAGES.
NATURAL CHARACTERISTICS OF WOOD
We cannot control the occurrence of the natural characteristics of
the wood, which may include raised grain, splitting, warping, shrink-
ing, swelling or twisting. Continuous water absorption and water
loss in the wood used for your fence will cause its natural defects to
surface. A well-maintained fence will still experience some of these
natural defects. However, the ex tent can be significantly reduced
through a maintenance plan.
To effectively combat these maintenance con cerns, it will be up to
you to follow a preventative maintenance plan.
Your initial maintenance plan should be determined by water absorp-
tion and loss, mildew growth and UV discoloration.
• Future periodic preventative maintenance: Depending on the
location of your fence with regard to direct sun exposure,
foliage, coverage, etc., it may be sufficient to clean/brighten
and recoat every two years. A power washer may be necessary
to properly clean your fence.
COMMON MAINTENANCE CONCERNS
The continuous changes in weather conditions are extremely harsh
on your fence. Your maintenance plan must be geared to combat
the problems caused by water absorption and water loss, mildew
growth, and discoloration of wood due to the sun's ultraviolet rays.
All of the maintenance concerns discussed be low are weather-
related. The degree to which your fence is af fected by them
depends on many factors. These factors include general climate
conditions (such as normal precipitation, humidity, etc.) and location
in your yard (with regard to direct sun expo sure, foliage cover-
age, etc.). If your fence is built using pressure-treated lumber, it is
im portant to note that the pressure treatment does not increase
the likelihood that your fence will develop these natural defects to
any greater degree than the same material left untreated. These
weather-related defects are beyond the control of the pressure
treatment process.
Care and Maintenance
VERTICAL PANEL INSTALLATION (6x6 or 6x8)
• Attach backer rails to the face of the posts using 3-1/2" wood
screws. We recommend using three backer rails – one at the top of
the panel, one in the middle and one at the bottom. The distance
from the top of the top rail to the bottom of the bottom rail should
measure 72" (see Fig. 4).
• Predrill holes in the 2x6 panels for the screws. We recommend using
six screws per panel.
• Attach the 2x6 panels to the backer rails by driving 2-1/2" wood
screws through the predrilled holes (see Fig. 5).
HORIZONTAL PANEL INSTALLATION (4x6 or 6x6)
• Be sure the posts are set 72" on-center.
• Predrill holes in the 2x6 panels for the screws. We recommend using
four screws per panel.
• Attach the 2x6 panels to the face of the posts by driving 2-1/2"
wood screws through the predrilled holes (see Fig. 6).
Fig. 4
72"
/