Page is loading ...

QR-2000N
UHF 100/16-Channel Wireless Microphone System
ISO 9001
ISO 14001
OHSAS 18001
GREEN PRODUCT
Operation manual
IS O
14001
REG IS TER ED
O H S A S
18001
REG IS TER ED

-1-
Thank you purchasing CHIAYO’s professional modular wireless system. Please read this
manual thoroughly to be familiarized with the function of each part before use.
Parts and functions of QR-2000N
Front
1. Power switch.
2. Channel A: RECEIVER module, also can be MP3 (RECORDER) PLAYER,
BLUETOOTH RECEIVER, or TRANSMITTER module.
3. Channel B: TRANSMITTER module, also can be RECEIVER, MP3 (RECORDER)
PLAYER, BLUETOOTH RECEIVER module.
4. Transmitter antenna.
Rear
1. Antenna B
2. Balanced audio output (channel B) for only RECEIVER module.
3. Unbalanced audio output for ANY module / input for only TRANSMITTER or MP3
RECORDER PLAYER module (channel B)
4. Repeater ON/OFF. Switch ON when TRANSMITTER module is to be used for audio
signal transmission of the other module, which can be RECEIVER, MP3 (RECORDER)
PLAYER or BLUETOOTH RECEIVER module. Switch OFF if not.
5. Balanced audio output (channel A) only RECEIVER module.
6. Unbalanced audio output for ANY module / input for only TRANSMITTER or MP3
RECORDER PLAYER module (channel A)
7. DC-input
8. Antenna A
1
2 3
4
1 2 3 4 5 6 7 8

ISO 9001 / ISO 14001 / OHSAS 18001
-2-
Connection
There are two audio connecters on the rear of this unit, Mic-level balanced and Line-level
unbalanced. Use shielded audio cable for the connection between this unit and the
mixer/amp or audio source. If the mixer/amp has a 1/4"(6.3mm) phone jack, connect a
cable from the 1/4"(6.3mm) unbalanced audio output from the receiver to the mixer/amp.
If the mixer has an XLR input, connect a cable from the balanced XLR audio output from
the receiver to the mixer input. This 1/4"(6.3mm) phone jack also serves as the audio
input when using TRANSMITTER or MP3 RECORDER PLAYER module.
Installation
For best operation, this unit should be at least 1m above the ground and at least 1m away
from a wall or metal surface to minimize reflection. The transmitter should also be at least
1m away from a wall or metal surface to minimize reflection. The transmitter should also
be at least 1m away from the receiver.
Mounting
QR-2000N has a half-19"-casing design. It can be cabinet-mounted with either 1 or 2 units.
Individual kits for mounting 1 or 2 QR-2000N are available and please refer to below
assembly illustration.

-3-
SDR-5200M IrDA/SDR-5100M IrDA/SDR-5116M receiver modules
1. Channel indicator
2. Diversity A/B indicator
3. Audio signal indicator
4. IR sensor area (SDR-5200M IrDA/SDR-5100M IrDA)
5. Channel Selector
6. IRDA synchronizing button (SDR-5200M IrDA/SDR-5100M IrDA)
7. Squelch control
8. Power switch/volume control
First turn on the Power of the main unit. Then turn on the individual power of the receiver
module. Select a channel that corresponds to the transmitter. When transmitter is turned on,
either A or B diversity indicator will flash to indicate that signal has been received.
SQUELCH (SQ) setting
When a channel is in use and undesired interference signal is received, turn the SQ in
clockwise direction to make the receiver less sensitive and thus less susceptible to interference.
If this still does not solve the problem, it means this frequency is not applicable at current
position. Please switch over to the next channel.
Channel synchronizing of the receiver and microphone (SDR-5200M IrDA/SDR-5100M IrDA)
1. Limit the distance between the receiver and transmitter within 30cm.
2. Align both sensor areas
3. To change the receiver’s channel, please press the synchronizing button of the microphone.
The microphone will transmit synchronizing signal to the receiver and change its channel.
4. To change the microphone’s channel, please press the synchronizing button of the receiver.
The receiver will transmit synchronizing signal to the microphone and change its channel.

ISO 9001 / ISO 14001 / OHSAS 18001
-4-
RP-5016M/RP-5100M transmitter module
HI LOW
1. Channel indicator
2. Antenna socket (TNC type)
3. Channel selectors: Press ▲(up)▼(down) to increase/decrease channel number. Please
select a non-interfering frequency channel to those used in the receiver modules.
4. Power control
5. Unit GAIN control: This controls the GAIN level of interior audio sources.
6. 3.5mm audio input jack
7. AUX IN GAIN control: This controls the GAIN level of external audio input.
8. Output power setting: LOW (left) for Low output power and HI (right) for high output power.
Low output power will reduce the RF transmission distance and High output power will
extend the possible RF transmission distance. However, if the module is installed on battery-
powered amplifiers, HIGH output power would reduce more operation time than LOW output
power since it requires more power for longer RF transmission.
DPR-500M MP3 recorder player module
1. LCD display
2. Press to return to previous track, press and hold to fast reverse.
3. Press to play/pause.
4. Press to go to next track, press and hold to fast forward.
5. Press to record.
6. Press to switch repeat modes.
7. Press to stop playing or recording.
8. IR sensor area
9. USB 2.0 input
10. USB/SD indicator: The LED flashes green during playing and red during recording. It lights
red if there is no track to play, lighting green when playing or recording stops.
11. SD card input
12. Power switch/volume control
remote control▲

-5-
Operating functions on the panel and the remote
※Extra attention to recording
1. Recordable only when USB/SD is detected.
2. Record files will be stored in the RECORD folder of USB/SD.
3. The files will be named as FILE_001, FILE_002, FILE_003…etc.
4. The name of a deleted track won’t be applied to its next one.
5. Recordable until FILE_999 appears with LCD displaying Num Full.
6. LCD displays USB FULL or SD FULL when insufficient memory left.
7. LCD displays SD LOK if the SD is locked.
8. Don’t remove the USB/SD during the recording process in case the interrupted track might
be damaged.
Operating function
On the panel
On the remote
Play/pause
Press
II
Record
Press
●
to record and
■
to stop.
Press REC to record and
■
to stop.
Skip forward
Press
I
Press
I
Fast forward
Press and hold
I
Press and hold
I
Skip backward
Press I
Press I
Fast backward
Press and hold I
Press and hold I
Next folder
-
Press
Previous folder
-
Press
Track select (button #0-9)
-
input track number, then press
II
USB/SD switch
-
Press USB/SD
Repeat mode switch
(ALL//SINGLE/FLDER)
Press MODE
Press MODE
Volume control
-
Press or
A-B section play
-
Press A-B to start, again to play
section and again to stop
Delete tracks
-
Press DEL to delete track and again
to confirm your delete
Mute
press MUTE to mute/recover

ISO 9001 / ISO 14001 / OHSAS 18001
-6-
BT-500m Bluetooth receiver module
1
234
1. Power/volume control
2. LOCK LED
3. SCAN LED
4. PAIRING button
Matching instruction
1. Turn on BT-500m and both SCAN and LOCK LEDs will flash alternatively.
2. Activate Bluetooth on your device and search new external Bluetooth devices.
3. Find and connect to “Bluetooth Speaker” that appears on your option list.
4. Once connection is made, the LOCK LED will flash green.
5. Pressing PAIRING button can cut the connection.

-7-
UHF handheld microphones(SQ-6100 IrDA/SQ-2100 IrDA/SQ-1100 IrDA)
SQ-6100 IrDA
SQ-2100 IrDA
SQ-1100 IrDA
Parts and functions
SQ-6100 IrDA
SQ-2100 IrDA
SQ-1100 IrDA
Cartridge
1
1
1
Battery power LED
2
2
2
Power switch
3
3
3
LCD
4
-
-
Menu button
5
-
-
Setting button
6
-
-
IrDA synchronizing button
7
4
4
Battery compartment
8
5
5
Color cap
9
6
-
IrDA sensor area
10
7
6
Charging port
-
-
7
Battery installation & indicator
This microphone requires 2 x AA batteries to operate.
To install, remove the battery cover and slide the batteries into the battery compartment &
replace the battery cover.
Note: Batteries contain a corrosive acid that may leak and damage the microphone when
stored for a long period. Batteries should be removed from the microphone before storing
without use for more than 4 weeks.
When the microphone is switched ON a red LED (2) will blink once to indicate the batteries
installed are in good condition. If the LED remains illuminated the batteries have expired
and require replacement.
1 2 3
7
4 5
6

ISO 9001 / ISO 14001 / OHSAS 18001
-8-
Channel synchronizing of the receiver and microphone
1. Limit the distance between the receiver and transmitter within 30cm.
2. Align both sensor areas
3. To change the receiver’s channel, please press the synchronizing button of the microphone.
The microphone will transmit synchronizing signal to the receiver and change its channel.
4. To change the microphone’s channel, please press the synchronizing button of the receiver.
The receiver will transmit synchronizing signal to the microphone and change its channel.
Other settings(SQ-6100 IrDA)
1. Channel setting
Use MENU button to go to the CHANNEL/FREQUENCY page.︰
After pressing the SET button for 3 seconds, the cursor will flash to allow changes to be made.
Pressing SET/MENU buttons will increase/decrease the channel number. The corresponding
frequency will change accordingly. 3 seconds after selecting a channel, it will be automatically
saved.
2. Battery type setting
Use MENU button to go to the BATTERY TYPE page.︰
After pressing the SET button for 3 seconds, the cursor will flash to allow changes to be made.
Press SET button to select either NiMH (rechargeable battery) or AKLN (alkaline battery). 3
seconds after selecting a channel, it will be automatically saved.
Remark: NiMH battery must be selected when rechargeable battery is being used. Never select
AKLN (alkaline) when microphone is intended for charging as alkaline battery isn’t
rechargeable. Wrong battery selection will result in battery sensing electronics to display wrong
and misleading status information.

-9-
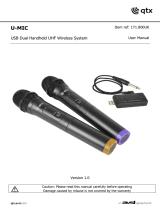
UHF belt-pack transmitters(SM-7100 IrDA/SM-6100 IrDA/SM-1100 IrDA)
SM-7100 IrDA/SM-6100 IrDA SM-1100 IrDA
Parts and functions
SM-7100 IrDA
SM-6100 IrDA
SM-1100 IrDA
Antenna
1
1
1
LCD
2
2
-
Cover release button
3
3
6
Power switch
4
11
3
IrDA synchronizing button
5
5
7
Menu button
6
6
-
Setting button
7
7
-
High-impedance gain control (GT)
8
8
8
Low-impedance gain control (MT)
9
9
9
Battery compartment
10
10
10
Audio mute switch
11
-
-
Battery power LED
12
12
2
IrDA sensor area
13
13
4
Mini XLR connector
14
14
5
Charging contacts
15
15
11
Battery installation & indicator
This belt-pack requires 2 x AA batteries to operate.
To install, open the battery cover using the cover release buttons and insert the batteries into
the battery compartment.
1
2
3 3
9
7
84 5
6
10
11 12
13
14
15
1
2
3
4
5
6
7
8
10
11 11
9

ISO 9001 / ISO 14001 / OHSAS 18001
-10-
Note: Batteries contain a corrosive acid that may leak and damage the belt-pack when stored
for a long period. Batteries should be removed from the belt-pack before storing without use for
more than 4 weeks.
When the microphone is switched ON, the battery power LED (red) will blink once to indicate
the batteries installed are in good condition. If the LED remains illuminated the batteries
have expired and require replacement.
Channel synchronizing of the receiver and transmitter
1. Limit the distance between the receiver and transmitter within 30cm.
2. Align both sensor areas
3. To change the receiver’s channel, please press the synchronizing button of the transmitter.
The transmitter will transmit synchronizing signal to the receiver and change its channel.
4. To change the transmitter’s channel, please press the synchronizing button of the receiver.
The receiver will transmit synchronizing signal to the transmitter and change its channel.
GAIN setting (GT/MT)
Gain control enables the user to set different output levels. GT is for the use of instrument with
high impedance, such as guitar while MT is for the use of low impedance such as lapel or
headset microphones.
Other settings(SM-7100 IrDA/SM-6100 IrDA)
1. Channel setting
Use MENU button to go to the CHANNEL/ FREQUENCY page.︰
After pressing the SET button for 3 seconds, the cursor will flash to allow changes to be made.
Pressing SET/MENU buttons will increase/decrease the channel number. The corresponding
frequency will change accordingly. 3 seconds after selecting a channel, it will be automatically
saved.
2. Battery type setting
Use MENU button to go to the BATTERY TYPE page.︰
After pressing the SET button for 3 seconds, the cursor will flash to allow changes to be made.
Press SET button to select either NiMH (rechargeable battery) or AKLN (alkaline battery). 3
seconds after selecting a channel, it will be automatically saved.
Remark: NiMH battery must be selected when rechargeable battery is being used. Never select
AKLN (alkaline) when transmitter is intended for charging as alkaline battery isn’t rechargeable.
Wrong battery selection will result in battery sensing electronics to display wrong and
misleading status information.

-11-
UHF handheld microphones(SQ-1016/SQ-1016V/SQ-5016)
1 2 3 5
7
4 6
8
SQ-1016/1016V (UHF 16-freq)
1 2 3 4 5 6
91011
7 8
SQ-5016 (UHF LCD 16-freq)
Microphone parts and functions
SQ-1016
SQ-1016V
SQ-5016
Cartridge
1
1
1
Battery weak/power LED
2
2
2
Power switch
3
3
3
Channel switch
4
4
-
LCD
-
-
4
Battery compartment
5
5
5
Bottom cap
6
6
6
Locking button
-
-
7
Audio mute switch
-
-
-
Setting button
-
-
8
Up button
-
-
9
Down button
-
-
11
Charging port
7
7
10
Volume control
-
8
-
Battery installation & indicator
This microphone requires 2 x AA batteries to operate.
To install, remove the battery cover and slide the batteries into the battery compartment &
replace the battery cover.
Note: Batteries contain a corrosive acid that may leak and damage the microphone when
stored for a long period. Batteries should be removed from the microphone before storing
without use for more than 4 weeks.
When the microphone is switched ON a red LED (2) will blink once to indicate the batteries
installed are in good condition. If the LED remains illuminated the batteries have expired
and require replacement.
Channel setting (SQ-1016/1016V)
Please use the attached small screw driver to set the channel.
Volume adjusting (SQ-1016V)
Please slide the wheel to adjust the volume.

ISO 9001 / ISO 14001 / OHSAS 18001
-12-
Other settings (SQ-5016)
1. Channel setting
Use UP or DOWN button to go to the CHANNEL/ FREQUENCY page.
The cursor will flash to allow changes to be made. Pressing UP or DOWN button will increase
or decrease the channel number. The corresponding frequency will change accordingly. When
a desired channel is selected, it will be automatically saved and stored in the memory.
2. Making changes to Battery selection
Use UP or DOWN button to go to the Battery selection page.
Press UP or DOWN button to move the cursor to either NiMH (rechargeable battery) or AKLN
(Alkaline battery) position.
When the desired battery has been selected, it will be automatically saved and stored in the
memory.
Remark: NiMH battery must be selected when rechargeable battery is being used. Never select
AKLN (Alkaline) when microphone is intended for charging as Alkaline battery can’t be charged.
Wrong selection of battery will result in battery sensing electronics to display wrong and
misleading status information.
3. Making changes to Sensitivity Level
Use UP or DOWN button to go to the SENS SET page.
Press UP or DOWN button to increase or decrease the Sensitivity Level of the microphone.
The MAX level is 4 and the MIN level is 1.When a desired sensitivity level has been selected
for your application, it will be automatically saved and stored in the Memory.
Remark: When selecting Sensitivity level, please bear in mind that Level 1 is for close proximity
singing purposes whereas Level 4 is for use of microphone on tripod mount for speech
purposes. When Level 4 setting is used for close proximity singing, high SPL input will result in
undesirable distortion in the output.
After performing setting changes, you could turn the protective cover 180° in either direction to
block the buttons from being accidentally adjusted.

-13-
UHF belt-pack transmitters(SM-1016/SM-5016)
Parts and functions
1
2
3
4
6
5
7
8
12
9
11
10
13
14
15 15
Transmitter parts and functions
SM-1016
SM-5016
Antenna
1
1
Battery weak/audio mute indicator
2
2
Power switch
3
8
(Lavalier microphone) Mini XLR connector
4
4
Audio mute switch
-
3
LCD
-
5
Charging port
-
6
Cover release button
7
7
Charging contacts
15
15
Setting button
-
11
Up button
-
12
Down button
-
13
Channel switch
11
-
Gain control (GT, high impedance)
12
9
Gain control (MT, low impedance)
13
10

ISO 9001 / ISO 14001 / OHSAS 18001
-14-
Battery installation & indicator
This belt-pack requires 2 x AA batteries to operate.
To install, open the battery cover using the cover release buttons and insert the batteries into
the battery compartment.
Note: Batteries contain a corrosive acid that may leak and damage the belt-pack when stored
for a long period. Batteries should be removed from the belt-pack before storing without use for
more than 4 weeks.
When the transmitter is switched ON, the battery power LED (red) will blink once to indicate the
batteries installed are in good condition. If the LED remains illuminated the batteries have
expired and require replacement.
CHANNEL and GAIN setting (SM-1016)
Please use the attached small screw driver to set the channel.
Gain control is an adjustable design that enables user to set different output levels. GT is for
the use of instrument with high impedance, such as guitar while MT is for the use of low
impedance such as lavalier or headset microphone.
Other settings (SM-5016)
1. Channel setting
Use UP or DOWN button to go to the CHANNEL/ FREQUENCY page.
The cursor will flash to allow changes to be made. Pressing UP or DOWN button will increase
or decrease the channel number. The corresponding frequency will change accordingly. When
a desired channel is selected, it will be automatically saved and stored in the memory.
2. Making changes to Battery selection
Use UP or DOWN button to go to the Battery selection page.
Press UP or DOWN button to move the cursor to either NiMH (rechargeable battery) or AKLN
(Alkaline battery) position.
When the desired battery has been selected, it will be automatically saved and stored in the
memory.
Remark: NiMH battery must be selected when rechargeable battery is being used. Never select
AKLN (Alkaline) when microphone is intended for charging as Alkaline battery can’t be charged.
Wrong selection of battery will result in battery sensing electronics to display wrong and
misleading status information.

CHIAYO ELECTRONICS CO.,LTD.
Http://www.chiayo.com.tw Email: sales@chiayo.com.tw
Office: 30, Lane 27, Section 4, Jen-Ai Road, Taipei 10685, Taiwan / Tel: 886-2-27415741 / Fax: 886-2-27525242
Factory: 88, Chung-Hsiao Street 2, Chiayi 60080, Taiwan / Tel: 886-5-2711000 / Fax: 886-5-5767611
/