Page is loading ...

ALL SURFACE
TV HANGER
WD-2060
Installs easily into all surfaces. No anchors needed!
32-80”
FIXED MOUNT-HOLDS 100lbs
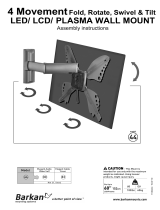
Parts List:
(1) 26” HANGMAN®
Wall Bracket
(1) 26”
TV Bracket
(1) Bubble Level
(11) Anchorless
Walldog™ Screws
(2) M8 (8mm)
x 35mm Bolts
(2) M6 (6mm)
x 35mm Bolts
(2) M5 (5mm)
x 35mm Bolts
(2) M4 (4mm)
x 35mm Bolts
(2) M4 (4mm)
x 12mm Bolts
(2) M5 (12mm)
x 12mm Bolts
(2) M6 (6mm)
x 20mm Bolts
(2) M6 (6mm)
x 12mm Bolts
(2) M8 (8mm)
x 20mm Bolts
(2) M8 (8mm)
x 16mm Bolts
(2) Small Washers
For 4mm Bolts
(6) Bolt Washers
(1) Security cable (1) Wall-Dog™ screw for security cable
(2) M8 (8mm)
x 45mm Bolts
Check out our No Stud 65”TV Hanger®
Don’t want to damage your walls but have a
huge TV to hang? We got you.
WARNING: Before starting assembly, verify all parts
are included and undamaged. If any parts are missing
or damaged, do not return to your dealer; contact
customer service. Never use damaged parts!
© Hangman Products 2020
Have a question? Give us a call.
(818)-610-0487 | Mon-Fri | 7am-6pm PST
Share your installation video with
#hangitlikeapro for a chance to be featured!
Scan QR for
installation video
CAUTION:This WD-2060 mount is intended for use
only with TVs weighing up to 100lbs.
Use with TVs heavier than 100lbs. may result in collapse of
the mount and it’s accessories causing possible injury.
All Surface TV Hanger - Installation Instructions
14”x 8.5” - Printed front and back - Folded 3.5”x 8.5”

1. Install TV Mounting Bracket
Place the TV face down on a soft surface where it is secure and
stable. If your TV is already attached to a base, it must be
removed before beginning the installation.
The VESA holes on the back of the TV are either 100mm,
200mm, 300mm, 400mm or 600mm depending on the brand
of the TV. This kit includes all sizes.
Attach TV mounting bracket to the top 2 holes using the
appropriate bolts. This kit also includes different lengths of
each size. Hand tighten to choose appropriate length then use a
handheld Phillips screwdriver and tighten until snug.
Do not overtighten.
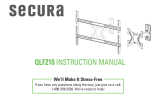
Note: It is very important to
select the correct bolt length
and diameter that fits your
specific TV. This kit
includes all sizes.
Too Short
IMPORTANT
Too Long
Correct
Use washers if bolts
are too long
Do not install bracket into
bottom holes on your TV.
Install into VESA holes closest
to the top edge of your TV.
Installing On Smart TVs
Some smart TVs may have holes located towards the center. Install the
TV bracket in holes “closest to top” in relation to any bottom holes.
Installing On Other TVs
Most TVs have 4 holes located on the back in the below configuration.
Make sure to always choose the top two holes when installing the bracket.
Back of TV
Back of TV
STEP 2: LEVEL AND INSTALL WALL BRACKET
Using a handheld Phillips-head screwdriver, install the wall
bracket using Wall-Dog™ anchorless screws.
DO NOT OVERTIGHTEN
TIP: Install center screw first, then insert level into wall bracket.
Once level, install one screw on each end. Lastly, spread out the
remaining screws evenly to complete your installation.
Minimum Wall-Dog™ screw requirement:
A. Wood Stud & Drywall: 5
B. Drywall: 11
C. Brick: 5
D. Concrete: 5
Minimum Structural Requirements:
A. Wood stud under drywall
Minimum stud size and stud spacing (2x4 stud, 16-in spacing),
maximum drywall covering thickness (1/2-in)
For direct installations into stud, we suggest using a power
screwdriver.
B. Drywall only (No Stud)
Minimum thickness of drywall (1/2-in)
When installing into drywall a manual screwdriver must be used
to fasten screws to drywall. Do not overtighten the screws.
C. Brick
Solid facing brick, approx. mortar thickness (3/8-in)
When installing into brick, drill a 3/16” x 1-3/8” deep pilot hole
first, all fasteners should be fastened into brick and not the
mortar.
D. Concrete (solid)
When installing into concrete,
drill a 3/16” x 1-3/8” deep pilot hole first.
Minimum thickness (4-in.) and the psi of the concrete (if required PSI is
greater than 2500psi)
*
It’s reccommended to feed the security cable through the TV
bracket before hanging your TV. Please refer to step one in the
included Security Cable Installation sheet.
STEP 3: HANG YOUR TV
Hang TV by engaging the TV bracket on top of the wall bracket.
Place against wall and slide down. Lower slowly to ensure
proper engagement. TV should be centered on the wall mount -
no right or left offset.
IMPORTANT:
Make sure to fully and properly engage
the TV bracket with the wall bracket.
2
Wall
Wall
1
2
Incorrect Correct
All Surface TV Hanger - Installation Instructions
14”x 8.5” - Printed front and back - Folded 3.5”x 8.5”
/