Jegs 555-630642 User manual

Type
User manual

Jegs 555-630642 Rear End Disc Brake Conversion Kit provides a reliable and efficient way to upgrade your vehicle's braking system. This kit is compatible with vehicles featuring a big bolt pattern and allows for the installation of disc brakes, ensuring improved stopping power and enhanced safety. It includes all the necessary components, such as calipers, rotors, brackets, and hoses, to complete the conversion. This kit is designed for experienced individuals familiar with brake system installation and operation.

Jegs 555-630642 Rear End Disc Brake Conversion Kit provides a reliable and efficient way to upgrade your vehicle's braking system. This kit is compatible with vehicles featuring a big bolt pattern and allows for the installation of disc brakes, ensuring improved stopping power and enhanced safety. It includes all the necessary components, such as calipers, rotors, brackets, and hoses, to complete the conversion. This kit is designed for experienced individuals familiar with brake system installation and operation.

Installation Instructions
Note: Always refer to the vehicle owner’s manual for correct torque specifications when installing kit.
555-630642, 555-631808, 555-631809
MOPAR 8 3/4” / Dana 60 Rear
End Disc Brake Conversion Kit
FOR BIG BOLT PATTERN ONLY.
Take time to read all the literature that came with this kit. Before beginning
installation check the provided list of parts against what you received to
ensure that all parts are present. While this kit was designed to make the process of changing brake
parts as simple as possible, NOTE: WITH SOME KITS IT MAY BE NECESSARY TO MAKE
MINOR CHANGES TO YOUR CAR! READ ALL WARRANTY DISCLAIMERS AND RETURN
POLICIES INCLUDED IN THIS KIT PRIOR TO INSTALLATION!
Important
Proper operation of your brakes is essential for your safety and the safety of others.
Any brake service should be performed ONLY by persons experienced in the
installation and proper operation of brake systems. It is the responsibility of the person installing
any brake component or kit to determine the suitability of the component or kit for the particular
application. After installation, and before operating your vehicle, be sure to test the function of the
brakes under controlled conditions. DO NOT DRIVE WITH UNTESTED BRAKES!
Warning
Always utilize safely restraints when operating the vehicle. The installation of disc brakes
will require the use of 15” wheels. Any attempt to install disc brake with a 14” wheel will
be the customers responsibility.
Note
This kit is an aftermarket solution. It is not intended to be a direct installation or OEM
replacement. Due to changes in production in certain years, your car may require
modications beyond these instructions for this kit to install properly.
Note
WITH EVERY NEW SET OF ROTORS AND PADS, YOU SHOULD GIVE
YOUR VEHICLE 200 - 250 MILES OF EASY DRIVING TO PROPERLY
SEAT THE PADS TO THE ROTORS. DO NOT TAKE THE VEHICLE UP TO 60 MPH AND JAM
ON THE BRAKES BEFORE THE FIRST 200 - 250 MILE BREAK IN PERIOD IS OVER, OR YOU
WILL GLAZE THE PADS AND ROTORS.
Important
Parts included with this kit: 555-630642 w/Natural Calipers
JEGS Part # Description Quantity
555-630426 Caliper, Natural Cast Finish (Left/Driver Side) Including Brake Pads 1
1
1
1
1
2
2
Secondary (Caliper) Bracket 2
Parts included with this kit: 555-631809 w/Black Calipers
555-630008 Caliper, Black Powder Coated Finish (Left/Driver Side) Including Brake Pads 1
1
Due to the wide variety of applications that this kit may be used for, no E-brake cable is included with
this kit. However, E-Brake cables in a variety of lengths are available for seperate purchase. If you have
purchased the E-Brake cable please check the E-Brake cable tment chart to ensure you have the correct
cable for your installation
E-BRAKE CABLES can BE PURCHASED SEPERATELY WITH THIS KIT
Emergency Brake Cable Fitment chart
JEGS Part # Length Application
555-630621 34 & 3/4” / 73&3/4 1967-1976 Chrysler/ Dodge A-Body
555-630625 35” / 72 & 3/4” 1970-1974 Chrysler/ Dodge E -Body
555-630623 35 & 5/8” / 75 & 3/4” 1966-1970 Chrysler/ Dodge B-Body
555-631828 (Left) Rotor - 10 Hole Drilled & Slotted w/ 5 x 4 1/2 & 5 x 4 3/4 Dual Bolt Patterns
555-630427 Caliper, Natural Cast Finish (Right/Passenger Side) Including Brake Pads
Caliper, Black Powder Coated Finish (Right/Passenger Side) Including Brake Pads
555-630007
Bracket Spacers & Attaching Bolts
Primary Bracket
8
Axle Spacer Plate
Stainless Steel Braided Hoses (1 Pair) Incl: Banjo Bolts & Copper Washers
Rotor - 10 Hole Drilled & Slotted w/ 5 x 4 1/2 & 5 x 4 3/4 Dual Bolt Patterns
555-630466
555-631829 (Right)
Parts included with this kit: 555-631808 w/Red Calipers
Plus all the above items that are included in the 555-630642 Kit
Caliper, Red Powder Coated Finish (Left/Driver Side) Including Brake Pads
Caliper, Red Powder Coated Finish (Right/Passenger Side) Including Brake Pads
555-630006
555-630005
1
1
Preparing your vehicle to install your brake system upgrade
1. Rack the vehicle.
2. If you dont have a rack, then you must take extra safety precautions.
3. Choose a rmly packed and level ground to jack up the vehicle.
4. Chock the front wheels.
5. Jack the vehicle up and support it with jack stands and secure the pins.
6. Put the transmission in park if automatic, reverse if manual transmission.
7. The wheels should be allowed to free hang to relieve tension on the springs.
Components to inspect, replace or upgrade during installation of disc conversion kits
Shocks and hardware Proportioning Valve Stainless steel hardware
Brake lines Stainless steel brake lines
Suggestions:
»Take the time to identify any suspect parts that are not included in this kit.
»Make upgrades such as converting to polyurethane bushings, performance shocks, Coil Over Springs, etc.
»Plan any Installation (s) of replacement parts during the various stages of the drum to disc conversion process.
»Check for interference with the exhaust system before installation.
»Check for proper master cylinder bore size
Slide Hammer Tool Drum brake tool Flare wrench set Wheel chocks
3/8” ratchet drive set 3/8” Allen wrench or socket Jack stands Brake spring pliers
Box end wrench set Differential Fluid Tire iron Brake bleeder wrench
Pliers Screwdriver Snips
Brake Fluid Line bending tool
555-80086
Disc brake quiet Wheel bearing grease
Caliper slide grease Brake cleaner Hand cleaner
Instructions
Note: The rear axles must be removed to install this kit!
1. Prior to disassembly spray the nuts and bolts that will be
removed with a penetrant.
2. Remove the rear tires.
3. Disconnect the drum brake hoses from the hard line using
the appropriate are wrenches.
4. Now you can remove the drum backing plate and
disconnect the emergency brake.
5. Clean the rotors using brake cleaner rst, then with soap and water. Dry with a clean towel.
NEVER rely on jacks to support a vehicle! Always test the steadiness of your stands
that are supporting the vehicle before attempting to work on a raised vehicle!
Important
Slide Hammer w/ Axle Flange Adaptor
6. Check to make sure that the axle ange is 6 1/8” in diameter. (Trial t the rotor to the axle ange.) This will
ensure that the rotor will mount ush to the axle ange. (If the axle ange is larger than 6 1/8”, you will
need to machine it down to the proper size.)
7. Be sure to check the axle ange size. It should be 6 1/8” in diameter.
8. Using a 3/8” extension, remove the bearing retainer nuts to pull out the axle. You can access the nuts
through the service hole in the axle ange.
9. Install the axle spacer plate followed by the axle. (spacer plate takes the place of the backing plate.) (Fig 1A)
10. Install the primary bracket so that the calipers will be mounted up and toward the rear of the car.
11. Now reinstall and tighten the bearing retainer nuts. Take the supplied bolts, and install those on the primary
bracket. Then use the spacers, that are also provided, and install those onto the bolts. (Fig 1B)
12. Bolt the secondary bracket to the primary bracket and tighten the nylock nuts. (Fig 1C)
13. Install the new rotor onto the axle ange. (Note: Use two or three wheel nuts to hold the rotor in place so
you can complete the installation. Only hand tighten the wheel nuts so that you will not damage or warp
the rotor.) Now rotate the rotor and check that the rotor runs true. You also want to be sure that nothing is
interfering with the rotation. To be sure that the rotor is ush to the axle ange and is all the way over the
axle center pilot, insert some strips of paper between the back of the rotor and the axle ange. If you cannot
pull the paper out easily, then the rotor is all the way on.
REAR CALIPER INSTALLATION
The installation of the rear caliper has three steps:
A. Physically installing the caliper.
B. Physically setting up the emergency brake.
C. Emergency brake adjustment.
1. With the rotor and caliper bracket installed, locate the two metal slider sleeves that the mounting bolts go
though (Fig. 2).
Fig. 3
Fig. 2
FIG 1A FIG 1B FIG 1C
Remove Bearing Retainer Nuts from these studs To
Remove the Axle before installing this spacer plate
2. With your thumbs, press the slider sleeves ush against their tabs to allow the caliper to be installed into the
caliper bracket smoothly (Fig. 3). Prior to inserting the caliper into the bracket, you need to make sure that
the pads are installed correctly.
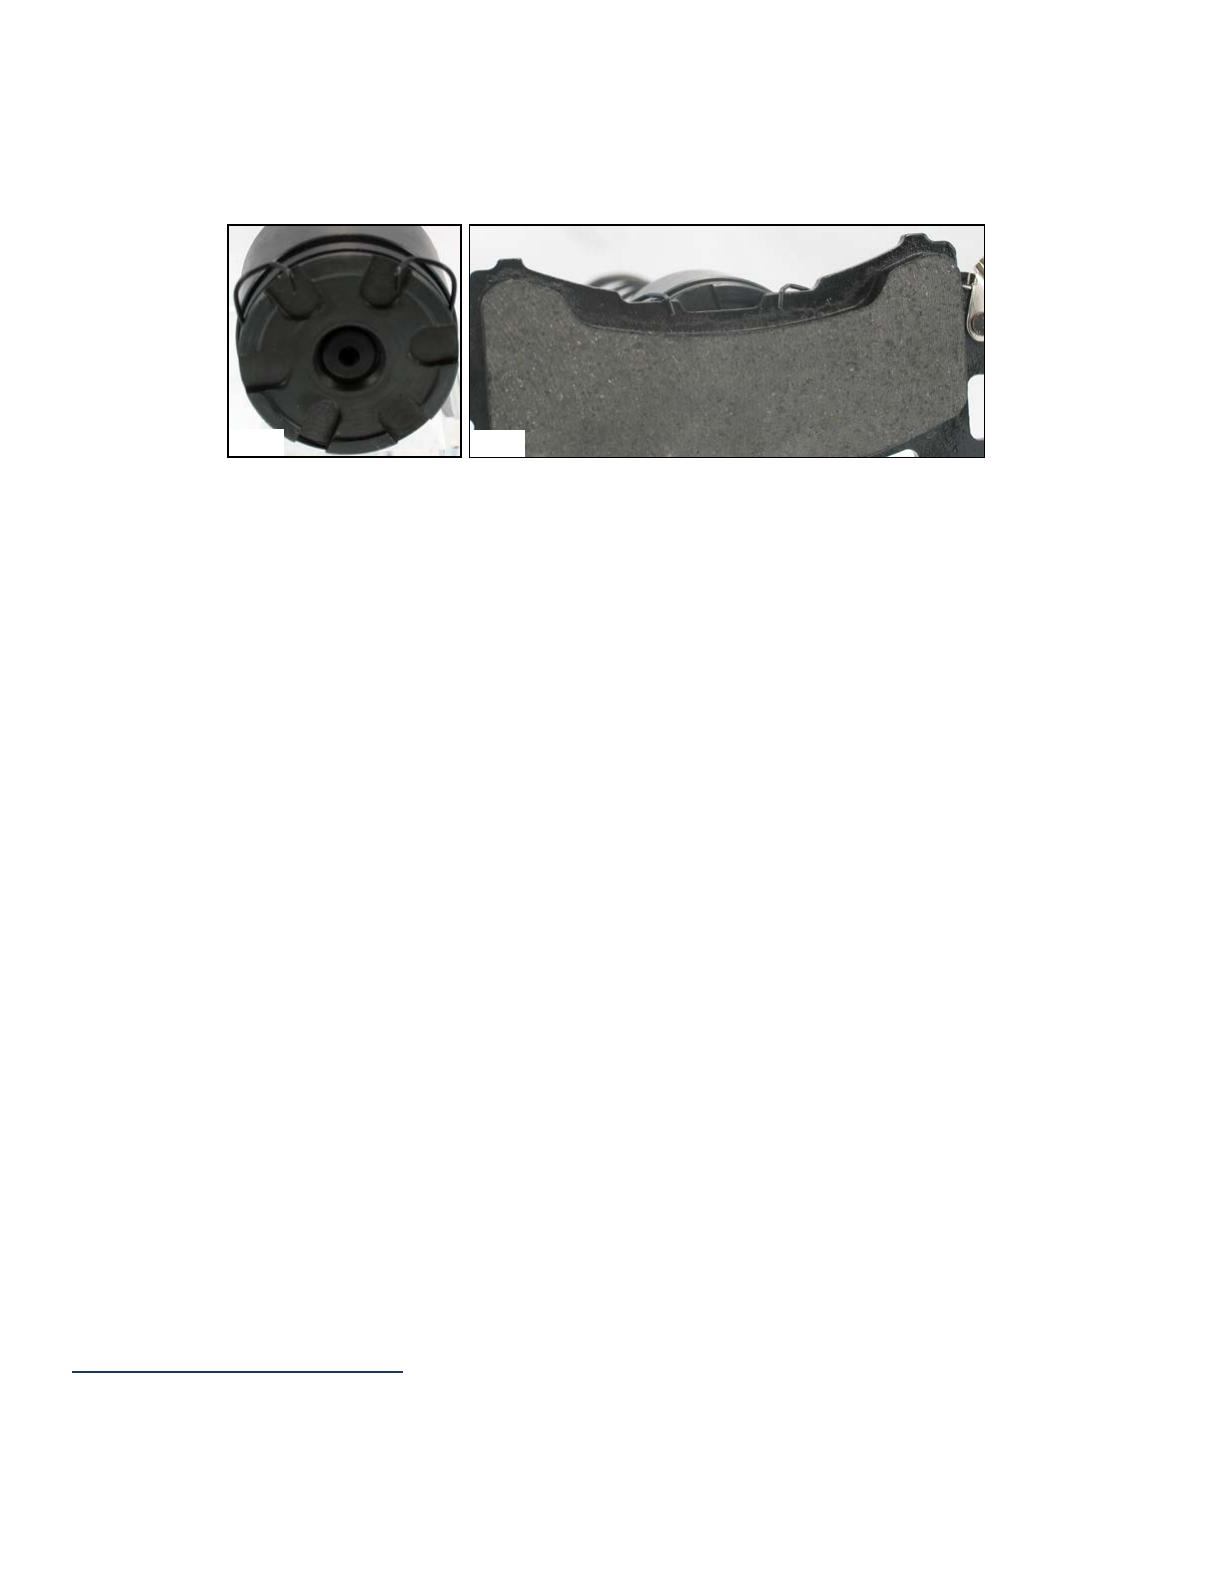
3. The inboard pad has a special clip (Fig. 4) that snaps over the caliper piston and rests in a groove on the
piston. The pad has notches into which the tabs of the clips t (Fig. 5).
4. Now insert the caliper, with the pads installed, into the caliper bracket. The bleeder screws and springs
should be at the top with the caliper on the rear of the axle.
5. It may be necessary to retract the caliper piston to allow the brake pads to clear the rotor.
6. To retract the piston, remove the spring on the emergency brake. Be sure to note the position of the spring.
Next remove the nut and its’ lever. Be sure to note the position of the lever.
7. Move the piston in or out as needed by turning the shaft with the wrench positioned on the integrated hex nut.
You may also use the lever to adjust piston depth.
8. Reinstall the bracket, spring, and pads. Install the caliper into the caliper bracket, and press the slider sleeves
up against the caliper bracket and tighten down the 2 mounting bolts using an Allen wrench. If needed, install
the bracket shims between the axle and the caliper bracket in order to center the caliper over the rotor.
9. Test spin the rotor, and once it is centered, tighten down the bracket.
10. Proceed to setting the emergency brake.
11. If you have not already done so, remove the original drum brake cables from the vehicle.
12. You will be using the front and middle sections of the original drum cable setup.
13. Next feed the end of the new cable though the spring and locate, but do not install the cable into the notch on
the lever yet.
14. Now take the clip provided with the kit and stake it over the emergency brake cable to steady the cable against
the caliper. Save the old emergency brake clip so you can check the new brake clips for the proper size.
15. With the system physically assembled, proceed to the adjustment of the e brake setup.
16. Check to make sure you have correct E-Brake cable Kit as described in the chart on P.3
17. Attaching the exible brake hose to the caliper and then to the hard line. Now attach the E-brake cable to the
caliper. If you did not purchase the E-Brake cable the system will still opperate as normal. To purchase the
optional E-Brake cable please call customer service and have the part number ready to order.
18. Bleed the brakes and test for a full pedal. If the back wheels skid before the front you should install a
proportional valve to reduce the pressure to the rear brakes.
REAR CALIPER ADJUSTMENT
When installing rear disc brakes with calipers that have an internal parking brake you must adjust or set the
calipers when installing. Failure to do so will prevent you from getting a rm pedal and you will have no rear
brake function. Only do this adjustment with the caliper and rotor installed on the vehicle. You must set the
parking brake every time you park to keep the calipers adjusted.
Fig. 4 Fig. 5
INITIAL ADJUSTMENT
1. Remove the spring.
2. Crank the lever or turn the retention nut to actuate
the lever forward.
3. After cranking the lever forward as far as it will
go, rotate it back the other way until you hit the
stop. You may need to use a long screwdriver to
lever the lever back into place.
4. The rear caliper should now be correctly adjusted.
5. Re-install spring
Important: You must use the parking brake
mechanism on a regular basis to set the self
adjusting calipers. Failure to use the rear parking
brake will result in rear brake loss!
Spring
E-Brake
Lever
Retention
Nut
Lever cranks
this way to
adjust piston.
Stop
Rear Disc Brake Checklist
All bolts on base bracket properly tightened.
All caliper mounting bolts properly tightened.
Rotor slides onto axle with ease.
No interference with rotor and any other parts (splash shield, brackets, etc.).
Caliper is centered over the rotor (because of difference in axle lengths, you may have to shim caliper in or out).
No interference with caliper and rotor.
All brake lines are tight with no leaks.
Parking brake is properly adjusted and not dragging, with vehicle on ground.
Adjustable proportioning valve installed (if applicable).
Distribution block modication made (if applicable).
Brake system properly bled.
  • Page 1 1
  • Page 2 2
  • Page 3 3
  • Page 4 4
  • Page 5 5
  • Page 6 6
  • Page 7 7

Jegs 555-630642 User manual

Type
User manual

Jegs 555-630642 Rear End Disc Brake Conversion Kit provides a reliable and efficient way to upgrade your vehicle's braking system. This kit is compatible with vehicles featuring a big bolt pattern and allows for the installation of disc brakes, ensuring improved stopping power and enhanced safety. It includes all the necessary components, such as calipers, rotors, brackets, and hoses, to complete the conversion. This kit is designed for experienced individuals familiar with brake system installation and operation.

Ask a question and I''ll find the answer in the document

Finding information in a document is now easier with AI