Craftsman 113179881 Owner's manual
- Category
- Electric laundry dryers
- Type
- Owner's manual
This manual is also suitable for
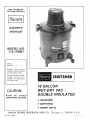
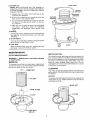
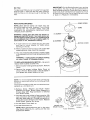
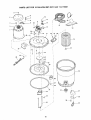
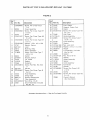
Craftsman 113179881 is a powerful and versatile tool that can be used for a wide variety of cleaning tasks. It features a 16-gallon drum capacity, making it ideal for large cleanup jobs. The vac's double-insulated motor provides superior suction power, and its patented air bleed-off system increases performance. The vac also comes with a variety of attachments, including a rectangular nozzle, utility nozzle, and hose strap, making it easy to clean hard-to-reach areas.
Craftsman 113179881 is a powerful and versatile tool that can be used for a wide variety of cleaning tasks. It features a 16-gallon drum capacity, making it ideal for large cleanup jobs. The vac's double-insulated motor provides superior suction power, and its patented air bleed-off system increases performance. The vac also comes with a variety of attachments, including a rectangular nozzle, utility nozzle, and hose strap, making it easy to clean hard-to-reach areas.


-
 1
1
-
 2
2
-
 3
3
-
 4
4
-
 5
5
-
 6
6
-
 7
7
-
 8
8
-
 9
9
-
 10
10
-
 11
11
-
 12
12


Craftsman 113179881 Owner's manual
- Category
- Electric laundry dryers
- Type
- Owner's manual
- This manual is also suitable for
Craftsman 113179881 is a powerful and versatile tool that can be used for a wide variety of cleaning tasks. It features a 16-gallon drum capacity, making it ideal for large cleanup jobs. The vac's double-insulated motor provides superior suction power, and its patented air bleed-off system increases performance. The vac also comes with a variety of attachments, including a rectangular nozzle, utility nozzle, and hose strap, making it easy to clean hard-to-reach areas.
Ask a question and I''ll find the answer in the document
Finding information in a document is now easier with AI
Related papers
-
Craftsman 113.177360 Owner's manual
-
-
-
-
Sears 113.179490 Owner's manual
-
-
-
-
-
Other documents
-
RIDGID 50323 Installation guide
-
HQ W7-60451-BLN Datasheet
-
-
 T & S Brass & Bronze Works B-0605-CR Datasheet
-
-
Challenge Xtreme Wet and Dry Vacuum User manual
-
Caroline's Treasures 8545GF User manual
-
 Lincoln Manufacturing 16901 User manual
-
gefran AFE200-3220-4 Series User manual
-

