Challenge Xtreme Wet and Dry Vacuum User manual

Type
User manual

This manual is also suitable for

RAC-HP095
HP095 - Issue 1 - R.W. 12-10-07
12V Wet & Dry Vacuum Cleaner
This product is guaranteed for domestic use for a period of 12 months against faulty manufacture or materials.
This guarantee does not affect the statutory rights of the consumer. In the event of any problem occurring please
contact our Helpline at the number above for advice. This product is not guaranteed for HIRE purpose.
Manufactured under licence for Hilka Pro Imports.
1 ROEBUCK PLACE, ROEBUCK ROAD, CHESSINGTON, SURREY KT9 1EU
If faults cannot be remedied, contact the Helpline on 020-83916767
Helpline@hilka.co.uk
Waste electrical products should not be disposed of with household waste.
Please recycle where facilities exist. Check with your local authority or retailer
for recycling advice.
ENVIRONMENTAL PROTECTION
-1- -2-
SAFETY INSTRUCTION AND CLEANING TOOLS PART LIST AND TECHNICAL SPECIFICATIONS
WARNING
To reduce the risk of fire, electrical shock or injury:
• Be aware of extended on time as this can flatten the vehicle battery.
• Close supervision is necessary when any appliance is used by or near children.Do not allow this
vacuum cleaner to be used as a toy. Keep any plastic bags in the vacuum packing away from
children to avoid suffocation or other injuries. Although this vacuum is designed to pick up liquids,
only the Suction Nozzle end of the Dirt/Liquid Container should be placed in liquid.
• Do not immerse the entire vacuum in any liquid.
• Do not pick up anything that is burning or smoking, such as a cigarette. Avoid picking up hard,
sharp objects with the vacuum. They may damage the vacuum and the Filter.
• Do not use the vacuum to pick up toxic, flammable, or combustible substances/ liquids such as
gasoline or operate the vacuum in the presence of explosive or flammable fumes such as
alcohol-based cleaning sprays.
• Do not operate the vacuum in areas close to explosive, combustible, or flammable items.
• Do not put any object into the openings. Do not use with any opening blocked. Keep free of dust,
lint, hair or anything that may reduce airflow.
• Do not operate the vacuum without the Dirt/Liquid Container or Filter in place. Replace a
damaged filter promptly.
• Clean the Dirt/Liquid Container after picking up any perishable food items.
• Do not use on or near hot surfaces.
• This vacuum is intended for automotive use only. The vacuum is not for commercial or industrial
use.
• Use only as described in this manual. Use only original manufacturer's accessories and parts.
• Save this manual for future reference.
CLEANING TOOLS
1.Crevice Tool:
This tool works as a long reach cleaning wand or a crevice tool. Simply attach the Crevice Tool to
the Suction Nozzle. The tool is for cleaning hard to reach areas and tight places.
2.Squeegee & Uphoistery Brush:
This tool has a rubber squeegee edge and bristle brush edge. The squeegee side is for picking up
liquid spills on hard surfaces like floors, glass, counter tops, etc. The bristle side is for brushing
and picking up dirt, dust, and debris from upholstery, carpet, tables, etc.
1. Built-in 12V Car Plug
2. Handle Housing
3. Dirt/Liquid Container
4. Dirt/Liquid Container Release Button
5. On/Off Switch
6. Squeegee & Upholstery Brush
Type: Handheld, automotive use, wet &dry cleanups
Performance: 19,000RPM (±15%)
Car Plug: For standard automotive 12V cigarette lighter socket
TECHNICAL SPECIFICATIONS
7. Crevice Tool
8. Filter
9. Filter Bracket
10. Liquid Deflector
11. Suction Nozzle
12. Cord & Plug Compartment
11
3
10
9
8
4
5
2
12
7
6
1
-3- -4-
OPERATING AND MAINTAINENCE
HOW TO USE
Push the On/Off Switch forward and hold it to turn on your vacuum. Release the On/
Off Switch to turn off your vacuum.
1. Picking up dry debris:
Use your vacuum to pick up dirt, dust, food crumbs, etc. from bare floors, rugs, counters,
upholstered furniture, automobile interiors, etc. After dry cleanups, empty and clean the
Dirt/Liquid container and the Deflector before picking up liquid or wet spills.
2. Picking up liquids or wet debris:
Use your vacuum to pick up liquid spills and wet debris. For better liquid cleanups on hard
surfaces like counter and glass tops, insert the Squeegee & Uphoistery Brush into the Suction
Nozzle. Pull the squeegee side through the liquid for cleanup while vacuuming.
The liquid capacity of the Dirt/Liquid Container is 6 oz. (175mL), about half a standard soda/beer
can. Hold the vacuum with the Suction Nozzle pointing vertically down towards the floor, the
Dirt/Liquid Container is full when the liquid level is about 3 inches up from the suction end.
After liquid cleanups, empty the Dirt/Liquid Container and thoroughly clean the Dirt/ Liquid
Container, Liquid Deflector, Filter Bracket, and Filter to prevent the formation of mold and mildew.
MAINTAINENCE
IMPORTANT: Proper use and care of your vacuum will extend the life of the vacuum and its
accessories. Thoroughly cleaning the Filter after each use will improve performance. Mold or
mildew may form in the Dirt/Liquid Container, Liquid Deflector, Filter Bracket, Filter if they are not
properly cleaned.
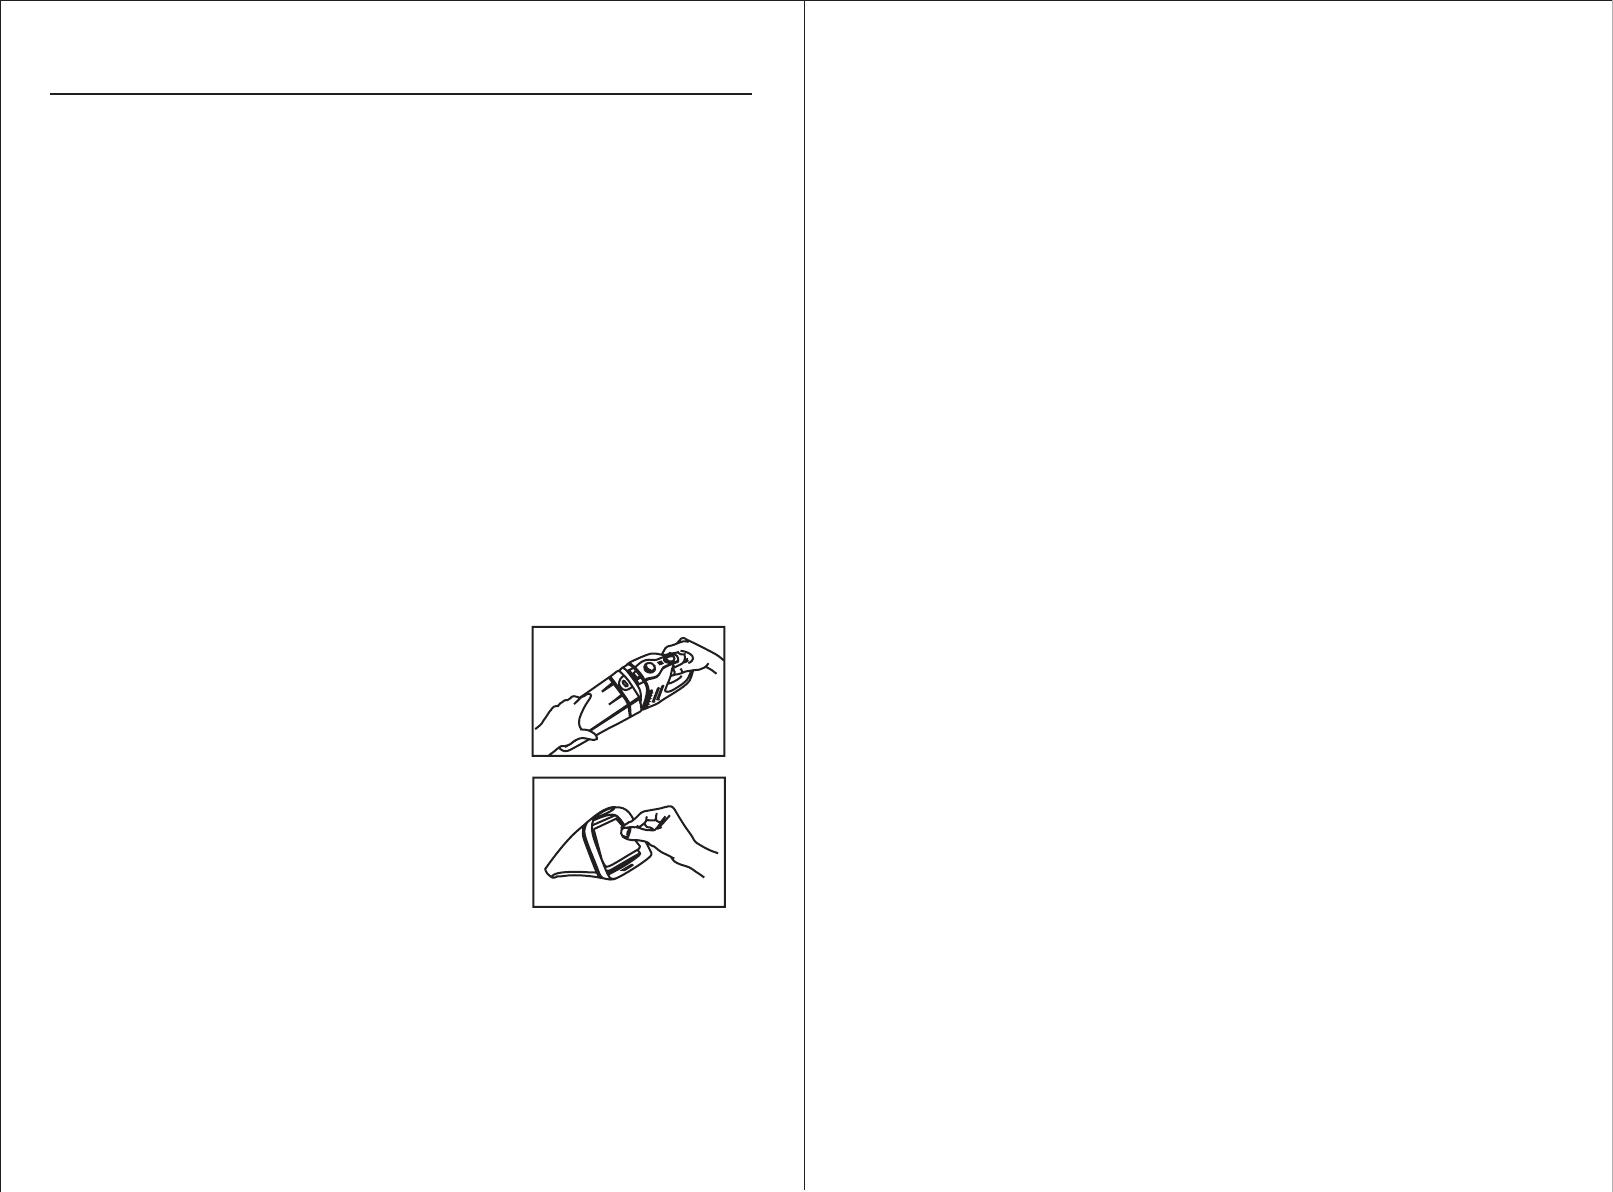
Emptying Dirt/Liquid Container:
Liquids, dirt, and debris (wet or dry) picked up by your
vacuum will collect in the Dirt/Liquid Container. To empty
the Dirt/Liquid Container, follow these steps:
1. Holding the Dirt/Liquid Container with one hand and the
Handle Housing with the other, press the Dirt/Liquid
Container Release Button to swing the container away
from the housing.
2. While holding the container over a sink or wastebasket,
pull the Filter out first and then the Filter Bracket and Liquid
Deflector. Do not pull on the rubber seal of the Filter
Bracket.Empty contents from the container.
Maintainence.
3. Some dirt or debris may be collected inside the Liquid Deflector. Pull the Filter Bracket away
from the Liquid Deflector. Do not pull on the rubber seal of the Filter Bracket. Empty contents
from the Liquid Deflector.
If needed, hand wash the Dirt/Liquid Container, Liquid Deflector, Filter Bracket, and Filter in warm
soapy water. Only the Dirt/Liquid Container can be washed in a dishwasher. Use only mild soap
and detergents. Other detergents, cleaners, or solvents may damage the plastic.
After the cleaning, press the Filter Bracket onto the Liquid Deflector. Gently insert the Filter into the
Filter bracket. You may need to press around the edge of the Filter to make it fit properly to the
Filter Bracket. Put the Liquid Deflector, with the Filter Bracket and Filter in place, back into the
Dirt/Liquid Container.
Place the Dirt/Liquid Container back onto the Handle Housing by placing the lower rear edge of
the container against the lower front edge of the housing. The latch at the lower front edge of the
housing should fit into the lower latch hole of the container.
Swing the container so the upper rear edge of the container is against the upper front edge of the
housing. The Dirt/Liquid Container Release Button on the housing will snap into the upper latch
hole of the container.
Cleaning the Vacuum Housing:
Clean the vacuum housing with a damp cloth. Do not use detergents, cleaners, or solvents.
Note: Never clean the vacuum by immersing the vacuum in water!
Note: Make sure that the Filter is dry before you operate the vacuum. The Filter should be
replaced periodically to provide optimal vacuum performance, or when the Filter has been
damaged.
  • Page 1 1
  • Page 2 2
  • Page 3 3

Challenge Xtreme Wet and Dry Vacuum User manual

Type
User manual
This manual is also suitable for

Ask a question and I''ll find the answer in the document

Finding information in a document is now easier with AI