Page is loading ...

Follow all instructions when assembling this ATV. If any parts are damaged or missing, those parts must be replaced before
proceeding.
WARNING: To reduce the risk of injury, you must read and understand this assembly guide before attempting to
assemble this product.
ASSEMBLY GUIDE
GUÍA DE ARMADO
ATV
AT250UT
SAVE THIS GUIDE FOR FUTURE REFERENCE
Siga todas las instrucciones al armar este vehículo todoterreno (all terrain vehicle, ATV). Si falta alguna pieza o hay piezas
dañadas, dichas piezas deben reemplazarse antes de proceder a utilizar el producto.
ADVERTENCIA: Para reducir el riesgo de lesiones, debe leer y comprender esta guía de armado antes de
intentar armar este producto.
GUARDE ESTE MANUAL PARA FUTURAS CONSULTAS

2 — English
Rules for Safe Assembly .................................................................................................................................................. 2
Symbols ............................................................................................................................................................................ 3
Tools Needed .................................................................................................................................................................... 3
Unpacking ......................................................................................................................................................................... 4
Loose Parts List ................................................................................................................................................................ 5
Assembly ..................................................................................................................................................................... 6-11
Final Preparation ............................................................................................................................................................ 11
TABLE OF CONTENTS
WARNING:
Strictly adhere to all torque wrench tightening speci-
cations. Failure to do so may cause serious personal
injury.
All information, illustrations, photographs and specications
contained in this manual are based on the latest product
information available at the time of publication. Due to im-
provements or other changes, there may be some discrep-
ancies in this manual. We reserve the right to make product
changes at any time, without notice and without incurring
any obligation to make the same or similar changes to the
vehicle previously built or sold.
Any person attempting to assemble this product must have
proper training and experience. Read this manual carefully
and follow all assembly procedures as described.
In addition to completing all the items in this manual,
mechanic must read and complete the Dealer portion of
the Pre-Delivery Inspection Checklist.
All assembly must be completed with the unit on a level
surface. Once installed, the wheels should be pointed
straight ahead during assembly.
RULES FOR SAFE ASSEMBLY

3 — English
The following signal words and meanings are intended to explain the levels of risk associated with this product.
SYMBOL SIGNAL MEANING
DANGER:
Indicates an imminently hazardous situation, which, if not avoided, will result in
death or serious injury.
WARNING:
Indicates a potentially hazardous situation, which, if not avoided, could result in
death or serious injury.
CAUTION:
Indicates a potentially hazardous situation, which, if not avoided, may result in
minor or moderate injury.
CAUTION:
(Without Safety Alert Symbol) Indicates a situation that may result in property
damage.
SYMBOLS
TOOLS NEEDED
The following tools (not included or drawn to scale) are needed for assembly and alignment:
TORQUE WRENCH
BATTERY CHARGER
20
30
40
0
50
Some of the following symbols may be used on this product. Please study them and learn their meaning for safe opera-
tion of this product.
SYMBOL NAME EXPLANATION
Safety Alert Precautions that involve your safety.
Chemical Burns
Contains sulfuric acid. Avoid contact with skin, eyes, or
clothing.
Poison
Contains sulfuric acid. Do not ingest and avoid contact
with skin, eyes, or clothing.

4 — English
NOTE: Having two people available will make the assembly
process easier, even if using an overhead hoist.
Cut packing straps and remove cardboard carton from
metal frame.
WARNING:
Do not stand at the front or the rear of the ATV while the
straps are being cut. Keep the carton level while lifting and
do not allow it to tip forward or backward. Failure to follow
these instructions may result in serious personal injury.
Remove box which contains manufacturer’s statement of
origin, assembly guide, operator’s manual, and assembly
hardware.
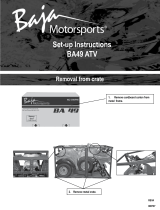
Remove all bolts and brackets that attach the metal ship-
ping crate to the ATV. See gure below.
Remove front tires from shipping crate.
Remove bolts from the bottom on both sides of shipping
crate.
With a person on each side, carefully lift shipping crate
off the ATV and set aside.
NOTE: If a second person is unavailable, use an overhead
hoist to lift and remove the metal frame.
WARNING:
Carefully support the crate at all times during the removal
process. Allowing the crate to drop could cause serious
injury and/or damage the ATV.
Remove and set aside all packaging and wrap from unit
and parts. Do not discard the packing material until you
have carefully inspected and satisfactorily operated the
product.
Remove and discard ties securing handlebars.
WARNING:
Do not use this product if any parts on the Loose Parts List
are already assembled to your product when you unpack
it. Parts on this list are not assembled to the product by
the manufacturer and require customer installation. Use
of a product that may have been improperly assembled
could result in serious personal injury.
Inspect the product carefully to make sure no breakage
or damage occurred during shipping.
If any parts are damaged or missing, please call
1-888-863-2252 for assistance.
UNPACKING

5 — English
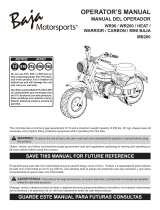
LOOSE PARTS LIST
Key
No. Description Qty.
1 Wheel Hardware
Front Wheels (left and right) ............................ 2
Hub Caps (front and rear) ................................ 4
Lug Nuts (17 mm) ............................................ 8
2 Rear Shock Hardware
Rubber Grommets ........................................... 2
Shock Pin ........................................................ 1
Metal Washer ................................................... 1
Cotter Pin ......................................................... 1
3 Handle Bar Hardware
Bottom Bracket ................................................ 1
Top Brackets .................................................... 2
Bracket Bolts (M8 x 60 mm) ............................ 4
4 Speedometer Hardware
Bolts (M8 x 16 mm) ......................................... 2
Key
No. Description Qty.
5 Cargo Rack Hardware
Bolts (M6 x 16 mm) ......................................... 8
Flange Bolts (M8 x 16 mm) ............................. 2
6 Battery Box and Hardware
Electrolyte Bottle .............................................. 1
Bolt (6 mm x 30 mm) ....................................... 2
Square washer ................................................ 2
7 Tool Kit ................................................................. 1
Gas Cap Vent Tube (Not Shown) ......................... 1
Assembly Guide (Not Shown) .............................. 1
Operator’s Manual (Not Shown) ........................... 1
WARNING:
If any parts are damaged or missing do not assemble
this product until the parts are replaced with new original
manufacturer’s parts or their equivalent. Assembly of this
product with damaged, missing, or incorrect parts could
result in serious personal injury.
1
7
6
5
8
2
3
4

6 — English
Torque lug nuts to 35 ft.lbs. (47 Nm).
WARNING:
Strictly adhere to all torque wrench tightening speci-
cations. Failure to do so may cause serious personal
injury.
Check the cotter pin located in the center of the hub on
all 4 wheels. Make sure the pin is seated securely.
WARNING:
If any parts are damaged or missing do not assemble
this product until the parts are replaced with new original
manufacturer’s parts or their equivalent. Assembly of this
product with damaged, missing, or incorrect parts could
result in serious personal injury.
Install hub caps on all wheels.
Check the air pressure of the tires and inate as needed
to the proper amount.
NOTE: Tire pressure should only be measured or
adjusted when tires are cold.
Recommended Pressure
Front
3.7 psi ± 1.2 psi
(25.5 kpa ± 8.3 kpa)
Rear
4.1 psi ± 0.9 psi
(28.3 kpa ± 6.2 kpa)
WARNING:
Check the tire pressure carefully while inating. Too much
air in the tire could cause the tire to burst, causing serious
personal injury.
WARNING:
Maintaining correct air pressure in the tires is very impor-
tant. Too little pressure could allow the tire to rotate off
the wheel rim. Too much pressure could cause the tire to
burst. Failure to maintain correct air pressure in the tires
could cause problems with vehicle operation and stability,
causing serious personal injury.
ASSEMBLY
WARNING:
Strictly adhere to all torque wrench tightening speci-
cations. Failure to do so may cause serious personal
injury.
WARNING:
Do not attempt to modify this product or create acces-
sories not recommended for use with this product. Any
such alteration or modication is misuse and could result
in a hazardous condition leading to possible serious
personal injury.
WARNING:
To prevent accidental starting that could cause serious
personal injury, always disconnect the engine spark plug
wire from the spark plug when assembling parts.
INSTALLING FRONT WHEELS
When correctly installed, the tread pattern on the wheels face
forward when looking at the wheel from the top.
Locate wheel hardware as described in the Loose Parts
List on page 5.
Lift front of ATV and install front tires using lug nuts provided.
Tighten the lug nuts securely in a crisscross direction.
NOTE: The unit is heavy. Get help as needed.
NOTE: The ATV can now be rolled off the bottom of the metal
packing frame.

7 — English
ASSEMBLY
INSTALLING REAR SHOCK
Locate rear shock hardware as described in the Loose
Parts List on page 5.
Place rubber grommets on each side of shock. The beveled
portion of the grommet should face in toward the shock.
Place shock in frame bracket on ATV and install shock
pin.
Slide metal washer on the end of the shock pin, then install
cotter pin. The ends of the cotter pin should be bent over
to secure in place.
WARNING:
If any parts are damaged or missing do not assemble
this product until the parts are replaced with new original
manufacturer’s parts or their equivalent. Assembly of this
product with damaged, missing, or incorrect parts could
result in serious personal injury.
INSTALLING HANDLEBAR
Locate handlebar hardware as described in the Loose
Parts List on page 5.
Place bottom bracket under handlebars and align bolt
holes.
Place top brackets over handlebars and align bolt
holes.
Insert both bracket bolts and nger tighten.
WARNING:
If any parts are damaged or missing do not assemble
this product until the parts are replaced with new original
manufacturer’s parts or their equivalent. Assembly of this
product with damaged, missing, or incorrect parts could
result in serious personal injury.
Lift handlebars to proper operating position. Tighten handle
bar bolts securely. Torque to 20 ft.lbs. (27 Nm).
WARNING:
Strictly adhere to all torque wrench tightening speci-
cations. Failure to do so may cause serious personal
injury.
Turn the handlebars fully left and right to verify proper
operation and to make sure the throttle cable, brake hoses,
and other wires are not squeezed or pulled too tightly.
WARNING:
Failure to correctly install and verify proper operation of
the handlebars could cause a loss of control when operat-
ing the ATV, which may result is serious injury or death.

8 — English
INSTALLING GAS CAP VENT TUBE
Locate the gas cap vent tube as described in the Loose
Parts List on page 5.
Place one end of the vent tube through the opening in the
gas cap.
Insert the other end of the tube into the speedometer
assembly.
ASSEMBLY
INSTALLING SPEEDOMETER
Locate speedometer hardware as described in the Loose
Parts List on page 5.
Attach the speedometer assembly securely to the brackets
using the bolts provided.
INSTALLING CARGO RACK
Locate cargo rack hardware as described in the Loose
Parts List on page 5.
Insert ange bolts into the holes as shown. Tighten
securely.
Place the cargo rack in position on the ATV.
Insert bolts into the holes as shown. Tighten securely.

9 — English
ASSEMBLY
REPLACING PACKING LUBRICANT
The ATV engine is shipped with packing lubricant in it. This
lubricant must be drained and replaced with new engine
lubricant before attempting to operate the ATV. Do not start
the engine while it still contains the packing lubricant.
Always use a 4-stroke motor lubricant that meets or exceeds
the requirements for API service classication SJ.
ENGINE
LUBRICANT
°C -30 -20 -10 0 10 20 30 40
TEMP.
°F -22 -4 14 32 50 68 86 104
CHANGING/ADDING ENGINE LUBRICANT
To change engine lubricant:
Lubricant should be changed while the engine lubricant is still
warm, but not hot. This allows the lubricant to drain quickly
and completely.
Park vehicle on level ground.
Remove oil cap/dipstick.
Place a container underneath the oil drainage bolt to col-
lect used lubricant as it drains.
Unscrew the oil drainage bolt and remove the bolt, spring,
and oil strainer.
Allow lubricant to drain completely.
Remove oil lter cap and oil lter.
Using a non-ammable solvent, clean the oil strainer and
oil lter.
Inspect rubber o-ring on lter cap and replace if dam-
aged.
CAUTION:
Attempting to operate the ATV with a damaged or missing
o-ring will result in engine failure.
Reinstall oil lter, o-ring if removed, and lter cap.
Reinstall oil strainer, spring, and oil drainage bolt. Torque
oil drainage bolt to 18 ft.lbs. (24 Nm).
Fill crankcase with specied lubricant as described at the
beginning of this section.
NOTE: Used lubricant should be disposed of at an approved
disposal site. See your local oil retailer for more informa-
tion.
To check lubricant level:
Park vehicle on level ground.
Unscrew the oil cap/dipstick and remove.
Wipe dipstick clean and re-seat in hole, but do not re-
thread.
Remove the dipstick and inspect the lubricant level. Level
should be between the minimum and maximum marks on
the dipstick.
If lubricant is below minimum mark on dipstick, add lu-
bricant until level falls between minimum and maximum
marks on the dipstick.
CAUTION:
Attempting to start the engine before it has been properly
lled with lubricant will result in equipment failure.
SAE 10W-30
SAE 20W-40
SAE 10W-50
SAE 15W-40

10 — English
ASSEMBLY
PREPARING BATTERY FOR USE
WARNING:
Batteries contain sulfuric acid. Avoid contact with skin,
eyes, or clothing. Always wear eye protection with side
shields marked to comply with ANSI Z87.1, along with
rubber gloves when working with batteries. Have water
available in case acid comes in contact with eyes or skin.
Keep all children and bystanders away from the area
while this procedure is being performed. Failure to do so
could result in uids entering your eyes, burns, and other
possible serious injuries.
POISON CAUSES
SEVERE BURNS
Contains sulfuric acid. Avoid con-
tact with skin, eyes, or clothing.
To prevent accidents, rinse empty
container with water.
ANTIDOTE:
External Flush with water
Internal Call physician immediately. Drink large quantities
of water or milk. Follow with Milk of Magnesia, beaten eggs,
or vegetable oil.
Eyes Flush with water for 15 minutes and get prompt
medical attention.
Locate battery box and hardware as described in the
Loose Parts List on page 5.
Remove seat and set aside to gain access to battery
compartment.
Remove bolt from right side and slightly loosen bolt on left
side of battery hold-down bracket. Lift and rotate bracket
counterclockwise to gain complete access to battery.
Carefully remove battery from battery compartment and
place on a level surface.
WARNING:
Failure to place battery on a level surface may allow uid
to seep or spill out of the battery, resulting in serious
personal injury.
Remove cap strip from top of battery.
Place electrolyte bottle upside down over the six cell
openings in the battery. Press rmly down on the bottle
to allow the seals to be punctured and the electrolyte
solution to drain into the battery until the electrolyte bottle
is completely empty.
Discard empty electrolyte container in a waste receptacle
that is inaccessible to children and animals.
Let the battery stand for at least 30 minutes before charging.
This allows the electrolyte to penetrate plates for optimum
performance and ensures longer battery life.
NOTE: Do not leave battery unattended during this
time.
The battery is now ready for its initial charge. Place
replacement cap strip loosely over the battery cell
holes.
CHARGING BATTERY
Connect the red positive (+) cable of the charger to the
red positive (+) pole on the battery.
NOTE: The red positive (+) cable has a larger diameter
than the black negative (–) cable.
Connect the black negative (–) cable of the charger to the
black negative (–) pole on the battery.
WARNING:
Always connect the red positive (+) cable rst and then the
black negative (–) cable. Failure to do so could cause the
battery to explode, causing serious personal injury.
Charge the battery for 5 to 10 hours. After charging is
complete, securely install the battery cap strip.

11 — English
FINAL PREPARATION
VERIFY FLUID LEVELS
All uids except fuel and appropriate engine lubricant are
lled at the factory. However, before attempting to operate
the unit, you should verify the correct levels of all uids. When
checking uid levels, make sure the unit is on a level surface
and the engine is off.
ADD GASOLINE
Add a small amount of gasoline to the unit for testing pur-
poses. Always use unleaded gasoline with a pump octane
rating of 87 or higher. Never use old, stale, or contaminated
gasoline, and do not use an oil/gas mixture. Do not allow dirt
or water into the fuel tank.
Ethanol. Gasoline containing up to 10% ethanol by volume
(commonly referred to as E10) is acceptable. E85 is not.
COMPLETE PRE-DELIVERY INSPECTION
CHECKLIST
Verify that all items on the Pre-Delivery Inspection Checklist
have been completed as required. Keep this list for delivery
to the purchaser of this product.
ASSEMBLY
REINSTALLING BATTERY
Lift up and remove the seat to expose the battery
compartment.
Insert battery with poles facing forward.
Insert the square washers through the side openings of
the battery poles.
Attach red positive (+) wire to one of the bolts, and insert
the bolt through the positive (+) terminal on the battery.
Tighten securely.
Attach black negative (–) wire to the other bolt and insert
the bolt through the negative (–) terminal on the battery.
Tighten securely.
Lift and rotate battery bracket clockwise to reposition over
battery. Align hole and reinstall right bolt. Tighten both
bolts securely.
Reinstall seat and push down rmly to secure.

12 — English
NOTES

987000-922
7-2-10 (REV:02)
ASSEMBLY GUIDE
GUÍA DE ARMADO
ATV
AT250UT
BAJA MOTORSPORTS
1428 Pearman Dairy Road
Anderson, SC 29625
Phone 1-866-260-8280
www.bajamotorsports.com
/