
ADVANCED OPERATION
Assigning Occupancy Emulation to a House Scene
You can assign the repeater’s occupancy emulation function to a Miro House
Scene button. This is very convenient, especially if the repeater is installed in a
hard to reach area.
1. From a wireless house scene controller (MRD5 or MRH5), press
until its
LED begins flashing (about 2 seconds).
2. Press the scene button you want to use. We recommend the fourth one. The
LEDs on all the Miro wireless devices begin to flash. You now have 10 minutes
to complete this process.
3. Go to the repeater and press both buttons for 2 seconds until the repeater
status LED blinks yellow.
IMPORTANT: Only one repeater should be assigned to the house scene
button. If you have more than one repeater, use the most centrally located.
4. Check all the Miro wireless device LEDs. If they are blinking yellow, they are
assigned to the selected scene button. To exclude a device from the scene
press
on the device until the LED begins to flash green.
Yellow flashing LED = Included in the active scene
Green flashing LED = NOT included in the active scene
If a device LED is NOT flashing, the 10 minute binding process timer may have
expired. Go back to step 1 and repeat.
5. Return to the house scene controller used in step 1.
Press for 2 seconds — the status LED stops flashing, then all the status
LEDs in the house turn to solid green.
6. From the same house scene controller, press and hold the same scene button
until the LED flashes once (about 2 seconds). Scene recording for this button
is complete.
7. When you leave the house, press the House Scene button you just recorded.
One minute later, occupancy emulation will begin.

CLEANING
Clean using only a cloth dampened with water and a little mild detergent.
Use of solvents or hydrocarbon-based cleaners may cause permanent damage.
TROUBLESHOOTING
During Set House ID, the LED is not flashing on some Wireless Miro
devices.
• IfLEDissolidgreenbeforeinitiatinghouseIDbinding:
The device already has another house ID. Reset it to the factory default so
that it can be bound to the desired house ID. Resetting to factory defaults is
described in the “I need to start over” issue.
• IfLEDissolidyellowafterinitiatinghouseIDbinding:
The device may be out of range of the initiating device. Relocate the MRR2. It
may be necessary to add another MRR2 if reception to a particular area of the
house is blocked.
I made a configuration mistake. I need to start over.
You can reset any wireless Miro device to factory default settings by pressing
and holding
until the LED changes to solid yellow (approximately 10
seconds). During the process, the LED flashes yellow and when complete, it
changes to solid yellow. The device can then be reconfigured, exactly like any
new device.

FCC NOTICE
This equipment has been tested and found to comply with the limits for a Class
B digital device, pursuant to part 15 of the FCC Rules. These limits are designed
to provide reasonable protection against harmful interference in a residential
installation. This equipment generates, uses and can radiate radio frequency
energy and, if not installed and used in accordance with the instructions, may
cause harmful interference to radio communications. However, there is no
guarantee that interference will not occur in a particular installation. If this
equipment does cause harmful interference to radio or television reception,
which can be determined by turning the equipment off and on, the user is
encouraged to try to correct the interference by one or more of the following
measures:
• Reorientorrelocatethereceivingantenna.
• Increasetheseparationbetweentheequipmentandreceiver.
• Connecttheequipmentintoanoutletonacircuitdifferentfromthattowhich
the receiver is connected.
• Consultthedealeroranexperiencedradio/TVtechnicianforhelp.
Caution:Anychangesormodicationstothisdevicenotexplicitlyapprovedby
The manufacturer could void your authority to operate this equipment.
Warranty Information
Manufacturer warranties its products to be free of defects in materials and
workmanship for a period of five (5) years. There are no obligations or liabilities
on the part of manufacturer for consequential damages arising out of, or
in connection with, the use or performance of this product or other indirect
damages with respect to loss of property, revenue or profit, or cost of removal,
installation or reinstallation.
Please
Recycle
1061 South 800 East
Orem, UT 84097
Phone:800.555.9891
www.vantagecontrols.com
03886r29/2007
Legrand Customers contact: Vantage Customers contact:
301 Fulling Mill Road Suite G
Middletown,PA17057
Phone:800.321.2343
www.legrand.us/onq
IS-0527

MRR2
Wireless Repeater
Specifications
MRR2InputVoltage ......................... 9-12VDC,50mAminimum
AC-DCadaptor(provided)
Input120VAC,60Hz
Output ............................................................. 9VDC,50mA
Patents pending
Installation Instructions

UNIT DESCRIPTION
Use the Miro™ MRR2 Wireless Repeater in large
installations, where the standard range (approximately
25m/80’)isinsufcient,orinbuildingswithdifcult
wireless reception conditions.
The wireless repeater effectively doubles the
transmit/receiverangeofMirowirelessdevices.In
large applications or where radio reception is difficult,
you may use two repeaters, strategically located.
For extremely large or difficult applications requiring more than two repeaters,
please contact Technical Support for assistance.
The wireless repeater also offers a security feature — real life occupancy
emulation. It continuously records a one-week loop of actual Miro wireless
network traffic, and can play it back when you’re away from home — it will look
like the house is occupied.
While we recommend the repeater for either or both of these functions, you
should use only the number required for effective wireless communication
throughout the home. Using too many repeaters will not provide any additional
benefit and may slow down network communication. For in-depth system design
guidance,seeApplicationAssistance,below.
Miro Wireless
Miro wireless devices use radio signals to communicate with each other to
control lighting and other types of electric loads in selected areas. Miro wireless
devicesusethe900MHzbandforhigh-speedcontrolcommunication.Usingthe
“frequency-agile” Top Dog™ technology, Miro wireless devices avoid interference
withother900MHzdevices,suchascordlessphonesandbabymonitors.
Application Assistance
The Miro Installation Guide provides more information about configuring
the Miro wireless control system, including setting up scenes and presets.
Instructions for installation and use are included with the relevant Miro wireless
devices.Applicationsupportinformation,theSpecification Guide and the Miro
Installation Guide is available online.
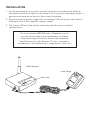
Repeater
Identification Icon

INSTALLATION
1. Locate the repeater in a central location, taking into consideration both the
horizontalandverticalspaceinthehome.Ina2-storyplusbasementhome,a
good position may be on the first floor atop a bookcase.
2. Plug the external power supply into a convenient 120 volt outlet, and connect
the power cord to the repeater’s power socket.
3. The status LED will light yellow, indicating that the unit is ready for
configuration.
Do not locate the MRR2 Wireless Repeater close to
any device that may cause interference or behind
large metal objects that can block radio reception.
Avoiduorescentlightxtures,TVsets,computers,
refrigerators, microwave ovens, range hoods, safes, etc.
MRR2 Repeater
Power Supply
Status LED

SET HOUSE ID
AllMirowirelessdevicesinstalledinthesamehomemustacquirethesame
unique House ID before use. This process is known as house binding. Each Miro
wireless device is bound to all other Miro wireless devices in the house.
IMPORTANT:BecausetherepeaterincreasestherangeoftheMirowireless
system, it is very important to make sure the repeater is installed and powered
before setting the House ID using any other Miro wireless device. The repeater
automatically checks for House IDs that are installed in the neighborhood.
New Installation
1. With all devices installed and
energized,makesurethatevery
Miro wireless device LED is
yellow. If any LED is off, be sure
the circuit breaker is on and the
device is correctly installed.
2. Press
on any device until the
LED flashes yellow (about 2
seconds). This indicates that it
has acquired a unique House ID.
3. Make sure that all other Miro wireless device LEDs are flashing green,
indicating that they have acquired the same House ID.
4. Return to the device used in step 2, which is still flashing yellow. Press
untiltheLEDchangestosolidgreen(about2seconds).AlldeviceLEDsinthe
House change to solid green, indicating house binding is complete.
Adding a Device to an Existing Installation
If you’re adding or replacing a device in a Miro wireless installation that is
already operating, the new device must acquire the same House ID as the other
Mirowirelessdevicesinthehouse.Afterthenewdeviceispoweredup,theLED
should be solid yellow. This indicates that it has not yet acquired a House ID. To
acquiretheHouseIDfortheexistingsystem:
1. Press
on any previously bound device until the LED flashes yellow (about 2
seconds).
2. VerifythatthenewlyaddeddeviceLEDisashinggreen,indicatingthatithas
acquired the House ID.
3. Return to the same previously bound device used in step 1 and press until
theLEDchangestosolidgreen(about2seconds).AlldeviceLEDsshouldnow
be solid green.
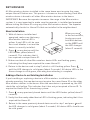
REPEATER 2 FINGERS
When you see
in the instructions,
firmly press and
hold both buttons
on the MRR2 until
the LED changes
(about 2 seconds).

OPERATION
Wireless Range Boost
Once the repeater is bound to the House, it automatically receives and
retransmits all wireless Miro network traffic in the House, effectively doubling
the range of all devices sharing the same House ID.
Occupancy Emulation
The repeater stores a 7-day record of actual network traffic. It constantly keeps it
up to date to account for seasonal variations in lighting use.
1. PresstheAwaybutton.Oneminute
later the repeater starts playing back
a seven-day loop of wireless Miro
commands. It will be just like the last
week you spent at home.
2. When you come back, press Home,
or any button on any wireless
Miro device in the home to cancel
occupancy emulation.
Power Fail Memory
Afterapowerfailure,allMirodevices
automatically return to the state that
they were in immediately prior to loss
ofpower.Allcongurationandscene
control information is preserved.
Home
Away

4-FOLD
•Print:2-sides
•InkColor:Black
•Paper:White16lb(60g/msq)
Uncoated, prefer recycled stock
•Finaltrimsize:16”(Wide)x6”(High).
•Four(4)fold.
•Finalfoldedsize:4”(Wide)x6”(High).
TITLE BOX PAGE ONLY.
DO NOT MAKE FILM • DO NOT PRINT
SANTA CLARA, CALIFORNIA
Title:
MRR2 Installation Instructions
IFYOUHAVEANYQUESTIONSREGARDINGSPECIFICATIONSORREQUIRE
ADDITIONALFILEFORMATTING,PLEASECONTACTMaryJoSowinski.
Phone:408-486-7511
Email:[email protected]
Drawing #:
03886
Orig. Drawing Date: 23 APR 04
Rev. #:
2
Revision Date: 25 SEP 07
REVEL
Scale: 1:1
All information in this drawing is the property of Watt Stopper/Legrand and cannot be copied or
used without the written approval of Watt Stopper/Legrand.
Drawn by
PLM
MarCom
Engineering
QA
TITLE BOX PG
REV DESCRIPTION INT: REV. DATE APPROVED
1 ECO#C00890 MJS 4/28/04 CG
2 EC0# C02412 DR
-
 1
1
-
 2
2
-
 3
3
-
 4
4
-
 5
5
-
 6
6
-
 7
7
-
 8
8
-
 9
9


Legrand Repeater & Away Emulator Operating instructions
- Type
- Operating instructions
- This manual is also suitable for
Ask a question and I''ll find the answer in the document
Finding information in a document is now easier with AI
Related papers
-
Legrand MRR2 Wireless Repeater Installation guide
-
-
Legrand In-Wall 2000 W Box Dimmer Installation guide
-
-
-
-
-
Legrand DRLV1 Wireless 0-10V Controller Installation guide
-
Legrand RS232 to RF Interface Installation guide
-
