Page is loading ...

R
R
E
E
V
V
E
E
R
R
S
S
E
E
O
O
S
S
M
M
O
O
S
S
I
I
S
S
A
A
P
P
P
P
L
L
I
I
A
A
N
N
C
C
E
E
O
O
W
W
N
N
E
E
R
R
’
’
S
S
M
M
A
A
N
N
U
U
A
A
L
L
A
A
N
N
D
D
I
I
N
N
S
S
T
T
A
A
L
L
L
L
A
A
T
T
I
I
O
O
N
N
G
G
U
U
I
I
D
D
E
E
M
M
O
O
D
D
E
E
L
L
S
S
H
H
2
2
0
0
0
0
0
0
,
,
H
H
2
2
5
5
0
0
0
0
,
,
H
H
3
3
0
0
0
0
0
0
,
,
H
H
3
3
5
5
0
0
0
0
,
,
L
L
C
C
3
3
0
0
,
,
L
L
C
C
5
5
0
0
,
,
L
L
C
C
1
1
0
0
0
0
,
,
L
L
C
C
5
5
0
0
P
P
,
,
L
L
C
C
1
1
0
0
0
0
P
P
V
V
E
E
R
R
S
S
I
I
O
O
N
N
4
4
.
.
2
2

25 Year Limited Warranty
To place the equipment under warranty, the warranty
registration card must be completed and returned by the original
owner to the warrantor, Hague Quality Water International,
within 30 days of installation. 4343 South Hamilton Road.
Groveport, OH 43125.
Coverage
This warranty covers specif
ied parts of the Hague WaterMax
®
Reverse Osmosis Appliance delivered to the original owner
when the appliance is purchased for personal, family or
household use from an independent Hague dealer. Appliances
installed in commercial establishments will only qualify for the
Commercial Three Year Limited Warranty; please refer to form
#F0105. It is intended to cover defects in workmanship or
materials or both.
Warrantor’s Performance and Length of Warranty
Hague Quality Water International warrants that upon receipt
from the owner of any Hague RO dispensing spigot, filter
housing and cap, PCF filter housing and cap, membrane
housing and cap found to be defective in material or
workmanship, Hague will repair or replace the defective item, at
no charge for that item, for 25 YEARS from date of installation.
Hague Quality Water International further warrants that upon
receipt from the owner of the RO storage tank which is found to
be defective in material or workmanship, Hague will repair or
replace the defective item, at no charge, for 5 YEARS from date
of installation. If the permeate pump and/or auto shut-off valve
are found to be defective in material or workmanship, Hague will
repair or replace the defective parts at no charge, 2 YEARS
from date of installation. If the membrane is found to be
defective in material or workmanship, Hague will repair or
replace the defective part for 1 YEAR from date of Installation.
Should a defect or malfunction occur, contact your dealer. If you
are unable to contact your dealer, then contact Hague Quality
Water International.
All defective parts must be returned, along with the equipment
serial number and date of original installation, to a
n authorized
Hague dealer or Hague Quality Water International PREPAID,
and replacement parts will be returned by Hague FREIGHT
COLLECT.
Furt
her Exclusions and Limitations on Warranty:
This warranty is null and void un
less the Hague Appliance was
purchased from an independent Hague dealer.
THERE ARE NO
WARRANTIES OTHER THAN THOSE
DESCRIBED IN THIS WARRA
NTY INSTRUMENT.
This warranty does not cover any service call or labor costs
incurred with respect to the removal and replacement of any
defective part or parts. Hague Quality Water International will
not be liable for, nor will it pay service call or labor charges
incurred or expended with respect to this warranty.
In the event the water supply being processed through this
product contains bacterial iron, algae, sulphur, tannins, organic
matter or othe
r unusual substances, then unless the appliance
is represented as being capable
of handling these substances in
the appliance specifications, other special treatment of the water
supply must be used to remove these substances before they
enter this product. Otherwise, Hague Quality Water International
shall have no obligations under this warranty.
This warranty does not cover damage to a part or parts of the
appliance from causes such a
s fire, accidents, freezing, or
unreasonable use, abuse or neglect by the owner.
This warranty does not cover damage to a part or
parts of the
appliance resulting from improper installation. All plumbing and
electrical connections should be made in accordance with all
local code
s and the installation instructions provided with the
appliance. The warranty does not cover damage resulting from
use with inadequate or defective plumbing; inadequate or
defective water supply or pressure; inadequate or defective
house wiring; improper voltage, electrical service, or electrical
connections; or violation of applicable building, plumbing, or
electrical codes, laws, ordinances or regulations.
THIS WARRANTY DOES NOT COVER INCIDENTAL,
CONSEQUENTIA
L OR SECONDARY DAMAGES. ANY
IMPLIED WARRANTIES ON THE PRODUCT DESCRIBED IN
THIS WARRANTY WILL NOT BE EFFECTIVE AFTER THE
EXPIRATION OF THIS WARRANTY.
No dealer, agent, representative or other person is authorized to
extend or expand this lim
ited warranty.
Some states do not allow limitations on how long an implied
warranty lasts or the exclusion or limitation of incidental or
consequential damages, so the
above limitations and exclusion
may not apply to you. This warranty gives you specific legal
rights and you may also have other rights which vary from state
to state.
WaterMax RO Owner’s Manual 11/11/2009 2

Contents
OWNER INFORMATION......................................................................................................................................4
General Information .......................................................................................................................................4
Service Log ....................................................................................................................................................5
Introduction to Reverse Osmosis ...................................................................................................................6
How Your Appliance Works............................................................................................................................8
WQA–Performance Data Sheet ...................................................................................................................10
Fact Section for Pentavalent Arsenic Treatment Appliances........................................................................12
INSTALLATION AND MAINTENANCE INFORMATION...................................................................................13
Checklist Before Installation.........................................................................................................................13
Installation Tool List .....................................................................................................................................14
Installation Diagram .....................................................................................................................................15
Typical Flow Diagram...................................................................................................................................16
Booster Pump Retrofit Diagrams..................................................................................................................17
Installation Steps and Start-Up Procedures .................................................................................................18
Changing Filters...........................................................................................................................................24
Sanitizing the WaterMax
®
RO Appliance......................................................................................................27
Assembly and Parts .....................................................................................................................................29
Optional Parts ..............................................................................................................................................40
Troubleshooting ...........................................................................................................................................41
RO Specifications.........................................................................................................................................43
Certificates ...................................................................................................................................................44
WaterMax RO Owner’s Manual 11/11/2009 3

OWNER
I
NFORMATION
General Information
Congratulations on choosing a superior Hague water treatment appliance! Use
this guide to attain the maximum benefit from your appliance. As an owner, you
may find the first few pages to be the most helpful in solving your needs. If you
have trouble with the operation of your appliance, see Troubleshooting in the back
of this manual or contact your independent Hague dealer.
Warning: This appliance must be applied to potable water only. It is recommended that an independent Hague
dealer install and maintain this appliance.
Note: The manufacturer reserves the right to make specification and product changes without prior notice.
This manual is for installation, operation, and maintenance of the following RO appliance models:
x WaterMax
®
H2000 x WaterMax
®
H3500 x WaterMax
®
LC100
x WaterMax
®
H2500 x WaterMax
®
LC30 x WaterMax
®
LC50P
x WaterMax
®
H3000 x WaterMax
®
LC50 x WaterMax
®
LC100P
For Owner’s Reference
Date of Installation:
Model Number:
Serial Number
1
:
Installer’s Signature:
Dealership Name:
Dealership Address:
Dealership Phone Number:
Hardness:
Iron:
pH:
Water Pressure:
Water Temp:
Returned Warranty Card Date
2
:
1
The serial number is located on top of the mounting bracket.
2
Completely fill out the Warranty Card and return it by mail to ensure that the appliance is registered with the factory and the warranty
becomes validated.
WaterMax RO Owner’s Manual 11/11/2009 4

Service Log
Services
We recommend that you have your local independent Hague dealer service this appliance.
Important: Meeting operational maintenance and replacement requirements are essential for this product to
perform to specifications. Hague recommends that the storage tank be drained weekly to maintain highest
quality water.
WaterMax RO Owner’s Manual 11/11/2009 5

Introduction to Reverse Osmosis
Reverse Osmosis (RO) operates by removing contaminants from water at the molecular level. By using your
household water pressure to squeeze your water against a special membrane, water molecules are separated
from impurities. Rejected dissolved solids are automatically rinsed down the drain leaving only high-quality,
delicious water for you to use.
General Information
1. WaterMax
®
Reverse Osmosis Drinking Water Appliances replenish at about one-half gallon per hour,
depending on your tap water pressure and the water temperature. Low water pressure and
temperature will cause all RO appliances to produce a lower quantity of treated water. This appliance is
designed with a self-regulating flush feature that limits the reject water to approximately four gallons for
every gallon of permeate water. Your RO will perform better and last longer with heavy use. We
encourage you to water house plants, provide water for pets, cook, mix drinks, fill batteries, etc., with
RO water.
Figure 1: H3500 RO Appliance
WaterMax RO Owner’s Manual 11/11/2009 6

Introduction to Reverse Osmosis, Cont.
2. The storage tank will store between two and three gallons of water.
Note: The storage tank will operate in either a horizontal or a vertical position to permit convenient placement
under your sink. Additional tanks may be added to your appliance to provide more storage, space permitting.
3. Your WaterMax
®
RO Drinking Water Appliance can be connected to your automatic ice maker and
cold water dispenser in the refrigerator door. You may also want to install additional spigots in remote
locations such as at a wet bar.
4. Your WaterMax
®
RO Drinking Water Appliance is designed to be used on cold water only. Never run
warm or hot water through your appliance.
Caution: Connect to the cold water supply only!
Warning: Do not allow your appliance to freeze.
5. The rate that water will dispense through your treated water spigot will not be as strong as your regular
sink faucet. The appliance is designed to operate at up to 90% of your regular sink water pressure.
6. The WaterMax
®
spigot has two dispensing positions. Push down on the black handle for intermittent
flow, or lift the handle to a vertical position for continuous flow. The spout may be turned clockwise or
counterclockwise for convenient use. The spigot handle may also be repositioned for your
convenience.
WaterMax RO Owner’s Manual 11/11/2009 7

How Your Appliance Works
Your WaterMax
®
Drinking Water Appliance has been designed as a complete, self-contained appliance using
three stages of primary filtration and separation. The frequency in which membranes and filters should be
replaced depends upon the quality of the water that enters the appliance (feed water).
Meeting operational maintenance and replacement requirements are essential for this appliance to perform to
specification. Contact your local dealer for replacement filters and parts, or contact Hague Quality Water
International for the dealer nearest you.
First Stage–The Pre-Filters
Your RO appliance uses one or more pre-filters to remove impurities before the feed water reaches the reverse
osmosis membrane.
Pre-Filter Model Number Function
Sediment
H2000, H2500, H3000,
LC
30, LC
50,
L
C1
00
Rem
oves suspended and particulate matter 5 microns or larger
from the incoming tap water to protect the RO membrane and
any Carbon Pre-Filter from clogging
Carbon
H3000, LC30, LC50,
LC
10
0
Rem
o
v
e
s free chlorine from the feed water and protects the
membrane from chlorine degradation
Dual-Function
(combination sediment and
carbon)
H3500, LC50P LC100P Protects the membrane from clogging and chlorine degradation
Sediment Pre-Filter Maintenance—Models H2000, H2500, H3000, LC30,
LC50 and LC100
If you are using softened water, replace your Sediment Pre-Filter annually. If you are not using softened water,
the replacement interval will vary. Every six months, schedule an inspection and replace the Sediment
Pre-Filter as necessary. If you notice a discoloration in the core (center) of the Sediment Pre-Filter and/or a
heavy accumulation of sediment on the surface of the Sediment Pre-Filter, then replacement is necessary. The
maximum recommended practical service life of the Sediment Pre-Filter is one year. The pre-filter is overdue
for change when you notice reduced water production or a slower rate of flow.
Note: The Sediment Pre-Filter performance has not been tested or certified by WQA.
Carbon Pre-Filter Maintenance—Models H3000, LC30, LC50, and LC100
Changing the Carbon Pre-Filter should be based on the free chlorine levels in the feed water. If the free
chlorine is 1 ppm or less, then the Carbon Pre-Filter should be replaced once a year. If the free chlorine level is
greater than 1 ppm, then the Carbon Pre-Filter should be replaced every six months.
Note: Models H3000, H3500, and LC30 also incorporate a special prolonged contact filter that further reduces
chlorine and organics from your water supply.
Dual-Function Pre-Filter Maintenance—Models H3500, LC50P and LC100P
Follow the same maintenance procedures as for the Sediment Pre-Filter.
WaterMax RO Owner’s Manual 11/11/2009 8

How Your Appliance Works, Cont.
Second Stage—The Reverse Osmosis Membrane
The semi-permeable RO membrane separates the remaining suspended solids and most of the dissolved
solids from the water molecules. Remaining impurities are washed down the drain.
Maintenance
The RO membrane is critical for effective reduction of total dissolved solids. The product water should be tested
periodically to verify that the appliance is performing satisfactorily. The RO membrane should be changed when
it rejects less than 75% of the dissolved solids. A noticeable change in water quality and taste may occur and
indicates that a change is needed. Consult your Hague dealer for additional monitoring devices or water check
programs.
Note: If your WaterMax
®
RO appliance is installed on a soft water supply, it will greatly increase the life of the
membrane.
Third Stage—Carbon Post-Filter
The Activated Carbon Post-Filter is the final stage of filtration depending on your model. It reduces tastes,
odors, and chlorine.
Maintenance
Replace the Carbon Post-Filter at least once a year.
Note: The performance of the Carbon Post-Filter has not been tested or certified by WQA.
Getting Maximum Efficiency From the Appliance
This appliance should be used only with potable water. It contains replaceable components critical to its
efficiency. Replacement of the components should be with ones of identical specifications, as defined by
Hague, to assure the same efficiency and contaminant reduction performance. See Performance Data Sheet.
WaterMax RO Owner’s Manual 11/11/2009 9

WQA–Performance Data Sheet
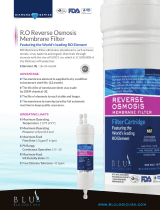
Our H3000 and H3500 Reverse Osmosis Drinking Water Appliances have been
tested and conform to NSF/ANSI Standard 58. The water treatment
performance for specific claims are substantiated and verified by the “Reduction
Performance” test data listed below. The concentration of the indicated
substances in water entering the appliances was reduced to a concentration
less than or equal to permissible limits for water leaving the appliance, as
specified in NSF/ANSI 58. While testing was performed under standard
laboratory conditions actual performance may vary. H3000 and H3500 are
certified by WQA to NSF/ANSI 58.
Reduction Performance Model H3000 (P/N 3146U)
Contaminant
ICC
2
mg/L
MPWC
3
mg/L
Average %
Rejection
Arsenic (+5) †
0.050±10% 0.010 99.3
Barium* 10.0±10% 2.0 99.8
Cadmium* 0.03±10% 0.005 99.0
Chromium (3)* 0.30±10% 0.05 99.7
Chromium (6)* 0.30±10% 0.05 99.2
Cysts** Min.50,000/mL 99.95% 99.98%
Fluoride 8.0±10% 1.5 97.0
Lead 0.15±10% 0.010 99.4
Nitrate-N*1 27±10% 10.0 94.3
Nitrite-N*1 3.0±10% 1.0 82.1
Selenium 0.10±10% 0.05 94.0
TDS 750±40 mg/L 187 96.7
Reduction Performance Model H3500 (P/N 2246 U)
Contaminant
ICC
2
mg/L
MPWC
3
mg/L
Average %
Rejection
Arsenic (+5)†
0.050±10% 0.010 99.3
Barium* 10.0±10% 2.0 99.8
Cadmium* 0.03±10% 0.005 99.0
Chromium (3)* 0.30±10% 0.1 99.7
Chromium (6)* 0.30 ±10% 0.1 99.2
Cysts** Min.50,000/mL 99.95% 99.99
Fluoride 8.0±10% 1.5 97.0
Lead 0.15±10% 0.010 99.4
Nitrate-N*1 27±10% 10.0 94.3
Nitrite-N*1 3.0±10% 1.0 82.1
Selenium 0.10±10% 0.05 94.0
TDS 750±40 mg/L 187 96.2
2
Influent Challenge Concentration
3
Maximum Permissible Water Concentration
Performance Data Sheet
Reverse Osmosis / Activated Carbon Drinking Water Appliance
4343 South Hamilton Rd.
Groveport, OH 43125 614-836-2115
Test Parameters
pH 7.5±0.5
TDS 200-500 mg/L
Temperature 77±2°F 25±1°C
Turbidity 1 NTU
Pressure 50±3 psig
* This contaminant was tested at 750 mg/L ±40 mg/L TDS.
** This appliance may be used on disinfected water that may contain filterable cysts.
1
This appliance is acceptable for treatment of Nitrate / Nitrite with influent
concentrations of no more than 27 mg/L of nitrate and 3 mg/L of nitrite combined
measured as N and is certified for nitrate/nitrite reduction only for water sources with a
water pressure of 40 psig or greater.
† This appliance has been tested for the treatment of water containing pentavalent
arsenic (also known as As(V), As(+5), or arsenate) at concentrations of 0.30 mg/L or
less. This appliance reduces pentavalent arsenic, but may not remove other forms of
arsenic. This appliance is to be used on water supplies containing a detectable free
chlorine residual at the appliance inlet or on water supplies that have been
demonstrated to contain only pentavalent arsenic. Treatment with chloramine
(combined chlorine) is not sufficient to ensure complete conversion of trivalent arsenic
to pentavalent arsenic. Please see the Arsenic Facts section.
WARNING! These appliances must not be installed where the water source is
microbiologically unsafe or of unknown quality without adequate disinfection before
and/or after the appliance! A water source that is not potable relative to waterborne
pathogens voids the warranty.
Operational maintenance and replacement requirements are essential for these
appliances to perform to specification as advertised.
FACTORS WHICH AFFECT THE LIFETIME AND
PERFORMANCE OF YOUR WATERMAX
®
RO
1. TYPE OF MEMBRANE: Cellulose Tri-Acetate (CTA): Up to 1,200 PPM TDS with
pressure of at least 40 PSI. Chlorine Tolerant- Some bacteria resistance- 5.0 to 9.0
pH- Excellent production rate- For use only with a chlorinated water supply.
Thin-Film Composite (TFC): Up to 2,000 PPM TDS with pressure of at least 40 PSI.
Not chlorine tolerant- Bacteria resistant-
4.0 to 11.0 pH- Most advanced thin-film
composite, non-cellulosic- Chemically stable- Highest production rate.
2. SQUARE FEET OF MEMBRANE: The square feet of membrane and the production
of
RO water are in direct proportions.
3. WATER PRESSURE: The higher the net pressure across the membrane,
the greater
the quantity of RO water. A minimum pressure of 40 PSI is recommended.
4. TOTAL DISSOLVED SOLIDS: The higher the TDS, the low
er the production. Each
100 PPM represents about one PSI reduced pressure on the membrane. Thus,
1,000 PPM reduces the effective net pressure by 10 PSI.
5. WATER TEMPERATURE: Colder water results in lower production. Temperat
ures
above 85 degrees F are to be avoided because of problems with the membrane
support structures and accelerated compaction rates of CTA membranes. TFC may
be used at temperatures up to 113 degrees F.
6. SURFACE COATING OR FOULING: A neglected pre-filter can allow sediment
to
accumulate on the cartridge surface and impair the necessary flow of water through
the filter, thus reducing membrane life. Also, salts can precipitate on the membrane,
plugging the pores and channels. A water softener or other types of pre-treatment
installed before the RO appliance significantly reduces this load and extends
membrane life.
Our Reverse Osmosis Drinking Water appliances contain replaceable treatment components, critical for the effective reduction of Total Dissolved Solids as well as
inorganic contaminants. Each appliance will have some or all of the following replacement service components: Sediment pre-filter, sediment/carbon block pre-filter
( H3500 only ), activated carbon pre-filter, prolonged contact filter, activated carbon post-filter, flow restrictor and the membrane. (Please see replacement element
diagrams on reverse side.) The life expectancy of these components will vary from one water source to another. Therefore, we recommend that you, the user, have
the water tested every six months to maintain acceptable water quality. Operational, maintenance and replacement requirements are essential for these appliances
to perform to specification. To maintain the highest quality water, we recommend draining the storage tank every week. Ask your dealer about maintenance
programs or monitoring devices for any of our drinking water appliances.
WaterMax RO Owner’s Manual 11/11/2009 10

WQA–Performance Data Sheet
Reverse Osmosis / Activated Carbon Drinking Water Appliance
General Operation Limits Model H3500 Model H3000
Membrane Type TFC TFC
Production, GPD (LPD)
1
20 (76) 20 (76)
Production, WQA
2
gpd (LPD) 13 (49) 13 (49)
Efficiency Rating
3
17.9% 13%
Recovery Rating
4
21.4% 24%
Pressure, Min-Max, psig 30-100 40-100
Temperature, Min- Max, Deg. F 40°-113° 40°-113°
Chlorine Tolerance, ppm
5
0.0 0.0
Hardness, Max grains 10 10
Iron, Max ppm <0.1 <0.1
Manganese, Max ppm <0.05 <0.05
pH, Min / Max 4.0-11.0 4.0-11.0
Hydrogen Sulfide, ppm 0.0 0.0
Turbidity, Max NTU 1.0 1.0
TDS, Max ppm 2000 2000
1
Product output is measured to atmosphere with feed water of 77 degrees F,
60 psig and 360 ppm TDS.
2
WQA production is measured against a pressure tank @ 5 psi backpressure,
77 degrees F, 50 psig and 750 mg/L ± 40 mg/L TDS.
3
Efficiency Rating means the percentage of the influent water to the system
that is available to the user as reverse osmosis treated water under
operating conditions that approximate typical daily usage.
4
Recovery Rating means the percentage of the influent water to the
membrane portion of the system that is available to the user as reverse
osmosis treated water when the system is operating without a storage tank
or when the storage tank is bypassed.
NOTE! Actual production rate and TDS reduction will vary depending on
water temperature, water pressure, TDS level, usage and membrane type.
5
Models equipped with TFC membranes incorporate activated carbon as
pretreatment for chlorine.
CAUTION! Contaminants in excess of the established
limit
s will require pretreatment.
WARNING! Do not use with water that is microbiologically unsafe or of unknown
quality without adequate disinfection before and/ or after the appliance.
LIMITED 25 YEAR WARRANTY
25 years—Dispensing spigot, filter housings and caps, PCF housing and cap and membrane housing and cap.
5 years—R.
O. storage tank.
2 years—Permeate pump (H3500 only) and aut
omat
ic shut
of
f
valve.
1 year—Membrane.
Filters—Are not warranted.
REPLACEMENT ELEMENT DIAGRAMS
Routine maintenance is essential for our products to function at peak performance. Estimated costs are listed with the part numbers. We strongly recommend
changing the Sediment Pre-filter, Pre-carbon filter, Post-carbon filter and Prolonged contact filter every six months to one year or sooner depending on the quality
of the feedwater source. Replace the membrane and the drain restrictor when the TDS rejection reaches 75% or less. The practical service life of the membrane is
three years. Contact your local dealer for service and sanitizing for your Reverse Osmosis drinking water appliance.
Appliance Part Number Estimated Cost
H3000
Drain Restrictor 200095-24 $6.80
Prolonged Contact Filter 200190 $10.32
R.O. Module 200290 $51.80
Carbon Postfilter 200195 $6.44
Carbon Pre-filter 200195 $6.44
Sediment Pre-filter P/N 200850 $3.14
Appliance Part Number Estimated Cost
H3500
Drain Restrictor 200095-24 $6.80
Prolonged Contact Filter 200190 $10.32
R.O. Module 200290 $51.80
Carbon Postfilter 200195 $6.44
Dual Function Pre-filter 200851 $26.80
WaterMax RO Owner’s Manual 11/11/2009 11

Fact Section for Pentavalent Arsenic Treatment Appliances
Arsenic (As) is a naturally occurring contaminant found
in many ground waters. It generally occurs in two forms
(valences or oxidation states): pentavalent arsenic (also
known as As(V), As(+5), or arsenate) and trivalent
arsenic (also known as As(lll), As(+3), or arsenite). In
natural ground water, arsenic may exist as trivalent
arsenic, pentavalent arsenic, or a combination of both.
Although both forms of arsenic are potentially harmful
to human health, trivalent arsenic is considered more
harmful than pentavalent arsenic. More information
about arsenic and its toxicity can be found on the U.S.
Environmental Protection Agency Web site at
http://www.epa.gov/safewater/arsenic.html.
These appliances (Model Numbers; H3000 and 3500)
are designed to remove only pentavalent arsenic.
These appliances do not provide a feature for
conversion of trivalent arsenic to pentavalent arsenic.
The appliances may remove some trivalent arsenic;
however, they have not been evaluated to remove
trivalent arsenic.
Trivalent arsenic is generally more difficult to remove
from drinking water than pentavalent arsenic. Trivalent
arsenic can be converted to pentavalent arsenic in the
presence of an effective oxidant such as free chlorine.
The arsenic in water containing detectable free chlorine
or that has been treated with another effective oxidant
will be in the pentavalent arsenic form.¹ Treatment with
chloramines (combined chlorine) is not sufficient to
ensure complete conversion of trivalent arsenic to
pentavalent arsenic.
Consumers using public water supplies can contact
their utility to verify whether free chlorine treatment
chemicals are being used.
¹ Laboratory Study on the Oxidation of Arsenic lll to Arsenic V,
EPA/600/R-01/021, March 2001 available online at:
http://www.epa.gov/ORD/publications/ordpubs.html
Private water supplies and waters that do not have
detectable free chlorine residuals should be analyzed to
determine the form(s) of arsenic present and the
potential need for oxidation of trivalent arsenic to
pentavalent arsenic.
Arsenic does not generally impart color, taste, or smell
to water; therefore, it can only be detected by a
chemical analytical test. Public water supplies are
required to monitor treated water for total arsenic
(trivalent arsenic plus pentavalent arsenic) and the
results are available to the public from the utility.
Consumers using private water sources will need to
make arrangements for testing. A total arsenic test
usually costs about $15-$30 and it is recommended the
test be conducted by a certified laboratory. Local health
departments and environmental protection agencies
can help provide consumers with a list of certified
laboratories. Some laboratories may also be able to
analyze specifically for (speciate) the two forms of
arsenic present in a water sample if requested.
These appliances were tested under laboratory
conditions as defined in NSF/ANSI 58 Reverse
Osmosis Drinking Water Treatment appliance and were
found to reduce 0.30 mg/L in the test water to less than
0.010 mg/L, under standard testing conditions. Actual
performance of the appliance may vary depending on
specific water quality conditions at the consumer’s
installation. Following installation of the appliance, the
consumer should have the treated water tested for total
arsenic to verify arsenic reduction is being achieved
and the appliance is functioning properly.
The pentavalent arsenic removal component of these
appliances must be replaced at the end of its useful life
(approx. 3 years). The replacement component
#200290 can be purchased from the original source of
this appliance (retailer or distributor), from other
sources of these appliances, or directly from the
manufacturer.
Hague Quality Water
4343 S. Hamilton Rd.
Groveport, OH 43125
WaterMax RO Owner’s Manual 11/11/2009 12

I
NSTALLATION AND MAINTENANCE
I
NFORMATION
Checklist Before Installation
Refer to this checklist before installation.
WaterMax
®
H3000 and H3500 are designed for chlorinated municipal water supplies.
A WaterMax
®
Water Softener or additional types of pretreatment are highly recommended should your water
not meet water quality or characteristics standards. Should you have any questions about your water not
meeting these standards, contact your Hague dealer.
Water Quality—If the water supply contains sand, sulfur, bacteria, iron bacteria, tannins, algae, oil, acid, or
other unusual substances, consider pre-treating the water to remove these contaminants before the water
supply enters the appliance, unless the appliance is represented as being capable of treating these
contaminants in its specifications. Consider purchasing and installing a WaterMax
®
water conditioner or filter.
Water Pressure—Not less than 40 psi constant for WaterMax
®
RO appliances.
Drain—Drain the appliance to an appropriate drain, such as a floor drain or washer drain that complies with all
local and state plumbing codes. To prevent back-siphoning, provide an adequate air gap or a siphon break.
See Installation Steps and Start-Up Procedures.
Water Characteristics: pH—The appliance requires a pH of between 5.0 and 9.0 for H3000 and H3500
models and between 4.0 and 11.0 for other models to function properly.
Water Characteristics: Iron and/or manganese—A test to determine iron or manganese levels is necessary.
Should iron exceed 0.1 ppm, or manganese exceed 0.05 ppm, additional pretreatment is recommended.
If you have any questions, contact your Hague dealer.
Precautions
Do
1. Comply with all state and local, building, plumbing, and electrical codes.
2. Check all fittings and locking clips to ensure none are loose.
3. Install the appliance after the pressure tank on well-water installations.
4. Connect to the cold water supply only!
Do Not
1. Do not install if checklist items are not satisfactory. See Checklist Before Installation.
2. Do not install if the incoming or outlet piping water temperature exceeds 113°F. See Specifications.
3. Do not use to treat water that is microbiologically unsafe or of unknown quality without adequate
disinfection before or after the appliance.
4. Do not allow your appliance to freeze.
5. Do not tie into hot water feed.
WaterMax RO Owner’s Manual 11/11/2009 13

Installation Tool List
The following are the tools you will need for installation.
Recommended Tool List Optional Tool List
1/4-inch High-speed drill bit Needle nose pliers
7/16-inch High-speed drill bit 7/8-inch High-speed hole saw
1/2-inch High-speed drill bit, with 3/8-inch shank
(for non air gap spigot)
Air-pressure test gauge, 1-20 psi
1-inch High-speed drill bit with 1/2-inch shank
(for air gap spigot)
7/8-inch chassis punch
1/2-inch Drill motor (for 1-inch high-speed drill bit) Conductivity or TDS meter
1/2-inch Open-end wrench Water-pressure test gauge
9/16-inch Open-end wrench Bicycle tire pump
5/8-inch Open-end wrench Silicon/carbide grinding wheel
Medium-sized Phillips screwdriver High-speed Dremel tool
WaterMax RO Owner’s Manual 11/11/2009 14

Installation Diagram
WaterMax
®
H2000, H2500, H3000, H3500, LC30, LC50, LC100, LC50P,
and LC100P
Figure 2: Installation Diagram
Notes:
1. For maximum flow, keep yellow tubing to tank and blue tubing to spigot as short as practical.
2. Install feed water line on COLD WATER LINE ONLY.
3. Installation procedures for the WaterMax
®
H2000, H2500, H3000, H3500, and LC30 are identical.
WaterMax RO Owner’s Manual 11/11/2009 15

Typical Flow Diagram
Air Gap Silencer for H3500 and H2500
Figure 3: WaterMax
®
H3500 Flow Diagram
WaterMax RO Owner’s Manual 11/11/2009 16

Booster Pump Retrofit Diagrams
WaterMax
®
H2000
For retrofit instructions see form #F0873
Figure 4: WaterMax
®
H2000
WaterMax
®
H3000
For retrofit instructions see form #F0874
Figure 5: WaterMax
®
H3000
WaterMax RO Owner’s Manual 11/11/2009 17

Installation Steps and Start-Up Procedures
We recommend that you have your local Hague dealer install and service this appliance.
Warning: Installation of this appliance must conform with state and local plumbing and electrical codes, laws,
regulations and the instructions provided with this appliance. Failure to install as instructed will void the product
warranty.
S
S
tep 1
Study the Installation Diagram
Study the overall installation diagram (See Figure 2) before proceeding, to familiarize yourself
with the general layout of the appliance.
tep 2
Check Fit
Ensure that the complete appliance will fit under the sink. Check all factory fittings
1
and tubing
connections. Be sure all locking clips are in place. See steps A through F and the illustrations
below for tube connection instructions.
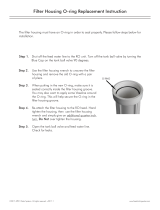
A. Cut tube square D. Insert the locking clip
Collet
Cut the tube square. It is essential that the outside
diameter be free of score marks and that burrs and sharp
edges be removed before inserting into fitting.
Insert the locking clip. The locking clip secures the collet in its
position to prevent an accidental disconnection of the tube.
B. Insert tube E. Pull to check security
The fitting grips before it seals. Ensure that the tube is
pushed into the tube stop.
Pull on the tube to check that it is secure. Test the appliance
before leaving the site or before use.
C. Push up to tube stop F. Disconnecting
Push the tube into the fitting to the tube stop. The collet
(gripper) has stainless-steel teeth that hold the tube firmly
in position while the O-Ring provides a permanent
leak-proof seal.
To disconnect, ensure that the appliance is depressurized.
Remove the locking clip. Push in the collet squarely against
face of the fitting. With the collet held in this position, the tube
can be removed. The fitting can then be re-used.
1
The WaterMax
®
RO has been pressure tested. However, due to shipping vibrations, Hague recommends rechecking all
factory fittings upon installation.
WaterMax RO Owner’s Manual 11/11/2009 18

Installation Steps and Start-Up Procedures, Cont.
Step 3
Install the Spigot Assembly
The most convenient installation would allow the use of an existing spray attachment hole. If the
spray attachment hole is not available, then follow the basic procedures outlined below.
Drilling a stainless steel sink:
A. Mark the sink location for the center of the faucet.
B. Impact punch the sink top to provide a starting point
for the drill bit.
C. Drill a 1/4-inch pilot hole in the sink using a
high-speed drill bit.
D. Drill a 1/2-inch diameter hole to accept the bolt of a 1-
1/4-inch Greenlee Chassis Punch.
E. Set the punch and turn the nut with a wrench to cut
the hole. Follow Greenlee instructions.
Drilling a porcelain clad steel or cast iron sink:
A. Mark the sink location for the center of the faucet. Be
sure the location you select is not over a reinforcing
rib. Check the location from below.
B. Grind away a 1-1/4-inch diameter circle in the
porcelain using a silicon/carbide wheel and high-
speed grinder (See Installation Tool List), down to the
metal surface of the sink. (See Figure 7)
C. Impact punch a small indent in the center of the area
ground away.
D. Drill a 1/4-inch pilot hole through the metal base
using a standard high-speed drill bit.
Caution: Be careful when the drill is about to penetrate
the base metal of the sink. Reduce the speed and
support the drill so the drill chuck does not impact the
porcelain or enamel. Figure 6: Air Gap Spigot Assembly
E. Use the pilot hole as a guide to drill a minimum 1-inch up
to a 1-1/4-inch diameter hole with carbide bits to mount
the RO air gap spigot.
Figure 7: Grinding Wheel
WaterMax RO Owner’s Manual 11/11/2009 19

Installation Steps and Start-Up Procedures, Cont.
Step 4
Prepare the RO Air Gap Spigot Assembly for Installation
A. Using the diagram in Figure 6, assemble the Air Gap Spigot with all the components except
the slot washer. Begin with the escutcheon, followed by the rubber gasket, spacer, flat
washer, 9/16-inch nut, and 3/8-inch spigot adapter.
B. Using the diagram in Figure 2, from under the sink, feed the pre-connected 1/4-inch black
tube and the pre-connected 3/8-inch blue tube from the RO assembly through the hole in the
sink. Remove the red locking clip from the spigot adapter, slip the blue tube into the spigot
adapter, and replace the red locking clip. Slip the 1/4-inch black tube onto the small hose
barb on the base of the spigot.
C. Slip one end of the loose 3/8-inch black tube over the large hose barb on the base of the
spigot.
Installation Tip: To make it easier to slip the tubing over the hose barbs, soak the black tube
ends in hot water to soften the tubing. The tubing will slip onto the hose barbs much more easily,
and will conform better as it cools and reduce the possibility of splitting.
D. Feed the assembled spigot and tubing through the hole in the sink and let the spigot rest on
the rubber gasket and escutcheon.
E. From under the sink, slip the slot washer between the sink and the spacer and finger-tighten
the 9/16-inch nut until snug.
F. Position the spigot for customer convenience and then use a 9/16-inch wrench to tighten the
nut to secure the spigot on the sink.
WaterMax RO Owner’s Manual 11/11/2009 20
/