Page is loading ...

Ride2Roll
™
Scooter
Ride2Roll
™
Scooter
OVER 18 months
06717
CAUTION:
This product contains small parts which are necessary for assembly. Prior to
and during assembly of this product, keep small parts out of children's reach. Small parts pose a
choking hazard to children under 3 years.
Thank you for buying this PLAYSKOOL brand product!
MAXIMUM WEIGHT
60 LBS. (27.2 KGS.)
CAUTION:
Always wear protective equipment including helmet, wrist guards, knee pads
and elbow pads (not included). Close-toed shoes or sneakers must be worn.
WARNING:
Adult supervision required. This ride-on toy is not to be used near swimming
pools, on or near hills, roadways or stairways. Shoes must be worn at all times when riding this
toy. Designed for only one rider at a time.
Parts include:
1 base, 1 end piece, 1 vehicle body, 4 wheels, 1 axle,
1 handlebar section, 1 dashboard unit, 1 dashboard
holder, 1 bag of screws, 2 labels.
Adult assembly
required.

ASSEMBLY
BBAASSEE
EENNDD PPIIEECCEE
VVEEHHIICCLLEE
BBOODDYY
DDAASSHHBBOOAARRDD
HHOOLLDDEERR
1. Attach End piece to Base
Fit end piece onto base. From underside of
base, tighten 2 screws into base and end piece.
AAlliiggnn
hhoolleess
AAXXLLEE
LLAARRGGEERR
WWHHEEEELL
SSMMAALLLLEERR
WWHHEEEELL
RROOUUNNDDEEDD SSIIDDEE FFAACCIINNGG OOUUTT
VVEEHHIICCLLEE
BBOODDYY
AAXXLLEE
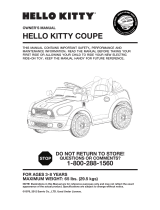
3. Attach Vehicle Body and Axle to Base
Fit vehicle body onto base (align holes in body with holes in base). Insert axle through holes.
From underside of vehicle, tighten screw into axle and base.
4. Attach Wheels to Vehicle
Note: Be sure rounded side of wheels
face out
when attaching to vehicle.
Snap smaller wheels onto rear of
base. Snap larger wheels onto axle.
2. Attach Dashboard Holder to Vehicle Body
Fit dashboard holder onto vehicle body (align 3
tabs on holder with slots on body). Tighten 6
screws into dashboard holder and vehicle body.

RIDE-ON
SCOOTER
BBAASSEE
LLAATTCCHH
BBAASSEE PPOOSSTT
TTiigghhtteenn SSccrreewwss
HHAANNDDLLEEBBAARR
SSEECCTTIIOONN
5. Attach Handlebar Section
Press latch on vehicle body, slide arm of handlebar section through hole in vehicle body, and
snap handlebar arm into post on base. Tighten 2 screws into base post and handlebar arm.
6. Attach Label
NOW YOU’RE READY TO ROLL OR RIDE…YOU DECIDE!
This unique toddler toy offers 2 kinds of vehicle play!
Use it as a ride-on or scooter!
As your child grows steadier on his feet, this toy
easily converts to a child’s first scooter that
encourages balance, coordination and timing.
If the toy is in ride-on mode:
• Remove dashboard unit from handlebar
section by lifting it up.
• Press latch on vehicle body and raise vehicle
body until it locks into place. Be sure the
word “LOCKED” appears on latch.
• Snap clip on unit to post in dashboard
holder. (To remove dashboard unit, lift up
on unit from bottom.)
Now you’re ready to roll!
For growing toddlers, the RIDE2ROLL Scooter is
a foot-to-floor ride-on that offers extra height
and leg room.
If the toy is in scooter mode:
• Push latch on vehicle body downward and
bring vehicle body down until it locks into
place. Be sure the word “LOCKED” appears
on latch.
• Slide the clip on the dashboard unit into slot
in the center of handlebar section.
Now you’re ready to ride!
L
O
C
K
E
D
RRIIDDEE--OONN
DDAASSHHBBOOAARRDD
RROOLLLL--OONN
DDAASSHHBBOOAARRDD
PPuullll oouutt ttoo CCoonnvveerrtt ttoo
SSCCOOOOTT MMOODDEE
PPuusshh DDoowwnnwwaarrdd ttoo CCoonnvveerrtt
ttoo RRIIDDEE--OONN MMOODDEE

© 2003 Hasbro, Inc. All Rights Reserved.
® denotes Reg. U.S. Pat. & TM Office.
U.S. Patent Pending.
06717 P/N 6293990000
PLAYSKOOL.COM
FOR NEW PRODUCTS AND OFFERS
PLAYSKOOL.COM
FOR NEW PRODUCTS AND OFFERS
Questions? Call: 1-800-PLAYSKL
FCC STATEMENT
This equipment has been tested and found to comply with the limits for a Class B
digital device, pursuant to part 15 of the FCC Rules. These limits are designed to
provide reasonable protection against harmful interference in a residential installation.
This equipment generates, uses and can radiate radio frequency energy, and, if not
installed and used in accordance with the instructions, may cause harmful
interference to radio communications. However, there is no guarantee that
interference will not occur in a particular installation. If this equipment does cause
harmful interference to radio or television reception, which can be determined by
turning the equipment off and on, the user is encouraged to try to correct the
interference by one or more of the following measures:
- Reorient or relocate the receiving antenna.
- Increase the separation between the equipment and the receiver.
- Consult the dealer or an experienced radio/TV technician for help.
TO REPLACE BATTERIES
Use a Phillips/cross head
screwdriver to loosen
screw in battery
compartment door
(screw remains attached
to door). Remove door.
Remove and discard old
batteries. Insert 3 x
1.5 V "AAA" or LR03-size
batteries. Alkaline
batteries recommended.
Replace door and
tighten screw.
PLAY FEATURES
Flashing lights, happy songs, and great vehicles sounds
help keep the fun in high gear – in either mode!
TTuurrnn tthhee kkeeyy ssttaarrtt tthhee
eennggiinnee ssoouunndd!!
PPllaayyss 55 ddiiffffeerreenntt
cchhiillddrreenn’’ss ssoonnggss!!
PPeerrffeecctt ffoorr iinnddoooorr oorr
oouuttddoooorr ffuunn!!
TTuurrnn tthhee ““ttuurrnn ssiiggnnaall””
lleevveerr ffoorr ssoouunndd eeffffeeccttss!!
EEaassyy--ggrriipp hhaannddlleebbaarrss!!
PPrreessss
bbuuttttoonn ffoorr
hhoorrnn
ssoouunndd aanndd
mmuussiicc!!
DDAASSHHBBOOAARRDD
CAUTION:
TO AVOID BATTERY LEAKAGE
1. As with all small batteries, the batteries
used with this toy should be kept away
from small children who still put things in
their mouths. If they are swallowed,
promptly see a doctor and, in the U.S.,
have the doctor phone (202) 625-3333
collect, or, in Canada, have the doctor call
your provincial Poison Control Centre.
2. Make sure the batteries are inserted
correctly and always follow the toy and
battery manufacturers' instructions;
3. Do not mix old batteries and new batteries
or alkaline, standard (carbon zinc) or
rechargeable (nickel-cadmium) batteries.
IMPORTANT: BATTERY INFORMATION
Please retain this information for future reference.
Batteries should be replaced by an adult.
CAUTION:
1. Always follow the instructions carefully. Use only
batteries specified and be sure to insert them
correctly by matching the + and – polarity
markings.
2. Do not mix old batteries and new batteries or
standard (carbon-zinc) with alkaline batteries.
3. Remove exhausted or dead batteries from the
product.
4. Remove batteries if product is not to be played with
for a long time.
5. Do not short-circuit the supply terminals.
6. Should this product cause, or be affected by, local
electrical interference, move it away from other
electrical equipment. Reset (switching off and
back on again or removing and re-inserting
batteries) if necessary.
7. RECHARGEABLE BATTERIES: Do not mix these with
any other types of battery. Always remove from the
product before recharging. Recharge batteries
under adult supervision. DO NOT RECHARGE
OTHER TYPES OF BATTERIES.
/