Page is loading ...


1
EvoHeat CS & CS-GEN2 Series Manual
Contents
1. Introduction _________________________________________________________________________________ 2
2. Unit Dimensions ______________________________________________________________________________ 3
3. Quick Start Guide _____________________________________________________________________________ 5
4. Safety Instructions ____________________________________________________________________________ 6
5. Installation __________________________________________________________________________________ 7
5.1 System Installation _________________________________________________________________________ 7
5.2 Location Recommendations _________________________________________________________________ 8
5.3 Airflow Clearances _________________________________________________________________________ 8
5.4 Adequate Water Flow ______________________________________________________________________ 8
5.5 Rubber Feet ______________________________________________________________________________ 9
5.6 Condensate Drain Barb _____________________________________________________________________ 9
5.7 Drainage & Condensation ___________________________________________________________________ 9
5.8 Plumbing ________________________________________________________________________________ 9
5.9 Electrical Connection ______________________________________________________________________ 10
5.10 Remote Controller Connection _____________________________________________________________ 10
5.11 Initial Start-up __________________________________________________________________________ 10
6. Operation __________________________________________________________________________________ 11
6.1 Main Controller Interface __________________________________________________________________ 11
6.2 Functions of the Controller _________________________________________________________________ 11
6.2.1 Using the HELP Button _________________________________________________________________ 11
6.2.2 Starting & Shutting Down _______________________________________________________________ 11
6.2.3 Switching Modes ______________________________________________________________________ 12
6.2.4 System State Checking _________________________________________________________________ 12
6.2.5 Changing Temperature _________________________________________________________________ 12
6.2.6 Clock Setting _________________________________________________________________________ 12
6.2.7 Timer Settings ________________________________________________________________________ 13
6.2.8 Keyboard Lock ________________________________________________________________________ 15
6.2.9 Malfunction Display ___________________________________________________________________ 15
7. Troubleshooting _____________________________________________________________________________ 16
7
.1 Error Codes______________________________________________________________________________ 18
8. Appendix __________________________________________________________________________________ 19
8.1 Cable Specifications _______________________________________________________________________ 19
8.2 Parameter Table __________________________________________________________________________ 19
8.3 Wiring Diagrams __________________________________________________________________________ 20
9. Maintenance _______________________________________________________________________________ 27
9.1 Energy Saving Tips ________________________________________________________________________ 27
10. Warranty _________________________________________________________________________________ 28

2
EvoHeat CS & CS-GEN2 Series Manual
1. Introduction
This manual contains all the necessary information in regard to the installation, troubleshooting, operation and
maintenance of this unit. Ensure instructions in this manual are adhered to at all times. Failing to comply with these
recommendations will invalidate the warranty.
The EVO CS & CS-GEN2 commercial heat pump is the most efficient way to heat a commercial pool regardless of size
or location. Our commercial heat pumps are ideal for sports and leisure centres, aquaculture, agriculture, water
parks, hotels, resorts, apartments and office builds – there is no job in the field too big for the EVO CS Series!
A tried and trusted commercial pool heater that’s able to save businesses tens of thousands of dollars a year, you
can expect innovative and intelligent commercial pool heating designed with forward thinking technology and high-
end performance.
• Unparalleled energy efficiency
• Heating and cooling
• Dual speed fans
• Exclusive tariff + timers (only available on CS-GEN2)
• Electric expansion valve (EEV)
• Exclusive Goldtech/Bluetech Hydrophilic Coating
• Double coil titanium heat exchangers for optional performance
• Dual defrost systems- Reverse Cycle and Thermotec Element
• Precision-built intelligent digital controller
• 304 stainless steel chassis and cabinet
• Monobloc design and compact piping system
• Designed for very high flow rates and low pressure drops
• V shape evaporator
• Ozone Friendly R410A refrigerant

3
EvoHeat CS & CS-GEN2 Series Manual
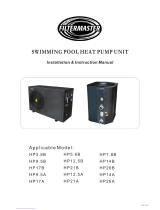
2. Unit Dimensions
CS38, CS47 & CS57
CS95-GEN2

4
EvoHeat CS & CS-GEN2 Series Manual
CS120-GEN2 & CS145-GEN2
CS200-GEN2

5
EvoHeat CS & CS-GEN2 Series Manual
3. Quick Start Guide
INITIAL START UP OF THE UNIT
Note: in order for the unit to heat the pool or spa, the filter pump must be running to circulate water through the
heat exchanger.
START-UP PROCEDURE
After installation is completed, follow the steps below:
1. Turn on your filter pump. Check for water leaks and verify flow to and from the pool.
2. Turn on the electrical power supply to the unit, then press the key ON/OFF of wire controller, it should start after
several seconds.
3. After running a few minutes make sure the air leaving the top of the unit is cooler (between 5-10 ℃)
4. With the unit operating turn the filter pump off. The unit should also turn off automatically.
5. Allow the unit and pool pump to run 24 hours per day until desired pool water temperature is reached. (Note:
this may take up to several days depending on the initial water temperature and the size and location of the
pool). When the water-in temperature reaches the set temperature the unit will shut off. The unit will now
automatically restart (as long as your pool pump is running) when the pool temperature drops more than 1℃
below the set temperature.
TIME DELAY
The unit is equipped with a 3-minute built-in solid-state restart delay included to protect control circuit components
and to eliminate restart cycling and contactor chatter. This time delay will automatically restart the unit
approximately 3 minutes after each control circuit interruption. Even a brief power interruption will activate the
solid state 3-minute restart delay and prevent the unit from starting until the 5-minute countdown is completed.
Power interruptions during the delay period will have no effect on the 3-minute countdown.

6
EvoHeat CS & CS-GEN2 Series Manual
4. Safety Instructions
• Installation, repair or relocations must be done by a fully qualified person and not by the customer. If done
incorrectly it may cause fire, electric shock, water leakage and other hazards.
• Maintenance and operation must be carried out according to the recommended time and frequencies, as
stated in this manual.
• To avoid risk of electrical shock, the unit must have a good power connection and earthing.
• If the supply cord is damaged, it must be replaced.
• Use genuine standard spare parts only.
• When an abnormality (smell of burning, etc.) occurs, stop the unit and disconnect the power or turn off the
breaker. If the unit continues to be operated in an abnormal condition, it may cause a fire or hazards.
• Do not insert fingers or objects into the fans or evaporator of the unit.
• The unit is equipped with an over-load protection system. After a previous stoppage, the unit will not start
for at least 3 minutes.
• For unit cleaning or maintenance, switch off and disconnect the power of the unit.
• Do not install the unit near flammable gas or spray flammable substances near it.
• Ensure the heat pump is installed on a strong and stable platform.
• A circuit breaker must be installed for the unit.
• Use supply wires suitable for 75°C
* Caution: Single wall heat exchanger, not suitable for potable water connection.

7
EvoHeat CS & CS-GEN2 Series Manual
5. Installation
5.1 System Installation
The schematic diagram is for reference only. Please check the water inlet/outlet label on the heat pump while
plumbing the unit.
INSTALLATION ITEMS
EvoHeat only provide the main EvoHeat unit and EvoHeat accessories; other items in the illustration above should be
provided by the user or the installer.
EVOHEAT ACCESSORIES – DO NOT THROW AWAY
All EvoHeat units are provided with rubber feet, controller and leads for the controller– do not throw them away as
they are required as part of the installation.
CHECK HEATER CONDITION ON ARRIVAL
Check the heater packaging upon delivery for any obvious signs of damage. Inform your supplier IMMEDIATELY if
there is any evidence of rough handling. When the heater has been removed from the packaging check the
refrigerant gauge on the front panel of the unit. The gauge should be showing a pressure of approx 10-20 on the
outside red band – any less than this figure means there may be a leak in the refrigerant system, and you should
immediately contact your EvoHeat Dealer.
General installation information disclaimer: Install your EVOHEAT heat pump in accordance with the procedures in
the product manual. Always check that your installation will comply with local building and council regulations.
IMPORTANT: EvoHeat heat pumps MUST be connected by a licensed electrician. Under no circumstances should an
unlicensed person attempt to install or repair an EvoHeat heat pump themselves. Heater electrical installation
undertaken by an unlicensed installer will void the warranty. Correct installation is required to ensure safe and
efficient operation of your pool heater.
Before installation it is very important to ensure 5 variables are carefully checked to allow the unit to operate
correctly.
• Location
• Clearances & Air Flow
• Adequate water flow & plumbing
• Correct electrical connection & supply

8
EvoHeat CS & CS-GEN2 Series Manual
5.2 Location Recommendations
Installation and service must be performed by a qualified installer.
Evo recommend the heat pump should be installed in an outdoor location with appropriate ventilation. Installing the
heater indoors without adequate ventilation, or in a poorly ventilated enclosed space, will result in very poor
performance and can, in extreme cases, damage the heater. Ensure the heater is installed in a well-ventilated area
with plenty of fresh air.
Evo recommend the heat pump should ONLY be installed in a location with appropriate ventilation.
If installing the heater on an existing pump/filtration system, the heater must be installed AFTER the filter and
BEFORE the chlorinator/sanitizer.
The heat pump should be installed on a flat level surface as close as possible to the pool.
The Evo pool heat pump should be installed with a minimum clearance of at least 3.5m to the water’s edge.
Furthermore, EvoHeat recommend installing the heat pump no greater than 7.5 meters away from the water’s edge
due to heat loss from the piping.
A rough estimate of heat loss over a 30m pipe run can be as high as 600 Watts per hour per 5 degrees of
temperature difference between the air/ground and the pool water. These losses need to be taken into account over
long distances and piping may need to be insulated to reduce heat leakage.
The heat pump should be installed a maximum of 5m below the water level of the pool/spa. If further than 5M
please discuss with your EvoHeat specialist for the best advice.
Make sure the heat pump is not located where large amounts of water may run-off from a roof into the unit. Sharp
sloping roofs without gutters will allow excessive amounts of rainwater mixed with debris from the roof to be forced
through the unit. A water deflector may be needed to protect the heat pump.
5.3 Airflow Clearances
The heat pump unit needs continuous fresh air whilst
running. The heater draws up to 47000 m3/h ambient air
through the sides and discharges through the top fan cowl.
Installing the heater indoors or in an enclosed space will
result in very poor performance and can in extreme cases
damage the heater. Ensure the heater is installed in a well-
ventilated area with plenty of fresh air, a minimum gap
between walls/fences etc of 1000mm on the sides and
1500mm overhead clearance.
Leave sufficient space for unobstructed airflow into and out of the heater. Do not locate the heater in an enclosed
area, or the discharged cold air will recirculate into the unit and consequently lower the heating efficiency as well as
possible icing up.
If you do not have a location with these suggested clearances, please contact our EvoHeat Tech Support Specialist to
discuss appropriate installation locations.
5.4 Adequate Water Flow
All EVOHEAT heat pumps have a factory preset internal water flow switch. If there is insufficient water flow the
heater will not operate.
It is CRITICAL that there is sufficient water flow to the unit. Incorrect water flow can cause a loss of efficiency and
possible damage to the unit. Optimal water flow rates are listed in the EvoHeat manual. It is imperative that water
flow is kept as close as possible to these flow rates. Correct water flow not only offers optimal heater performance,
but may also prevent possible damage to your heater.

9
EvoHeat CS & CS-GEN2 Series Manual
Before connecting the heater to the plumbing, all piping must be thoroughly flushed to ensure no debris can enter
the heater. Failure to remove pipe debris can jam or damage the flow switch and may cause damage to the heater.
When cleaning the pool it is advisable to turn off your heater as restricted water flow may cause the heater to shut
down and indicate low water flow fault (E03 error) or high pressure fault (E01 Error).
IMPORTANT: A Variable speed pump or bypass valve and plumbing MUST be fitted to allow water flow to be
adjusted through the heater. Do not direct connect a water pump with higher flow than required to the heat
pump.
5.5 Rubber Feet
All EvoHeat units are provided with rubber feet which EvoHeat highly recommend being installed. The rubber feet
help reduce vibration of the unit and help provide a space below the heat pump to install the drainage barbs.
5.6 Condensate Drain Barb
Fit the condensate drain barb into the 2 holes under the unit if you
need to direct water away from the heater. Put in hot water if stiff.
5.7 Drainage & Condensation
Whilst the heater is operating, water in the air condenses on the fins of the evaporator. In the instance of high
humidity, the condensate may be several litres per hour. This may give the impression that the heater is leaking,
however this is a normal function of heat pumps.
The heater will automatically activate reverse cycle or de-icing mode when required which also increases condensate
discharge. This normally occurs at temperatures below 8 degC. The condensate water will discharge through the
base of the heater. As an option a pipe can be connected to the drain on the base of the unit to direct condensate
water to an appropriate location.
NOTE: A quick way to verify that the water is condensation is to shut off the unit and keep the pool pump running. If
the water stops running out of the basepan, it is condensation. AN EVEN QUICKER WAY IS to TEST THE DRAIN WATER
FOR CHLORINE – if the is no chlorine present, then it’s condensation.
5.8 Plumbing
The Swimming Pool Heat Pumps exclusive rated flow titanium heat exchanger requires no special plumbing
arrangements except bypass (please set the flow rate according to the nameplate). The water pressure drop is less
than 10kPa at max.
Flow rate: Since there is no residual heat or flame Temperatures, the unit does not need copper heat sink piping.
PVC pipe can be run straight into the unit.
Location: Connect the unit in the pool pump discharge (return) line downstream of all filter and pool pumps, and
upstream of any chlorinators, ozonators or chemical pumps.
Standard model have slip glue fittings which accept 40 mm PVC pipe for connection to the pool or spa filtration
piping. By using a 50 NB to 40NB you can plumb 40NB.
Give serious consideration to adding a quick coupler fitting at the unit inlet and outlet to allow easy draining of unit
for winterizing and to provide easier access should servicing be required.

10
EvoHeat CS & CS-GEN2 Series Manual
5.9 Electrical Connection
IMPORTANT: Always use a qualified Electrician to perform any electrical work. A licensed electrician must read the
information before connecting.
Ensure the power cable and circuit breaker are of a suitable size for the heater being installed. Also check that there
is adequate voltage and current available at the heater connection to run the unit.
Voltage range should be 220-230 volts for single phase, and 380-400 volts for 3 phase units. Voltage ranges outside
these parameters will cause heater damage and void your warranty.
1. Ensure power is disconnected during installation or service.
2. Always comply with the national and local electrical codes and standards.
3. Ensure electrical cable size is adequate for heater requirements at the installation location.
4. The heater must be equipped with a circuit breaker and isolation device.
5. Circuit breaker must be installed between the heater and the water circulation pump if the water pump is
hard-wired into the heater. Please note recommended circuit breaker sizes make no allowance for a water
pump hard wired into the heater.
6. The unit must be well earthed. Remove the front panel to access the electrical connection terminals of the
heater. The electrical wiring diagram is affixed to the inside of the front panel.
Correct phase connection is important with 3 phase heaters. NOTE: if 2 lights are showing on the 3 PHASE relay
monitor this means the EvoHeat heat pump has been wired correctly (one orange light and one green light). If
only one light is showing, the phases are out of rotation and need to be rotated to get the correct phase rotation.
5.10 Remote Controller Connection
All Evo heaters can be controlled remotely by any device capable of opening and closing a circuit. The circuit must be
low voltage 5V or lower.
Remove the cable loop noted on the wiring diagram on the PCB and connect the remote cable from the external
controller into these terminals – this differs between models.
When this circuit is open (no connection) the Evo heat pump will not operate. When the circuit is closed the unit will
operate according to the parameters set on the controller(s).
This can change based on model, please check the wiring diagram that comes with the heater inside the electric
box cover or refer to the wiring diagrams within this manual.
5.11 Initial Start-up
Refer to the Quick Start Guide, page 5 for instructions on the initial start-up and commissioning of the unit.

11
EvoHeat CS & CS-GEN2 Series Manual
6. Operation
6.1 Main Controller Interface
Button
Name
Function
ON/OFF
Press this button to start up/shut off the unit, cancel current operation or go back to
previous interface.
HELP Press this button to check button function of system state.
MODE Press this button to change the current mode, page up or confirm current operation.
CLOCK Press this button to set the clock or turn the timer on/off.
UP Press this key to select the upwards option or increase the parameter value.
DOWN Press this key to select the downwards option or decrease the parameter value.
6.2 Functions of the Controller
6.2.1 Using the HELP Button
You can use at any interface and it will explain the buttons & functions of the current interface. To exit the help
interface, simply press the ON/OFF button.
EXAMPLE: Press HELP at the Main Interface
6.2.2 Starting & Shutting Down
To turn on/off the unit, press the ON/OFF button for 1 second. The screen will display as following for each state:

12
EvoHeat CS & CS-GEN2 Series Manual
6.2.3 Switching Modes
At the main interface, you can switch between the modes of cooling, economic heating, heating & rapid heating by
pressing . Example: Switch from Cooling mode to Economic Heating
Note: The operation of mode is invalid if the unit you purchase is heating only or cooling only.
6.2.4 System State Checking
At any interface you can enter the system working state by pressing TWICE, then using the UP and Down arrow
keys to highlight the required parameter, then press to enter. To exit, press the ON/OFF button
6.2.5 Changing Temperature
At the main interface, press the UP or DOWN key to adjust the temperature setting as desired. Once complete, press
the button to save the settings and exit. Press the ON/OFF button to exit without saving settings. Refer to the
Parameter Table to set relevant temperature.
6.2.6 Clock Setting
At the main interface press to enter the clock setting interface. Select the parameter you wish to change and
press to make the parameter begin flashing which indicates it can be changed. Press the UP or DOWN keys to
change the parameter value, then press to save. Press the ON/OFF button to return to the main menu.
Note: If there is no operation after 10 seconds, it will return to the main menu and changes will automatically be saved.
To change the date, the same process is followed.

13
EvoHeat CS & CS-GEN2 Series Manual
6.2.7 Timer Settings
Four timer periods can be set according to your needs.
From the main interface, press to enter the timer setting, press DOWN to select Timer, then press to enter
the timer setting interface. The process is much the same as adjusting the Clock settings. To cancel and return to the
previous menu, press the ON/OFF button.
6.2.7.1 Timer
Each timer has an ON value when the unit will turn on an OFF value when the unit will turn off (00:00-00:00).
These timers are required for the Daily Timers & Temperature Timers to work.
Example: TIMER1 Unit is on at 7:30am – and off at 10pm

14
EvoHeat CS & CS-GEN2 Series Manual
6.2.7.2 Daily Timer
The Daily Timer allows you to apply your timers to particular days of the week.
• OFF means that the unit will not run on that day.
• ON means the system will be running for a whole day.
• Applying one timer will have the unit run from A-B.
• Applying two timers will mean the unit runs from A-B, then C-D.
Example: Setting the operation on Friday to run two different timers.
If the Timer2 were 8am-10am & Timer 3 were 1pm-5pm, the unit would operate or stop accordingly.
6.2.7.3 Temperature Timer
The temperature timer will adjust the temperature as desired for your set Timer periods.
Example: If Timer 3 was set for 1pm – 5pm on a Monday, the unit would operate to the set temperature during the
timeframe on the Monday.

15
EvoHeat CS & CS-GEN2 Series Manual
6.2.8 Keyboard Lock
To lock the controller after adjusting settings, at the main interface hold the ON/OFF button for 5 seconds. The
keyboard will be locked and display a lock symbol on the screen. To unlock the screen, hold the ON/OFF button for 5
seconds. Note: If the unit is in alarm state, the keyboard lock is automatically removed.
6.2.9 Malfunction Display
If a fault occurs, there will be a malfunction code showing on the controller screen. Refer to the Malfunction Table
(9.9) to find out the failure cause and solutions.

16
EvoHeat CS & CS-GEN2 Series Manual
7. Troubleshooting
EvoHeat have developed a YouTube Channel where you will find useful videos regarding the CS
Controller usage. https://www.youtube.com/playlist?list=PLBPkftdZuJSq6XM6Q48_JDTadbmil31Ie
IF YOUR HEAT PUMP ISN’T WORKING, CHECK THE FOLLOWING…
• Is the screen of control panel lit?
If not, make sure the electrical wires and cables are correctly connected and the power is on. Ensure any circuit
breaker devices are set to the ON position and press the ON button on your controller. Check your controller cable is
plugged in and is not damaged. If the unit has been shut off or the power has been interrupted the heater will not
restart for a 5-minute period to protect the compressor. Wait 5 minutes before attempting a restart.
• Is there enough water flow?
If the screen displays a water flow related error check the water flow. Is the water pump in operation and the system
free of debris that may cause a blockage? Disconnect pool cleaners to ensure proper water flow.
• Is the current pool/spa water temperature higher than the set temperature on the controller?
If so the unit will not operate until the pool/spa water temperature falls below the set temperature on the
controller.
• Is your heat pump set to run at the correct time and date?
Please check your current timing or temperature modes on your controller – you may have programmed the unit to
turn on at a different time.
• Does your heat pump have an error message on the screen?
If yes, refer to the error code table 19.
IF YOUR HEAT PUMP IS RUNNING BUT NO HEATING, CHECK THE FOLLOWING…
• Is the fan functioning?
If not contact EvoHeat tech support on 1300 859 933
• Is the air discharged from the top of the fan noticeably cooler than the ambient temperature?
If not, check the refrigerant gauge on the bottom panel of the heater. Another way to determine if the heater is
working correctly is to look at the controller’s screen and check to see if the WATER OUT temp is higher than the
WATER IN temp. Check also the INLET WATER TEMP is lower than the HEAT TEMP set point.
If the gauge shows less than 0.8MPA contact EvoHeat tech support to check the refrigerant system.
Example of empty (loss of refrigerant)
Example of normal
(Note: can vary based on ambient
temperature)

17
EvoHeat CS & CS-GEN2 Series Manual
Ensure sufficient fresh airflow around the unit as per installation instructions.
Make sure cold air discharged does not recycle back through the heater. Check the condenser fins. If they are dirty
or blocked use a low flow garden hose only (Pressurised water may cause damage to the heater).
• The unit will periodically defrost when the ambient air temperature is lower than 8 degrees C.
IF YOUR HEAT PUMP IS RUNNING CONTINUOUSLY, CHECK THE FOLLOWING…
• Check the set temperature is at your desired level and that the pool water temperature is at or below this set
point.
• Alternatively, this could be a possible electrical component failure – contact EvoHeat tech support on 1300 859 933
IF YOUR HEAT PUMP HAS WATER APPEARING AROUND THE BASE OF THE UNIT, CHECK THE
FOLLOWING…
The water appearing around the base of your heat pump could be condensation or a possible water leak. To
determine, check the following:
• Check the discharge for the presence of chlorine.
If the water has no chlorine then it is condensation and is it normal – see drainage and condensation for more
information. If the water has chlorine, it is a water leak and you need to contact EvoHeat tech support on 1300 859
933. Or…
• Turn the heater off and run the water pump continuously for a period of 2-4 hours.
If the water dries out, then it was condensation – see drainage and condensation for more information. If there is a
continuous leak contact EvoHeat tech support on 1300 859 933.
DRAINAGE & CONDENSATION
Whilst the heater is operating, water in the air condenses on the fins of the evaporator. In the instance of high
humidity, the condensate may be several litres per hour. This may give the impression that the heater is leaking,
however this is a normal function of heat pumps.
The heater will automatically activate reverse cycle or de-icing mode when required which also increases condensate
discharge. This normally occurs at temperatures below 8°C. The condensate water will discharge through the base of
the heater. As an option a pipe can be connected to the drain on the base of the unit to direct condensate water to
an appropriate location.
NOTE: A quick way to verify that the water is condensation is to shut off the unit and keep the pool pump running. If
the water stops running out of the basepan, it is condensation. AN EVEN QUICKER WAY IS to TEST THE DRAIN WATER
FOR CHLORINE – if the is no chlorine present, then it’s condensation.

18
EvoHeat CS & CS-GEN2 Series Manual
7.1 Error Codes
CODE
FAILURE
REASON
SOLUTION
Power on
Normal working
P01
Inlet temp. sensor failure
The temp sensor is broken or short circuit
Check or change the temp. sensor
P02
Outlet temp. sensor failure
The temp sensor is broken or short circuit
Check or change the temp. sensor
P04
Ambient temp. sensor failure
The temp sensor is broken or short circuit
Check or change the temp sensor
P15
System 1 coil temp. sensor failure
The temp sensor is broken or
short circuit
Check or change the temp sensor
P25
System 2 coil temp. sensor failure
The temp sensor is broken or short circuit
Check or change the temp sensor
P35
System 3 coil temp. sensor failure
The temp sensor is broken or
short circuit
Check or change the temp sensor
P45
System 4 coil temp. sensor failure
The temp sensor is broken or short circuit
Check or change the temp sensor
P17
System 1 absorb temp. sensor
failure
The temp sensor is broken or
short circuit
Check or change the temp sensor
P27
System 2 absorb temp sensor failure
The temp sensor is broken or short circuit
Check or change the temp sensor
P37
System 3 absorb temp sensor failure
The temp sensor is broken or short circuit
Check or change the temp sensor
P47
System 4 absorb temp sensor
failure
The temp sensor is broken or
short circuit
Check or change the temp sensor
P19
System 1 anti-freezing temp sensor
failure
The temp sensor is broken or short circuit
Check or change the temp sensor
P29
System 2 anti-freezing temp.
sensor failure
The temp sensor is broken or
short circuit
Check or change the temp sensor
P39
System 3 anti-freezing temp. sensor
failure
The temp sensor is broken or short circuit
Check or change the temp sensor
P49
System 4 anti-freezing temp.
sensor failure
The temp sensor is broken or
short circuit
Check or change the temp sensor
P191
Using side system 1 anti-freeze
temp failure
The temp sensor is broken or short circuit
Check or change the temp sensor
P291
Using side system 2 anti-freeze
temp failure
The temp sensor is broken or short circuit
Check or change the temp sensor
P391
Using side system 3 anti-freeze
temp failure
The temp sensor is broken or
short circuit
Check or change the temp sensor
P491
Using side system 4 anti-freeze
temp failure
The temp sensor is broken or short circuit
Check or change the temp sensor
P151
System 1 coil inlet temp failure
The temp sensor is broken or
short circuit
Check or change the temp sensor
P251
System 2 coil inlet temp failure
The temp sensor is broken or short circuit
Check or change the temp sensor
P351
System 3 coil inlet temp failure
The temp sensor is broken or
short circuit
Check or change the temp sensor
P451
System 4 coil inlet temp failure
The temp sensor is broken or short circuit
Check or change the temp sensor
E05
System protection
The protection system has failed
Check each protection point of the
system
E08
Communication Failure
Communication failure between wire
controller and main board
Check the wire connection between
remote wire controller and main board
E11
High pressure 1 protection
The high-pressure switch is
broken
Check the pressure switch and cold
circuit
E21
High pressure 2 protection
The high-pressure switch is broken
Check the pressure switch and cold
circuit
E31
High pressure 3 protection
The high-pressure switch is broken
Check the pressure switch and cold
circuit
E41
High pressure 4 protection
The high-pressure switch is
broken
Check the pressure switch and cold
circuit
E12
Low pressure 1 protection
The high-pressure switch is broken
Check the pressure switch and cold
circuit
E22
Low pressure 2 protection
The high-pressure switch is
broken
Check the pressure switch and cold
circuit
E32
Low pressure 3 Protection
The high-pressure switch is broken
Check the pressure switch and cold
circuit
E42
Low pressure 4 protection
The high-pressure switch is broken
Check the pressure switch and cold
circuit
E03
Water flow failure
No water/little water in water system
Check the pip water flow and water
pump
E04
Electrical-heat over heat failure
Electrical-heat is over heat
Check or change electrical-heat

19
EvoHeat CS & CS-GEN2 Series Manual
CODE
FAILURE
REASON
SOLUTION
E06
Water-inlet and outlet temp.
difference
Water flow is not enough and low
differential pressure
Check the pipe water flow and whether
the water system is jammed or not
E06
System 1/2/3/4 anti-freeze
protection
Water flow is not enough and low differential
pressure
Check the pipe water flow and whether
water system is jammed or not
E171
The system 1 use side anti-freezing
protection
Water flow is not enough
Check the pipe water flow and whether
the water system is jammed or not
E271
The system 2 use side anti-freezing
protection
Water flow is not enough
Check the pipe water flow and whether
the water system is jammed or not
E371
The system 3 heat source side anti-
freezing protection
Water flow is not enough
Check the pipe water flow and whether
the water system is jammed or not
E471
The system 4 heat source side anti-
freezing protection
Water flow is not enough
Check the pipe water flow and whether
the water system is jammed or not
E19
The primary anti-freezing
protection
The ambient temp is low
/
E29
The secondary anti-freezing
protection
The ambient temp is low
/
8. Appendix
8.1 Cable Specifications
Single Phase Unit
Nameplate maximum
current
Phase line
Earth line
MCB
Creepage Protector
Signal Line
No more than 10A
2 x 1.5mm
2
1.5mm
2
20A
30mA less than 0.1 sec
n x 0.5mm
2
10~16A
2 x 2.5mm
2
2.5mm
2
32A
30mA less than 0.1 sec
16~25A
2 x 4mm
2
4mm
2
40A
30mA less than 0.1 sec
25~32A
2 x 6mm
2
6mm
2
40A
30mA less than 0.1 sec
32~40A
2 x 10mm
2
10mm
2
63A
30mA less than 0.1 sec
40~63A
2 x 16mm
2
16mm
2
80A
30mA less than 0.1 sec
63~75A
2 x 25mm
2
25mm
2
100A
30mA less than 0.1 sec
75~101A
2 x 25mm
2
25mm
2
125A
30mA less than 0.1 sec
101~123A
2 x 35mm
2
35mm
2
160A
30mA less than 0.1 sec
123~148A
2 x 50mm
2
50mm
2
225A
30mA less than 0.1 sec
148~186A
2 x 70mm
2
70mm
2
250A
30mA less than 0.1 sec
186~224A
2 x 95mm
2
95mm
2
280A
30mA less than 0.1 sec
Three Phase Unit
Nameplate maximum
current
Phase line
Earth line
MCB
Creepage Protector
Signal Line
No more than 10A
2 x 1.5mm
2
1.5mm
2
20A
30mA less than 0.1 sec
n x 0.5mm
2
10~16A
2 x 2.5mm
2
2.5mm
2
32A
30mA less than 0.1 sec
16~25A
2 x 4mm
2
4mm
2
40A
30mA less than 0.1 sec
25~32A
2 x 6mm
2
6mm
2
40A
30mA less than 0.1 sec
32~40A
2 x 10mm
2
10mm
2
63A
30mA less than 0.1 sec
40~63A
2 x 16mm
2
16mm
2
80A
30mA less than 0.1 sec
63~75A
2 x 25mm
2
25mm
2
100A
30mA less than 0.1 sec
75~101A
2 x 25mm
2
25mm
2
125A
30mA less than 0.1 sec
101~123A
2 x 35mm
2
35mm
2
160A
30mA less than 0.1 sec
123~148A
2 x 50mm
2
50mm
2
225A
30mA less than 0.1 sec
148~186A
2 x 70mm
2
70mm
2
250A
30mA less than 0.1 sec
186~224A
2 x 95mm
2
95mm
2
280A
30mA less than 0.1 sec
If the unit is to be installed outdoors, ensure that a UV resistant cable is used.
8.2 Parameter Table
Meaning
Default
Remarks
Set-point of cooling target temperature
27°C
Adjustable
Set-point of heating target temperature
27°C
Adjustable
Set-point of auto mode target temperature
27°C
Adjustable
/