Page is loading ...

Save This Manual
For Future Reference
SE_AI
MODEL NO.
113.169270
Serial
Number
Model and serial numbers
may be found on the rear
of the floor nozzle.
You should record both
model and serial numbers
in a safe place for future
use.
L
FOR YOUR
SAFETY:
READ ALL
INSTRUCTIONS
CAREFULLY
i k,.
CARPET/U OLSTERY
SHAMPOOE ATTACHMENT
- assembly
- operating
* repair parts
Sold by SEARS, ROEBUCK AND CO., Chicago, IL 60684 U.S.A.
J
Part NO. SP5507 Pri_ted if" ,J_/-

WARRANTY SERVICE IS AVAILABLE BY SIMPLY CONTACTING THE NEAREST
SEARS SERVICE CENTER/DEPARTMENT THROUGHOUT THE UNITED STATES.
This warranty applies only while this product is used in the United States.
This warranty gives you specific rights, and you may also have other rights
which vary from state to state.
SEARS, ROEBUCK AND CO., D/817 WA Hoffman Estates, IL 60195
iMPORTANT SAFETY iNSTRUCTiONS
.LAD,LL,.ST.UCT,ONS
WARNING: DocotattempttO operate
until you have read thoroughly and understan_
completely a_l instructions contained in this manual.
Failure to do so can result in accidents. Save OwneCs
Manual and review frequentJy for continuing safe
operation. Use only in compliance with your Wet/Dry
Vac Owners Manual.
DONOT ATTACH OR USE WITH A VACUUM
CLEANER INTENDED FOR DRY PICKUP ONLY. IT
COULD CAUSE ELECTRICAL SHOCK. YOU
COULD BEELECTROCUTED " _ :_"
DO NOT USE THIS SHAMPOOER WHERE WATER
PRESSURE iS GREATER THAN 110 :POUNDS PER
SQUARE INCH Higher pressures can break parts
and spray hot water onto=people and property. People
could be badly burned.
Use shampoo (non-foaming cleaning solution
concentrate) with a mix ratio between 60-1 and 40-1
Note: the mixing valve is designed to automatically
make this mixture for you. Additional shampoo may
be purchased in your local Sears store.
NEVER allow children to operate shampooer, nor
should they play with shampooer as a toy, Hot.water
could be sprayed onto people or property. People
coufd get tangled in hoses and fall.
WetiDry Vacs contain a float system which shuts off
the suction when the water picked up reaches a
predetermined level. To continue your cleaning, turn
off the vac, disconnect the power cord from electrical
outlet, empty the drum, reassemble and continue
cleaning. Follow instructions for your Wet/Dry Vac
whenever using it with this accessory.
Safety Signal Word s
DANGER: means if the safety information is not
followed someone will be seriously injured or kiffed.
WARNING: means if the safety information is Hot
fotlowed someone could be seriously injured or killed.
CAUTION: means if [he safety information is not
followed someone nlight be seriously injured or killed.
TABLE OF CONTENTS
WARRANTY INFORMATION .................................... 2
SAFETY INSTRUCTIONS ......................................... 2
UNPACKING AND CHECKING CARTON
CONTENTS ............................................................. 3
SHAMPOOER ASSEMBLY ....................................... 3
OPTIONAL UPHOLSTERY NOZZLE ........................ 4
VALVE ASSEMBLY ................................................... 4
OPE RATION .............................................................. 6
CLEANING AND CARE ............................................. 6
REPAIR PARTS ........................................................ 7
SAVE THESE INSTRUCTIONS
: : iI _
2

Removeentirecontentsofcarton.Checkeachitem
againstthe Carton Contents LisL Notify your Sears
Store immediately if any parts are damaged or
missing.
Carton Contents List
Key
A
B
C
O
E
F
G
H
[
J
K
L
M
N
0
P
Q
R
S
T
Desc riptio n Qty.
Lower Wand ............................................. 1
Upper Wand ............................................. 1
Handle With Trigger .................................. 1
Floor Nozzle .............................................. 1
Upholstery Nozzle .................................... 1
Vacuum Hose .......................................... I
Braided Hose w/Fittings ............................ 1
Tubing-Solution ........................................ 1
Shampoo Tubing Fitting w/Check Valve...1
Shampoo Lid and Shampoo Tubing ......... 1
Mixing Valve ............................................. I
Faucet Adapter (A-1) ................................ 1
Faucet Adapter {k-2) ................................. t
Faucet Adapter (A-3) ................................ 1
Washer (G-l) ............................................. 1
Washer (G-2) ............................................ t
Washer (G-3) ............................................ 1
Nozzle Adapter ......................................... 1
Owner's Manual ........................................ t
Shampoo (bottle appearance may vary} ............ 1
Shampooer Assembly
I I!'ll '
C
G
I llil Jl IIII!.... I Ir
A
I II]
Preparation: Prior to using shampooer, vacuum the
carpet to remove loose dirt.
1. Insert a 6' x 1-1/4" vacuum hose into the inlet of
your wet/de/vac.
2. Assemble s:hampooer wands together assuring
snap lock is in place.
3. Assemble the handle with trigger to the upper wand
assuring snap lock is in place.
4. Assemble handle with trigger and wands to vac
hose.

5:Attachfloornozzletothe owerwand assuring snap
lock is in ptace..
6.:Push solution tub ng onto the nipple of the nozzle.
Thread solution tubing nut onto threads of nozzle.
Snap p astic tubing into the retainer clips on
underside ot wands.
7":_Thread braided hose onto handle with trigger.
WAND
BRAIDED
HOSE
Optional Upholstery Nozzle
r=
1. Snap on and turn to lock the nozzle adapter onto
handle with trigger.
2. Attach upholstery nozzle to handle with trigger,
assuring snap lock is }n place and that the
upholstery nozzle and nozzle adapter are pushed
together.
HANDLE
TRIGGER
NOZZLE ADAPTER
UPHOLSTERY NOZZLE
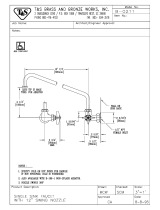
Valve Assembly
i
1. Select adapter that fits your: faucet from the kits
provided with the shampooer.
2. Thread faucet adapter to any externally or internally
threaded faucet.
NOTE: Most faucets have aerators or filter
screens that unscrew. Remove the aerator or
screen by using pliers, if necessary. To avoid
damage to the aerator or screen, wrap aerator
with tape. Be certain auxiliary washer is used with
adapter and that you are careful not to cross or
strip adapter threads. Match auxiliary washers
and adapters by shape;
3. Make sure check valve is snapped into the fitting
but moves freely (see diagram). Slide end of
shampoo tubing onto fitting with check valve and
attach fitting to bottom of mixing valve.
4. Attach braided hose to the mixing valve.
THREAD
im
_INTERNAL
==_ ======= THREAD
i ]
I AUXILIARY
__ WASHER
ADAPTER _------..-_
LOCKING _ _ MIXING VALVE
RING _
U.--r"--" '_ BRAIDED
HOSE
4 FI'FI'ING

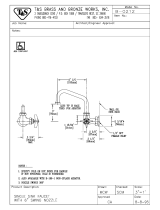
5. Slide mixing valve ontO=faUCet adapter, then push
locking ring in an upward motion to lock,
NOTE: The braided hose should be pointing in the
general direction of the area to be cleaned.
PUSH
|
LOCKING RiNG
DIRECTIONOF AREA
TO BE CLEANED
6. Adjust your faucet to cold. Check for leaks, if
present, tighten the area where the leak occurs.
Then, adjust your faucet between warm and hot.
Extremely hot water could damage components of
the shampooer.
DANGER
Ordinary tap water can be hot enough to
quickly cause bad burns if it leaks or sprays
onto someone. To avoid this, make sure
your hot water heater thermostat is set at
120°F or less. Ask a plumber or your
electric, gas, or fuel oil supplier for help.
Many companies provide this service at no
charge.
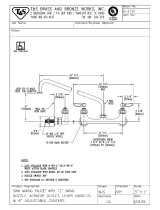
7. Set the bottle of shampoo in sink to avoid tipping
and remove bottle cap. (Retain cap to close bottle
after use).
NOTE: Additional shampoo may be purchased in
your local Sears store.
8. Ptace filter end of shampoo tubing into bottle of
cleaning solution. Thread aux ary cap onto
solution bottle.
9.
Squeeze trigger on handle and start the flow of
solution. Place floor nozzle or upholstery nozzle in
sink and squeeze tdgger until cleaning solution is
observed in the spray from the nozzle.
FILTER _.
I
iJ
il
1
4t,./FAUCET
MIXING VALVE
i SHAMPOOTUBING
=_--_----AUXILIARYCAP
- SINK

Operation ...........
DANGER
DANGER
This Carpet Shampoo Attachment is
intended to be used with a Craftsman
Wet/Dry Vac. Do not attach or use with a
vacuum cleaner intended for dry pickup only.
it could cause electrical shock. You could be
electrocuted.
5. When cteaning is complete, release water pressure
before disconnecting from the faucet, Turn faucet
"OFF", Squeeze the trigger until spray stops.
6. For maximum efficiency, empty drum frequently
and keep the inside of hose, wands, nozzle an(]
drum clean.
1. Connect wet/dry vac power cord to a convenient
wall outlet.
2, Turn wet/dry vac power switch on.
3, Place nozzle on area to be cleaned and squeeze
trigger to release spray of solution onto surface.
Pull nozzle towards you with a slight downward
pressure while releasing spray. Release the trigger
and return the nozzle to the point where you initially
placed the nozzle. Slowly pull nozzle over damp
surface and observe dirty solution being recovered,
4. For easy emptying, periodica!ly check the level of
waste solution in the vac drum. If level of solution is
approximately half full, then empty. To empty, turf,
power switch "OFF" and disconnect power cord
from outlet. Release the two latches and remove lid
from the drum. Empty drum and reassemble in the
reverse order.
Wet/dry vacs are equipped with an automatic float
which is activated when the level of recovered
solution reaches a predetermined level When this
level is reached you cannot recover any more
liquid. To continue, follow your vac instructions to
empty liquid from the canister.
\
\ \
\ \
\
\
\
\
\
Cleaning and Care
I , , I
1. Proper care of the equipment, after you have
finished shampooing, will extend the life of the
shampooer. First, remove shampoo tubing from
mixing valve and shampoo bottle. Place floor
nozzle over sink or bathtub and spray for
approximately 60 seconds to dnse cleaning solution
from tubing.
2, Remove mixing valve from faucet. Thoroug_qty
clean mixing valve under hot water for 60 seconds
te remove any concentrate residue build up. While
cleaning mixing valve, be very careful not to 10se or
misplace the check valve located inside the
shampoo tubing fitting. (See illustration on the
bottom of page 4).
NOTE: Leave braided hose connected and thread
large nut back onto valve body. If you used one of
the adapters provided, return adapter and its
washer to the bag it came in for future use.
3. Rinse wands and wrap braided hose around c)eats
provided on straight wands. Snap mixing valve
onto braided hose with "C" shaded clip provided on
the mixing valve.
6

%
Repair Parts-
__ i,, ,l!l!l, .... i, , J,i
B
PARTS LiST FOR CARPET/UPHOLSTERY SHAMPOOER ATTACHMENT
MODEL NO. 113.169270
©©©
7 1
5
Always order by Part Number
Not by Key Number
i KEV PART
i NO. NO.
L
820456
2 820455
3 820454
4 820839
5 820840
6 820461
7 820460
8 820459
9 820473
10 820465
11 821888
12 820462
13 820472
14 9-16929
-- SP5507
DESCRIPTION
Handle With Trigger
Upper Wand
Lower Wand
FJoor Nozzle
Upholstery Nozzle
Tubing-Solution
Braided Hose w/Fittings
Vacuum Hose
Upholstery Nozzle Adapter:
Mixing Valve
Shampoo Tubing Fitting
w/Check Valve
Shampoo Lid and Shampoo
Tubing
Loose Parts Bag
Containing:
Three Washers
Three Faucet Adapters
1 Shampoo
Owners Manual
"stock item'- May be secured through the hardware
department of most Sears stores.

SERVICE
MODEL NO.
113.169270
HOW TO ORDER
REPAIRPARTS
f
CA RPET/UPHO LSTERY
SHAMPOOER ATTACHMENT
Service is available by returning this carpet cleaner to
the nearest Sears Service Center/Department
throughout the United States.
Model and serial numbers may be found on the rear of
the floor nozzle,
A!I pads listed may be ordered from any Sears Service
Center and most Sears stores, If the parts you need are
not stocked locally, your order will be electronically
transmitted to a Sears Repair Parts Distribution Center
for handling.
PART NUMBER
PART DESCRIPTION
MODEL NUMBER
] ] 3. ] 69270
NAME OF ITEM
Carpet/Upholstery
Shampooer Attachment
.... r, J
Sold by SEARS, ROEBUCK AND CO., Chicago, IL 60684 U.S.A.
Part NO, SP5507 Form No. SP5507-3 Printed }n USA 5,'93
/