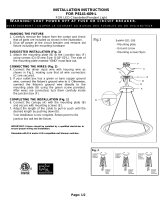
George Kovacs P1396-044G-L User manual

Type
User manual

George Kovacs P1396-044G-L is an LED chandelier/pendant light that offers adjustable hanging height to suit your needs. Its dimmable feature allows you to create the perfect ambiance for any occasion, whether it's a cozy dinner or a lively party. Installation requires attaching the mounting plate to the junction box and connecting the wires as per the provided instructions. The LED module can be replaced if needed, ensuring the longevity of your lighting fixture.

George Kovacs P1396-044G-L is an LED chandelier/pendant light that offers adjustable hanging height to suit your needs. Its dimmable feature allows you to create the perfect ambiance for any occasion, whether it's a cozy dinner or a lively party. Installation requires attaching the mounting plate to the junction box and connecting the wires as per the provided instructions. The LED module can be replaced if needed, ensuring the longevity of your lighting fixture.

INSTALLATION INSTRUCTIONS
FOR P1396-044G-L
FOR LED Chandelier/Pendant Light
WARNING! SHUT POWER OFF AT FUSE OR CIRCUIT BRE AKE R.
AV E R T I S S E ME N T ! C O U P E R L E C O U R A N T A U N I V E A U D ES F U S I B L E S OU D O D I S J ON C T E U R
Page: 1/2
Fig. 3
HANGING THE FIXTURE
1. Carefully remove the fixture from the carton and check
that all parts are included as shown in the illustration.
2. Shut off power at the circuit breaker and remove old
fixture including the mounting hardware
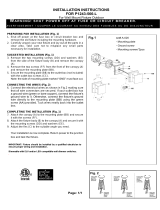
SUGGESTED INSTALLATION (Fig. 1,2)
3. Attach the mounting plate (A) to the junction box (C)
using screws (B) (Size: 8-32*1/2”L). The side of the
mounting back plate marked GND must face out.
4. Determine the desired hanging height and thread rods
(F1, F2 and F3) to the nipple (R). Then attach loop
(H1) by screwing in to rod (F1). Note: remove the
nipple if installing with one 6 rod only.
5. Attach the quick link (S) to loop (H1) and loop (H2) on
the canopy (D), carefully feed the wire over loop (H1),
quick link (S) and loop (H2). Adjust the loop (H2) to
make sure both loops are on the same direction.
6. The support cable (Q) is provided to support the
weight of the fixture while wiring. Attach the hook on
support cable (Q) to the slot hole on the mounting
plate (A). Carefully allow the support cable (Q) to
support the weight of the fixture while wiring.
7. To straighten the wire, use a blow dryer.
CONNECTING THE WIRES (Fig. 3)
8. At this point, connect the electrical wire as shown in
figure 3, making sure that all wire connectors are
secured. If your outlet box has a green or bare copper
ground wire, connect the fixture’s ground wire to it.
Otherwise, connect the fixture’s ground wire directly to
the mounting plate (A) using the green screw
provided.
9. After wires are connected, tuck them carefully into the
ceiling junction box (C), then place Canopy (D) over
the mounting plate (A) and secure it against ceiling
with screws (E).
COMPLETING THE INSTALLATION (Fig. 1.2)
10. Twist each glass (J) with metal plate (I) onto the
fixture body (G) by hand until tight, but dont too
tighten.
Your installation is now complete. Return power to the
junction box and test the fixture.
Note: Illustration (Fig. 1, 2) on this manual is for
installation purposes only. It may or may not be
identical to the fixture purchased.
CAUTION /ATTENTION: When handling bracket, do not
apply pressure to the LEDs. Hold the metal parts.
Fig.1
Set# A-021-190115
- Mounting plate
- Ground screw
- Mounting screws*2pcs
FIXTURE
WIRES
Black or
Smooth
HOUSE
WIRES
Black
(Hot)
FIXTURE
WIRES
White or
Ribbed
HOUSE
WIRES
White
(Neutral)
FIXTURE
WIRES
Bare
Copper
(Ground)
Fig.2
Hardware bag:
F1.Rod 12”*2 Rod# W30-1-044G
F2.Rod 12”*4 Rod# W30-1-044G
F3.Rod 6” *2 Rod# W30-H-044G
Page: 2/2
Replacing LED module (Fig. 4)
The LED module can be replaced by a qualified electrician
without cutting of wire and without damage to any decorative
element to which the fixture is attached. See installation steps
for more details (Fig.4.)
a. Shut off power.
b. Remove glass (J) and metal plate (I).
c. Remove screws (L) and the glass diffuser (M).
d. Remove screws (N) and washers (O).Use a pin to press
the hole on the quick connect (P) to disconnect the LED
module. Carefully remove the LED module from bracket.
e. Reverse steps a-d for installing the new LED module.
f. Note: The LED module should be provided by a specified
supplier.
IMPORTANT: Fixture should be installed by a qualified
electrician to ensure proper wiring and installation.
Dimmable with ELV and/or LED compatible wall
dimmer switches.
Fig.4
  • Page 1 1
  • Page 2 2

George Kovacs P1396-044G-L User manual

Type
User manual

George Kovacs P1396-044G-L is an LED chandelier/pendant light that offers adjustable hanging height to suit your needs. Its dimmable feature allows you to create the perfect ambiance for any occasion, whether it's a cozy dinner or a lively party. Installation requires attaching the mounting plate to the junction box and connecting the wires as per the provided instructions. The LED module can be replaced if needed, ensuring the longevity of your lighting fixture.

Ask a question and I''ll find the answer in the document

Finding information in a document is now easier with AI