Page is loading ...

Module Type Controller SRZ
IMS01T14-E4
Thank you for purchasing this RKC product. In order to achieve maximum performance and ensure proper
operation of the instrument, carefully read all the instructions in this manual. Please place the manual in a
convenient location for easy reference.
1. OUTLINE
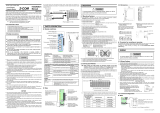
Using the setting examples below, this section explains the configuration when SRZ unit is connected to a
programmable controller (PLC). In addition, PLC communication environmental settings are required to
communicate with the PLC. The PLC communication environmental settings are set by the Loader
communication (Environmental settings can also be made in the Host communication), so the personal
computer, USB communication converter COM-K and SRZ unit must be connected.
Programmable controller (PLC)
SRZ unit
Loader communication
The Loader port is only for
parameter setup.
Z-TIO module
Z-DIO module
Personal computer
Z-COM module
USB communication converter
COM-K (RKC product)
PLC communication
RS-422A
[PLC Communication example]
This manual describes the preparation for conducting PLC communication between the Z-COM and PLC.
For the data map, Host communication, the installation, the detail handling procedures and various function
settings, please read if necessary the following separate manuals.
Z-COM Installation Manual (IMS01T05-E): Enclosed with Z-COM
Z-COM Host Communication Quick Instruction Manual (IMS01T09-E): Enclosed with Z-COM
Z-COM PLC Communication Data List (IMS01T15-E): Enclosed with Z-COM
Z-COM Instruction Manual (IMS01T22-E): Separate*
Z-COM Host Communication Instruction Manual (IMS01T23-E): Separate*
Z-TIO INSTRUCTION MANUAL (IMS01T01-E): Enclosed with Z-TIO
Z-TIO Host Communication Quick Instruction Manual (IMS01T02-E): Enclosed with Z-TIO
Z-DIO INSTRUCTION MANUAL (IMS01T03-E): Enclosed with Z-DIO
SRZ Instruction Manual (IMS01T04-E): Separate*
* Download free or purchase hard copy
When using a Z-COM module joined together with Z-CT modules, refer to Z-COM Instruction
Manual (IMS01T22-E) or Z-CT Instruction Manual [Detailed version] (IMS01T21-E).
These manuals can be downloaded from the official RKC website:
URL: http://www.rkcinst.com/english/manual_load.htm
2. HANDLING PROCEDURES
Communication setting
of Z-COM module
Refer to 3. COMMUNICATION SETTING OF Z-COM MODULE
Personal computer,
SRZ unit, and PLC
mounting and wiring
PLC communication
environment setting
Initial setting
Data setting
Refer to 4. COMMUNICATION SETTING OF FUNCTION
MODULES
Refer to Z-COM Installation Manual (IMS01T05-E)
Refer to Z-TIO INSTRUCTION MANUAL (IMS01T01-E)
Refer to Z-DIO INSTRUCTION MANUAL (IMS01T03-E)
Refer to 5. PLC COMMUNICATION ENVIRONMENT SETTING
Refer to 6. PLC COMMUNICATION SETTING
PLC setting
Refer to 7. PLC COMMUNICATION DATA TRANSFER
Refer to Z-COM PLC Communication Data List (IMS01T15-E)
Refer to 7. PLC COMMUNICATION DATA TRANSFER
Refer to Z-COM PLC Communication Data List (IMS01T15-E)
Communication setting of
the function modules
(Z-TIO, Z-DIO)
Preparation of communi-
cation converter
Preparation of communi-
cation program
Setting for Loader
communication
Connecting for Loader
communication
Refer to 5. PLC COMMUNICATION ENVIRONMENT SETTING
3. COMMUNICATION SETTING OF Z-COM MODULE
Set communication setting before mounting and wiring of the Z-COM.
Do not separate the module mainframe from the base with the power turned on.
If so, instrument failure may result.
3.1 Unit Address Setting
Set an address for the SRZ unit using a small blade screwdriver.
In this example, the unit address is set to “0.”
To avoid problems or malfunction, do not duplicate an address on the same
communication line.
A
ddress setting switch
Setting range:
0 to F
[0 to 15: Decimal]
Factory set value:
0
Z-COM module
COM
Address setting for PLC communication
Up to four Z-COM modules can be connected to a PLC communication port. Therefore the unit address
uses the four Z-COM modules as a group. For Z-COM modules which are multi-drop connected to the same
PLC communication port, use successive numbers assigned to any one of four groups shown in the
following table as their addresses.
Always set the unit address of each group including 0, 4, 8 or C.
0, 4, 8 or C becomes the master for communication transfer.
When the PLC and SRZ unit are connected one-to-one, use the factory set value “0.”
Group Address setting switch Group Address setting switch
Group 1
0 (Master)
Group 3
8 (Master)
1 9
2 A
3 B
Group 2
4 (Master)
Group 4
C (Master)
5 D
6 E
7 F
Address setting for Loader communication
When Loader communication is performed, the host computer and SRZ unit communicate on a one-to-one
basis, and the unit address is fixed at “0.” Even when an address setting switch is set to other than 0,
communication is performed with unit address 0.
3.2 Protocol Selections and Communication Speed Setting
Use the DIP switch on the right side of the Z-COM module to select Communication speed, Data bit
configuration and protocol. Because PLC communication is performed in this example, configure
communication 2 (COM. PORT 3, COM. PORT 4).
The data change become valid the power of the Z-COM module is turned on again or
when control is switched from STOP to RUN.
DIP switch
ONOFF
1234567
8
NO
Z-COM module
mainframe
Right side view
Communication 2
setting
COM. PORT3
COM. PORT4
Contents of the DIP switch
Communication 1 (COM. PORT1 and COM. PORT2) setting
Use switches No. 1, No. 2, and No. 3 to set the Communication speed, Communication protocol and Data
bit configuration for Communication 1.
1 2 Communication speed
OFF OFF 4800 bps
ON OFF 9600 bps
OFF ON 19200 bps (Factory set value)
ON ON 38400 bps
3 Communication protocol and Data bit configuration
OFF
Host communication (RKC communication)
Data 8-bit, without parity, Stop 1-bit
(Factory set value *)
ON
Host communication (Modbus)
Data 8-bit, without parity, Stop 1-bit
* Factory set values when the Communication protocol is not specified at the order.
Communication 2 (COM. PORT3 and COM. PORT4) setting
Use switches No. 4, No. 5, No. 6, and No. 7 to set the Communication speed, Communication protocol and
Data bit configuration for Communication 2.
4 Communication speed
OFF 9600 bps
ON 19200 bps (Factory set value)
5 6 7 Communication protocol and Data bit configuration
OFF OFF OFF
Host communication (RKC communication)
Data 8-bit, without parity, Stop 1-bit (Factory set value *)
ON OFF OFF
Host communication (Modbus)
Data 8-bit, without parity, Stop 1-bit
OFF ON OFF
PLC communication
MITSUBISHI MELSEC series special protocol
A-compatible 1C frame (format 4)
AnA/AnUCPU common command (QR/QW)
QnA-compatible 3C frame (format 4) command (0401/1401)
(Register type: ZR register only)
Data 7-bit, without parity, Stop 1-bit
ON ON OFF
PLC communication
OMRON SYSMAC series special protocol
C mode command (RD/WD, RE/WE)
Data 7-bit, Even parity, Stop 2-bit
OFF OFF ON
PLC communication
MITSUBISHI MELSEC series special protocol
A-compatible 1C frame (format 4) ACPU common command (WR/WW)
Data 7-bit, without parity, Stop 1-bit
ON OFF ON
PLC communication
YOKOGAWA FA-M3R special protocol
Data 8-bit, without parity, Stop 1-bit
OFF ON ON
Do not set this one
ON ON ON
* Factory set values when the Communication protocol is not specified at the order.
Settings of Communication speed, Communication protocol and Data bit configuration can be set
even by the Loader communication or Host communication. For the communication data, refer to
Communication setting data of Z-COM module on the next page.
DIP switch setting validity/invalidity
Set switch No.8 to “ON” when performing communication by the communication settings set via Host
communication or Loader communication. When set to “ON,” the DIP switch settings are disabled.
8 DIP switch setting validity/invalidity
OFF
Valid (Factory set value)
ON
Invalid (According to the settings in Host communication or Loader communication)
4. COMMUNICATION SETTING OF FUNCTION
MODULES
4.1 Address Setting of Z-TIO/Z-DIO Module
Only make the module address setting to make the Z-TIO and Z-DIO module communication settings. The
SRZ unit performs internal communication (RS-485) between the Z-COM module and the function module
(Z-TIO, Z-DIO), so the Communication protocol, Communication speed and Data bit configuration do not
need to be set. A module address is set for each function module type. In this example, the module address
is set to the address shown below.
To avoid problems or malfunction, do not duplicate an address in a function module of the
same type on the same communication line.
Z-TIO
module 1
A
ddress setting switch
Setting range:
0 to F
[0 to 15: Decimal]
Factory set value:
0
Z-TIO/Z-DIO modules
Setting of the address setting switch (module address)
0 1 2 0
Z-TIO
module 3
Z-TIO module 2 Z-DIO module 1
4.2 For the SRZ Unit’s Temperature Control Channel
Setting the Z-TIO module address determines the temperature control channel number used for
communication. To each Z-TIO module address, the relevant temperature control channel is assigned. Each
temperature control channel number can be calculated from the following equation.
Temperature control channel number of communication
[Module address setting
a
] [Maximum channel number of the function module
b
] +
[Channel number in a module]
a
When the setting is A to F, it is a decimal number.
b
For the Z-TIO module, it is calculated by “4.”
Example: When 3 Z-TIO modules (4-channel type) are joined
Module address setting
012
CH1
CH2
Z-TIO module 1
CH3
CH4
CH9
CH10
Z-TIO module 3
CH11
CH12
CH5
CH6
Z-TIO module 2
CH7
CH8
Z-TIO module 3: The temperature control channel number used for communication of channel 2
2 4 + 2 = 10
4.3 Digital Input/Output Channel of Z-DIO Module
Setting the Z-DIO module address determines the digital input/output channel number of SRZ unit. To each
Z-DIO module address, the relevant digital input/output channel is assigned. Each digital input/output
channel can be calculated from the following equation.
Digital input/Output channel number
[Module address setting
a
] [Maximum channel number of the function module
b
]
+ [Input (or output) channel number in a module]
a
When the setting is A to F, it is a decimal number.
b
For the Z-DIO module, it is calculated by “8.”
Example: When 2 Z-DIO modules are joined
Setting of the address setting switch
0 1
Z-DIO module 1
DI4 (CH4)
DI3 (CH3)
DI2 (CH2)
DI1 (CH1)
DI8 (CH8)
DI7 (CH7)
DI6 (CH6)
DI5 (CH5)
DO1 (CH1)
DO2 (CH2)
DO3 (CH3)
DO4 (CH4)
DO5 (CH5)
DO6 (CH6)
DO7 (CH7)
DO8 (CH8)
Z-DIO module 2
DI4 (CH12)
DI3 (CH11)
DI2 (CH10)
DI1 (CH9)
DI8 (CH16)
DI7 (CH15)
DI6 (CH14)
DI5 (CH13)
DO1 (CH9)
DO2 (CH10)
DO3 (CH11)
DO4 (CH12)
DO5 (CH13)
DO6 (CH14)
DO7 (CH15)
DO8 (CH16)
Digital output channel number of digital output (DO) channel 1
of Z-DIO module 2
1 8 +1 = 9
5. PLC COMMUNICATION ENVIRONMENT SETTING
The PLC communication environmental (system data) settings must be made to perform PLC
communication. The System data settings are made by the Loader communication (System data settings
can also be made in the Host communication).
The System data contains setting items (refer to the setting item table of next page) and monitor items. The
monitor items require space (corresponding to 8 words) in the PLC register.
For the monitor items, refer to Z-COM PLC Communication Data List (IMS01T15-E).
5.1 Preparation of USB Communication Converter
To perform Loader communication, our converter and a communication cable are required.
USB communication converter COM-K (With USB cable) *
Loader communication cable W-BV-01 [optional]
* To use the Loader communication, USB driver for COM-K must be installed on the personal computer.
The USB driver for COM-K can be downloaded from our website:
URL: http://www.rkcinst.com/
5.2 Preparation of Communication Program
RKC can provide communication program “PROTEM2” or “WinUCI-SRZ.” (Free of charge)
Download this tool from the RKC official website. Then install this tool on your personal computer.
For the RKC communication protocol, refer to Z-COM Host Communication Instruction
Manual (IMS01T23-E).
5.3 Setting of Loader Communication
Set the communication settings of the host computer to the same settings as the Z-COM module. Set the
Communication speed, Communication protocol, and Data bit configuration of Host computer using
PROTEM2 or WinUCI-SRZ. When Loader communication is used, the Communication speed, Communication
protocol, and Data bit configuration of the Z-COM module are fixed.
(There is no need to configure the communication settings of the Z-COM module.)
Unit address: 0
Communication speed: 38400 bps
Data bit configuration: Data 8-bit, Without parity, Stop 1-bit
5.4 Connection for Loader Communication
Connect SRZ unit to the personal computer. When the personal computer has a USB connector, connect
the USB communication converter between the personal computer and the Z-COM module.
USB communication
converter COM-K
*
(RKC product)
Connect to USB port
of personal computer
Connect to USB connector of COM-K
COM
Loader communication cable
(W-BV-01) [Sold separately]
Connect to loader
communication connector
of Z-COM module
Connect to loader
communication
connector
USB cable (COM-K accessory)
Personal computer
* The termination resistor is built
into the COM-K.
CAUTION
All Rights Reserved, Copyright 2006, RKC INSTRUMENT INC.
Z-COM
PLC Communication
Quick Instruction
Manual
Communication
Extension Module

HEADQUARTERS: 16-6, KUGAHARA 5-CHOME, OHTA-KU TOKYO 146-8515 JAPAN
PHONE: 03-3751-9799 (+81 3 3751 9799)
E-mail: info@rkcinst.co.jp Website: http://www.rkcinst.com/DECJUN. 2018
Modbus is a registered trademark of Schneider Electric.
The name of each programmable controller (PLC) means the
products of each manufacturer.
Company names and product names used in this manual are
the trademarks or registered trademarks of the respective
companies.
Website:
http://www.rkcinst.com/
The first edition: DEC. 2006 [IMQ00]
The fourth edition: JUN. 2018 [IMQ00]
5.5 Setting of System Data (setting items)
1. Turn on the power of the SRZ unit. (PLC power is off.)
2. On the personal computer, set the communication data of PLC communication environment indicated
below.
Setting item table R/W: Read/Write
Name
RKC
Iden-
tifier
Modbus
Register address
Digits
Attri-
bute
Data range and
Number of data
Factory
set value
HEX DEC
Station number
QV 8008 32776 7 R/W
0 to 31 (MITSUBISHI PLC or
OMRON PLC)
1 to 31 (YOKOGAWA PLC)
Note 1
PC number
1
[CPU number]
QW 8009 32777 7 R/W
0 to 255 (MITSUBISHI PLC
)
1 to 4 (YOKOGAWA PLC)
Note 2
Register type
2
QZ 800A 32778 7 R/W
MITSUBISHI MELSEC serie
s
0: D register 3: ZR register *
1: R register 4 to 29: Unused
2: W register
* Method of specifying
consecutive numbers when
32767 of R register is exceeded.
0
OMRON SYSMAC serie
s
0: DM register (Data memory)
1 to 9: Unused
10 to 22: EM register (Extended
data memory)
[Specify the bank No.]
Set the bank No.+10.
23 to 28: Unused
29: EM register
(Extended data memory)
[Specify the current bank]
YOKOGAWA FA
-
M3
R
0: D register (data register)
1: R register (shared register)
2: W register (link register)
3: Unused
4: B register (file register)
5 to 29: Unused
Register start
number
2, 3
(High-order 4 bit)
QS 800B 32779 7 R/W 0 to 15:
QnA compatible 3C frame
0
Register start
number
2,
(Low-order 16 bit)
QX 800C 32780 7 R/W
0 to 9999:
MITSUBISHI MELSEC series
A-compatible 1C frame, ACPU
common command (WR/WW)
OMRON SYSMAC series
0 to 65535:
MITSUBISHI MELSEC series
A-compatible 1C frame,
AnA/AnUCPU common
command (QR/QW),
QnA-compatible 3C frame
command (0401/1401)
YOKOGAWA FA-M3R
1000
System data
address bias
2, 4
QQ 800D 32781 7 R/W
0 to 65535
(When the OMRON SYSMAC
series is used: 0 to 9999)
2100
COM module link
recognition time
4
QT 800E 32782 7 R/W
0 to 255 seconds
10
PLC scanning
time
VT 800F 32783 7 R/W
0 to 3000 ms
255
PLC
communication
start time
R5 8010 32784 7 R/W
1 to 255 seconds
5
Slave mapping
method
5
RK 8012 32786 7 R/W
0: Bias from the address setting
switch
[Register address + (Remainder
of set value of address setting
switch/4)
System data address
bias]
1: Bias disabled
0
Note 1: MITSUBISHI PLC and OMRON PLC: 0 YOKOGAWA PLC: 1
Note 2: MITSUBISHI PLC: 255 YOKOGAWA PLC: 1
1
This item is not used for the OMRON SYSMAC series.
2
Usable register ranges and types vary depending on used CPU types. For register ranges and types that
can actually be used, see the PLC instruction manual.
3
Only enabled when the ZR register is selected.
4
Use the factory set value when the PLC and SRZ unit are connected one-to-one.
5
In this example, set the factory set value.
3. Turn the SRZ unit’s power OFF and ON again. When the power is turned ON, the changed System data
values are enabled.
Communication setting data of Z-COM module
Z-COM settings of Communication speed, Communication protocol and Data bit configuration can be set
even by the Loader communication or Host communication.
Set switch No.8 to “ON” when performing communication by the communication settings
set via Host communication or Loader communication. When set to “ON,” the DIP switch
settings are disabled.
If you changed the communication setting data, the data change become valid the power
of the Z-COM module is turned on again or when control is switched from STOP to RUN.
R/W: Read/Write
Name
RKC
Iden-
tifier
Modbus
register address
Digits
Attri-
bute
Data range and
Number of data
Factory
set value
HEX DEC
Communication 1
protocol
VK 8000 32768 1 R/W 0: RKC communication
1: Modbus
0
Communication 1
communication
speed
VL 8001 32769 1 R/W 0: 4800 bps 2: 19200 bps
1: 9600 bps 3: 38400 bps
2
Communication 1
data bit
configuration
VM 8002 32770 7 R/W Modbus: 0 to 2
RKC communication: 0 to 5
Refer to Table 1 (Data bit
configuration).
0
Communication 1
interval time
VN 8003 32771 7 R/W 0 to 250 ms
10
R/W: Read/Write
Name
RKC
Iden-
tifier
Modbus
register address
Digits
Attri-
bute
Data range and
Number of data
Factory
set value
HEX DEC
Communication 2
protocol
VP 8004 32772 1 R/W 0: RKC communication
1: Modbus
2: MITSUBISHI MELSEC series
special protocol
A-compatible 1C frame
(format 4) AnA/AnUCPU
common command (QR/QW)
QnA-compatible 3C frame
(format 4) command
(0401/1401)
Register type: ZR register only
3: OMRON SYSMAC series
special protocol
4: MITSUBISHI MELSEC series
special protocol
A-compatible 1C frame
(format 4) ACPU common
command (WR/WW)
5: YOKOGAWA FA-M3R
special protocol
0
Communication 2
communication
speed
VU 8005 32773 1 R/W 0: 4800 bps 2: 19200 bps
1: 9600 bps 3: 38400 bps
2
Communication 2
data bit
configuration
VW 8006 32774 7 R/W Modbus: 0 to 2
RKC communication: 0 to 5
PLC communication: 0 to 11
Refer to table 1 (Data bit
configuration).
0
Communication 2
interval time
VX 8007 32775 7 R/W 0 to 250 ms 10
Table 1: Data bit configuration
Set value Data bit Parity bit Stop bit Modbus RKC communication PLC communication
0
8
Withou
t
1
Can be set
Can be set
Can be set
1
8
Even 1
2
8
Odd
1
3
7
Withou
t
1
Cannot be
set
4
7
Even
1
5
7
Odd
1
6
8
Withou
t
2
Cannot be set
7
8
Even 2
8
8
Odd
2
9
7
Withou
t
2
10
7
Even
2
11
7
Odd
2
Data range: Modbus: 0 to 2 RKC communication: 0 to 5 PLC communication: 0 to 11
6. PLC COMMUNICATION SETTING
Sets the communication items of PLC side.
The setting item varies depending the PLC. The details of the setting procedure for the PLC, refer to
the instruction manual for the PLC being used.
Programmable controlle
r
(PLC)Personal compute
r
Use GX Developer
(MITSUBISHI) or
CX-Programmer (OMRON)
to configure PCL
communication settings.
MITSUBISHI MELSEC series,
OMRON PLC SYSMAC series or
YOKOGAWA FA-M3R
MITSUBISHI MELSEC series
Recommend setting example
Item Description
Protocol Format 4 protocol mode
Station number 00
Computer link/multi-drop selection Computer link
Communication rate Set the same as Z-COM
Operation setting Independent
Data bit 7
Parity bit Without
Stop bit 1
Sum check code Provided
Writing during RUN Allowed
Setting modification Allowed
Termination resistor Connect the termination resistor attached to the PLC
OMRON SYSMAC series
Recommend setting example
Item
Description
Serial communication mode High-order link
Unit number (Model No.) 0
Start bit 1
Data bit 7
Stop bit 2
Parity bit Even
Transmission speed Set the same as Z-COM
I/O port selection RS-422A
Synchronization selection Internal synchronization
CTS selection 0 V (always ON)
5 V supply OFF
Termination resistor Termination resistor is inserted
YOKOGAWA FA-M3R
Recommend setting example
Item Description
Station number 01
Start bit 1
Data bit 8
Stop bit 1
Parity bit Without
Check sum None
Communication rate Set the same as Z-COM
Termination resistor Set the termination switch to 2-wire mode or 4-wire
mode to conform to the wiring system being used
(2-wire or 4-wire).
7. PLC COMMUNICATION DATA TRANSFER
The data transmitted between the PLC and the SRZ unit is compiled in the PLC communication data map. In
the PLC communication data map the communication data is classified into System data (monitor items),
Request commands, Monitor groups, and Setting groups.
For the PLC communication data map, refer to the Z-COM PLC Communication Data List
(IMS01T15-E).
7.1 Data Transfer Type
Data transfer between PLC and SRZ unit are executed by Request command. For the Request command,
both Setting request bit and Monitor request bit are available.
Setting request bit (PLC SRZ)
This command requests that the SRZ unit read the communication data of the Setting group on the PLC side.
[Processing]
(1) Just when “1” is set to the Setting request bit, the SRZ unit starts reading the data from the PLC side.
(2) All data of the setting communication group is transferred from PLC to the SRZ unit.
(3) After data transmission is completed, the Setting request bit becomes “0.”
Monitor request bit (PLC SRZ)
This command requests that the SRZ unit write the communication data of the Setting group on the PLC side.
[Processing]
(1) Just when “1” is set to the Monitor request bit, the SRZ unit starts writing the data to the PLC side.
(2) All data of the setting communication group is transferred from SRZ unit to the PLC.
(3) After data transmission is completed, the Monitor request bit becomes “0.”
Monitor group
The Monitor group communication data is always transferred as monitor data between the PLC and the SRZ
unit regardless of the Request command setting.
7.2 Data Transfer Procedures
Change each set value of SRZ unit from the PLC after the initial settings are made.
If each set value of SRZ unit is changed from the PLC without setting the initial values, it is re-written to “0” with
each set value of the PLC at that time set to “0.”
Initial setting
Data setting
When the Setting group communication data is transferred from PLC to the SRZ unit.
Data processing precautions
The data type is treated as binary data with a sign and without a decimal point. For this reason, carefully
express and set the data. (Excluding the bit data)
When the SRZ unit power is turned ON, the Z-COM modul
e
begins collecting the Z-TIO module and Z-DIO module data.
In addition, writing of the System data (monitor items) begin
s
after the PLC communication start time (Factory set value:
5
seconds) has passed.
When the PLC register Monitor request bit is set to “1,” th
e
SRZ unit begins writing the Setting group data to the PLC.
During data write:
Treat the data of all items as inconsistent during the data write.
If the PLC register’s Monitor request bit is “0,” it shows th
e
data write to the PLC has been completed.
The Z-COM module changes the System communication
state to “1” when collection of the Z-TIO and Z-DIO modul
e
data is completed.
When the System communication state becomes “1,” PL
C
communication can be performed.
System communication
state
1?
YES
NO
Start
Set “1” to
the Monitor request bit.
Monitor request bit
0?
YES
NO
End
Turn on power of each
instrument
Set the Setting group
communication data values in
the register (memory) on
the PLC side.
Set the Setting request bit to “1.”
[Data setting]
When the PLC register’s Setting request bit is set to “1,” the SR
Z
unit begins reading the data set in the register (memory) on th
e
PLC side.
During data read:
Treat the data of all items as inconsistent during the data read.
Setting request bit
0?
If the PLC register’s Setting request bit is “0,” it shows that
reading of data from the PLC has been completed.
NO
Set the Monitor request bit to “1.”
[Confirmation of setting data]
When the SRZ unit sets the PLC register’s Monitor request bit t
o
“1” to check the data read from the PLC, the SRZ unit begin
s
writing data to the PLC.
YES
During data write:
Treat the data of all items as inconsistent during the data write.
Start
If the PLC register’s Monitor request bit is “0,” it shows
that writing of data from the PLC has been completed.
Monitor request bit
0?
NO
YES
End
/