Page is loading ...

Operating Instructions
PROFITESTPV
Peak Power Meter and Curve Tracer for PV Modules and
Generators up to 1000 V DC, 20 A DC, 20 kW
3-349-633-03
3/3.16

2 GMC-I Messtechnik GmbH
Contents Page Contents Page
1 License Agreement .......................................................... 3
2 Introduction ...................................................................... 4
3 Use for Intended Purpose ................................................. 4
4 Safety Precautions ........................................................... 4
4.1 Safety Features and Precautions .....................................................4
5 Warnings .......................................................................... 5
6 Operating the PROFITEST PV ............................................ 6
6.1 Controls and Connectors ................................................................6
6.2 General Notes ...............................................................................6
6.3 Connecting Peripheral Devices .......................................................6
6.4 Power Supply ................................................................................7
6.5 Connection to a PC ........................................................................7
6.6 Connecting the Solar Generator ......................................................7
6.7 Measured Value Transducers for Temperature and
Irradiation ......................................................................................7
6.8 Switching the Instrument On ..........................................................8
6.9 Buttons .........................................................................................8
6.10 Measurement ................................................................................9
6.10.1 Entering Module, Customer and System Data ..................................9
6.10.2 Start Measurement ........................................................................9
6.10.3 Archive .........................................................................................9
6.10.4 Transfer ......................................................................................10
6.10.5 Results .......................................................................................10
6.11 Messages ...................................................................................10
7 1000 V / 32 A Load Disconnector ................................... 11
8 Influences on Measuring Accuracy ................................ 11
9 Installing PV Analyzer Transfer Software ....................... 12
10 Installing the USB Device Driver (CDM) .......................... 13
10.1 Installation via “Found New Hardware” ..........................................13
10.2 Uninstalling the CDM Driver ..........................................................14
11 Using PV Analyzer Transfer Software ............................ 15
11.1 The File Menu .............................................................................15
11.1.1 Open ..........................................................................................15
11.1.2 Save as ... ...................................................................................15
11.1.3 Browse .......................................................................................15
11.1.4 Export .........................................................................................16
11.1.5 Report .........................................................................................16
11.1.6 Analysis ......................................................................................17
11.1.7 Printer Setup ...............................................................................17
11.1.8 Exit .............................................................................................17
11.2 Edit .............................................................................................17
11.2.1 Cut .............................................................................................17
11.2.2 Copy ...........................................................................................17
11.2.3 Paste ..........................................................................................17
11.3 Extras .........................................................................................17
11.3.1 Start Measurement at the PROFITEST PV
(“Trace Curve” button). ................................................................17
11.3.2 Managing Files at the PROFITEST PV (“Data Transfer” button) ...18
11.3.3 Transfer Date and Time to the PROFITEST PV ..............................18
11.3.4 Continuous Measurement ............................................................18
11.3.5 Editing the PROFITEST PV Sensor Database .................................19
11.3.6
Managing Modules at the PROFITEST PV
(“Module List” button) ........................................................................19
11.3.7
Managing Measuring Tasks at the PROFITEST PV
(“Measuring Tasks” button) ................................................................19
11.3.8 Calculating Internal Series Resistance Rs ......................................19
11.3.9 Customer Database .....................................................................20
11.3.10 Module Database ........................................................................20
11.3.11 Settings ......................................................................................20
11.3.12 Setting Temperature Offset ..........................................................21
11.3.13 Firmware Update .........................................................................21
11.4 Using the Graphic Interface ..........................................................21
11.4.1 Measuring Points On/Off (“Measuring Points” button) ....................21
11.4.2 MPP On/Off (“Show MPP” button) ................................................21
11.4.3 Display Theoretical Curve On/Off ..................................................21
11.4.4 Display Characteristic STC Curve On/Off .......................................21
11.4.5 Power Display On/Off ...................................................................21
11.4.6 Key On/Off (“Key” button) .............................................................22
11.4.7 Stretch On /Off (“Max. Zoom” button) ...........................................22
11.4.8 To Clipboard (“Clipboard” button, main toolbar) .............................22
11.5 Results .......................................................................................22
11.6 Help ...........................................................................................22
11.6.1 Contents .....................................................................................22
11.6.2 Search ........................................................................................22
11.6.3 Using Help ..................................................................................22
11.6.4 Info .............................................................................................22
12 Technical Data ............................................................... 23
12.1 Unit of Measure ...........................................................................23
12.2 Sensor Connection Pin Allocations ................................................23
12.3 Computer Unit .............................................................................23
12.4 Display .......................................................................................23
12.5 Operation ....................................................................................23
12.6 Power Supply ..............................................................................23
12.7 Dimensions .................................................................................23
12.8 Operating Conditions ...................................................................23
12.9 Optionally Available .....................................................................23
13 List of Symbols Used in Formulas .................................. 24
14 Causes of Reduced Output and Yield ............................. 25
15 Characteristic IU Curves: Contexts ................................. 26
16 Sample Characteristic Curves from Actual
Practice (source: PVE) ..................................................... 29
17 Glossary ......................................................................... 30
18 Appendix A ..................................................................... 32
18.1 Charge Level Indicator for Integrated Rechargeable Battery ............32
18.2 Acoustic Signals ..........................................................................32
19 Maintenance and Recalibration ..................................... 33
19.1 Return and Environmentally Sound Disposal ..................................33
19.2 Recalibration ...............................................................................33
19.3 Repair and Replacement Parts Service
Calibration Center and Rental Instrument Service ..........................33
20 Product Support ............................................................. 34

GMC-I Messtechnik GmbH 3
1 License Agreement
The following conditions apply to the use of GMC-I Messtechnik
software by the end user, hereinafter referred to as “licensee”.
The subject matter of this agreement if the computer program
included on the data storage medium, the program description
and the instructions for use, as well as all other associated printed
materials, hereinafter referred to as “software”.
We draw the user’s attention to the fact that it is not possible, with
the current state-of-the-art, to produce computer software such
that it functions in an error-free fashion in all applications and
combinations. The subject matter of the license agreement is thus
once piece of software only, which is generally usable as set forth
in the program description and instructions for use.
For the duration of this agreement, GMC-I Messtechnik GmbH
grants you the non-exclusive personal right (hereinafter referred to
as “license”) to use the accompanying copy of GMC-I Messtech-
nik software on a single computer (i.e. with a single central pro-
cessing unit), and at a single location only. If this single computer
is a multi-user system, the right to use the software applies to all
users of the system.
As the licensee, you may transmit software in physical form (i.e.
stored to a data storage medium) from one computer to another,
on the condition that it will always be used on one computer at
any given point in time.
Any further use is impermissible.
The licensee is forbidden:
a) To forward the software or associated printed materials to any
third party, or otherwise make it accessible to any third party,
without prior written consent from GMC-I Messtechnik GmbH
b) To transfer the software from one computer to another via a
network or other data transmission lines
c) To modify, translate, reverse engineer, decompile or disas-
semble the software without prior written consent from
GMC-I Messtechnik GmbH
d) To produce other work derived from the software or to dupli-
cate the printed materials
e) To translate or modify it the printed materials, or to produce
other work derived from them
Upon purchasing the product, the licensee acquires ownership of
the physical data storage medium only, to which the software has
been recorded. Even in this case, the licensee does not acquire
any rights to the software. GMC-I MesstechnikGmbH reserves all
rights to the software, in particular regarding publication, duplica-
tion, editing and utilization rights.
The software and the associated printed materials are protected
by copyrights. Insofar as the software is not copy protected, you
are entitled to make a single backup copy for purposes of data
security. You are obligated to attach or record the copyright
notice of GMC-I Messtechnik to the backup copy. Any copyright
notice included in the software and registration numbers recorded
to it may not be removed. It is expressly prohibited to copy or oth-
erwise duplicate the software or the printed materials, either in
part or in their entirety, in their original or in any modified form, or
in any form involving mixing with, or inclusion in, other software.
The right to use the software can only be transferred to a third
party with prior written consent from GMC-I Messtechnik, and
only under the conditions set forth in this agreement. Giving away,
renting and loaning the software are expressly forbidden.
The license agreement is valid for an indefinite period of time. The
licensee’s right to use the software expires automatically without
notice in the event that he violates any of the conditions of this
agreement. Upon termination of the licensee’s right to use the
software, he is obligated to destroy the original data storage
medium, as well as all copies of the software, including any modi-
fied copies and the printed materials.
GMC-I Messtechnik draws attention to the fact that the licensee is
liable for all damages resulting from copyright violations incurred
by GMC-I Messtechnik due to any breach of the conditions of this
agreement committed by the licensee.
GMC-I Messtechnik is entitled to update the software at its own
discretion.
GMC-I Messtechnik is not obligated to automatically make any
software updates available to the licensee.
Guarantee:
a) GMC-I Messtechnik guarantees to the original licensee that, at
the time of delivery, the data storage medium to which the
software has been recorded, as well as the hardware supplied
with the software, demonstrate error-free material and work-
manship when used under normal operating conditions and
with normal maintenance.
b) In the event that the data storage medium or the hardware
delivered with it should be defective, the buyer is entitled to
demand replacement during the guarantee period of 6
months after delivery. The buyer must return the data storage
medium and any hardware supplied along with it to this end,
together with the backup copy, the printed materials and a
copy of the invoice to GMC-I Messtechnik.
c) If a defect as described in point b) is not eliminated within a
reasonable period of time by means of replacement, the buyer
is entitled to demand either a reduction of the purchase price
or cancellation of the sales contract at his own discretion.
d) GMC-I Messtechnik does not assume any liability for defects
in the software. In particular, GMC-I Messtechnik does not
guarantee that the software shall fulfill the buyer’s require-
ments and purposes, or that it functions together with other
software programs selected by the buyer. Responsibility for
correct selection and the consequences of use of the soft-
ware, as well as any intended or achieved results obtained
with the software, are borne by the buyer. The same applies
to the printed materials which accompany the software. If the
software is not generally usable in the spirit of the program
description and the instructions for use, the buyer has the
right to rescind the sales contract. GMC-I Messtechnik also
has the right to rescind the sales contract if such usability can-
not be restored at reasonable expense.
e) GMC-I Messtechnik assumes no liability for damages, unless
they result from gross negligence or malicious intent on the
part of GMC-I Messtechnik. Liability for gross negligence is
also excluded vis-à-vis merchants. Any liability resulting from
characteristics warranted by GMC-I Messtechnik remain unaf-
fected. Liability for consequential damages which are not cov-
ered by warranted characteristics is excluded.

4 GMC-I Messtechnik GmbH
2 Introduction
The PROFITEST PV allows for the measurement of the characteristic IU
curves of photovoltaic modules and strings. Thanks to a new process, the
instruments are capable of calculating peak power, internal series resistance Rs
and shunt resistance Rp on the basis of measured values directly at the PV sys-
tem’s installation site, and displaying them at the color graphic display.
Peak power is power achieved by a module under standard test conditions (STC)
[1]. Until recently, the measurement of peak power was only possible by means
of a complex procedure in specially equipped laboratories. Thanks to a patented
process developed by Professor Dr. Wagner at the university of applied sciences
in Dortmund, Germany, this measurement can now be easily performed with
the PROFITEST PV. Quality control for PV systems is thus quick and eco-
nomical without a long learning curve. In actual practice, this simple yet deci-
sive test assures safety for the customer and for the installer. Beyond this,
acquired characteristic curves make it possible to draw further conclusions
regarding the electrical characteristics of the measured module or string. And
thus the PROFITEST PV is also suitable for use in research and develop-
ment.
The PROFITEST PV is a portable measuring instrument with inte-
grated battery (supply power) in a sturdy housing. The instrument
is equipped with its own miniature industrial PC and a high-con-
trast, color graphic, daylight-compatible LCD, and can thus be
used independent of additional devices. However, a PC can be
connected via a standard USB port if required for data transmis-
sion and further analysis of the measured values.
The PROFITEST PV is operated conveniently via a touch-screen
and a menu. The functions are designated in a self-explanatory
fashion with simple pictograms, and the user is prompted contin-
uously by the software. The leaning curve for becoming familiar
with instrument operation is practically non-existent.
All commercially available irradiation sensors can be connected to
the instrument, which generate a voltage of approximately 0 to
100 mV with linear dependence on irradiation (Phox sensors).
Depending on instrument variant, an additional Pt100 sensor can
also be connected. This makes it possible to measure module
temperature, and is mounted to the back of the module.
Measurement Description
The PROFITEST PV automatically measures the characteristic
current-voltage curve of the generator at a capacitive load, as well
as momentary temperature and irradiation at the point in time of
measurement, and calculates the effective solar cell curve, P
pk
,
R
p
and R
s
, on the basis on the measured values [2][3]. Measure-
ment data are saved to continuously battery-backed memory
after measurement, and can thus be retrieved again later (for
example at the office) [4]. The instrument has enough internal
memory storage capacity for several thousand measurements.
The following values are displayed as results:
Absolute values:
• Peak power P
Pk
• Internal series resistance R
s
• Parallel internal resistance (shunt resistance) R
p
Instantaneous values:
•U
pmax
, I
pmax
, P
max
,
•U
oc
, I
sc
, FF, T
mod
, E
TRMS
If desired, the ascertained characteristic IU curve appears directly
at the integrated, high resolution color graphic display.
3 Use for Intended Purpose
The PROFITEST PV peak power meter and characteristic curve
tracer is used exclusively for recording IC curves of individual pho-
tovoltaic modules and strings. Before the device under test is
connected to the measuring instrument, it must be assured that
the DUT cannot, at any time, exceed the measuring instrument’s
maximum permissible current and voltage values.
4 Safety Precautions
Before initial startup of the measuring instrument, read through
the included operating instructions completely in any case,
because it contains important information for the prevention of
damage to the measuring instrument and personal injury! Keep
this manual together with the PROFITEST PV.
Instructions regarding safety are identified with symbols signifying
“Caution!” or “Caution: High-Voltage!,” and must be carefully
adhered to. Damages resulting from non-compliance with these
instruction are excluded from the guarantee. No liability is
assumed for consequential damages.
PV Analysator software necessitates a PC with hard disk and MS
Windows Vista, 7 or 8, as well as a mouse for control purposes.
An available USB port is required in order to connect the
PROFITEST PV to the PC.
Available space on the hard disk required for PV Analysator soft-
ware amounts to roughly 10 MB prior to installation. Make sure
that there is always adequate hard disk memory capacity for sub-
sequent storage of data.
Caution!
!
We would like to draw attention to the fact that, for pur-
poses of data security, it’s very important to create a
backup for program data on separate data storage
media at regular intervals, in order to be able to continue
working without any significant loss of data in the event
that data or the data storage medium is damaged. Even
with the current state-of-the-art, damage of this sort
cannot be ruled out. In the case of damage, do not re-
store individual program files: Always restore the entire
data backup because inconsistencies amongst program
functions might otherwise occur, which in turn may lead
to loss of data! If you have any doubts in such cases,
contact your supplier or the manufacturer.
Opening of Equipment / Repair
The equipment may be opened only by authorized service per-
sonnel to ensure the safe and correct operation of the equipment
and to keep the warranty valid.
Even original spare parts may be installed only by authorized ser-
vice personnel.
In case the equipment was opened by unauthorized personnel,
no warranty regarding personal safety, measurement accuracy,
conformity with applicable safety measures or any consequential
damage is granted by the manufacturer.
4.1 Safety Features and Precautions
This instrument fulfills all requirements of applicable European and
national EC directives. We confirm this with the CE mark. A corre-
sponding declaration of conformity can be requested from GMC-I
Messtechnik GmbH.
[1] Standard test conditions STC (IEC60904-3) specify irradiation: 1000 W per sq.
meter, spectrum AM: 1.5, module temperature: 25°C.
[2] Wagner A.: Peak-Leistung- und Serien-Innenwiderstand-Messung unter natürli-
chen Umgebungsbedingungen. - EuroSun Kopenhagen 2000.
[3] Bendel C., Wagner A.: Photovoltaic Measurement relevant to the Energy Yield. -
WCPEC3 Osaka 2003
[4] Schulte K.M., Wagner A.: Die effektive Solarzellenkennlinie. - Anwendung Teillast-
Berechnung. Staffelstein. 2002.

GMC-I Messtechnik GmbH 5
5 Warnings
Non-observance of the following information may result in sever
injury and/or mortal danger!
Caution!
!
Read the operating instructions before starting the
instrument up.
Caution: High-Voltage!
Danger of electric shock
Caution: measuring category I. The instrument may not be used in
measuring categories II, III and IV.
Measurement terminals may not be connected to ground.
This instrument may never be used in proximity to flammable
gases.
Keep children and babies away from the measuring setup!
The measuring instrument may not be used in areas with exces-
sive dust or high atmospheric humidity. No liquids may be permit-
ted to penetrate into the instrument’s interior.
In case of unusual sounds or odors, or if smoke develops, switch
the instrument off immediately and disconnect it from supply
power with the load disconnector.
Check the power measurement cable for damage prior to each
measurement. If the measuring instrument’s cables are damaged,
they must be replaced immediately. Cables may not be repaired.
Only a limited DC power source (photovoltaic generator) with no
more than 20 A may be connected to the power measurement
input at the
PROFITEST PV. Connecting other sources may lead to
destruction of the instrument!
Cable connections to the PV generator may only be completed by
qualified electricians. For safety reasons, measurement should
only be performed by a trained electrician. Other required qualifi-
cations and laws (e.g. VDE 0100) must also be adhered to,
because mortal danger prevails due to heavy current and high-
voltage!
The devices included in the scope of delivery of the
PROFITEST PV (PROFITEST PV basic instrument, irradiation ref-
erence sensor) may only be opened up and repaired by qualified
personnel who have been authorized to do so by the manufac-
turer. All cables which might conduct dangerous voltage or cur-
rent must be disconnected before each and every intervention.
Caution: Even after disconnecting the device under test, life endangering
voltage may still be present inside the PROFITEST PV!
Under certain circumstances, the solar generator may generate
very high current and voltage, which may result in severe injury in
the event of improper handling! The corresponding safety regula-
tions (VDE) must be adhered to.
Observe all applicable safety regulations regarding work per-
formed on roofs.
!! Very Important !!
Never connect or disconnect the solar generator cables to or from
the
PROFITEST PV without first isolating the generator! An all-pole
safety switch included in the measurement cable (see section 7)
allows for isolation and hazard-free connection of the measure-
ment cables to the
PROFITEST PV.
The plugs at the ends of the measurement cables for power mea-
surement (4-wire measurement cable) must be inserted into the
corresponding sockets as far as they will go. The measuring
instrument and the cable might otherwise be damaged during
measurement due to arcing in the plug connection (fire hazard!).
During measurement and in the case of electrical damage to the
measuring instrument, the generator is short-circuited inside the
PROFITEST PV and arcing may occur between the plug and the
socket when the plug is removed, which may cause severe dam-
age to health, as well as property damage! Disconnection from
the
PROFITEST PV is only rendered safe after isolating the solar
generator.

6 GMC-I Messtechnik GmbH
6 Operating the PROFITEST PV
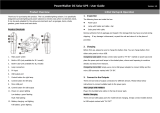
6.1 Controls and Connectors
1 On/off switch
2USB port to PC
3 Socket for external power supply, 16 V DC / 2 A
4 Status LEDs
5 Color graphic display
6 Irradiation input or combined
irradiation-temperature input
7 Temperature measurement input, Pt100 or Pt1000
8 4-wire voltage measurement input
9 4-wire current measurement input
6.2 General Notes
As is the case with nearly all electronic measuring instruments,
the PROFITEST PV can only be used within a limited temperature
range (see appendix). For this reason, it’s important to avoid
exposing the PROFITEST PV to direct sunlight for lengthy periods
of time. Keep the PROFITEST PV in a shaded area if possible, or
protect it from direct sunlight during long periods of work, for
example with a screen.
In its standard variant, the PROFITEST PV is not intended for
installation into other devices or holders. During operation, it’s
important that air surrounding the PROFITEST PV can circulate
freely in order to assure sufficient heat dissipation. For strict stor-
age purposes (without batteries – i.e. no charging of the batteries
– when no heat is generated inside the instrument) the instrument
can be stacked.
Caution!
!
Under no circumstances may any plug connections be
disconnected during measurement! Due to DC voltages/
currents which are very high in some cases, arcing may
otherwise occur at the point of contact which may cause
fire or severe personal injury (see section 4).
The membrane front panel at the PROFITEST PV is rugged. How-
ever, please take good care of it in order to assure that you will be
able to enjoy your instrument for many years.
Observe the following suggestions in order to prevent damage to
the front panel:
Do not contact the front panel with sharp or pointed objects. In
addition to causing scratches, this may also result in destruction
of the membrane at places at which, for example, keys are
located behind it.
Clean the front panel with a soft, moist cloth. Do not use any plas-
tic sponges or abrasive cleansers, because this would cause
scratching of the Plexiglas sheet mounted in front of the LCD
monitor, which in turn would impair display quality.
When closed, the instrument housing is waterproof (IP 67). Never-
theless, do not subject the instrument to the direct influence of
water. Never leave the instrument in the rain.
In order to obtain good measuring accuracy, solar irradiation
should amount to at least 500 W per square meter at the time of
measurement if at all possible. Curves can be traced with lower
irradiation values, but results for peak power are inaccurate in this
case and are no longer displayed for this reason.
6.3 Connecting Peripheral Devices
The measuring setup consists of the peak power measuring
instrument and the following additional components:
1 USB port for optional PC
2 External power pack, 16 V DC, 2 A
3 Irradiation reference sensor
4 External Pt100 for temperature at the back of the module or
short-circuiting plug
5 External safety disconnector (see section 7) between the
4-wire power measuring cable and the PROFITEST PV
6 4-wire power measuring cable
The PROFITEST PV is equipped with the following inputs and out-
puts (except for the jacks for the external power pack, all inter-
faces are located on the front panel, and are labeled):
1
2
3
4
5
6
7
9
8
Interface Function
Mains External power pack: connection via jack plugs,
5.5 x 2.1 mm
Temperature Connection for temperature sensor
• Instruments with second temperature measuring input:
external Pt100 for acquiring temperature at the back of
the module
• Other instruments: external Pt100 or Pt1000 (depend-
ing on variant) for measuring temperature at the back of
the reference cell
Irradiation Socket for irradiation reference sensor (Phox)
• The Pt100/Pt1000 reference sensor and the measured
irradiation value are combined into a single 8-pin plug.
4-wire measurement Measurement input (voltage measurement)
Current input Power input (for current measurement)
PC Port for connection to the control PC via USB cable
1
2
3
4
5
6

GMC-I Messtechnik GmbH 7
6.4 Power Supply
The PROFITEST PV includes a rechargeable battery, thus allow-
ing for use independent of mains power. The battery is charged
by means of an external power pack.
Connect the power pack to the external power supply socket at
the front panel. The battery is charged for as long as the power
pack is connected and active. In order to interrupt charging, sim-
ply pull the plug from the power pack out of the socket at the
PROFITEST PV.
The battery charge level is indicated by means of an LED at the
front panel, see section 18.1.
6.5 Connection to a PC
The PROFITEST PV is usually used independent of a PC. How-
ever, if extended data evaluation is required, or if the
PROFITEST PV needs to be controlled externally, it can be con-
nected to a PC: Connect one end of the included USB cable to an
available USB port at your PC, and the other end to the output at
the PROFITEST PV provided for this purpose (“PC” socket).
Before you can control the PROFITEST PV from your PC, you’ll
have to install the device driver for the USB port (section 10).
First of all, activate transfer at the PROFITEST PV.
Otherwise, no
connection can be established between the PV
Analysator control program and the PROFITEST PV.
6.6 Connecting the Solar Generator
Caution!
!
During measurement, the solar generator under test may
only be connected to the PROFITEST PV. It is absolutely
mandatory to disconnect any power consumers, re-
chargeable batteries or inverters. Due to the fact that the
PROFITEST PV short-circuits the solar generator during
characteristic curve tracing, the PROFITEST PV could
otherwise be severely damaged or destroyed by a bat-
tery connected in parallel or a charging capacitor at the
input of an inverter.
Connect the measuring instrument, correctly polled, to the solar
generator with the included, adequately dimensioned connector
cable. The plus pole is red and the minus pole is black.
Caution!
!
Make sure that all of the power cable’s plugs have been
inserted as far as they will go into the sockets in the
housing.
Use the two sockets at the right-hand side of the housing for the
solar generator (“current input”). In case of reversed polarity,
short-circuiting of the PV generator inside the PROFITEST PV is
prevented by means of a reverse polarity protection diode.
It’s important to ensure that all of the 4-wire measurement inputs
are connected in any case. If measurement will be conducted
with only two measurement cables, connect the sockets at the
PROFITEST PV to the neighboring sockets of the same color with
the help of short-circuiting plug, laboratory cables or the like. Volt-
age measurement is not possible unless all of the 4-wire mea-
surement inputs at the PROFITEST PV have been connected.
Furthermore, significant voltage measurement error must other-
wise be expected.
Caution!
!
Maintain an adequate distance from current conducting
parts for the cable connection to the solar generator, be-
cause high voltages may be present and personal injury
may result even if no direct contact takes place!
6.7 Measured Value Transducers for Temperature and
Irradiation
In order to conduct a peak power measurement, a Pt100/Pt1000
temperature sensor (depending on equipment) and a Phox irradi-
ation reference sensor must be connected to the appropriate
sockets at the PROFITEST PV (included combination device).
Neither of these measured value transducers is required for mea-
suring internal series resistance or for strict characteristic curve
tracing. The sockets are laid out such that temperature sensor
and irradiation reference sensor connections cannot be reversed.
If at all possible, the combination irradiation-temperature sensor
must be connected to the modules under test such that its orien-
tation to the sun is the same as that of the modules (compass
direction and installation angle). Be aware of the fact that any
close-by bright surfaces such as buildings may distort light inci-
dence.
For this reason, the sensor should not be set up at any consider-
able distance from the string (e.g. string on the roof and sensor in
the driveway). Due to the fact that solar cells react not only to
direct irradiation, but rather to die reflected ambient light as well,
the sensor may detect other light and distort the measurement
even if the sensor and the modules demonstrate the same orien-
tation.
In the simplest cases, the sensor is secured to the module under
test with a clamp. Make sure that no shadows are cast on the
module to be measured as a result. After mounting, the sensor
should be allowed to adjust to ambient conditions for several min-
utes. In the case of instruments without a second temperature
measurement input, the irradiation reference cell must reach a
temperature which approximates that of the module under test
(temperatures can be read from the display when the
PROFITEST PV is switched on). For safety reasons we recom-
mend additionally checking the temperature at the back of the
test object manually, for example with the help of an infrared ther-
mometer. Only then should measurement be performed with the
PROFITEST PV (see also section 8).

8 GMC-I Messtechnik GmbH
6.8 Switching the Instrument On
Switch the PROFITEST PV on with the “Power” switch on the
front panel. The initial window appears at the color display:
The PROFITEST PV conducts several self-tests and requires
approximately 10 to 15 seconds before it’s ready for operation.
The instrument is ready for operation when the main menu
appears at the LCD panel:
The following information is displayed:
Header: instrument serial number, calibration date, firmware ver-
sion
Data line: momentary irradiation, temperature of the irradiation ref-
erence sensor, temperature at the back of the module (optional),
voltage applied to the power input
Sensor line: The currently active irradiation sensor is indicated here,
and can be switched if applicable.
Footer: current date and time, “Info”, “Archive”, “PC” and “New
Measurement” buttons
Indicator lamps on the front panel:
* In the case of continuous alternation between green and yellow, the battery is be-
ing charged in the charge conservation mode. This charging procedure can be
continued for 1 to 3 hours. Longer charging in this mode is not advisable because
the battery might otherwise be damaged.
The PROFITEST PV generates acoustic signals in order to indi-
cate various system functions and errors. A list of the individual
acoustic signals is included in the appendix.
6.9 Buttons
Available functions are represented at the screen by means of
buttons which are identified with symbols for the respective oper-
ations, for example a PC symbol identifies the data transfer func-
tion.
Charge level
(3-color LED)
Red: battery depleted (charge immedi-
ately!)
Green: battery ready for operation
Yellow: battery fully charged *)
Operation is not
possible!
Operation is possible
Operation is possible
External power
supply
Lights up when the external power pack is connected and switched
on. The integrated rechargeable battery is charged automatically in
this case as well.
Info: provides information regarding the buttons
Switch: an entry can be selected here
New curve trace, opens submenu
Load measurement from the archive
Connection to the PC (transfer)
Start curve tracing now
General: cancel/exit function
Generate events list
Display characteristic IU curve
Add entry
Previous page
Next page
Acknowledge selection, OK

GMC-I Messtechnik GmbH 9
6.10 Measurement
Observe the safety precautions in section 4 and section 5, as well
as the measuring accuracy factors in section 8. Measurement is
started either at the PROFITEST PV or from the interconnected
analysis PC. Measurement should not be started until the solar
generator and the required sensors have been connected. The
measurement itself takes about 1 to 2 seconds, after which
results are immediately calculated and displayed at the
PROFITEST PV (or at the PC).
Accesses the measurement sub-page.
6.10.1 Entering Module, Customer and System Data
Before measurement is started, the user has the opportunity of
entering module, customer and system data. The measured val-
ues can then be saved directly to the customer data.
Modules ser: Number of modules connected in series.
Acknowledge with “OK”.
Abort returns to previous page.
Modules par: Number of strings/modules connected in
parallel.
Acknowledge with “OK”.
Abort returns to previous page.
Customer Enter / select customer from database
Create customer data either in PV Analyzer or
directly at the Profitest PV (max. 30 characters).
Add entry
Acknowledge with “OK”.
Abort returns to previous page.
System Enter / select system parameters
System parameters are set up either in PV
Analyzer or directly at the Profitest PV
(max. 30 characters).
Add entry
Acknowledge with “OK”.
Abort returns to previous page.
String / Module Enter / select installation parameters
Installation parameters are set up
either in PV Analyzer or directly at the
Profitest PV (max. 30 characters).
Add entry
Acknowledge with “OK”.
Abort returns to previous page.
Module Type
Enter / select module types / parameters
More than
20,000 entries in PV Analyzer’s inte-
grated
database. Up to 50 module types can be
exported to the test instrument data transfer.
Add entry (manually in the test instrument /
characteristic module data required)
Acknowledge with “OK”.
Abort returns to previous page.
6.10.2 Start Measurement
This option starts one-time only curve tracing: Measure-
ment is conducted automatically, any errors are indi-
cated and results such as peak power, internal series
resistance R
s
, as well as others including the characteristic IU
curve can be accessed immediately at the graphic display.
6.10.3 Archive
This function makes it possible to access measurement
series which have been saved automatically for a previ-
ous measurement. Existing measurement series are
listed with names based on the dates on which they were per-
formed.
A file can be selected with the help of the “Up” and
“Down” buttons.
Any other additional pages can be displayed with
the help of the “Left” and “Right” buttons.
A file can be selected with the “OK” button. The
“Abort” button returns the display to the previous
page.

10 GMC-I Messtechnik GmbH
The “Delete” button can be used to remove the
selected data from memory at the
PROFITEST PV (Caution: this procedure cannot
be undone).
6.10.4 Transfer
This function prepares the PROFITEST PV for control by
means of an interconnected PC. The function can be
exited by pressing a button at the PROFITEST PV.
6.10.5 Results
Calculated values (peak power, Rs, Rp, FF), as well as measured
values (voltage and current) are displayed in the results page.
The characteristic IU curve can be displayed with the
“Diagram” button, and the display can be returned to the
results page with the “List” button.
6.11 Messages
“Fluctuating irradiation (ref. cell)!”,
“Too little irradiation!”,
“Fluctuating irradiation (mod)!”
Irradiation at the reference cell or the module is not
constant enough (e.g. due to clouds), and measure-
ment results may be faulty.
“Not available”
This message indicates that the measured value could
not be calculated.
“No space for new data!”
“Delete data from the PROFITEST PV”
Internal non-volatile memory at the PROFITEST PV is
full. Before performing any further measurements, pre-
viously stored measurements should be deleted from
the PROFITEST PV (see section 6.10.3).
“Write error”
Problems while writing a series of measurement data
to internal non-volatile memory.
“Measurement not yet possible”
Safety waiting time between two measurement has
not yet elapsed.
“Rs calculation not possible”
The measurement data do not allow for the calculation
of R
s
(see next point).
“Measured values cannot be analyzed”
The measured values include data which make an
analysis of the characteristic curve impossible, for
example the shape of the curve deviates significantly
from the standard curve.
“Input voltage too high”
Switch the generator off immediately with the load dis-
connector! The measuring instrument may be dam-
aged by excessively high voltage.
“Immediate repair required”
The instrument is damaged and must be inspected by
authorized service personnel and repaired if neces-
sary. In this case, the instrument must be immediately
disconnected from the device under test (set the
safety switch to “0” without delay!) and may not be
used again until it has been inspected by the manufac-
turer.
“Incorrect polarity!”
The cables at the PROFITEST PV have been con-
nected incorrectly. Isolate the generator immediately
with the load disconnector and reconnect the cables
correctly.

GMC-I Messtechnik GmbH 11
7 1000 V / 32 A Load Disconnector
This switch is used to isolate the PROFITEST PV peak power
meter and characteristic curve tracer from PV generator voltage
while working with cables, thus assuring safety for the user.
Operation:
Set the switch to the neutral position (0) before connecting cables
(both “0” positions are identical).
Insert the measurement cables with MC plugs included with the
PROFITEST PV into the sockets at the switch as far as they will
go (red plugs to red sockets, black plugs to black sockets). The
two red plugs are interchangeable, as are the two black plugs.
Either of the red plugs can be inserted into either of the red sock-
ets, and either of the black plugs can be inserted into either of the
black sockets. Now connect the connector cables from the
switch to the PROFITEST PV (red plugs to red sockets, black
plugs to black sockets). Here as well, either of the red plugs can
be inserted into either of the red sockets, and either of the black
plugs can be inserted into either of the black sockets.
The switch must be set to one of the “1” positions in order to per-
form a measurement. Set the switch back to the “0” position after the
measurement has been completed! The cables can then be safely
disconnected from the PROFITEST PV.
Safety precautions:
Caution!
!
Set the switch to the “0” position before working with the
cables!
Under no circumstances may the safety switch be acti-
vated if you detect any defects at the switch, the hous-
ing, the connector cables or the sockets.
Repair work may only be carried out by trained person-
nel who have been specially authorized to do so by the
manufacturer.
Keep the switch away from liquids, dust and contamina-
tion. Clean the surface with a slightly dampened cloth
only.
8 Influences on Measuring Accuracy
Make sure that the module under test is not shaded (not even
slightly). Even shadows from, for example, blades of grass may
cause detectable error. The same applies to the reference sensor.
Don’t forget that contamination on the modules creates shade as
well.
The more irradiation the module is exposed to, the more accurate
the measurement results. If possible, irradiation (determined by
the combination sensor) to which the module is exposed should
be greater than 500 W per square meter.
The combination irradiation-temperature sensor measures tem-
perature at the back of the reference cell. If the PROFITEST PV is
only furnished with the temperature of the irradiation reference
sensor because no external sensor for measuring temperature at
the back of the module has been mounted, the PROFITEST PV
assumes that the temperatures of the reference cell and the mod-
ule under test are approximately the same. This is the case to a
relatively accurate degree if the reference cell and the PV module
have been subjected to the same amount of irradiation for a long
enough period of time. The module and the cell should be aligned
to the sun for more than 15 minutes prior to measurement to this
end. In order to make sure, the temperature at the back of the
module should be checked in this case, for example with an infra-
red thermometer, before curve tracing.
If possible, the module under test should be aligned perpendicu-
lar to the sun. However, this is frequently not possible. Sufficient
irradiation at the surface of the module is important in this case
(which automatically necessitates orientation toward the sun to at
least a given extent), as is precise alignment of the reference cell:
It must have exactly the same orientation as the module. In the
simplest cases, the combination sensor can be clamped to the
module under test. However, the combination sensor may also be
located some distance from the module, but it must be assured
that alignment to the sun is identical and that no local reflections
will be able to influence irradiation measurement values (the refer-
ence cell must face the same pat of the sky as the device under
test).
The irradiation reference cell and the device under test must also
have the same spectral characteristics (in accordance with IEC
60904) – ideally, both have the same layout. It’s entirely possible
to use a module which is identical in design to the module under
test as a reference: The module is subjected to a load via a preci-
sion shunt resistor, and measurable voltage occurring at the shunt
as a result is used as a measure of momentary irradiation – most
reference sensors function precisely in this way.
Caution!
!
If alignment of the reference cell deviates even a few de-
grees from that of the PV module, considerable error
may occur in the measurement results.
Maximized measurement accuracy can be achieved by perform-
ing several measurements (e.g. 5) for the same object, and statis-
tically evaluating the results.
The parameters which are decisive for measurement accuracy are
listed once again below:

12 GMC-I Messtechnik GmbH
Accuracy of Peak Power Calculations based on IU Curve
Tracing at Photovoltaic Generators using the
PROFITEST PV
Measuring Instrument
Under the following conditions, peak power values obtained with
the PROFITEST PV have an accuracy of ±5% relative to the actual
peak power value of the device under test:
• The device under test is made of monocrystalline or polycrys-
talline silicon cells.
• The device under test is not shaded (not even slightly).
• The irradiation reference sensor is not shaded (not even
slightly).
• The irradiation reference sensor must essentially demonstrate
the same spectral sensitivity as the device under test.
• The measurement is performed in natural sunlight.
• In accordance with IEC 60904, the sun should be aligned per-
pendicular to the surface of the device under test within a tol-
erance of ±10°.
• According to IEC 60904, irradiation must be at least 800 W
per square meter. On the basis of our own comparative mea-
surements, we consider 600 W per square meter adequate.
• Irradiation measurement must take place immediately before
or after characteristic IU curve tracing – elapsed time between
curve tracing and irradiation measurement must be less than
10 ms.
• The measured value form the irradiation reference sensor
must be corrected based on measured cell temperature.
• Cell temperature measurement must take place immediately
before/after curve tracing (within 1 second) with an accuracy
tolerance of 1 K.
• The active surface of the device under test must lie in the
same plane as the surface of the irradiation reference sensor
within a tolerance of ±5%.
• Irradiation must be adequately constant (±10 W per sq. meter)
prior to IU curve tracing for a period of at least 10 seconds, in
order to be able to prevent any misinterpretation of tempera-
tures at the DUT and at the reference cell.
• Irradiation may not fluctuate by more than 10 W per square
meter during IU curve tracing (the PROFITEST PV generates a
warning in this case).
• The temperatures of the device under test and the irradiation
reference sensor must be settled in (no temperature change
may be displayed).
• Voltage and current is measured at the device under test with
separate measurement cables (4-wire measurement).
9 Installing PV Analyzer Transfer Software
PV Analysator is included with the instrument on a CD ROM. The
data storage medium includes a setup program for simple instal-
lation to your PC. The setup program copies all of the necessary
files to your hard disk and configures the program. The software
can be installed by anyone who is experienced in working with
PCs and is familiar with the MS Windows
®
user interface.
Administrator rights may be required in order to install the soft-
ware.
The following steps must be completed to install the software:
1 Insert the CD ROM with the setup program into the corre-
sponding disk drive.
2 If the setup program starts automatically after inserting the CD
ROM, continue with step 5.
3 Select “Run” in the start menu.
4 Enter “x:SETUP” to the entry line which then appears under
“Open” (x: designation of the disk drive with the setup file).
Press the return key or click the OK button.
5 The setup program is now executed. Follow the instructions
which appear at the screen.
6 All of the necessary files are installed to your hard disk by the
setup program, and a new program group is added with an
entry for PV Analysator software.
7 After installation has been completed, start PV-Analysator.exe.
The program should now function as described below.
Use of the program is described in detail in section 11.
At least the following files are required in order to run the program:
The program also installs files with the SUI ending, which contain
measured data for IU curve tracing. When these measurement
data are transferred automatically from the PROFITEST PV, the
filename includes the date and time of the measurement in order
to identify the data record, for example, the file with the name
24-05-01 14_17_04.SUI
contains data from a measurement conducted on 24 May 2001
at 14:17:04 o’clock.
The measurement files are usually saved to folders in the following
directory path: “documents\PV-Analysator\“.
PV-Analysator.exe The control program (directory path: \pro-
grams\PV-Analysator\ )
PV-Analysator.ini The configuration file. This file may not be man-
ually changed (directory path: \documents and
settings\{username}\application data\GMC-I
Messtechnik\PV-Analysator\ )
PV-Analysator.hlp Help file (not yet available) (directory path: fold-
ers\programs\PV-Anlysator\ )

GMC-I Messtechnik GmbH 13
10 Installing the USB Device Driver (CDM)
10.1 Installation via “Found New Hardware”
Using Windows XP as an example, the following describes how to
install the USB driver for the virtual COM port for the
PROFITEST PV:
– A device driver is included in the installation CD in a subdirec-
tory designated “x:\CDM nnnnn”. x: stands for the CD ROM
disk drive with the installation CD and nnnnn stands for the
version number of the USB driver. If necessary, you can
download the latest version of the CDM driver form the FTDI
website (www.ftdichip.com) and decompress the ZIP file to a
directory at your PC.
– If you use Windows XP or Windows XP SP1, your Internet link
should now be temporarily disconnected.
This can be accomplished either by removing the network cable
from your PC, or by deactivating the network adapter card by
right clicking on the corresponding connection under “Control
panel / Network and dial-up connections”, and then selecting
“Deactivate” from the menu.
Connection can once again be established after installation has
been completed.
This is unnecessary with Windows XP SP2, assuming that Win-
dows is configured such that you are asked before a connection
is established for the Windows update function.
– Connect the PROFITEST PV to an available USB port at your
PC. The “found new hardware” dialog is started automatically.
If the PC is not connected to the Internet or if Windows XP SP2 is
correspondingly configured, you are asked before the Windows
update function is started as shown in figure 10.1.
Select “No, not this time” and click the “Next” button in order to
continue with installation.
Figure 10.1
– Select “Install from a list or specific location (advanced)”, as
shown below in figure 10.2, and then click the “Next” button.
Figure 10.2
Figure 10.3
– Select “Search for the best driver in these locations” and enter
the directory path for the driver files to the box (e.g. “D:\CDM
2.02.04”), or search for the directory by clicking the “Browse”
button. After the directory has been entered, click the “Next”
button to continue.
– If Windows is configured such that a warning is displayed
when drivers are installed which are not WHQL certified, a
corresponding warning appears. Click “Continue anyway” in
order to install the driver.

14 GMC-I Messtechnik GmbH
Figure 10.4
– The screenshot in figure 10.4 shows Windows XP copying the
required driver files.
Figure 10.5
– Windows then displays a message indicating that installation
has been successful (fig. 10.5). Click the “Finish” button to
conclude installation for the instruments first port.
– If applicable, the hardware wizard now reappears to install a
second port.
The procedure for installing the second port is the same as for the
first (see above).
– After installation has been completed, the new COM port
appears in the device manager (figure 10.6).
Figure 10.6
10.2 Uninstalling the CDM Driver
Drivers can be removed with the help of the device manager by
simply right clicking the respective device and selecting uninstall.
The device’s associated registry entries are deleted as a result.

GMC-I Messtechnik GmbH 15
11 Using PV Analyzer Transfer Software
Software installation was described in section 9. After starting PV
Analysator, the following display appears:
The document shown above is empty – all displayed values are
zero. You are now able to access measurement data which have
been stored to the hard disk, perform a measurement, or transfer
measurement data from the PROFITEST PV (ascertained mea-
sured values are entered to this document and you can analyze
them further or save them to a file). A diagram (line graph of the
measured values) and results (right column), as well as an export
function (creation of a file with measured values or results in a for-
mat other than the one specified) are available for analysis pur-
poses.
Buttons which appear gray are disabled. They cannot be used
until data are actually available.
11.1 The File Menu
11.1.1 Open
Previously acquired and saved characteristic curves can be
retrieved by clicking the “Open” button. The last data processed
by the program are overwritten in RAM in this case. If you want to
keep these data, they have to be saved before opening another
document. The files have the SUI ending as a standard feature.
After clicking the folder icon next to the displayed directory at the
top of the dialog window, you can specify the directory from
which measurement data will be displayed in the list in the follow-
ing dialog box.
After double clicking an entry in this list, the respective data are
automatically loaded and displayed in the editing window. You
can also select several or all of the entries in the list, and delete or
export the selected data records by clicking the corresponding
button, or print out test reports for them.
11.1.2 Save as ...
The current characteristic curve can be saved to a data storage
medium by clicking the “Save” button. Plain text entries in the
“Description” field are saved along with the curve. The program
supports long file names. The standard filename ending is SUI.
11.1.3 Browse
The browse window displays miniature versions of the character-
istic curves for the measurement files in the selected directory.
This provides you with a quick overview of the measurements
included in the directory and makes it easy to find any conspicu-
ous characteristic curves.
After moving the mouse pointer to a given graphic, the most
important measurement results appear in a small window.
The respective file is opened by double clicking the graphic.

16 GMC-I Messtechnik GmbH
11.1.4 Export
Measurement data files from the PROFITEST PV can be con-
verted to formats which are readable for other programs with the
export function. You can use XLS (MS Excel) and DBF (dBase III+)
formats, as well as three different ASCII representations. Refer to
the manual for the program with which the measured values will
be processed regarding the correct format.
You can export either pure measurement data (IU measuring
points, temperature and irradiation) or calculation results. In the
latter case, the results of several measurements can be exported
together into a table. The data are represented line by line in the
target table.
Select the desired export format with the help of the combo box.
The files to be exported are selected in the file selection dialog
box which appears after clicking the “Select Files” button. Click
the “OK” button after selecting your files.
Export files are now created and saved to the same directory
using the same filename with the appropriate filename ending (i.e.
XLS instead of SUI). You can then process the export files in the
program of your choice. Changes to the export files have no
effect on the original data.
11.1.5 Report
This button opens a measurement report for the currently loaded
data record. The report can be printed out or written to a PDF file.
Please note that under certain circumstances you printer’s page
layout may have to be changed before printing. The print-out uti-
lizes all available space on the paper.
The buttons in the print preview are as follows, from left to right:
•Start printing
•Export to PDF
• Zoom factor
•Full page
• Page layout
• Next/previous page
• Close preview

GMC-I Messtechnik GmbH 17
11.1.6 Analysis
The analysis is used to evaluate the characteristic curve measure-
ment. All of the relevant data are arrange in a table. In the event of
errors, reference is made to possible causes in the overview.
11.1.7 Printer Setup
This function opens the Windows “printer setup” dialog box, with
which the desired printer can be set up.
11.1.8 Exit
PV Analysator software is closed with this option. Current data
are not saved automatically, but you are notified that data still
need to be saved, thus providing you with the opportunity of stor-
ing them before exiting the program.
Don’t forget:
Switch transfer back off again at the PROFITEST PV when you
exit PV Analysator.
Always log off the PROFITEST PV with the “End” function, by
clicking the “End” button or with the <ALT>-<F4> key combina-
tion and return to the system. Be sure to shut down your system
correctly afterwards because, for example, data loss might other-
wise be caused by a write-back cache.
11.2 Edit
This function is only activated when the mouse pointer is located
within a text entry field.
11.2.1 Cut
Cuts out the selected text and writes it to the clipboard.
11.2.2 Copy
Copies the selected text and writes it to the clipboard.
11.2.3 Paste
Inserts the content of the clipboard to the selected text.
11.3 Extras
First switch the PROFITEST PV on and set it to “Transfer” (the
solar generator to be measured and the sensor should already be
connected if applicable), before using the following “Measure-
ment” transfer function.
11.3.1 Start Measurement at the PROFITEST PV
(“Trace Curve” button).
“Performing measurement – please wait” appears in the status
line.
Measurement takes about 2 seconds. The measured values are
transferred immediately after measurement has been completed
(procedure is displayed in the status line), and the main window is
now filled with the respective values. You can display the data as
a diagram (section 11.4) or in a tabular overview (section 11.5),
export them (section 11.1.4) or save them to a file (section
11.1.2). Curve data are not saved to the PROFITEST PV in this
case, but rather only to the PC! This is advantageous when con-
ducting long measuring sequences with large volumes of mea-
surement data. Memory capacity at the PROFITEST PV might
otherwise be exhausted.
If the message shown below appears, the cable to the
PROFITEST PV is not correctly connected or the “Transfer” func-
tion has not been activated at the measuring instrument.

18 GMC-I Messtechnik GmbH
11.3.2 Managing Files at the PROFITEST PV (“Data Transfer” button)
First of all, clock time at the PC and the PROFITEST PV is com-
pared. If the difference is greater than 5 minutes, the application
asks the user if the clock in the PROFITEST PV should be set to
PC time.
After the time check has been completed, if data memory at the
PROFITEST PV is empty a corresponding message appears or, if
measurement data are available, a list of measurement series
appears (the PROFITEST PV must be connected to this end). The
displayed data can now be transferred to the PC for further pro-
cessing.
Select the destination directory in the line which appears at the
top of the window, to which the measurement data will be trans-
ferred. Click the folder icon at the right-hand side of the line to this
end, after which a directory selection dialog box appears in which
the desired directory can be selected.
Now select one or several measurements from the measurement
series list (all of the displayed data records can be selected at
once by clicking the “Select All” button), and then click the “Get
Data” button.
The measurement series are now transferred, one after the other,
and each data record is saved to the PC hard disk with a filename
based on the following pattern: 04-01-2000 23_44_38.SUI (in this
case a measurement conducted on 4 January 2000 at 23 hours,
44 minutes, 38 seconds).
If the “Delete data after transfer” checkbox is activated, a prompt
appears after data transfer asking the user to confirm that data
should really be deleted from the PROFITEST PV. Do not respond
with “Yes” unless you are absolutely sure that the data at the
PROFITEST PV are not longer needed – the selected measuring
series are then automatically deleted from the PROFITEST PV.
Data can also be deleted from the PROFITEST PV by selecting
the data to be deleted from the list and clicking the “Delete Data”
button. Caution: deletion cannot be undone!
11.3.3 Transfer Date and Time to the PROFITEST PV
This function is included in the Profitest PV menu. The clock in the
Profitest PV is set to current PC time and date.
11.3.4 Continuous Measurement
This function allows for automatic measurement with the
PROFITEST PV, which is time-controlled by the PC.
Simply select the desired time interval (seconds, minutes, hours)
at which the measurement will be repeated, as well as the num-
ber of repetitions (or 0 if the measurement is to be repeated indef-
initely).
After clicking the “Start Measurement” button, measurement is
performed automatically and can be stopped by clicking the
“Stop” button. Measurement data are saved automatically to files
in the specified directory, whose filenames include the date and
time of measurement.
Automatic measurement is ended when the selected number of
measurements has been completed, or in the event that a techni-
cal problem occurs (PROFITEST PV does not respond).

GMC-I Messtechnik GmbH 19
11.3.5 Editing the PROFITEST PV Sensor Database
Irradiation sensors from various manufacturers can be connected
to PROFITEST PV instruments. Due to the fact that each sensor
has a different calibration value, this value must be changed at the
measuring instrument depending on which sensor is used. In
order to simplify this procedure for on-site work, the
PROFITEST PV supports a small database of up to 10 sensors,
whose designations and calibration values can be entered or
changed here. When sensors are changed, the desired sensor
data can be selected at the PROFITEST PV with the help of the
“PROFITEST PV” menu.
Attention: A PROFITEST PV must be connected to the PC for this
function, and it must be ready for transfer. When the function is
activated, the current database at the PROFITEST PV is loaded.
In order to make a new entry, select an empty field with the
mouse pointer and enter the designation and calibration value to
the entry fields.
Click the “OK” button after completing your entries. You are then
asked if the changed data should be transferred to the
PROFITEST PV. As a rule, you should respond with “Yes”. The
new data are then immediately available at the PROFITEST PV.
11.3.6 Managing Modules at the PROFITEST PV
(“Module List” button)
A module database with as many as 50 modules is included in
the Profitest PV. This can be freely configured with the help of the
module database in the software. This function makes it possible
to add modules (Add Module) and delete modules (delete
selected entry).
11.3.7 Managing Measuring Tasks at the PROFITEST PV
(“Measuring Tasks” button)
Work orders can be managed at the PROFITEST PV with this
function. The customer database is accessed directly. Custom-
ers, systems, system components and plans can be easily final-
ized.
11.3.8 Calculating Internal Series Resistance R
s
In order to calculate, select the module to be compared from the
database.
The PROFITEST PV can calculate the characteristic TRMS solar
cell curve on the basis of STC values including short-circuit cur-
rent, open-circuit voltage and current and voltage at the MPP, and
determine expected internal series resistance R
s
from the results.
This theoretical value can be compared with other values which
have been ascertained by means of measurement: If the mea-
sured value is higher than the theoretical value, the difference can
be attributed to cable resistance.

20 GMC-I Messtechnik GmbH
11.3.9 Customer Database
All relevant customer data, system data and system components
can be managed in the customer database.
11.3.10 Module Database
The module database is based on the database of the “Photovol-
taik-Forum”. All of the necessary characteristic values are
included, which are required for comparison. The current data
sheet is loaded directly from the Internet. Manual entry of charac-
teristic values is possible at any time.
11.3.11 Settings
All of the changes entered here are saved automatically and
remain valid until another change is entered.
/