

2
Copyright Notice
All rights reserved. No part of this publication may be reproduced, stored in a retrieval system, or transmitted in
any form or by any means, electronic, mechanical, photocopying, recording, or otherwise, without the prior
written permission of SEIKO EPSON CORPORATION. The information contained herein is designed only for
use with this EPSON printer. EPSON is not responsible for any use of this information as applied to other
printers.
Neither SEIKO EPSON CORPORATION nor its affiliates shall be liable to the purchaser of this product or third
parties for damages, losses, costs, or expenses incurred by purchaser or third parties as a result of: accident, misuse,
or abuse of this product or unauthorized modifications, repairs, or alterations to this product, or (excluding the
U.S.) failure to strictly comply with SEIKO EPSON CORPORATION’s operating and maintenance instructions.
SEIKO EPSON CORPORATION shall not be liable for any damages or problems arising from the use of any
options or any consumable products other than those designated as Original EPSON Products or EPSON
Approved Products by SEIKO EPSON CORPORATION.
A Note Concerning Responsible Use of Copyrighted Materials
Digital cameras and scanners, like photocopiers, conventional cameras, and ink jet printers, can be misused by
improper copying and reprinting of copyrighted material. While some countries’ laws permit limited copying of
copyrighted material in certain circumstances, those circumstances may not be as broad as some people assume.
EPSON encourages each user to be responsible and respectful of the copyright laws when using digital cameras,
scanners, and ink jet printers.
Trademarks
EPSON, EPSON Stylus and EPSON Photo Stickers are registered trademarks of SEIKO EPSON
CORPORATION.
EPSON SoundAdvice is a service mark, and PhotoEnhance is a trademark of Epson America, Inc.
General Notice: Other product names used herein are for identification purposes only and may be trademarks of
their respective owners. EPSON disclaims any and all rights in those marks.
Copyright © 2002 by Epson America, Inc. 7/02

Contents
3
Contents
WELCOME! . . . . . . . . . . . . . . . . . . . . . . . . . . . . . . . . . . . . . . . . . 5
About Your Documentation . . . . . . . . . . . . . . . . . . . . . . . . . . . . . . . . . . . . . . .
5
Warnings, Cautions, Notes, and Tips . . . . . . . . . . . . . . . . . . . . . . . . . . . . .
6
PRINTING FROM START TO FINISH . . . . . . . . . . . . . . . . . . . . 7
Loading Paper . . . . . . . . . . . . . . . . . . . . . . . . . . . . . . . . . . . . . . . . . . . . . . . . . .
8
Printing in Windows . . . . . . . . . . . . . . . . . . . . . . . . . . . . . . . . . . . . . . . . . . . . .
9
Selecting the Settings You Use Most Often . . . . . . . . . . . . . . . . . . . . . . . . .
12
Printing on a Macintosh . . . . . . . . . . . . . . . . . . . . . . . . . . . . . . . . . . . . . . . . . .
12
Macintosh OS X . . . . . . . . . . . . . . . . . . . . . . . . . . . . . . . . . . . . . . . . . . . . .
12
Macintosh OS 8.5.1 to 9.x . . . . . . . . . . . . . . . . . . . . . . . . . . . . . . . . . . . . .
17
Printing on Envelopes . . . . . . . . . . . . . . . . . . . . . . . . . . . . . . . . . . . . . . . . . . . .
20
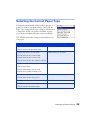
Selecting the Correct Paper Type . . . . . . . . . . . . . . . . . . . . . . . . . . . . . . . . . . .
22
MAINTAINING YOUR PRINTER . . . . . . . . . . . . . . . . . . . . . . . . 23
Cleaning the Print Head . . . . . . . . . . . . . . . . . . . . . . . . . . . . . . . . . . . . . . . . . .
23
Running the Head Cleaning Utility . . . . . . . . . . . . . . . . . . . . . . . . . . . . . .
24
Examining the Nozzle Check Pattern . . . . . . . . . . . . . . . . . . . . . . . . . . . . .
25
Replacing an Ink Cartridge . . . . . . . . . . . . . . . . . . . . . . . . . . . . . . . . . . . . . . . .
25
Ink Cartridge Precautions . . . . . . . . . . . . . . . . . . . . . . . . . . . . . . . . . . . . . .
26
Removing and Installing Ink Cartridges . . . . . . . . . . . . . . . . . . . . . . . . . . .
27
Aligning the Print Head . . . . . . . . . . . . . . . . . . . . . . . . . . . . . . . . . . . . . . . . . .
29
Cleaning the Printer . . . . . . . . . . . . . . . . . . . . . . . . . . . . . . . . . . . . . . . . . . . . .
30
Transporting the Printer . . . . . . . . . . . . . . . . . . . . . . . . . . . . . . . . . . . . . . . . .
31

Contents
4
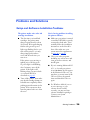
SOLVING PROBLEMS . . . . . . . . . . . . . . . . . . . . . . . . . . . . . . . . 32
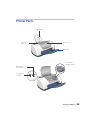
Printer Parts . . . . . . . . . . . . . . . . . . . . . . . . . . . . . . . . . . . . . . . . . . . . . . . . . . .
33
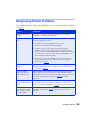
Diagnosing Printer Problems . . . . . . . . . . . . . . . . . . . . . . . . . . . . . . . . . . . . . .
34
Running a Printer Check . . . . . . . . . . . . . . . . . . . . . . . . . . . . . . . . . . . . . .
35
Problems and Solutions . . . . . . . . . . . . . . . . . . . . . . . . . . . . . . . . . . . . . . . . . . .
36
Setup and Software Installation Problems . . . . . . . . . . . . . . . . . . . . . . . . . .
36
Printer Problems . . . . . . . . . . . . . . . . . . . . . . . . . . . . . . . . . . . . . . . . . . . . .
37
Print Quality Problems . . . . . . . . . . . . . . . . . . . . . . . . . . . . . . . . . . . . . . . .
38
Paper Feeding Problems . . . . . . . . . . . . . . . . . . . . . . . . . . . . . . . . . . . . . . .
41
Miscellaneous Printout Problems . . . . . . . . . . . . . . . . . . . . . . . . . . . . . . . .
42
Uninstalling and Reinstalling Printer Software . . . . . . . . . . . . . . . . . . . . . . . . .
43
Windows . . . . . . . . . . . . . . . . . . . . . . . . . . . . . . . . . . . . . . . . . . . . . . . . . . .
43
Macintosh OS 8.5.1 to 9.x . . . . . . . . . . . . . . . . . . . . . . . . . . . . . . . . . . . . .
43
Macintosh OS X . . . . . . . . . . . . . . . . . . . . . . . . . . . . . . . . . . . . . . . . . . . . .
44
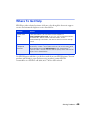
Where To Get Help . . . . . . . . . . . . . . . . . . . . . . . . . . . . . . . . . . . . . . . . . . . . .
45
REQUIREMENTS AND SPECIFICATIONS . . . . . . . . . . . . . . . . 46
Windows System Requirements . . . . . . . . . . . . . . . . . . . . . . . . . . . . . . . . . . . .
46
Macintosh System Requirements . . . . . . . . . . . . . . . . . . . . . . . . . . . . . . . . . . . .
47
Specifications . . . . . . . . . . . . . . . . . . . . . . . . . . . . . . . . . . . . . . . . . . . . . . . . . .
48
WHERE TO PURCHASE EPSON INK AND PAPER . . . . . . . . . . 50
INDEX . . . . . . . . . . . . . . . . . . . . . . . . . . . . . . . . . . . . . . . . . . . . . 51

Welcome!
5
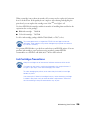
Welcome!
Printing with your EPSON Stylus
®
C42 printer is easy, friendly, and fast. Simple
enough for even the most inexperienced user, the Stylus C42 prints everything from
school reports to family photos with great results.
For added value, it supports a wide range of EPSON
®
special media, including
Glossy Photo Greeting Cards, Photo Stickers,
®
and special photo papers in a variety of
sizes and finishes. You’ll find a list of available papers at the end of this manual.
It’s a good idea to check EPSON’s support web site periodically for free
updates to your printer software. Visit http://support.epson.com.
Download instructions are posted for your convenience.
About Your Documentation
To set up your printer and install its software, see the Start Here sheet. This book
contains information about:
■
Printing with Windows
®
or on a Macintosh
®
■
Maintaining the printer
■
Solving basic problems
■
System requirements and printer specifications
For system requirements, safety instructions, specifications and other important
information, see the EPSON Stylus C42 Series Notices and Warranty booklet.

Welcome!
6
Warnings, Cautions, Notes, and Tips
Please follow these guidelines:
Warnings must be followed carefully to avoid bodily injury.
Cautions must be observed to avoid damage to your equipment.
Notes contain important information about your printer.
Tips contain additional hints for better printing.

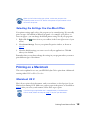
Printing From Start to Finish
7
Printing From Start to Finish
Before you start, make sure your printer software is installed as described on the Start
Here sheet.
No matter what you print, you need to remember two things:
■
Use the right paper.
For the best-looking photos, most vivid colors, and sharpest text, always use
EPSON ink jet papers.
■
Choose the right Paper Type setting (Media Type setting on the Macintosh).
Your printer automatically adjusts itself for each type of paper. That’s why this
setting is important. It tells your printer what kind of paper you’re using. So
remember to check your Paper Type setting every time you print. If you’re not
sure which setting to use with your paper, see page 22.
Follow the instructions in these sections:
■
Loading Paper on page 8
■
Printing in Windows on page 9
■
Printing on a Macintosh on page 12
■
Printing on Envelopes on page 20
■
Selecting the Correct Paper Type on page 22

Printing From Start to Finish
8
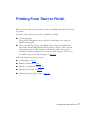
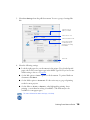
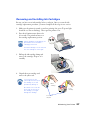
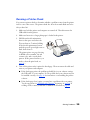
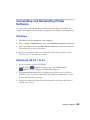
Loading Paper
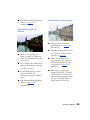
Make sure your printer and computer are turned on.
1. Place your paper against the right edge of the sheet feeder, behind the tab.
2. Press in the locking tab on the left edge guide and slide it against the paper.
3. Pull out the output tray extension.
Follow these guidelines when loading paper:
■
Always load the short edge first, even when you’re printing landscape oriented
documents.
■
Load the printable side face up. It’s usually whiter or brighter than the other side.
■
Load letterhead or preprinted paper into the printer top edge first.
■
Don’t load paper above the arrow on the left edge guide.
■
Load the following media types one sheet at a time: Photo Quality Self Adhesive
Sheets, Photo Stickers,, and Panoramic Photo Paper.
■
If you’re using special media, follow the instructions that came with the media.
Load paper
behind the tab
Press the locking
tab and slide the
left edge guide
against the paper

Printing From Start to Finish
9
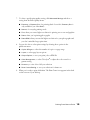
Printing in Windows
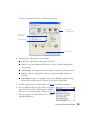
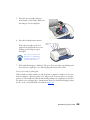
Here’s what to do to print a basic document—such as a newsletter or school project.
Make sure you have paper in the printer, as described on page 8. After you create your
document in a software program, follow these steps to print.
1. From the File menu, click
Print
. You see a Print window (your window may look
different):
2. Make sure
EPSON Stylus C42
Series
is selected.
3. Click the
Preferences
or
Properties
button. (If you see a
Setup
,
Printer
, or
Options
button, click it. Then click
Properties
or
Preferences
on the next screen.)
Click here to
open your printer
software
Select your printer here

Printing From Start to Finish
10
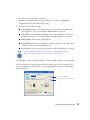
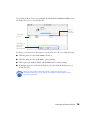
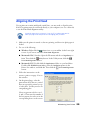
You see your printer Properties (or Preferences) window.
4. Select the type of document you’re printing:
■ Draft
: For rough drafts on plain paper. Saves ink.
■ Text
: For text-only documents, like letters or reports. Delivers high-quality
text printing.
■ Text & Image
: For documents that have both text and images, like newsletters.
■ Photo
: For photos and graphics, when you want good quality with faster
printing.
■ Photo RPM
: For photos or graphics, when you need highest quality printing.
Because this setting increases resolution, it also increases print time.
5. Load the right paper for your document. See page 8 for loading instructions.
6. If you loaded special paper, choose the correct paper
type (click the arrow to scroll through the
Type
list).
If you’re not sure which setting to select, see page 22.
7. Select your paper size (click on the arrow to scroll
through the
Size
list).
1 Choose your
document type
2 Choose your
paper type . . .
3 and paper size
4 Click here

Printing From Start to Finish
11
8. If necessary, select your page orientation:
Portrait
for documents that are longer than they are wide, or
Landscape
for
documents that are wider than they are long.
9. You can also make these settings:
■ PhotoEnhance
: Improves the appearance of low-resolution and improperly
exposed photos. Does not work when
Black Ink Only
is selected.
■ ICM
(Image Color Matching): Matches colors on your printout as closely as
possible to the colors you see using ICM-compatible monitors or scanners.
■ Black Ink Only
: Prints using only black ink.
■ Reverse Order
: Prints your document so that the pages are in the right order
when you retrieve them from the paper tray.
■ Print Preview
: Lets you see what your printout will look like before you print.
For more information about printer settings, click the Help button, or
right-click any item on the screen and then click What’s This?.
10. Click
OK
to return to the Print window. Then click
OK
(or
Print
) to start printing.
After a moment, this window appears and shows the progress of your print job. You
can use the buttons to cancel, pause, or restart printing. You can also see how much
ink you have left.
Click to cancel printing
Click to pause or resume printing

Printing From Start to Finish
12
When you’re finished using your printer, make sure you press the
P power button to turn it off. Never use a power strip or external switch
to turn off the printer.
Selecting the Settings You Use Most Often
Your printer settings apply only to the program you’re currently using. If you usually
print one type of document in different programs—for example, color photos on
letter-size paper—you can change the default printer settings for all your programs.
1. Right-click the printer icon on your taskbar (in the lower right corner of your
screen).
2. Select
Printer Settings
. You see your printer Properties window, as shown on
page 10.
3. Select the default settings you want to use for all your applications. Click
OK
when you’re finished.
Remember that you can always change the settings in your program when you want to
print different types of documents.
Printing on a Macintosh
This section explains how to use your EPSON Stylus C42 to print from a Macintosh
running either OS X or OS 8.5.1 to 9.x.
Macintosh OS X
Here’s how to print a basic document, such as a newsletter or school project, if your
Macintosh is running OS X. Make sure you have paper in the printer, as described on
page 8. After you create your document, follow these steps to print.
If you’re using an application that’s compatible only with Macintosh
Classic mode, follow the steps on page 17
to print your document.

Printing From Start to Finish
13
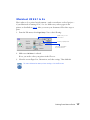
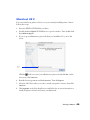
1. From the File menu, select
Page Setup
. You see a screen like this:
2. Select your printer from the
Format for
menu.
3. Select the Paper Size, Orientation, and any other settings you want to use and
click
OK
.
4. Select
Print
from the File menu. You see a screen like this:
Select your printer
from the Format for
pop-up menu
Click here and select
Print Settings

Printing From Start to Finish
14
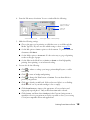
5. Select
Print Settings
from the pull-down menu. You see a group of settings like
this:
6. Select the following settings:
■
Load the right paper for your document in the printer. If you loaded special
paper, choose the correct paper type in the Media Type list. If you’re not sure
which setting to choose, see page 22.
■
Set the Ink option to
Color
to print a color document. To print a black text
document, click
Black
.
■
Set the Mode option to
Automatic
. It’s the easiest way to get good printing
results for most projects.
■
Set the slider to
Quality
or
Speed
to select high-quality printing, faster
printing, or an in-between setting (if available). (The slider may not be
available for some paper types.)
For more information about settings, click Help.
Select the type of
paper you loaded
Select the ink color
Select Automatic mode
Select higher quality
or faster printing, or
an in-between setting
(if available)
Click Print

Printing From Start to Finish
15
7. To select a specific print quality setting, click
Advanced Settings
and chose a
setting from the Print Quality menu:
■ Economy
or
Economy Plus
, for printing drafts. Saves ink. (
Economy Plus
is
only available if you select
Black
.)
■ Normal
, for everyday printing needs
■ Fine
, when you want a higher resolution for printing text or text and graphics
■ Photo
, when you’re printing photographs
■ Photo RPM
, when you want the highest resolution for your photographs and
you don’t mind the longer print time.
8. You can also choose other print settings by selecting these options in the
pull-down menu:
■ Copies & Pages
, to select the number of copies or a page range
■ Layout
, to select page layout options
■ Output Options
, to save your print job as a PDF file
■ Color Management
, to select ColorSync
®
or adjust the color controls or
gamma setting
■ Summary
, to view a list of all your selections
■ Save Custom Setting
, to save your selections for future use.
9. When you’re ready to print, click
Print
. The Print Center icon appears in the dock
on the bottom of your desktop.

Printing From Start to Finish
16
If you click the Print Center icon and then double-click the
C42 Series (USB)
icon in
the Printer List, you see a screen like this:
From here you can monitor the progress of your print job or do one of the following:
■
Click the print job, then click
Delete
to delete it
■
Click the print job, then click
Hold
to pause printing
■
Click a print job marked “Hold” and click
Resume
to resume printing
■
If multiple print jobs are listed, click a print job, then click the
Priority
arrow to
reorder the jobs
When you’re finished using your printer, make sure you press the
P power button to turn it off. Never use a power strip or external switch
to turn off the printer.
Click to
reorder
print jobs
Select a print
job, then . . .
click a button to
Delete, Hold
(pause), or
Resume printing

Printing From Start to Finish
17
Macintosh OS 8.5.1 to 9.x
Here’s what to do to print a basic document—such as a newsletter or school project—
if your Macintosh is running OS 8.5.1 to 9.x. Make sure you have paper in the
printer, as described on page 8. After you create your document, follow these steps to
print.
1. From the File menu, select
Page Setup
. You see the following:
2. Make sure
C42 Series
is selected.
If not, you need to select your printer in the Chooser.
3. Select the correct Paper Size, Orientation, and other settings. Then click
OK
.
For more information about printer settings, click the ? button.
Make sure you see
C42 Series
Select your paper size
Select the orientation
of your document

Printing From Start to Finish
18
4. From the File menu, select
Print
. You see a window like the following:
5. Make the following settings:
■
Choose the paper you’re printing on (click the arrow to scroll through the
Media Type
list). If you’re not sure which setting to select, see page 22.
■
Set the Ink option to
Color
to print a color document. To print a black text
document, click
Black
.
■
Set the Mode option to
Automatic
. It’s the easiest way to get good printing
results on all types of paper.
■
Set the slider in the Mode box to
Quality
or
Speed
to select high-quality
printing, faster printing, or an in-between setting.
6. You can also do the following:
■
Click to reduce or enlarge your image, print multiple layouts, or add a
watermark.
■
Click to turn on background printing.
■
Click to change the Print button to
Preview
. You can then click it to
preview your printout.
■
Click to check your ink levels. If the red
b error light is on or flashing,
check to see if one of your ink cartridges is low or empty.
■
Click
PhotoEnhance
to improve the appearance of low-resolution and
improperly exposed photos. Only works when
Color
ink is selected.
■
Click
Custom
, and then select
ColorSync
in the Custom Settings menu to
match the colors in your printout as closely as possible to those you see using
ColorSync-compatible devices and applications.
Select higher quality or faster printing
Select the type of
paper you loaded
Select Automatic mode
Select the
Ink color

Printing From Start to Finish
19
■
Click
Custom
, and then click the
Advanced
button that appears to select a
higher resolution or to change color management settings.
Print Quality settings include
Economy
and
Economy Plus
for draft printing,
Normal
for everyday printing needs,
Fine
when you want a higher resolution for text or text
and graphics,
Photo
when you’re printing photographs, and
Photo RPM
when you
want the highest resolution for your photographs and don’t mind the longer print
time.
7. Click
Print
to start printing. If you turned on background printing, you can select
EPSON Monitor3
from the Macintosh Application menu to see this dialog box:
If you’re not using background printing and you need to cancel printing,
hold down the
J
key and press the . (period) key.
When you’re finished using your printer, make sure you press the
P
power button to turn it off. Never use a power strip or external switch
to turn off the printer.
Click to cancel printing
Click to check ink levels
Click to restart your print job
Click to pause printing
Click on the
current print job
or a waiting
print job...
Then click here
to view details
of the selected
print job and
control print job
priorities

Printing From Start to Finish
20
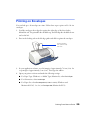
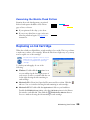
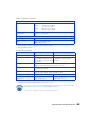
Printing on Envelopes
You can load up to 10 envelopes at a time. Follow these steps to print on No. 10 size
envelopes:
1. Load the envelopes short edge first against the right edge of the sheet feeder,
behind the tab. The printable side should be up, and the flap side should be down
and on the left.
2. Press in the locking tab on the left edge guide and slide it against the envelopes.
3. In your application software, set a left margin of approximately 7.6 cm (3 in). Set
a top margin of approximately 5 cm (2 in). Then type the address.
4. Open your printer software and make the following settings:
■
For Paper Type (Windows) or Media Type (Macintosh), select
Plain Paper
■
For Orientation, select
Landscape
■
For Paper Size, select
Envelope #10 (4 1/8 × 9 1/2 in)
(Windows and
Macintosh OS 8.5.1 to 9.x) or
Envelope #10
(Macintosh OS X).
Load the printable
side up and the flap
side down
Page is loading ...
Page is loading ...
Page is loading ...
Page is loading ...
Page is loading ...
Page is loading ...
Page is loading ...
Page is loading ...
Page is loading ...
Page is loading ...
Page is loading ...
Page is loading ...
Page is loading ...
Page is loading ...
Page is loading ...
Page is loading ...
Page is loading ...
Page is loading ...
Page is loading ...
Page is loading ...
Page is loading ...
Page is loading ...
Page is loading ...
Page is loading ...
Page is loading ...
Page is loading ...
Page is loading ...
Page is loading ...
Page is loading ...
Page is loading ...
Page is loading ...
Page is loading ...
Page is loading ...
-
 1
1
-
 2
2
-
 3
3
-
 4
4
-
 5
5
-
 6
6
-
 7
7
-
 8
8
-
 9
9
-
 10
10
-
 11
11
-
 12
12
-
 13
13
-
 14
14
-
 15
15
-
 16
16
-
 17
17
-
 18
18
-
 19
19
-
 20
20
-
 21
21
-
 22
22
-
 23
23
-
 24
24
-
 25
25
-
 26
26
-
 27
27
-
 28
28
-
 29
29
-
 30
30
-
 31
31
-
 32
32
-
 33
33
-
 34
34
-
 35
35
-
 36
36
-
 37
37
-
 38
38
-
 39
39
-
 40
40
-
 41
41
-
 42
42
-
 43
43
-
 44
44
-
 45
45
-
 46
46
-
 47
47
-
 48
48
-
 49
49
-
 50
50
-
 51
51
-
 52
52
-
 53
53


Ask a question and I''ll find the answer in the document
Finding information in a document is now easier with AI
Related papers
-
Epson C42 Series User manual
-
Epson C40UX Read me
-
-
-
-
-
-
-
-
Epson Stylus Color 880 User manual
