Page is loading ...

Manual
Read the safety instructions.


World service
Those who haven’t
ordered directly
from Logosol.
Everyone who bought directly
from Logosol in Madison is
already fully registered here.
Those of you who bought the
M7 through dealers must
send in the warranty card
below within thirty days of
purchase in order to benefit
from the warranty, get good
service and receive the right
spare parts.
Warranty
Logosol offers a two-year
warranty against material and
manufacturing defects. The
company will replace or fix any
faulty parts or constructions
within two years of purchase.
Free technical support
Regardless of where you
bought our equipment, we
offer free technical support by
phone, fax, mail or e-mail.
Regular information
All users of Logosol
equipment receive regular
information about new
products and accessories.
Our homepage is also a
source of up-to-date informa-
tion.
Name:
Address:
Tel:
Mobile:
E-mail:
Where bought:
When bought:
World Service
P.O.Box 660
Madison MS 39130
I have the following equipment:
Sawmill M7
Woodworkers Mill
Husqvarna 395 XP
Log House Moulder
Other:
Other:
Other:

0 1020304050607080
M6 M8 M10
M6x30 Bolt Sawmill Bolt Sizes
Collar nut Collar bolt Allen head bolt
30 mm
Metric scale in mm
BAG 71 BAG 72-73 BAG 74 BAG 75 BAG 76 BAG 77
Total for Page 10 for Page 11 for Page 12 for Page 13-14 for page 15-17 for Page 18
Collar nut M6
64 24 8 8 8
Collar nut M8 18 8 10
Locking nut M6 7 43
Locking nut M8 22
Locking nut M10 1 1
Square nut M6 18 6 8 4
Nut M10 22
Collar bolt M6x20 30 16 14
Collar bolt M6x40 88
Bolt M6x16 12 84
Bolt M6x20 12 8 4
Bolt M6x25 1 1
Bolt M6x40 6 42
Bolt M6x60 22
Bolt M10x40 22
Allen head bolt M6x25 44
Allen head bolt M6x30 44
Allen head bolt M8x14 22
Allen head bolt M8x25 88
Allen head bolt M8x30 88
Locking screw M6x8 66
Locking screw M6x10 44
M6 Washer 7 43
M8 Washer 88
M10 Washer 22
To assist you in the assembly of this mill, we have
detailed the nuts, bolts and washers found on each
page in the chart below. The part name and size is
listed to the left and the total number found in the
package listed in the second column. To the right, if
a part is listed on a page in the manual, the number
of that part to be used on that page is entered in the
column for the page. Using this chart, you can lay
out the parts for each page, and work your way
through the assembly with your parts needed for
each page. If you find you are missing any parts,
please call our Toll-Free number and we will ship
them out immediately to you.
Note: You will also notice pages referenced on
the bags themselves. DO NOT USE THE PAGE
NUMBERS ON THE BAGS FOR REFERENCE.
Only use the chart below to determine what bag
is used for the assembly of which page.
You will have extra nuts and bolts after the
assembly of this mill.
4
Metric Parts Sizing Chart Nut, Bolt and Washer Chart

Design and construction of the
M7 WoodWorkers Milll, plus
manual text and pictures:
Mattias Byström.
As LOGOSOL is constantly
developing and improving all
machines and devices, we
must reserve the right to
change the design, technical
characteristics and equipment
of our machines.
Printed on chlorine-free paper
using vegetable-oil based ink.
Manual, part. no.:
9999-000-9999
Copyright 2003 Logosol, Härnö-
sand, Sweden
Contents
Safety Rules 6
Description 8
Technical Specifications 8
Assembly 8
Tools Needed 8
M7 Components 9
Assembly: frame 10
Assembly: guide rail 11
Assembly: cross beam 11
Assembly: guide rail strut 11
Assembly: log side-rest 12
Assembly: log bed 12
Assembly: saddle plate 13
Assembly: rachet 13
Assembly:
crank and lifting cable 14
Assembly: edge support 14
Assembly: carriage 15
Assembly: chain guard 16
Assembly: extender nuts 16
Assembly: chain-saw 17
Assembly: spiked log grip 18
Siting 19
Adjustments – log bed 20
Adjustments –guide bar 21
Step-by-step Sawing 22
Sawing Tips 23
Material Drying 24
Trouble-shooting 25
Cutting Equipment 26
Accessories 28
Parts List 29
EU Declaration 30
Preface
You are now the owner of a
Logosol M7 WoodWorkers
Mill, the result of our collective
experience and dedicated
efforts since 1988. There are
currently more than fifteen
thousand Logosol Sawmill in
use in Sweden and the rest of
the world, making the Logosol
Portable sawmills the top
seller world-wide.
The goal for Logosol’s
development effort is to de-
sign smaller and lighter
machines that solve a task
intelligently, but without
lowering the quality of the
finished product. To top it off,
Logosol products must be
affordably priced so as to
make them available to
everyone working with wood.
Logosol produces a large
range of products, enabling a
single person to handle the
entire production chain from
forest felling to finished
product.
In addition to various sized
sawmills, the range includes
such products as a multi-
sided planer providing
exellent profiling. For more
information on Logosol
products and accessories,
send for our catalog.
For us, the most important
consideration is that you are
100% satisfied with your M7
WoodWorkers Mill. If you have
any questions or thoughts
about the sawmill, please do
not hesitate to contact us.
In closing, I wish you much
enjoyment and success with
your future Woodworking
projects.
Bengt-Olov Byström
Precident Logosol
5

other than the operator is 8 m
(26 feet) from all sides except
where the logs are rolled in.
The safety distance from this
side is 15 m (50 feet), due to the
danger of the chain being
thrown out if it breaks.
Anyone working with the Logo-
sol M7 WoodWorkers Mill must
be well-rested, healthy and in
good physical condition. Take
regular breaks while working
and never operate the machine
while under the influence of
alcohol, other drugs or
medicines that might cause
drowsiness or in-attention.
Work only in when the light is
good – never in darkness, fog or
the like.
Whenever you add extra
equipment to the M7 sawmill,
use products made by Logosol
or specifically approved by
Logosol for the purpose. Other
equipment can cause accidents
and thus should not be used.
Logosol will not accept liability
for personal injury or material
damage incurred while using
unauthorized attachments.
Should a sawing unit weighing
more than 15 kg (33 lbs) be
used, support legs must be
fitted under the guide rail ends in
order to avoid tipping.
Always wear authorized
personal protective
clothing and equipment.
Close-fitting working overalls
are the appropriate garment –
never wear loose items,
worker’s jackets or the like.
Do not wear a neckerchief, tie,
jewellery or other items that can
get caught in the equipment.
Use safety shoes with
high-grip soles and
steel toecaps.
Wear a safety helmet
with hearing protection
and a face shield.
Remember that hearing can
be damaged after relatively
short exposure to the high
frequency sounds from the
motor and the cutting
equipment.
Protective goggles are also
required as a face shield used
alone will not provide sufficient
protection for the eyes.
Wear strong gloves.
There is an injury risk
whenever you handle
the chain and the
cutting equipment can be hot
after sawing .
Never reach over or under the
guide rail during operation. The
cutting equipment can cause
severe injuries.
There are special
safety rules to
follow and dangers
to be aware of when
working with the
Logosol M7
WoodWorkers Mill.
This symbol points to
dangers. However, since
all risks are not marked,
you must read the entire
text.
This symbol calls for
additional attention to the
text.
Read through this whole
manual carefully before using
the M7. Failure to observe these
safety instructions may result in
fatal injury.
Make sure that every person
who uses the machine is well
informed of the dangers and
has read the entire manual. The
manual must also be available
to everyone using the sawmill.
This is also necessary if the
machine is sold or loaned out.
Read the manual and safety
rules for the particular sawing
unit used on the M7.
Minors under age 18 should not
be allowed to operate the M7.
Make sure that children and
animals are kept at a safe
distance.
While the Logosol
WoodWorkers Mill is a one-
person machine, be sure that
there are other persons within
hailing distance. The proper
safety distance for persons
6
Safety rules

ALWAYS
REMEMBER that should
any type of problem occur,
stop sawing and turn off the
chain-saw. Most accidents
with dangerous machines
happen when something
goes wrong and the opera-
tor attempts to fix it while
the machine is still running.
A stop seldom shows up
on the finished product.
During operation:
To avoid tipping, never
place the machine at an
angle while operating. The
M7 should be fastened directly
to the floor or be placed on a
bedding of planks in order to
increase the contact surface
(follow the manual).
Hold the crank firmly whenever
raising or lowering a log. If
released, the crank may spin
back and hit your hand.
Do not place your hand
inside the long leg while
raising or lowering the log.
Should the lifting line snap or the
crank spin, your hand may be
caught.
Logs must always be rolled
on to the sawmill level with the
horizontal beam. Do not lift logs
from ground level directly onto
the sawmill as this can cause
injury if the machine tips or the
log falls.
Do not saw logs that are so
short that they do not extend
0.2 m (app. 10 “) outside each
log bed. A shorter log could fall
when the log beds are raised.
The overall max. load capacity
of the M7 is 500 kg (1100 lbs).
The 2.5 m extension increases
the capacity by 250 kg (550 lbs)
for each extension with a lifting
unit.
Always stand to the right
of the chain-saw while it is
operating. When a chain or
band breaks, it is thrown out
through the chip outlet.
Keep the worksite free of tools,
pieces of wood, chips and other
items you can trip on.
Turn the chain-saw off after
each cut. Do not leave the M7
sawmill unattended where
unauthorized persons might
start it.
When using a petrol-driven
chain-saw:
Fire danger – Turn the
motor off before filling with
petrol. Petrol is extremely
flammable! Burns can cause
death! If you spill any fuel, clean
off any parts involved. If you get
fuel on your clothing, change
immediately.
Close the tank lid as tightly as
possible in order to reduce the
risk of it coming loose due to
vibrations during sawing.
Never operate the chain-saw
with the throttle lever locked.
Always operate the throttle
manually.
Do not use a ripping chain
for cross-cuts as this
increases the danger of
kickback.
Before using the M7:
Check the condition of the lifting
lines especially carefully,
replacing them at the slightest
sign of wear. Check that all bolts
and lock nuts on the log bed
lifting unit and the locking sys-
tem are tight and that all moving
parts move freely.
To avoid tipping, check that the
M7 stands level and is well
fastened in the bedding.
To avoid chain breaks, check
that the cutting equipment is
correctly assembled.
To avoid kickbacks when star-
ting, check that the chain-saw is
correctly positioned on the guide
rail.
7
Service:
The M7 sawmill must be
checked regularly and
maintained as needed.
Perform only the maintenance
and repairs specified in the
manual. Other repairs must be
done by Logosol or by
authorized Logosol dealers.
Do not make any alterations in
the construction of the sawmill
as this can increase the
accident risk. After service, the
M7 sawmill should be returned
to its original condition.
Logosol accepts no liability for
damage that occurs while
working on an improperly
modified machine.

- Because of the high quality
and precision construction,
none of the angles need setting.
The only parts to adjust are the
guide rail and the height of log
bed, in all three bolts.
- All aluminium components are
anodized, creating a wearing
surface as tough as tempered
steel. It has a low friction
coefficient and is easy to keep
free of pitch and chips.
- Adjustable legs make it easy to
compensate for uneven sites.
- The M7 has a double rachet
mechanism enabling a simple
shift by hand between 1/4” (6.25
mm) and 1/8” (3.12 mm)
increments.
- Clear scales show the height
of the log bed. Extra measuring
rods are available as
accessories to show sawing
height settings.
- The knee joint on the front leg
has a non-slip surface that
facilitates log handling. The joint
also has a mounting hole for
ramps, log tables and the like.
- The cross beam between the
short legs is a significant
stabilization factor.
- The Logosol M7
WoodWorkers Mill will not rust.
Springs are stainless steel and
all steel parts are thoroughly
galvanized.
Technical specifications
Length: 2.75 m (9 ft)
Width: 1.25 m (4 ft)
Width of log bed:0.5 m (1ft 8 in)
Weightwithout saw:38.5 kg (85
lbs)
Max. rec. log diam.: 0.6 m (2 ft)
Max. rec. log length (standard
design): 2.35 m (8 ft)
Max.logweight: 500 kg (1 100
lbs)
Tools needed
(Tools are not supplied with
delivery of the M7
WoodWorkers Mill.)
2 x 10 mm open end wrench
1 x 13 mm open end wrench
1 x 16 mm open end wrench
1 x 17 mm open end wrench
Hexagon socket wrench/Allen
key (metric)
1 x 4 mm open end wrench
1 x 8 mm open end wrench
1 x Try square
Assembly will be facilitated with
a battery-driven drill or
screwdriver with a 10 mm
hexagon socket and a ratchet
key with 10 and 13 mm hexagon
sockets.
The M7 is designed for simple
assembly and adjustment,
mainly because there are fewer
parts and assembly steps than
were needed in earlier models.
Most of the aluminium parts are
anodized making it easier to
force the bolts through the
profile holes. Assemble the M7
on a surface that will not
scratch the surface treatment.
Save time by reading the
entire assembly instruction
before beginning to work. Then
follow the instructions step by
step.
Whenever this symbol
appears, tighten bolt loosely
to allow some movement.
When there is no symbol,
tighten the bolts well.
8
Description Assembly
- No maintenance is needed.
The crank axle runs through
maintenance-free bronze
bearings, the slide rails use low-
friction plastic that has a
working life of several years
thanks to the superbly smooth
surface anodization.
- The settings for sawing
parallel to the grain of conical
logs are quick and simple.
- All accessories for M7 sawmill
fits the M7 WoodWorkers Mill as
well.

What follows is a brief description of the M7
components to assist in identifying them during
assembly. A more complete listing is found at the end
of the manual.
1 Guide rail
2 Long leg
3 Horizontal beam
4 Short leg
5 Cross beam
6 Edge support
7 Log bed
8 Guide rail strut
9 Foot
10 Log rest
11 Knee joint
12 Carriage
13 Log grip
14 Lifting beam
15 Ratchet bar
16 Ratchet bar stop plate
17 Saddle plate
18 Ratchet Cam
Cam Axle
19 Ratchet handle
Ratchet neutral plate
Turning spring
20 Crank
Lockring
Lockring with line attachment
21 Plastic slide rail on log bed
Indicator
22 Angle fitting
23 Line pulleys
9
15
16
17
18
19
22
21
23
20
2
1
3
4
5
6
7
8
9
10
11
12
13
14
M7 WoodWorkers Mill components

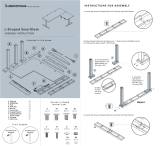
Assembly: frame
The right and left leg units of the
frame are assembled in the
same way. The bolts listed
below are for one leg unit.
(1) Fit the horizontal beam to
the short leg using the corner
fitting. Be careful not to damage
the bevelled faces before
assembly. (4 x M6x20 bolts, 4 x
M6 collar nuts)
(2) Fit the horizontal beam to
the long leg. The scale plate is
fitted to the long leg using the
two lower bolts.
Tighten all four bolts
loosely to allow the beams
to move somewhat in relation to
each other. (4 x M6x20 collar
bolts, 4 x M6 collar nuts)
(3) Fit the angle fitting to the
long leg and to the underside of
the horizontal beam. First
tighten the four bolts on the
angle fitting loosely, gradually
tightening them all the way. In
this way the frame will be set at
exactly 90°. (4 x M6x20 collar
bolts, 4 x M6 collar nuts)
Finally tighten the bolts between
the horizontal beam and the
long leg. (2)
(4) Fit the sawmill feet, turning
them so that the holes in the
foot and the leg form a cross
and that they lie correctly in the
leg tracks. (4 x M8x25 allen
head bolts, 4 x M8 nuts, 4 x M8
washers)
(A) Assemble the pulley, see
picture. (1x M6 collar nut)
10
2
1
4
3
4
A

11
(6) Fit the strut to the inside (D)
of the guide rail flanges with the
oval hole up. (4 x M6x20 collar
bolts, 4 x M6 collar nuts)
(5) Place the guide rail on the
long legs, pressing the guide rail
down while the bolts are tighte-
ned. (4 x M6x20 collar bolts, 4 x
M6 collar nuts)
Check that the angle
between the guide rail and
the long leg is 90°.
(7) Fit the cross beam. In each
leg there are six holes. The
inner ones are used for the
standard M7 unit (C), while the
others are used when the M7 is
extended and an additional
cross beam is fitted on either
side. (6 x M6x20 collar bolts, 6 x
M6 square nuts)
5
6
7
B
Assembly: guide rail, guide rail strut, cross beam
C

Assembly: log bed
(8) Place the plastic slide rail on
the log bed. Fit the longer (A)
scale against the plastic rail on
the right log bed and the shorter
(B) against the side of the left
log bed. Do not tighten the bolts
all the way. (2 x M6x30 allen
head bolts, 2 x M6 collar nuts)
(9) Fit the ratchet bar stop plate
under the lifting beam. (2 x
M6x25 allen head bolts)
(10) Fit the line pulleys. (1 x
M6x60 self-tapping bolt) Apply
some pressure while driving it
in.
(11) Fit the log support on the
lifting beam. As the bolts will be
hard to screw through the holes,
use an Allen wrench to pull the
log support down to the lifting
beam. After app. 20 hours of
use, these bolts will need to
be retightened. (4 x M8x30
self-tapping allen head bolts, 4 x
M8 collar nuts)
(C) Fit the bolt for extra support
(M8x16 allen head bolt, 1xM8
collar nut)
(12) Fit the rachet bar by
threading the adjustment bolt
(D) through the ratchet bar stop
plate and screwing on the nut.
Do not tighten. Place the bar in
the track of the lifting beam and
tighten the adjusting nut on the
bar. (1 x M10x40 bolt, 1 x M10
nut)
Assembly: log side-rest
(7) Fit the log side-rest. make
sure that the measuring scales
are both facing in torwards the
center of the mill so that
operator can read both scales
from the center position.(2 x
M6x20 bolts, 2 x M6 collar nuts)
12
7
A
11
12
B
C
10
8
8
9
D

(15) The ends of the ratchet
cam axle are different. Insert
the one that has the recess
nearest the tip through the lower
hole in the long leg.
(16) Thread the short end of the
spring through the scale
selector’s spring holder and slip
both over the cam axle inside
the long leg.
Now thread the axle through the
first flange of the sadle plate.
Thread the ratchet cam on in
front of the opening in the sadle
plate, placing an O-ring on both
sides. Turn the axle so that the
cam locking screw (M6x10)
lines up with the recess. Screw
the locking screw into the
recess.
Screw the cam axle handle
locking screw (M6x10) in the
other recess.
Use protective gloves for
the following steps (B): Pull
the long end of the spring aro-
und to fasten it in the spring
holder on the scale selector
fitting.
Assembly: saddle plate
(13) Thread the lifting line
through the hole in the lower
part of the saddle plate and
make the knot shown (A).
Leave a 1 cm (3/8”) end
after the knot.
(14) Press the steel sleeves into
the holes in the plastic glides.
Place the plastic glides (B) on
each side of the lifting beam and
fit the saddle plate over these.
(4 x M6x40 collar bolts, 4 x M6
collar nuts)
Assembly: rachet mechanism
13
13
A
14
B
15
16
B

18
A
17
A
Assembly: edge support
(18) Slide the edge support onto
the log bed.
(A) Attach crank handle to the
crank rod. Insert an allen
wrench into the end of the
threads on the handle and tight
it with an m8 locking nut.
14
(17) Thread the lifting line under
the outside pulley on the lifting
beam, straight up and around
the pulley on the cross beam
(A) and then down again to the
inner pulley on the lifting beam.
Fit the crank rod through the
upper hole in the long leg and
through the bushing on the
middle flange.
Place the lifting line in the
locking collar recess. Thread
the collar bushing with the line
and the other collar bushing, on
the crank rod.(collars facing out)
Push the crank rod through until
app. 1/8” extends beyond the
outer saddle plate bushing.
Screw the locking screw
(M6x8)on the locking collars into
the recesses on the crank rod.
Then tighten the locking screw
(M8x8) that’s holding the lifting
line.
Assembly: crank and lifting cable

(19) Insert bolts through the
holes along the sides of both the
chain-saw bed (pylon) and the
spool holder plate. Turn the
square nuts a few times. (8x
M6x16 bolts, 8 x M6 square
nuts)
(20) Insert the square nuts into
the slide rail track, moving the
spool holder plate and the
chain-saw bed to opposite ends
of the slide rails. Tighten the
bolts.
Assembly: saw carriage
15
(21) Thread the line spool over
the spool holder arm and tighten
the nut. (1 x M10 locking nut)
20
21
19

24
(22) Fit the chain guard on the
support and bolt. (2 x M6x40
collar bolts, 2 x M6 locking nuts)
23
22
Remove the two bolts holding
the guide bar and remove the
guide bar cover.
(23) Remove the bark grips,
leaving the bolts and
retightening the nuts.
(24) Refit the guide bar cover,
replacing the guide bar bolts
with the two extender nuts. The
guide bar nuts will be used to
fasten the chain-saw to the
carriage.
Only CE-approved chain-
saws with two guide bar
nuts may be used with the M7
sawmill.
Assembly: chain guard
Assembly: extender nuts
16

(25) Fit the Logosol extender
nuts through the chain-saw
plate using the front hole. (For
some chain-saw models the
rear hole has to be used to
ensure that the saw cover will
not extend too far. However, this
is relatively unusual.) Screw the
chain-saw’s guide bar nuts onto
the Logosol extender nuts under
the plate and tighten.
25
26
27
(26) Fit the chain guard support
on the two arms of the chain-
saw plate so that the chain
guard sits app. 4 cm (1 1/2”)
from the tip of the guide bar. (2 x
M6x40 bolts, 2 x M6 collar nuts)
(27) Push the assembled
carriage onto the guide rail with
the guide bar facing the log
beds.
Check that the carriage
moves easily on the guide
rail. If not, loosen the eight bolts
holding the sliding rails, move
the carriage back and forth and
retighten the eight bolts. If this is
insufficient, check the plastic
slide rails for damage.
Assembly: chain-saw
17

(28) Screw the handle with a
washer on the threaded rod for
the log grip carriage. (1 x M6
washer)
(29) Insert the bolts and screw
on square nuts in the same way
as when the chain-saw carriage
was assembled (see page 17).
(4 x M6x16 bolts, 4 x M6 square
nuts)
(30) Fit the sliding rails under
the plate so that the square nuts
fit into the slide rail tracks.
(31) Center the guard, log grip
and plastic spacer over the
holes in the plate. The spacer
should be turned so it extends
as far as possible behind the
grip. Thread the bolts through
the holes and tighten. (2 x
M6x40 bolts, 2 x M6 washers, 2
x M6 nuts)
(32) Thread the chain-saw feed
line holder bolt through the
spacer and fit on the plate. (1 x
M6x25 bolt, 1 x M6 nut)
The holder bolt can be fitted in
one of two holes depending on
whether a petrol or an electric
saw is being used. The picture
illustrates set-up for a petrol
saw. Make a loop on the feed
line and place it over the spacer.
30
29
31
28
32
30
29
Assembly: spiked log grip with guard
18

M
7
When setting up the M7
directly on the ground:
The surface must firm and
level enough that driving a
normal car on it would not be a
problem.
Fit a board under each pair
of legs using two M6 bolts
for each foot. The boards must
be of good quality, at least
50x150 mm (2”x 6”) and at least
2 m (6.5 ft) long. The boards
must extend at least 0.5 m
(1.5 ft) beyond the long legs.
While the goal is to have the M7
WoodWorkers Mill fully level,
any tilt, however slight, must not
be away from the operator as
this can cause the logs to slide
off or lie at an angle.
The M7 WoodWorkers Mill
may not tilt more than 5 °
from the horizontal in any
direction.
The saw may tip over if
the tilt is greater. The unit
may not be operated
unless the feet are faste-
ned to the floor.
The carriage may slide
off the guide rail if the tilt
is greater.
When bolting the M7 to a
concrete floor, asphalt
surface or similar, rigid surface,
a rubber underlay should be
placed under each foot in order
to prevent vibration damage to
the sawmill. Use a reliable
fastening system between
the feet and the surface.
Min. 0.5 m (1.6 ft)
Siting
19

(A) Check that when the log bed
is cranked down, it moves
easily through the saddle plate
driven by its own weight. If this
is not the case:
- Stop the log bed in the position
that you judge to be the sticki-
est. If it is equally hard in all
positions, place it in its upper-
most position.
Lock it using the rachet
cam to prevent it from
falling down.
- Loosen the four bolts on the
saddle plate and place it straight
in relationship to the lifting
beam.
- Loosen the plastic slide rail on
the log bed (D) and adjust it so
that it is straight in relation to the
log bed track.
- Lubricate the sliding surfaces
and the T-track of the lifting
beam using silicon or Teflon
spray.
(B) Check the height of the log
bed. Set the rachet in the 1/4”
position. Place the setting block
on the log bed. Move the chain-
saw guide bar to right over the
log bed. Move the log bed up to
the notch where the setting
block is nearest to the under-
side of the guide bar.
(C) Use the bolt and inside nut
on the rachet bar to move the
log bed up until the setting block
touches the underside of the
guide bar. Should the
adjustment be insufficient or too
much, move the log bed up or
down a notch and adjust again.
Lock using the inside nut.
(D) To adjust the scale indicator,
loosen the two bolts holding it
and the plastic block on the log
bed. Set both indicators of the
scale to 2” in the position where
the setting block touches the
underside of the guide bar.
A
B
C
D
20
Adjustments – log bed
/