The following are trademarks of PORTER-CABLE
•
DELTA (Las siguientes son marcas registradas de PORTER-CABLE
•
DELTA S.A.) (Les
marques suivantes sont des marques de fabriquant de la PORTER-CABLE
•
DELTA): BAMMER
®
, LASERLOC
®
, OMNIJIG
®
, POCKET CUTTER
®
,
PORTA-BAND
®
, PORTA-PLANE
®
, PORTER-CABLE
®
, QUICKSAND
®
, SANDTRAP
®
, SAW BOSS
®
, SPEED-BLOC
®
, SPEEDMATIC
®
,
SPEEDTRONIC
®
, STAIR-EASE
®
, THE PROFESSIONAL EDGE
®
, THE PROFESSIONAL SELECT
®
, TIGER CUB
®
, TIGER SAW
®
, TORQ-BUSTER
®
,
VERSA-PLANE
®
, WHISPER SERIES
®
, DURATRONIC™, FRAME SAW™, INNOVATION THAT WORKS™, JETSTREAM™, MICRO-SET™,
MORTEN™, NETWORK™, RIPTIDE™, TRU-MATCH™, WOODWORKER’S CHOICE™, THE AMERICAN WOOD SHOP™ (design) , AUTO-
SET™, B.O.S.S.™, BUILDER’S SAW™, CONTRACTOR’S SAW™, DELTA™, DELTACRAFT™, HOMECRAFT™, JET-LOCK™, KICKSTAND™,
THE LUMBER COMPANY™ (design). MICRO-SET™, Q3™, QUICKSET II™, QUICKSET PLUS™, SAFEGUARD II™, SANDING CENTER™,
SIDEKICK™, UNIFENCE™, UNIGUARD™, UNIRIP™, UNISAW™, VERSA-FEEDER™ .
Trademarks noted with ™ and ® are registered in the United States Patent and Trademark Office and may also be registered in other countries.
Las Marcas Registradas con el signo de ™ y ® son registradas por la Oficina de Registros y Patentes de los Estados Unidos y también pueden
estar registradas en otros países. Marques déposées, indiquées par la lettre ™ et ®, sont déposées au Bureau des brevets d’invention et
marques déposées aux Etats-Unis et pourraient être déposées aux autres pays.
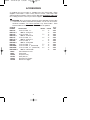
PORTER-CABLE • DELTA SERVICE CENTERS
(CENTROS DE SERVICIO DE PORTER-CABLE • DELTA)
(CENTRE DE SERVICE PORTER-CABLE • DELTA)
Parts and Repair Service for Porter-Cable
•
Delta Power Tools are Available at These Locations
(Obtenga Refaccion de Partes o Servicio para su Herramienta en los Siguientes Centros de Porter-Cable
•
Delta)
(Locations où vous trouverez les pièces de rechange nécessaires ainsi qu’un service d’entretien)
Authorized Service Stations are located in many large cities. Telephone 800-487-8665 or 731-541-6042 for assistance locating one. Parts
and accessories for Porter-Cable
•
Delta products should be obtained by contacting any Porter-Cable
•
Delta Distributor, Authorized
Service Center, or Porter-Cable
•
Delta Factory Service Center. If you do not have access to any of these, call 888-848-5175 and you will
be directed to the nearest Porter-Cable
•
Delta Factory Service Center. Las Estaciones de Servicio Autorizadas están ubicadas en
muchas grandes ciudades. Llame al 800-487-8665 ó al 731-541-6042 para obtener asistencia a fin de localizar una. Las piezas y los
accesorios para los productos Porter-Cable
•
Delta deben obtenerse poniéndose en contacto con cualquier distribuidor Porter-Cable
•
Delta, Centro de Servicio Autorizado o Centro de Servicio de Fábrica Porter-Cable
•
Delta. Si no tiene acceso a ninguna de estas
opciones, llame al 888-848-5175 y le dirigirán al Centro de Servicio de Fábrica Porter-Cable
•
Delta más cercano. Des centres de service
agréés sont situés dans beaucoup de grandes villes. Appelez au 800-487-8665 ou au 731-541-6042 pour obtenir de l’aide pour en
repérer un. Pour obtenir des pièces et accessoires pour les produits Porter-Cable
•
Delta, s’adresser à tout distributeur Porter-Cable
•
Delta, centre de service agréé ou centre de service d’usine Porter-Cable
•
Delta. Si vous n’avez accès à aucun de ces centres, appeler
le 888-848-5175 et on vous dirigera vers le centre de service d’usine Porter-Cable
•
Delta le plus proche.
ARIZONA
Tempe 85282 (Phoenix)
2400 West Southern Avenue
Suite 105
Phone: (602) 437-1200
Fax: (602) 437-2200
CALIFORNIA
Ontario 91761 (Los Angeles)
3949A East Guasti Road
Phone: (909) 390-5555
Fax: (909) 390-5554
San Leandro 94577 (Oakland)
3039 Teagarden Street
Phone: (510) 357-9762
Fax: (510) 357-7939
FLORIDA
Davie 33314 (Miami)
4343 South State Rd. 7 (441)
Unit #107
Phone: (954) 321-6635
Fax: (954) 321-6638
Tampa 33609
4538 W. Kennedy Boulevard
Phone: (813) 877-9585
Fax: (813) 289-7948
GEORGIA
Forest Park 30297 (Atlanta)
5442 Frontage Road, Suite 112
Phone: (404) 608-0006
Fax: (404) 608-1123
ILLINOIS
Addison 60101 (Chicago)
311 Laura Drive
Phone: (630) 628-6100
Fax: (630) 628-0023
Woodridge 60517 (Chicago)
2033 West 75th Street
Phone: (630) 910-9200
Fax: (630) 910-0360
MARYLAND
Elkridge 21075 (Baltimore)
7397-102 Washington Blvd.
Phone: (410) 799-9394
Fax: (410) 799-9398
MASSACHUSETTS
Braintree 02185 (Boston)
719 Granite Street
Phone: (781) 848-9810
Fax: (781) 848-6759
Franklin 02038 (Boston)
Franklin Industrial Park
101E Constitution Blvd.
Phone: (508) 520-8802
Fax: (508) 528-8089
MICHIGAN
Madison Heights 48071 (Detroit)
30475 Stephenson Highway
Phone: (248) 597-5000
Fax: (248) 597-5004
MINNESOTA
Minneapolis 55429
4315 68th Avenue North
Phone: (763) 561-9080
Fax: (763) 561-0653
MISSOURI
North Kansas City 64116
1141 Swift Avenue
P.O. Box 12393
Phone: (816) 221-2070
Fax: (816) 221-2897
St. Louis 63119
7574 Watson Road
Phone: (314) 968-8950
Fax: (314) 968-2790
NEW YORK
Flushing 11365-1595 (N.Y.C.)
175-25 Horace Harding Expwy.
Phone: (718) 225-2040
Fax: (718) 423-9619
NORTH CAROLINA
Charlotte 28270
9129 Monroe Road, Suite 115
Phone: (704) 841-1176
Fax: (704) 708-4625
OHIO
Columbus 43214
4560 Indianola Avenue
Phone: (614) 263-0929
Fax: (614) 263-1238
Cleveland 44125
8001 Sweet Valley Drive Unit #19
Phone: (216) 447-9030
Fax: (216) 447-3097
OREGON
Portland 97230
4916 NE 122 nd Ave.
Phone: (503) 252-0107
Fax: (503) 252-2123
PENNSYLVANIA
Willow Grove 19090
520 North York Road
Phone: (215) 658-1430
Fax: (215) 658-1433
TEXAS
Carrollton 75006 (Dallas)
1300 Interstate 35 N, Suite 112
Phone: (972) 446-2996
Fax: (972) 446-8157
Houston 77055
West 10 Business Center
1008 Wirt Road, Suite 120
Phone: (713) 682-0334
Fax: (713) 682-4867
WASHINGTON
Renton 98055 (Seattle)
268 Southwest 43rd Street
Phone: (425) 251-6680
Fax: (425) 251-9337
Printed in U.S.A.
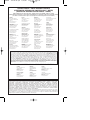
CANADIAN PORTER-CABLE • DELTA SERVICE CENTERS
ALBERTA
Bay 6, 2520-23rd St. N.E.
Calgary, Alberta
T2E 8L2
Phone: (403) 735-6166
Fax: (403) 735-6144
BRITISH COLUMBIA
8520 Baxter Place
Burnaby, B.C.
V5A 4T8
Phone: (604) 420-0102
Fax: (604) 420-3522
MANITOBA
1699 Dublin Avenue
Winnipeg, Manitoba
R3H 0H2
Phone: (204) 633-9259
Fax: (204) 632-1976
ONTARIO
505 Southgate Drive
Guelph, Ontario
N1H 6M7
Phone: (519) 836-2840
Fax: (519) 767-4131
QUÉBEC
1515 Avenue
St-Jean Baptiste, Québec, Québec
G2E 5E2
Phone: (418) 877-7112
Fax: (418) 877-7123
1447, Begin
St-Laurent, (Montréal), Québec
H4R 1V8
Phone: (514) 336-8772
Fax: (514) 336-3505


 1
1
 2
2
 3
3
 4
4
 5
5
 6
6
 7
7
 8
8
 9
9
 10
10
 11
11
 12
12
 13
13


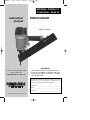
Porter-Cable BN200V12 User manual
Porter Cable US58 User manual
Porter-Cable Grinder 7406 User manual
DeWalt 7408 User manual
Delta Nail Gun DBN125 User manual
 PYLE Audio FCN200 User manual
 primatech 534FN Operating Instructions Manual
 Ramsond RMM4 User manual
 Ex-Cell ENS150 User manual
RAB Lighting HID-70-EX39-840-BYP-ADJ Operating instructions
 Porta-Nails 418A Installation guide


