Page is loading ...

INSTRUCTION MANUAL
Model Number: HE170543
.
Version 1.2


Warranty Note
If you experience any issues with this product, or it’s
performance is not what you had expected, please
contact us at Winplus before returning the item to
the store.
It is likely that we can resolve any problems for you
via phone or email.
We can be reached on:
Phone: 1300 663 907 (8:30am - 6:00pm EST)
Email: [email protected]
.

Warranty Details
The product is guaranteed to be free from defects in workmanship and parts for a period
of 12 months from the date of purchase. Defects that occur within this warranty period, under
normal use and care, will be repaired, replaced or refunded at our discretion. The benets
conferred by this warranty are in addition to all rights and remedies in respect of the product
that the consumer has under the Competition and Consumer Act 2010 and similar state and
territory laws.
Our goods come with guarantees that cannot be excluded under the Australian Consumer Law.
You are entitled to a replacement or refund for a major failure and for compensation
for any other reasonably foreseeable loss or damage. You are also entitled to have the goods
repaired or replaced if the goods fail to be of acceptable quality and the failure
does not amount to a major failure.
AFTER SALES SUPPORT
MODEL: HE170543 PRODUCT CODE: 58512 08/2017
REGISTER YOUR PURCHASE ATwww.aldi.com.au/en/about-aldi/product-registration/TO KEEP UP-TO-DATE WITH IMPORTANT PRODUCT INFORMATION
1300 663 907
AUS
customercare@winplus.com.au
YEAR WARRANTY
1
FLEX MOUNT REVERSING CAMERA
.

5
After Sales Support
1300 663 907
Model Number HE170543
.
Warranty Details
The product is guaranteed to be free from defects in workmanship and parts for a period
of 12 months from the date of purchase. Defects that occur within this warranty period, under
normal use and care, will be repaired, replaced or refunded at our discretion. The benets
conferred by this warranty are in addition to all rights and remedies in respect of the product
that the consumer has under the Competition and Consumer Act 2010 and similar state and
territory laws.
Our goods come with guarantees that cannot be excluded under the Australian Consumer Law.
You are entitled to a replacement or refund for a major failure and for compensation
for any other reasonably foreseeable loss or damage. You are also entitled to have the goods
repaired or replaced if the goods fail to be of acceptable quality and the failure
does not amount to a major failure.
AFTER SALES SUPPORT
MODEL: HE170543 PRODUCT CODE: 58512 08/2017
REGISTER YOUR PURCHASE ATwww.aldi.com.au/en/about-aldi/product-registration/TO KEEP UP-TO-DATE WITH IMPORTANT PRODUCT INFORMATION
1300 663 907
AUS
customercare@winplus.com.au
YEAR WARRANTY
1
FLEX MOUNT REVERSING CAMERA
Safety Instructions
WARNING: A failure to read and follow these warnings and instructions may result in a serious accident,
including damaged property or a serious injury, including loss of life.
• The Reversing Camera is designed as an aid to the driver in detecting large stationary objects to
help avoid damaging the vehicle. However, you, the driver, must use it safely and properly. Use of the
Reversing Camera is not a substitute for safe, proper and legal driving.
• Never back up while looking only at the screen. You should always check behind and around the
vehicle when backing up just as you would if the vehicle did not have the Reversing Camera. Always
make sure your intended path is clear. If you back up while looking only at the monitor, you may hit
a vehicle, pedestrian, bicyclist, child, pet or other object resulting in injury or death. Always back up
slowly.
• Never depend on the Reversing Camera entirely when backing up. The image on the screen is
dierentfromactualconditions.Objectsviewedintherearviewmonitordierfromactualdistance
becauseawide-anglelensisused.Objectsintherearviewmonitorwillappearvisuallyoppositethan
when viewed in the rear view and outside mirrors. Use the inside mirror or glance over your shoulder
to properly judge distances to other objects.
• The Reversing Camera “night vision” feature is an aid to a driver but is limited. Always use your own
eyestoconrmthevehicle’ssurroundings,asthedisplayedimagemaybefaintordark,distorted,
or not entirely visible. Always check behind and all around the vehicle visually with mirrors before
proceeding.
• The area displayed by the Reversing Camera is limited. The Reversing Camera does not display
objectsthatareclosetoorbelowthebumper,underneaththevehicle,orobjectsoutoftheCamera’s
eldofview.Theareadisplayedonthescreenmayvaryaccordingtovehicleorientationorroad
conditions.
• BesuretochecktheCamera’spositionandmountinganglebeforeeachuse.
• Make sure the trunk, hatch, or backdoor is completely and securely closed when backing up.
• If the back of the vehicle is hit, the position and mounting angle of the Reversing Camera may
change.
• When washing the vehicle with high pressure water, be sure not to spray it around the Camera.
Otherwise,watermayentertheCameraunitcausingwatercondensationonthelens,amalfunction,
reoranelectricshock.
• DonotstriketheCamera.Itisaprecisioninstrument.Otherwise,itmaymalfunctionorcause
damageresultinginareoranelectricshock.
• ThisproductwillonlyprovideimagesofitemsthatarewithintheeldofviewoftheCamera.Thus,
it is imperative that the Camera should be kept clean and unobstructed, and should be mounted so
thatitseldofviewincludestheentireareabehindyourvehicle.
• Adheretoallapplicabletraclawsandmotorvehicleregulationsapplicabletothedevice.
• Consult local laws and regulations for any restrictions on installation or use.
• Never allow children to play with the device. Small parts may be a choking hazard.
• If you replace the tires, the area displayed on the monitor may change and you may need to adjust
the Camera.
• There is a plastic cover over the Camera. Do not scratch the cover when cleaning dirt or snow from
the cover.
• The Camera has a water resistant construction. Do not detach, disassemble or modify it. This may
cause incorrect operation. Camera is waterproof.

6
After Sales Support
1300 663 907
Model Number HE170543
.
• Do not submerge Camera in water, as this can cause internal damage to the Camera.
• If the temperature changes rapidly, such as when hot water is poured on the vehicle in cold weather,
thesystemmaynotoperatenormally.TheDigitalCameracanwithstandtheeectsofrain,snow,
and inclement weather.
• When strong light directly enters a camera, objects may not be displayed clearly.
• Thescreenmayickerunderuorescentlight.
• Thecoloursofobjectsontherearviewmonitormaydiersomewhatfromthoseoftheactualobject.
• If dirt, rain or snow attaches to the Camera, the monitor may not clearly display objects. If water
droplets, snow or mud adhere to the Camera lens, rinse with water and wipe with a dry cloth.
• Do not use alcohol, benzene or thinner to clean the Camera. This will cause discoloration. To clean
the Camera, wipe with a clean cloth dampened with mild cleaner diluted with water and then wipe
with a dry cloth.
• Will work up to 30 feet.
• ALWAYS engage Parking/Emergency/Hand Brakes of the vehicle when testing the system.
Safety Around and Behind Other Vehicles
UsingaReversingCameraisnotenoughtocompletelyovercomeavehicle’sblindspot.Many
preventable injuries and deaths occur in driveways or parking lots when drivers do not see children,
pets, or others near their vehicles. Here are a few safety tips that will help you to avoid a back-over
accident:
• Walk completely around your vehicle before getting in. Check for kids, toys, and pets before entering
the vehicle and starting the engine.
• Know where children are. Have children stand in a place where they are in full view.
• Be aware of young children. Young children are small and hard to see.
• Parents, caregivers and all adults need to be vigilant in supervising children, especially when children
are in the yard, driveway or parking lot playing near parked cars.
• Roll down your window so you will be able to hear what is happening outside your vehicle.
• OwnersofSUVs,trucks,andvansneedtotakeextracaretoavoidhittingorrunningoverachild.
• Teach children to move away from a vehicle whenever it is started.
Safety Instructions

7
After Sales Support
1300 663 907
Model Number HE170543
.
Contents
Warranty Details 4
Safety Instructions 5
Parts List 8
Technical Specications 8
Product Overview 9
Installation 10
Dash Monitor Installation 10
MagneticMountOption 10
LicensePlateMountOption 11
Operation 13
PowerON/OFF 13
Parking Aid Line 13
Brightness and Contrast 13
Pairing 14
Rotate Image 14
FAQs 15
Disposal 16
Maintenance and Storage 16
Repair and Refurbished Goods or Parts Notice 18

8
After Sales Support
1300 663 907
Model Number HE170543
.
Parts List
Technical Specications
1x5inchDashMonitor
1xWirelessIPRatedCamera
1xLicensePlateAdaptorMountwithCable
1xSuctionMountforMonitor
1x12V/24VPowerAdaptorforMonitoror
Camera
1xMonitorHardwireCable(NotShown)
1xInstallationKit(NotShown)
1xSpareFuse(NotShown)
1xInstructionManual(NotShown)
1xWarrantyCard(NotShown)
1xGettingStartedGuide(NotShown)
Frequency: 2.4GHz
Operating Voltage: DC12V/24V
Operating Temperature: -10~+50°C
Maximum Signal Range: 30 feet/10 meters
(withoutInterferenceorObstruction)
Camera Water Resistance: IP67* rating
Battery Capacity: 1500mAh
Battery Usage Time: 4.5hours
* IP67 means protection from contact with harmful dust and protected from immersion in water with a
depthofupto1meter(or3.3feet)forupto30mins.

9
After Sales Support
1300 663 907
Model Number HE170543
.
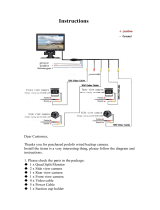
Product Overview
1. LCD Screen
2. Channel Button
3. Down
4. Menu
5. Power
6. Parking Aid Line / Enter
7. Up
3
4
5
1
2
6
7
98
10
8. Power Button
9. Reverse Lights Connector
(Behind)
10. ChargingPort(Below)

10
After Sales Support
1300 663 907
Model Number HE170543
.
Dash Monitor Installation
1. Stick the Suction Cup Mount on the windshield and adjust to your desired position.
2. Hook the Dash Monitor on to the windshield mount.
3. Remove the Dash Monitor protective overlay.
4. Now power the monitor:
a. 12V/24V Power Adapter
Takethe12V/24VPowerAdapterandplugadapterintotherightsideoftheDashMonitor.Plugthe
otherendinto12V/24Vpowerportinyourcar.
b. Hard Wire (Optional)
Take the Hard Wire Power Adapter and plug adapter into the right side of the Dash Monitor. Run cable
tofuseboxandconnecttofusedaccessorypowersource.Refertoyourvehicleownermanualfor
location of available accessory fuses.
5. The Dash Monitor is ready to be automatically powered on when the vehicle engine starts.
WARNING: Many vehicles provide constant power to the 12V outlet. If your outlet provides constant power,
please remember to unplug the monitor when not in use to avoid draining the vehicle battery.
Magnetic Mount Option
The camera has a strong magnet on its back and can be mounted on most metal surfaces of a vehicle, trailer,
or anything you tow. The camera is already charged,
but it is good practice to charge the camera when not in
use.Thecamerawillfullychargein5hours.
Thedesiredmountingplacehastobeacleanandat
surfacetoprovidemaximummagneticholdingforce.
Aluminium/plastics/carbonberwillnotholdthe
magneticcamera.Turnthecameraonorousingthepowerbuttononthetopofthecamera.Thecamera
image will always appear on the monitor screen as long as both are receiving power.* It is recommended
toremovethecamerawhennotinuseandchargefullybetweenuses.Thecameraprovides4-5hours
of viewing time between charging. When the battery on the camera is at 20%, an icon will appear on the
monitor to notify you.
The camera is not intended to be mounted permanently. It is recommended to remove the camera when not
in use and fully charge between uses. There are strap holders on each side of the camera. Use tie-wraps or
rope to secure if needed.
Installation

11
After Sales Support
1300 663 907
Model Number HE170543
.
Installation
License Plate Mount Option
This installation is based on powering the
Camera using the reverse tail lights. When
installed as directed, the camera image will only
appear when the vehicle is in reverse.
CAUTION: This unit is designed to operate on
a 12V/24V DC NEGATIVE GROUND electrical
system. Connecting to other types of electrical
systems will cause damage to your vehicle.
Please contact the manufacturer if you are
unaware of the system type in your vehicle.
1. Remove your license plate
2. Determine the best route for the License Plate Mount Adapter from the top of your license plate to the
inside of the vehicle. You may need to drill a small hole in the panel behind where the license plate is
situated.
3. TaketheadapterandrunthecablethroughtheRubberRingGrommet,thenfromtheoutsideofyour
car to the inside. Pull the cable through so that there is a small amount of slack and you can still move
the Camera around the license plate.
4. Locatethereversetaillights’wiringbehindyourreverselight.Youmayneedtoremovetheinterior
panelinordertolocateit.YouonlyneedtoattachtheadaptertoONEofthereverselights,notboth.If
you cannot manually locate the taillight cables, please contact the vehicle manufacturer or reference a
wiring diagram for your vehicle.
5. At your taillight, remove the light bulb socket from the reverse light housing.
6. Determine the reverse light power wires for your car, designating the positive and negative wires. If you
are not sure of which are the power wires, then please contact your vehicle manufacturer or reference a
wiring diagram for your vehicle.
7. Connecting the Power Cable:
a. Taketheopenwireendofthiscable,andconnectittothepowerwiresofyourcar(as
determinedinstep4).UsingtheSnapLockSpliceConnectors,connecttheadapter’sRedwireto
reverselight’sPositivewire.Connecttheadapter’sBlackWiretoreverselight’sNegativewire.
b. Use pliers to squeeze the metal tabs of the Snap Lock Splice Connectors and ensure a solid
connection, then snap the plastic cover closed.
8. Mountthewirelesscameraonthelicenseplateadapter.Whilesittinginthedriver’sseatofthecar
with the key in the accessory position. The monitor will automatically start when connected to a power
source.If,whenyouplacethevehicleinreversethereisnoimage,gotothesection“Operation”for
more information.

12
After Sales Support
1300 663 907
Model Number HE170543
.
Installation
9. Put the vehicle in reverse. If you have a clear picture, put the vehicle back in park and turn the key
totheoposition.Youarenowreadyfornalsteps.
10. Use the provided Zip ties to secure wires neatly within your car.
11. Replace the light socket back into the reverse light housing.
12. Replace any interior panels that may have been removed to access the taillight and close your trunk
or rear hatch.
13. Standing with the license plate in one hand and the Camera in the other hand, slide the License
Plate Mount Adapter along the top of the license plate in order to determine the placement. Best
placement is in the center of the license plate. If you have a rear hatch handle you may need to
remove the adapter bracket, turn the bracket upside down and reattach to the adapter. You would
then mount the Camera from the bottom of the license plate.
14. Peelotheliningofthedouble-sidedtapealreadyattachedtotheadapterandpressrmlytothe
license plate to secure the adapter. Make sure the back of the license plate is clean before attaching
double-sided tape.
NOTE: Ensure you do not obscure any part of your license plate
15. Pressthelicenseplateandtheadaptermountrmlytothecartosecureandgetfullcontact
between the license plate and the double-sided tape. Screw the license plate back onto the rear of
your vehicle.
16. AttachtheCameratotheadapter,youcanadjusttheverticalangleoftheCameratoyourspecic
need.
17. As a last check, note the position of the view from the Camera when you place the vehicle in
reverse. Adjust the angle of the Camera as necessary to achieve the best rear view.
18. There is no need to remove and recharge the camera.
If the 12/24V socket provides constant power, please unplug the monitor power adapter when the
vehicle is not in use.
Please follow your local laws and regulations regarding constant monitoring while driving. It is
recommended that you glance at the image only when in reverse, and use as an aid. Do not rely solely
on the camera view to back up.
By using the power button on the Monitor, the image can be shut off while driving. Please remember to
turn back on once the vehicle is stopped and ready to reverse.
When running the power cable inside of the vehicle do not close doors or windows on the cable or
obstruct it in any way.

13
After Sales Support
1300 663 907
Model Number HE170543
.
Power ON/OFF
• TheDashMonitorwillautomaticallyturnONwhenitisconnectedtoapowersource.
• HoldthepowerbuttontoturnON/OFFtheunitifnecessary.
• If the Camera is manually powered on by battery, it will be constantly powered instead of only when
in reverse gear.
Parking Aid Line
YoucanturnON/OFFtheParkingAidLinebypressingtheParkingAidLinebuttonwhenthereverse
image appears on screen.
You can adjust the parking aid line that appears in your monitor. When the Parking Aid Line is engaged,
press and hold the Parking Aid Line button for 3 seconds, then press the “+” or “-” to adjust up or down
on the monitor. There are a total of 10 adjustments that can be made.
Brightness and Contrast
You can adjust the contrast and brightness of the Monitor according to your desired level.
Note:ContrastandBrightnesssettingONLYworkswhilethecameraimageisonthescreen.
To Adjust Brightness
1. Press “MENU”
2. Goto“Brightness”bypressing“–”
3. Press “Parking Aid Line” to enter
4. Press“+“or“–”toadjustthecontrastlevel
5. Press“ParkingAidLine”toconrmandexit
To Adjust Contrast
1. Press “MENU”
2. Goto“Contrast”bypressing“–”
3. Press “Parking Aid Line” to enter
4. Press“+“or“–”toadjustthecontrastlevel
5. Press“ParkingAidLine”toconrmandexit
Operation

14
After Sales Support
1300 663 907
Model Number HE170543
.
Operation
Pairing
The Reversing Camera included with this System is already paired with the monitor. If you can not see
the Camera image, pair the Camera with the following steps:
1. Turn on your vehicle and place in reverse gear. This will power the Monitor and the Camera.
2. Onthemonitor:
a. Press “Menu”
b. Goto“PairCamera”andselect“Camera1”
c. Press“ParkingAidline”toconrm
d. The unit is now in pair mode - if the monitor is able to connect with the camera, the display
willshow“PairOK”.
Ifnocameraisfound,thenthedisplaywillshow“PairFail”.Ifyoureceivea“PairFail”message,please
call our technical support to assist in troubleshooting.
Rotate Image
You can rotate 180 degrees of the transmitted image signal and
disable mirror imaging according to your camera install orientation.
Note: Rotate Image setting ONLY works while the camera image is
on the screen.
1. Press “MENU”
2. Goto“RotateImage”bypressing“–”
3. Press “Parking Aid Line” to enter
4. Press“+”or“–”toadjusttheimagingrotationandmirroring
5. Press“ParkingAidLine”toconrmandexit

15
After Sales Support
1300 663 907
Model Number HE170543
.
FAQs
Question Solution
How do I adjust the parking aid lines? You can adjust the parking aid line that appears
in your monitor. When the Parking Aid Line is
engaged, press and hold the Parking Aid Line
button for 3 seconds, then press the “+” or “-” to
adjust up or down on the monitor.
Parkingaidlineisashing It is in aid line adjustable mode, press the “+” or
“-” to adjust up or down on the monitor. There are
a total of 10 adjustments that can be made. Press
entertoconrmthesetting.
Trouble adjusting parking aid line? Press “Parking Aid Line” button once to show
the aid line on screen. Then press and hold for 3
second to enter aid line adjustable mode.
Whydoimagesseemfaro? Thecamerahasawideviewsheyelenstoallow
view of not only what is directly behind you but also
ototheside.Asyougetclosertoanobjectthe
depth perception will change.
How long will it take the camera to
charge?
No need to charge between usage when hard wired
to reversing lights. If using magnetic mount option,
itneedsapproximately5hourstofullycharge.
Can the camera be left on constant
powersourcesoit’salwayscharged?
Yes, if you hardwire to a constant 12V power
source the image will always be on. Be advised
that if the camera is always on, it will continue to
draw power from the vehicle.
How can I get a replacement parts? Visit http://support.winplus.com.au/ or call 1300
663 907 to speak with Customer Care for help with
replacement parts
How can I tell if the camera is on when
pushing the power button?
You could tilt up the camera vertically and check
the LED underneath. Refer to the below for
explanationsonwhatthedierentLEDsmean:
• Blue - Camera is connected
• Red - Camera is not connected
• Red(Blinking)-Thebatteryislow
• RedwithBlue(Blinking)-Chargingwhilenot
connected
• Red and Blue - Charging while connected
• Red-Chargingwhenpoweredo

16
After Sales Support
1300 663 907
Model Number HE170543
.
Disposal
Maintenance and Storage
At the end of its working life, do not throw this product out with your household rubbish. Electrical and
electronicproductscontainsubstancesthatcanhaveadetrimentaleectontheenvironmentand
humanhealthifdisposedofinappropriately.Observeanylocalregulationsregardingthedisposalof
electrical consumer goods and dispose of it appropriately for recycling. Contact your local authorities
for advice on recycling facilities in your area.
Observeandlocalregulationsregardingthedisposalofwasteproducts.Contactyourlocalauthorities
for advise on recycling facilities in your area.
Please keep the original packaging carton and materials in a safe place. It will help to prevent any
damage if the product needs to be transported in the future. In the event it is to be disposed of, please
recycle all packaging material where possible.
If you require another copy of this instruction manual, please contact
customercar[email protected] to obtain an electronic copy.
None of the parts require scheduled cleaning. Should cleaning be necessary, simply wipe the outside
surface with a dry soft cloth.
Here are some additional cleaning tips:
• If dirt, rain or snow attaches to the Camera, the monitor may not clearly display objects. If water
droplets, snow or mud adhere to the Camera lens, rinse with water and wipe with a dry cloth.
• Do not use alcohol, benzene or thinner to clean the Camera. This will cause discoloration. To clean
the Camera, wipe with a clean cloth dampened with mild cleaner diluted with water and then wipe
with a dry cloth.
Alwaysstoretheunitinacleandryenvironmentandavoidstorageinextremeheatorcold.


Repair and Refurbished Goods
or Parts Notice
Unfortunately, from time to time, faulty products are manufactured which need to be returned
to the Supplier for repair.
Please be aware that if your product is capable of retaining user-generated data (such asles
stored on a computer hard drive, telephone numbers stored on a mobile telephone, songs
stored on a portable media player, games saved on a games console or les stored on a USB
memory stick) during the process of repair, some or all of your stored data may be lost.
We recommend you save this data elsewhere prior to sending the product for repair.
You should also be aware that rather than repairing goods, we may replace them with
refurbished goods of the same type or use refurbished parts in the repair process.
Please be assured though, refurbished parts or replacements are only used where they
meet ALDI’s stringent quality specications.
If at any time you feel your repair is being handled unsatisfactorily, you may escalate your
complaint. Please telephone us on1300 663 907 or write to us at:
Winplus Australasia
PO Box 537 Bayswater Business Centre, Victoria, Australia
1300 663 907 - Hours: Mon-Fri 8:30am - 6:00pm AEST
customercare@winplus.com.au
AFTER SALES SUPPORT
1300 663 907
AUS
customercare@winplus.com.au
YEAR WARRANTY
1
FLEX MOUNT REVERSING CAMERA
MODEL: HE170543 PRODUCT CODE: 58512 08/2017
.

Repair and Refurbished Goods
or Parts Notice
Unfortunately, from time to time, faulty products are manufactured which need to be returned
to the Supplier for repair.
Please be aware that if your product is capable of retaining user-generated data (such asles
stored on a computer hard drive, telephone numbers stored on a mobile telephone, songs
stored on a portable media player, games saved on a games console or les stored on a USB
memory stick) during the process of repair, some or all of your stored data may be lost.
We recommend you save this data elsewhere prior to sending the product for repair.
You should also be aware that rather than repairing goods, we may replace them with
refurbished goods of the same type or use refurbished parts in the repair process.
Please be assured though, refurbished parts or replacements are only used where they
meet ALDI’s stringent quality specications.
If at any time you feel your repair is being handled unsatisfactorily, you may escalate your
complaint. Please telephone us on1300 663 907 or write to us at:
Winplus Australasia
PO Box 537 Bayswater Business Centre, Victoria, Australia
1300 663 907 - Hours: Mon-Fri 8:30am - 6:00pm AEST
customercare@winplus.com.au
AFTER SALES SUPPORT
1300 663 907
AUS
customercare@winplus.com.au
YEAR WARRANTY
1
FLEX MOUNT REVERSING CAMERA
MODEL: HE170543 PRODUCT CODE: 58512 08/2017

/