Page is loading ...

754219_INS_Emergency Power Supply V2
Size:5”Wx4.75”H_Output:100%_Prints:1/1,Blk
You’re never
left in the dark.
Handcrank Power Supply
ALWAYS PREPARED FOR ANY OUTAGE
Merrimack, New Hampshire USA 03054 • 800-846-3000 • Brookstone.com

1
TABLE OF CONTENTS
Warnings and Cautions . . . . . . . . . . . . . . . . . . . . . . . . . . . . . . . . . . . . . . . . . . . . . . . . . . . . 2
Location of Parts and Controls . . . . . . . . . . . . . . . . . . . . . . . . . . . . . . . . . . . . . . . . . . . . . 3
Location of Parts and Controls (Charging Panels). . . . . . . . . . . . . . . . . . . . . . . . . . . . 4
LCD Icons (LCD Display). . . . . . . . . . . . . . . . . . . . . . . . . . . . . . . . . . . . . . . . . . . . . . . . . . . 5
Charging the Emergency Power Supply . . . . . . . . . . . . . . . . . . . . . . . . . . . . . . . . . . . . . 6
Setting the Time and Temperature Mode . . . . . . . . . . . . . . . . . . . . . . . . . . . . . . . . . . . . 7
Using the LED Flashlight . . . . . . . . . . . . . . . . . . . . . . . . . . . . . . . . . . . . . . . . . . . . . . . . . . 7
Using the AC Function. . . . . . . . . . . . . . . . . . . . . . . . . . . . . . . . . . . . . . . . . . . . . . . . . . . . . 8
Using the USB Connection . . . . . . . . . . . . . . . . . . . . . . . . . . . . . . . . . . . . . . . . . . . . . . . . 8
Using the 12V Power Outlet . . . . . . . . . . . . . . . . . . . . . . . . . . . . . . . . . . . . . . . . . . . . . . . 9
Using the Jump Starter . . . . . . . . . . . . . . . . . . . . . . . . . . . . . . . . . . . . . . . . . . . . . . . . . . . . 9
Care and Maintenance. . . . . . . . . . . . . . . . . . . . . . . . . . . . . . . . . . . . . . . . . . . . . . . . . . . .10
Power Information when Fully Charged. . . . . . . . . . . . . . . . . . . . . . . . . . . . . . . . . . . . . 11
Specifications . . . . . . . . . . . . . . . . . . . . . . . . . . . . . . . . . . . . . . . . . . . . . . . . . . . . . . . . . . . .12
Warranty. . . . . . . . . . . . . . . . . . . . . . . . . . . . . . . . . . . . . . . . . . . . . . . . . . . . . . . . . . . . . . . . .13

2
Do not try to remove the internal battery or try to repair this product. This product has an
internal inverter and jump-starter technology that raises the voltage and output to a much
higher level than the internal battery. Opening the product can cause serious injuries!
IMPORTANT This unit contains a lead acid battery that should be delivered
to a battery collection point for recycling at the end of its life.
• Read the instructions carefully before usage, and follow all the instructions.
• Connect the cables correctly and only use normal sockets and USB connectors.
Do not put any other object in the USB or AC output port.
• High voltage circuitry is used inside the body. Do not open the case at any time.
• Do not block the vent. Keep the AC socket dry to prevent electric shock.
• Do not operate in temperatures less than 14 degrees Fahrenheit.
• The unit should not be placed on sand or dirt as the fan for the heat reduction
at the bottom may blow or suck debris into the unit.
• To prevent the leakage of electrolyte in the lead acid battery, the unit should
be set upright on the ground.
• Always use the crank consistently. Rotating too slowly may reduce the current
and prolong charging time required.
• Rotating too fast will damage the internal gear.
• Do not place the device in very high temperatures or very humid environments.
• Use only the charging cables included.
• Charge the product at least once per month to prolong the life of the internal battery.
• Do not shine LED lights directly in eyes under any circumstances.
• When the unit is used for the first time, or not used for over 120 days, the internal
battery needs to be powered by DC charging for 14 hours.
WARNING!
HIGH VOLTAGE!
754219_INS_Emergency Power Supply V2
Size:5”Wx4.75”H_Output:100%_Prints:1/1,Blk

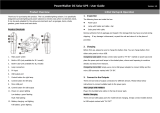
LOCATION OF PARTS AND CONTROLS
1. On/Off LED Light Switch
2. LED Light
3. LCD Display
4. Control Panel
5. Charging Panel 1 Door
6. Cable Access Door
7. Handle
8. Crank
9. Charging Panel 2 Door
10. AC Adapter (not shown)
11. 12V Car Adapter (not shown)
4
9
8
7
6
5
3
2
1
3

4
754219_INS_Emergency Power Supply V2
Size:5”Wx4.75”H_Output:100%_Prints:1/1,Blk
LOCATION OF PARTS AND CONTROLS (CHARGING PANELS)
1. Charging Panel 1 Cover
2. DC In
3. Solar In
4. 120V AC Power Outlet
5. 5V USB Outlet
6. Charging Panel 2 Cover
7. 30A Fuse
8. 12V DC Power Outlet
1 2 3
5
4
6
7
8

5
LCD ICONS (LCD DISPLAY)
5
1. AC/USB/Light Indicators
2. High Temperature Indicator
and Fan Icon
3. Inside/Outside Temperature
4. Charging Percentage
5. Set Button
6. USB Button
7. AC Button
8. Time
9. Overload Indicator
10. Voltage
Charging
Indicator
1
4
3
9
8
7
6
5
2
10

6
754219_INS_Emergency Power Supply V2
Size:5”Wx4.75”H_Output:100%_Prints:1/1,Blk
CHARGING THE EMERGENCY POWER SUPPLY
TURN THE CRANK
1. Pull the crank arm out of the holder and put it in its rotating position.
2. Rotate with a steady turning speed of 90-120 rotations per minute.
Please note: Turning the crank at a speed above 120 rotations per minute
may cause the gear to overheat and severe internal damage may occur.
3. During charging, the power level will blink on the LCD display.
4. Stop charging when the display shows a battery status of 100%.
CHARGING WITH AC ADAPTER (AC ADAPTER INCLUDED)
1. Connect the AC Adapter to an electrical outlet.
2. Connect the other end of the AC Adapter to DC-in of the unit.
3. During charging, the power level will blink on the LCD display.
4. Stop charging when the display shows a battery status of 100%.
CHARGING WITH 12V CAR ADAPTER (12V CAR ADAPTER INCLUDED)
1. Connect the 12V Car Adapter to the car’s cigarette lighter or power outlet.
2. Connect the other end of the 12V Adapter to DC-in of the unit.
3. During charging, the power level will blink on the LCD display.
4. Stop charging when the display shows a battery status of 100%.
IMPORTANT: During charging, the internal fan may operate to cool
off the inside temperature. This is a normal product function.

7
CHARGING BY SOLAR CELL (SOLAR CELL NOT INCLUDED)
1. To charge by solar cell, only use the solar input on the unit.
2. You may need an adapter tip to change the size of cable tip of a
solar cell to fit the unit.
SETTING THE TIME AND TEMPERATURE MODE
1. In Standby mode, press the SET button for 3 seconds.
2. The LCD display will show the time and the hour digit will blink.
3. Press the AC (+) or USB (-) buttons to adjust the hour.
4. Press SET to save the hour chosen. The minute digits will blink.
5. Press the AC (+) or USB (-) buttons to adjust the minute.
6. Press SET to save the minutes chosen. The 12/24 hour setting will blink.
7. Press the AC (+) or USB (-) buttons to choose between the 12 or 24 hour
display setting.
8. Press SET to save the 12/24 hour setting chosen. The C/F setting will blink.
9. Press the AC (+) or USB (-) buttons to choose between the C/F display setting.
Press SET to save.
USING THE LED FLASHLIGHT
1. Press the Light Switch on top of the unit to activate the LED flashlight.
2. Press again to activate the flashing red emergency light.
3. Press again to turn off.

8
754219_INS_Emergency Power Supply V2
Size:5”Wx4.75”H_Output:100%_Prints:1/1,Blk
USING THE AC FUNCTION
1. Press and hold the AC on/off button for three seconds to activate.
2. The AC power function will show on the LCD display. The power bank is now
ready to power any 120 Volt appliance with maximum power of 100 Watts.
3. Connect the plug of your 120 Volt device into the AC output.
Note: During use of the AC power function the internal inverter will get warm.
This is normal. The internal temperature is shown on the display. To cool down
the internal temperature, the integrated fan will automatically be activated
when required.
4. The wattage that is used by the connected AC device is shown in the display.
5. To deactivate the AC power function, disconnect your 120 Volt device and
press the AC on/off button for three seconds. The indication ‘AC OUTPUT’
will disappear from the display.
USING THE USB CONNECTION
1. Press and hold the USB on/off button for 3 seconds to activate the
USB function.
2. The USB power function will be displayed on the LCD display.
Connect the USB 2.0 connection of your mobile device to the USB
charging port from the unit.
3. The USB port can charge any mobile device with charging voltage of 5V
and output current of 1A.
4. To deactivate the USB output function, press and hold the USB button
for 3 seconds. The indicator USB OUTPUT will disappear from the display.

9
USING THE 12V POWER OUTLET
1. Open the Charging Panel 2 Cover.
2. Plug the 12V Car Adapter into the 12V Power Outlet.
3. Connect to device to be powered (up to 200W).
Replacing the Fuse: If the 12V Output isn’t operational, check the fuse and,
if fuse is blown (burned out), replace it with a 30A Fuse.
IMPORTANT: Only a 30A Fuse should be used.
USING THE JUMP STARTER
1. Open the CABLE DOOR.
2. Take out the RED and BLACK clamps.
3. Unscrew the BLACK nut from the negative terminal.
4. Connect the ring on the BLACK wire to the negative terminal.
5. Screw the BLACK nut back on the negative terminal to secure wire.
6. Unscrew the RED nut from the positive terminal.
7. Connect the ring on the RED wire to the positive terminal.
8. Screw the RED nut back on the positive terminal to secure wire.
9. Clamp the BLACK clamp to the negative pole of the car battery first followed
by the RED clamp to the positive pole of the car battery. This unit is able to
output a current of 200A.
WARNING! Fire or explosion may be caused because of a short circuit
or wrong connections of the poles.

10
754219_INS_Emergency Power Supply V2
Size:5”Wx4.75”H_Output:100%_Prints:1/1,Blk
IMPORTANT!: To prevent a short circuit, metallic parts should be kept away
from both the positive and negative clamps. Avoid any contact between the
negative and positive clamps. Carefully check if the poles are connected
correctly before connecting to any external battery.
For Best Performance Charging Car Batteries (for cars under 2.4L):
• Hand crank the unit until it’s charged to 12.0 Volts (readable on LCD display)
and use as a 12V output.
• The unit is suitable to power a 12V device directly by connecting the positive
wire of the 12V device to the red (positive) nut and the negative wire to the
black (negative) nut.
• Make sure, before connecting the positive wire, you integrated a suitable
fuse in the wire to protect your 12V device from short circuit and overcharge.
CARE AND MAINTENANCE
CLEANING
• Clean the Emergency Power Supply with a soft, dry clean cloth.
• Do not use any harsh abrasives or chemicals to clean the Emergency
Power Supply.
STORAGE
• The suitable storage temperatures are: -4 degrees Fahrenheit to
140 degrees Fahrenheit.

POWER INFORMATION WHEN FULLY CHARGED
Product: Run Time (approximate):
2W Night Light . . . . . . . . . . . . . . . . . . . . . . . . . . . . . . . . . 40 Hours
15W CD Player . . . . . . . . . . . . . . . . . . . . . . . . . . . . . . . . . 6 Hours
18W Desk Lamp . . . . . . . . . . . . . . . . . . . . . . . . . . . . . . . . 5 Hours
40W 14" TV . . . . . . . . . . . . . . . . . . . . . . . . . . . . . . . . . . . . 4 Hours
55W Fan . . . . . . . . . . . . . . . . . . . . . . . . . . . . . . . . . . . . . . . 2 Hours
70W Notebook . . . . . . . . . . . . . . . . . . . . . . . . . . . . . . . . . 85 Minutes
100 Watt Lamp . . . . . . . . . . . . . . . . . . . . . . . . . . . . . . . . . 55 Minutes
Mobile Phone DC 4.2V 1000mAh . . . . . . . . . . . . . . . . 20 cycles
Digital Camera DC 3.7V 1100mAh . . . . . . . . . . . . . . . 20 cycles
11

SPECIFICATIONS
AC-Charger: . . . . . . . . . . . . . . . . . . . . . . . . . . . . . . . . . . . . Input 100-240 Volt
Output 17 Volt
Amp 1.5 A
Output Capacity: . . . . . . . . . . . . . . . . . . . . . . . . . . . . . . . . AC 120/240 Volt/0.5/0.4 Amp
Charging Time Fully Charged by AC: . . . . . . . . . . . . . . 13 Hours
Charging Time Fully Charged by Crank: . . . . . . . . . . . 6 Hours
Crank Output: . . . . . . . . . . . . . . . . . . . . . . . . . . . . . . . . . . . 18 Volt, 40 Watt
Fuse . . . . . . . . . . . . . . . . . . . . . . . . . . . . . . . . . . . . . . . . . . . 30A
Operating Temperature: . . . . . . . . . . . . . . . . . . . . . . . . . . -10 ~ 40 Degrees Celsius
Storage Temperature: . . . . . . . . . . . . . . . . . . . . . . . . . . . . -20 ~ 60 Degrees Celsius
Battery (Lead Acid): . . . . . . . . . . . . . . . . . . . . . . . . . . . . . 12 Volt, 12 Ah, 7 Kg
Jump Starter: . . . . . . . . . . . . . . . . . . . . . . . . . . . . . . . . . . . Voltage 12 Volt
Starting Power: . . . . . . . . . . . . . . . . . . . . . . . . . . . . . . . . .200 Amp
Maximum Power: . . . . . . . . . . . . . . . . . . . . . . . . . . . . . . . . 140 Watt
Standby Time: . . . . . . . . . . . . . . . . . . . . . . . . . . . . . . . . . . 180 Days
Overcharge Protection: . . . . . . . . . . . . . . . . . . . . . . . . . . Yes
Maximum Solar Input: . . . . . . . . . . . . . . . . . . . . . . . . . . . 17 Volts
12

13
ONE (1) YEAR LIMITED WARRANTY
Brookstone
®
warrants this product against defects in materials and/or workmanship
under normal use for a period of ONE (1) YEAR from the date of purchase by the
original purchaser (“Warranty Period”). If a defect arises and a valid claim is received
within the Warranty Period, at its option, Brookstone will either 1) repair the defect
at no charge, using new or refurbished replacement parts, or 2) replace the product
with a new product that is at least functionally equivalent to the original product, or
3) provide a store credit in the amount of the purchase price of the original product.
A replacement product or part, including a user-installable part installed in accordance
with instructions provided by Brookstone, assumes the remaining warranty of the
original product. When a product or part is exchanged, any replacement item becomes
your property and the replaced item becomes Brookstone’s property. When a store
credit is given, the original product must be returned to Brookstone and becomes
Brookstone’s property.
Obtaining Service: To obtain warranty service, call Brookstone Limited Warranty Service
at 1-800-292-9819. Please be prepared to describe the product that needs service
and the nature of the problem. A purchase receipt is required. All repairs and
replacements must be authorized in advance. Service options, parts availability and
response times will vary. You are responsible for delivery and the cost of delivery of
the product or any parts to the authorized service center for replacement, per our
instructions.
Limits and Exclusions: Coverage under this Limited Warranty is limited to the United
States of America, including the District of Columbia and the U.S. Territories of
Guam, Puerto Rico, and the U.S. Virgin Islands. This Limited Warranty applies only
to products manufactured for Brookstone that can be identified by the “Brookstone”
trademark, trade name, or logo affixed to them or their packaging. The Limited
Warranty does not apply to any non-Brookstone products. Manufacturers or

14
suppliers other than Brookstone may provide their own warranties to the purchaser,
but Brookstone, in so far as permitted by law, provides these products “as is.”
This warranty does not apply to: a) damage caused by failure to follow instructions
relating to product’s use or the installation of components; b) damage caused by
accident, abuse, misuse, fire, floods, earthquake or other external causes; c) damage
caused by service performed by anyone who is not a representative of Brookstone;
d) accessories used in conjunction with a covered product; e) a product or part
that has been modified to alter functionality or capability; f) items intended to be
periodically replaced by the purchaser during the normal life of the product including,
without limitation, batteries or light bulbs; g) any product sold “as is” including, without
limitation, floor demonstration models and refurbished items; or h) a product that is
used commercially or for a commercial purpose.
BROOKSTONE SHALL NOT BE LIABLE FOR INCIDENTAL OR CONSEQUENTIAL
DAMAGES RESULTING FROM THE USE OF THIS PRODUCT, OR ARISING
OUT OF ANY BREACH OF THIS WARRANTY. TO THE EXTENT PERMITTED BY
APPLICABLE LAW, BROOKSTONE DISCLAIMS ANY AND ALL STATUTORY OR
IMPLIED WARRANTIES, INCLUDING, WITHOUT LIMITATION, WARRANTIES
OF MERCHANTABILITY, FITNESS FOR A PARTICULAR PURPOSE AND
WARRANTIES AGAINST HIDDEN OR LATENT DEFECTS. IF BROOKSTONE
CANNOT LAWFULLY DISCLAIM STATUTORY OR IMPLIED WARRANTIES, THEN
TO THE EXTENT PERMITTED BY LAW, ALL SUCH WARRANTIES SHALL BE
LIMITED IN DURATION TO THE DURATION OF THIS EXPRESS WARRANTY.
Some states disallow the exclusion or limitation of incidental or consequential damages
or how long an implied warranty lasts, so the above exclusions or limitations may not
apply to you. This warranty gives you specific legal rights and you may also have other
rights, which vary from state to state.
754219_INS_Emergency Power Supply V2
Size:5”Wx4.75”H_Output:100%_Prints:1/1,Blk

754219
Find thousands more
great ideas online
Merrimack, New Hampshire USA 03054 • 800-846-3000 • Brookstone.com
/