GE HTW200ASKWW Installation guide

Category
Washing machines
Type
Installation guide
WASHERS
SAFETY INSTRUCTIONS ..........3
USING THE WASHER
Getting Started ...................... 5
Loading .............................15
Appliance Communication .............16
CARE AND CLEANING ............17
INSTALLATION
INSTRUCTIONS
.....................18
TROUBLESHOOTING TIPS ......23
CONSUMER SUPPORT
Limited Warranty .................... 27
Consumer Support ................... 28
GTW500
GTW490
GTW485
GTW465
GTW460
GTW335
GTW330
GTW220
HTW240
HTW200
OWNER’S MANUAL &
INSTALLATION
INSTRUCTIONS
Write the model and serial
numbers here:
Model # _________________
Serial # _________________
You can find them under the
lid of the washer.
49-90576-2 11-18 GEA
ENGLISH/ESPAÑOL
G017
GE is a trademark of the General Electric Company. Manufactured under trademark license.
2 49-90576-2
THANK YOU FOR MAKING GE APPLIANCES A PART OF YOUR HOME.
Whether you grew up with GE Appliances, or this is your first, we’re happy to have you in the family.
We take pride in the craftsmanship, innovation and design that goes into every GE Appliances
product, and we think you will too. Among other things, registration of your appliance ensures that we
can deliver important product information and warranty details when you need them.
Register your GE appliance now online. Helpful websites and phone numbers are available in the
Consumer Support section of this Owner’s Manual. You may also mail in the pre-printed registration
card included in the packing material.
49-90576-2 3
IMPORTANT SAFETY INFORMATION
READ ALL INSTRUCTIONS BEFORE USING THE APPLIANCE
SAFETY INFORMATION
To reduce the risk of death, fire, explosion, electric shock, or injury to persons when using
your appliance, follow basic precautions, including the following:
Ŷ
Read all instructions before using the appliance.
Ŷ
Follow all fabric care instructions and warnings to prevent melting of garments or damage to the appliance.
Ŷ
DO NOT wash or dry articles that have been previously cleaned in, washed in, soaked in or spotted with
gasoline, dry-cleaning solvents, or other flammable or explosive substances, as they give off vapors that could
ignite or explode.
Ŷ
DO NOT add gasoline, dry-cleaning solvents, or other flammable or explosive substances to the wash water.
These substances give off vapors that could ignite or explode.
Ŷ
Under certain conditions, hydrogen gas may be produced in a hot-water system that has not been used for
2 weeks or more. HYDROGEN GAS IS EXPLOSIVE. If the hot water system has not been used for such a
period, before using a washing machine, turn on all hot-water faucets and let the water flow from each for
several minutes. This will release any accumulated hydrogen gas. As the gas is flammable, DO NOT smoke
or use an open flame during this time.
Ŷ
DO NOT allow children to play on or in this appliance. Close supervision of children is necessary when this
appliance is used near children. Before the washer is removed from service or discarded, remove the door or
lid. Failure to follow these instructions may result in death or injury to persons.
Ŷ
DO NOT reach into the appliance if the tub or agitator is moving to prevent accidental entanglement.
Ŷ
For waterproof, water-resistant and bulky items, only use the Bulky Items (or Delicates) cycle. DO NOT use
other cycles for these items. Using other cycles can cause excessive vibration and may result in injury or
damage to the washer, walls, or floor. DO NOT mix waterproof and non-waterproof items.
Ŷ
DO NOT install or store this appliance where it will be exposed to the weather.
Ŷ
DO NOT tamper with controls, repair or replace any part of this appliance or attempt any servicing unless
specifically recommended in the user maintenance instructions or in published user repair instructions that you
understand and have the skills to carry out.
Ŷ
DO NOT operate this appliance if it is damaged, malfunctioning, partially disassembled, or has missing or
broken parts including a damaged cord or plug.
Ŷ
Unplug the appliance or turn off the circuit breaker before servicing. Pressing the Power button DOES NOT
disconnect power.
Ŷ
DO NOT climb on or stand on this unit.
Ŷ
See “ELECTRICAL REQUIREMENTS” located in the Installation Instructions for grounding instructions.
WARNING
4 49-90576-2
SAFETY INFORMATION
READ AND SAVE THESE INSTRUCTIONS
IMPORTANT SAFETY INFORMATION
READ ALL INSTRUCTIONS BEFORE USING THE APPLIANCE
PROPER INSTALLATION
This washer must be properly installed and located in accordance with the Installation Instructions before it is used.
Ŷ
Ensure that the hot water hose is connected to the “H” valve and the cold water hose is connected to the “C”
valve.
Ŷ
Install or store where it will not be exposed to temperatures below freezing or exposed to the weather, which
could cause permanent damage and invalidate the warranty.
Ŷ
Properly ground washer to conform with all governing codes and ordinances. Follow details in the Installation
Instructions.
Ŷ
Ensure washer is properly leveled and washer legs are adjusted such that unit is stable.
Ŷ
Optional drain hose extension recommended for discharging heights from 60” - 96”.
Ŷ
GE Appliances strongly recommends the use of factory specified parts. A list of factory hoses available for
purchase are listed. These hoses are manufactured and tested to meet GE Appliances specifications.
Ŷ
GE Appliances strongly recommends the use of new water supply hoses. Hoses degrade over time and need
to be replaced every 5 years to reduce the risk of hose failures and water damage.
PARTS AND ACCESSORIES
Order on-line at GEApplianceparts.com today,
24 hours a day or by phone at 800.626.2002 during
normal business hours. In Canada, visit your local
GE Appliances parts distributor or call 800.661.1616.
Part Number Accessory
PM14X10002 4 ft rubber water supply hoses
Or
PM14X10005 4 ft braided water supply hoses
WH49X301 Drain hose extension
PM7X1 Washer Floor Tray
START-UP SEQUENCE
Ŷ
Any time the washer is being started or restarts after the washer lid has been opened and closed, the washer
will turn on the cold water valve for two short periods followed by a 10 second pause before continuing. If the
lid is opened during this period, the washer will pause. You will have to push the Start button again to restart
the cycle.
WHEN NOT IN USE
Ŷ
Turn off water faucets to minimize leakage if a break or rupture should occur. Check the condition of the fill
hoses; GE Appliances recommends changing the hoses every 5 years.
Plug into a grounded 3 prong outlet.
DO NOT remove ground prong.
DO NOT use an adapter.
DO NOT use an extension cord.
Failure to follow these instructions can result in death, fire or electrical shock.
- Electrical Shock Hazard
WARNING
AUTOMATIC DRAIN SEQUENCE
Ŷ
Machine will automatically drain any time the lid is left open for more than 15 minutes and water is present.
Ŷ
Machine will automatically drain if left in a paused state with the lid closed for more than 24 hours and water is
present.
49-90576-2 5
USING THE WASHER
Getting started
Throughout this manual, features and appearance may vary from your model.
Controls
Loosely add items around
agitator or Infusor. Overloading
may negatively impact wash
performance. See page 15 for
suggested loading examples.
Add the manufacturer’s
recommended amount of
detergent to the top of the
load after adding clothes. We
recommend the use of High
Efficiency detergents such as
in your energy efficient washer.
Step 2
Step 3
Step 4
Step 1
Close lid. Press
Start.
Add fabric softener to the
fabric
softener dispenser
(on some
models); see
page 14.
If using detergent packets,
add to the bottom of the
wash basket before adding
clothes.
To reduce the risk of fire, electric shock, or injury to persons, read the IMPORTANT SAFETY
INFORMATION before operating this appliance.
WARNING
NOTE: Unit will not start
with lid open if Precise
Fill is selected except on
Bulky Items cycle.
Select wash cycle.
Select wash options,
including Deep Rinse
option (on some models)
when using fabric softener.
Select options.
Select load size
(on some models).
DeepClean
D
B AEE F FF
D
B AEE F FF
6 49-90576-2
Getting started
USING THE WASHER
Medium
Precise Fill
D
B AC EF
D
B AEC F FF
DeepClean
D
B AEC F FF
DeepClean
D
B AC EF
49-90576-2 7
USING THE WASHER
Getting started
Medium
Large
Precise FillSmall
Super
D
B AC EF
Medium
Large
Precise FillSmall
Super
D
B AC EF
Regular Large
Small
Precise Fill
D
B AC
8 49-90576-2
Getting started
USING THE WASHER
A
B
Load Size (on some models)
Add detergent to the bottom of the basket and fabric softener to the dispenser (on some models) prior to loading clothes.
Loosely load items in the washer basket. Overloading may negatively impact wash performance. Adjust the load size
accordingly.
Make the load selection:
Precise Fill (on some models)
For convenience, best performance and optimal efficiency, select Precise Fill for models so equipped. This selection automatically
provides the correct amount of water suited to the size and type of load placed in the unit. Lid will be locked for the duration of the load
sensing process, which includes a brief spin period and a portion of the water fill.
If you prefer to manually select the water level, select Low/Small through Max/Super (or Large on some models). While Precise Fill is
best for most loads and general washing, you may want to manually select the load size for specialty items such as bulky, lightweight
comforters or pillows, where you want to ensure a larger water level is applied. Manual load size selections should be made for wet
items placed in the washer, such as soaked towels or garments.
The washer will not fill with water when
Precise Fill
is selected if the lid is opened. When the lid is closed the machine is
able to begin filling with water in order to sense the load size.
NOTE: This is a high-efficiency washing machine. This system requires less water while providing effective cleaning action. You may
notice that the water level is lower than on your previous washer. This is normal.
C
Start/Pause
Press Start to begin the cycle. NOTE: If the lid is closed, the lid will lock only during the load sensing portion of the cycle (when
the Precise Fill selection is made or models which do not have a load size selection) and during spin portions of the cycle. Lid will
unlock after load sensing and spin.
Pressing Pause will unlock the lid (if locked at that time), pause the cycle and the Pause indicator light will blink.
To continue the cycle, press Start again. If water remains in the machine, select the Drain & Spin cycle to drain basket and spin
water out of the washer basket. NOTE: Machine will automatically cancel and drain when water is present and the lid is left
open for 15 minutes or the unit is left in a paused state for 24 hours with the lid closed. Select cycle and press Start to
begin new cycle.
Cycle Status Lights
Shows whether the washer is in the Fill, Soak, Wash, Rinse or Spin portion of the cycle.
If an out-of-balance condition is detected by the washer, the Spin light will blink during the remaining portion of the cycle
and will stay illuminated for a short time after cycle completion. When this occurs, the washer is taking actions to correct the
out-of-balance condition and complete the cycle normally. In some cases, the washer may not be able to balance the load
and spin up to full speed. If you notice the load is more wet than normal at the end of the cycle, redistribute the load evenly
in the wash basket and run a Drain & Spin cycle.
Regular Large
Small
Precise Fill
(features and appearance will vary by model)
49-90576-2 9
USING THE WASHER
Getting started
D
Wash Cycles-Cycle Selector Knob - For models GTW500, GTW490, GTW485, GTW465, GTW460, GTW335,
GTW330, GTW220 & HTW240 only.
The wash cycle controls the type of washing process. The cycle selector knob can be turned in either direction. Turning the
knob after starting a cycle will stop the washer and change the cycle/options to the new selection. Press Start to begin the
new cycle selection.
The chart below will help you match the items to be washed with the best wash cycle settings. For optimal performance,
select the cycle that most closely matches the items being washed.
Selections and options shown in bold are the recommended settings for that cycle.
Some cycles and options may not be available on some models.
Items to Wash Cycle Wash Temp Soil
Level
Spin
Selection
(Duration)
Options Available Cycle Details
Cycle for normal,
regular, or typical
use for washing
up to a full load
of normally
soiled cotton
clothing.
Colors Hot
Warm
Colors
Cool
Cold
Tap Cold
Ex. Heavy
Heavy
Normal/
Medium
Light
Ex. Light
Max/Extra
Normal
Stain PreTreat
Guide
Auto Soak
Deep Rinse
2nd Rinse
On GTW460
Model Only:
Deep Fill
Cycle for normal, regular, or
typical use for washing up to
a full load of normally soiled
cotton clothing. Choose the
Heavy or Extra Heavy soil level
selection and Warm or Hot
water temperature selection as
appropriate for your clothes load
for a higher degree of cleaning.
Incorporates multi-stage fills and
wash periods to provide optimal
fabric care.
Dark colored
items, linens,
and mixed loads.
Dark
Colors
Hot
Warm
Colors
Cool
Cold
Tap Cold
Ex. Heavy
Heavy
Normal/
Medium
Light
Ex. Light
Max/Extra
Normal
Stain PreTreat
Guide
Deep Fill
Auto Soak
Deep Rinse
2nd Rinse
Lower wash temperatures,
a shorter wash period, and
a deep fill rinse (on some
models) minimizes fading and
spotting of dark colored fabrics.
Incorporates multi-stage fills and
wash periods to provide optimal
fabric care.
Casual clothes,
lightly soiled
office wear.
Casuals Hot
Warm
Colors
Cool
Cold
Tap Cold
Ex. Heavy
Heavy
Normal/
Medium
Light
Ex. Light
Max/Extra
Normal
Stain PreTreat
Guide
Deep Fill
Auto Soak
Deep Rinse
2nd Rinse
Wash period tailored to care for
casual clothes and office wear
items. Incorporates multi-stage
fills and wash periods to provide
optimal fabric care.
Lingerie and
special care
fabrics with light
soil.
Delicates Hot
Warm
Colors
Cool
Cold
Tap Cold
Ex. Heavy
Heavy
Normal/
Medium
Light
Ex. Light
Max/Extra
Normal
Stain PreTreat
Guide
Deep Fill
Auto Soak
Deep Rinse
2nd Rinse
Utilizes a unique “tri-pulse” extra
gentle agitate profile and a low
spin speed to provide special
care to delicate fabrics. It is
recommended to place small or
ultra delicate items in mesh bags
before washing.
Dark colored
fabrics and
mixed loads.
Cold
Wash
Hot
Warm
Colors
Cool
Cold
Tap Cold
Ex. Heavy
Heavy
Normal/
Medium
Light
Ex. Light
Max/Extra
Normal
Deep Fill
Auto Soak
Deep Rinse
2nd Rinse
Cycle combines multiple extended
wash agitation periods with soak
periods to provide enhanced
cleaning performance and energy
efficiency with colder water
temperatures.
Medium to lightly
soiled athletic
wear items of
technical or
synthetic fabrics.
Active
Wear
Hot
Warm
Colors
Cool
Cold
Tap Cold
Ex. Heavy
Heavy
Normal/
Medium
Light
Ex. Light
Max/Extra
Normal
Stain PreTreat
Guide
Deep Fill
Auto Soak
Deep Rinse
2nd Rinse
Cycle designed for care of medium
to lightly soiled active wear,
aththletic
wear, and technical
fabrics. Incorporates a multi
stage wash period with soak to
effectively treat body soils and
odors. Use the Heavy Duty cycle
for heavily soiled sports clothing
constructed of sturdy fabric.
10 49-90576-2
D
Wash Cycles-Cycle Selector Knob - Continued - For models GTW500, GTW490, GTW485, GTW465,
GTW460, GTW335, GTW330, GTW220 & HTW240 only.
Items to Wash Cycle Wash Temp Soil
Level
Spin
Selection
(Duration)
Options Available Cycle Details
Small loads of
lightly soiled
items that are
needed in a
hurry.
Speed
Wash
Hot
Warm
Colors
Cool
Cold
Tap Cold
Ex. Heavy
Heavy
Normal/
Medium
Light
Ex. Light
Max/Extra
Normal
Stain PreTreat
Guide
Deep Fill
Auto Soak
Deep Rinse
2nd Rinse
Utilizes an expedited wash period
and time saving continuous spray
rinse to clean small lightly soiled
loads in the fastest time possible.
Wet load of items.
For items that
need only to be
rinsed, use this
cycle with Deep
Rinse option.
Drain &
Spin
Max/Extra
Normal
Deep Rinse
2nd Rinse
Utilizes a high speed spin to
extract water from wet items.
For items that need to be rinsed,
select the Deep Rinse and/or
2nd Rinse option when using this
cycle.
Jeans with
medium to light
soil. For heavily
soiled work jeans,
use the Heavy
Duty Cycle.
Jeans Hot
Warm
Colors
Cool
Cold
Tap Cold
Ex. Heavy
Heavy
Normal/
Medium
Light
Ex. Light
Max / Extra
Normal
Stain PreTreat
Guide
Deep Fill
Auto Soak
Deep Rinse
2nd Rinse
Combines higher water levels,
a specially designed agitation
profile, and multi step wash and
soak periods to care for jeans
with medium to light soil. Use
the Heavy Duty cycle for heavily
soiled work jeans.
Sturdy fabrics with
heavy soil.
Deep
Clean
Hot
Warm
Colors
Cool
Cold
Tap Cold
Ex. Heavy
Heavy
Normal/
Medium
Light
Ex. Light
Max / Extra
Normal
Stain PreTreat
Guide
Deep Fill
Auto Soak
Deep Rinse
2nd Rinse
Incorporates multi-step wash
and soak periods combined
with extended wash periods to
effectively clean heavily soiled
sturdy fabrics.
Water-resistant,
bedding and
bulky items, such
as large coats,
mattress pads,
and bath mats.
Bulky
Items
Hot
Warm
Colors
Cool
Cold
Tap Cold
Ex. Heavy
Heavy
Normal/
Medium
Light
Ex. Light
Max / Extra
Normal
Stain PreTreat
Guide
Deep Fill
Auto Soak
Deep Rinse
2nd Rinse
Provides a Deep Fill/max fill
wash water level to wash bulky
and waterproof items. Also
incorporates a Deep Fill rinse to
effectively rinse bulky items and
a low spin speed appropriate
for these items. Only use this
cycle for water-resistant,
bedding or bulky items.
Towels.
Sheets.
Towels /
Sheets
Hot
Warm
Colors
Cool
Cold
Tap Cold
Ex. Heavy
Heavy
Normal/
Medium
Light
Ex. Light
Max / Extra
Normal
Stain PreTreat
Guide
Deep Fill
Auto Soak
Deep Rinse
2nd Rinse
Cycle designed washing towels or
sheets, using a higher water level
and a soak period to effectively clean
these items. It is recommended
that towels and sheets be washed
separately for best care and washing
performance. For waterproof bed
covers use Bulky Items cycle.
Whites and
household linens
Whites Hot
Warm
Colors
Cool
Cold
Tap Cold
Ex. Heavy
Heavy
Normal/
Medium
Light
Ex. Light
Max / Extra
Normal
Stain PreTreat
Guide
Deep Fill
Auto Soak
Deep Rinse
2nd Rinse
Cycle tailored to clean and
brighten your whites.
Getting started
USING THE WASHER
Failure to follow these instructions may result in injury or property damage.
For Waterproof, Water-Resistant, or Bulky Items:
Only use the Bulky Items (or Delicates) cycle. NOTE: Some models only have a Delicates cycle
.
Using other cycles can cause excessive vibration and may result in injury or damage to the washer, walls, or
floor.
Do not mix waterproof and non-waterproof items
.
Read the Owner’s Manual for wash cycle details.
CAUTION
49-90576-2 11
USING THE WASHER
Getting started
D
Wash Cycles-Cycle Selector Knob - For model HTW200 only.
The wash cycle controls the type of washing process. The cycle selector knob can be turned in either direction. Turning the
knob after starting a cycle will stop the washer and change the cycle options to the new selection. Press Start to begin the
new cycle selection.
The chart below will help you match the items to be washed with the best wash cycle settings. For optimal performance,
select the cycle that most closely matches the items being washed.
Items to Wash Cycle Wash Temp Soil
Level
Spin
Selection
(Duration)
Cycle Details
Cycle for
normal, regular,
or typical use
for washing up
to a full load of
normally soiled
cotton clothing.
Colors Cool
Cold
Tap Cold
Normal Normal Cycle for normal, regular, or typical use for washing up
to a full load of normally soiled cotton clothing. Multiple
wash temperature selections are available within this
single cycle:
Tap Cold: Coldest selection available, adds no hot
water.
Cold: Adds some hot water to aid dissolving
detergents in colder climates.
Cool: Adds more hot water to increase cleaning.
The Normal cycle is identical in cycle steps, wash
times, etc. for each wash temperature selection
available.
All rinses are cold.
Whites and
household linens
Whites Hot Heavy
Medium
Light
Normal Provides the hottest hot temperature available (based
on your water heater setting) with longer wash periods
to clean and brighten your whites. It is recommended
that a Oxi or chlorine bleach product appropriate
for items being washed be used with this cycle to
maximize whitening performance. Note that three soil
levels are available: Heavy, Regular, and Light. Rinse
is cold.
Light colored
items. More
heavily soiled or
items with body
soils.
Casuals Warm Heavy
Medium
Light
Normal Wash temperature and wash profile tailored for items
that are more heavily soiled and/or contain body
soils. Note that three soil levels are available: Heavy,
Regular, and Light. Rinse is cold.
Lingerie and
special care
fabrics with
light soil.
Water-resistant,
bedding and
bulky items,
such as large
coats, mattress
pads, and bath
mats.
Delicates Cool Light Normal Utilizes a unique “tri-pulse” extra gentle agitate profile
and a low spin speed to provide special care to
delicate fabrics. It is recommended to place small or
ultra delicate items in mesh bags before washing.
Wet load of
items.
Drain &
Spin
Normal Utilizes a high speed spin to extract water from wet
items.
NOTE: Water temperature selections are embedded within the wash cycles. For the Colors Cycle Normal, there are multiple
temperature selections available. For other cycles, such as Whites, there is only one temperature available but there are
multiple soil levels embedded. Select the cycle, temperature and soil level that best matches items being washed.
12 49-90576-2
Stain PreTreat
The Stain PreTreat feature allows you to indicate what stains are on the garments in your load. This feature incorporates a
patent pending treatment method. An initial water fill is performed at a temperature tailored to the stain type selected and to
an amount which enables a concentrated cleaning step. A stain scrubbing period, followed by an active soak, is conducted
to effectively treat the stain. Then additional water is added to the selected temperature and the wash phase is conducted
for the cycle selected. For washing normally soiled cotton clothing the Stain PreTreat option should be in the Off position.
This feature can be applied to most wash cycles as described in the cycle guide.
To use Stain PreTreat:
1. Select the desired wash cycle.
2. Select the stain to be treated under the Stain PreTreat options.
Stain PreTreat Guide
Category
Recommended
Temperatures
Treatment/Wash
Stain
For best results,
before placing in
washer:
Tomato Cool/Warm Sauce
Catsup
Salsa
Pretreat with liquid
detergent or stain
remover product;
rinse with cool
water.
Dirt Cool/Warm Dirt
Clay
Mud
Allow dirt to dry;
remove loose dirt
using a brush.
Rinse with cool
water.
Grass Cold/Warm Grass
Lipstick
Chocolate
Gravy
Mayonnaise
BBQ Sauce
Pretreat with liquid
detergent or stain
remover product.
Brush lightly; rinse
with cold water.
Wine Cool/Warm Wine
Soda
Kool-Aid
Tea
Coffee
Juice
Beer
Pretreat with
mixture of Oxi
product and cool
water. Add Oxi
product along with
detergent in the
washer.
Recommended temperatures are optimal for stain removal performance; adjust temperature selection to suit load being
washed.
Ensure stain is completely removed after wash cycle and before placing in dryer; very tough stains may require a second
treatment.
F
Cycle Options (on some models)
Settings
Select settings for agitation (Soil) and water temperature (Temp).
NOTE: Longer Spin times typically reduce dryer time/energy usage (i.e. reduces total energy when using both a washer and
a dryer).
E
Getting started
USING THE WASHER
49-90576-2 13
Cycle Options - Continued
Deep Fill
Select the Deep Fill feature for loads where extra water is needed. The Deep Fill feature is recommended for special case
loads only, not for typical use.
Press the Deep Fill button once before starting the cycle to add an incremental amount of water to the wash load. Holding the
Deep Fill button for 3 seconds will provide the deepest fill level possible; this will increase cycle time due to the additional time it
takes to fill the washer.
To cancel the option if desired, press the Deep Fill button again.
NOTE: The Deep Fill button can also be pressed after the washer has completed filling and is in the wash phase if additional
water is desired. To stop the extra fill, press the Deep Fill button again and the water will stop.
Auto Soak
This option begins with a brief agitation, soaks for a specified period of time, then moves through the rest of the cycle
automatically.
2nd Rinse
When you use extra detergent or bleach to clean heavily soiled clothes, use the 2nd Rinse option to better remove additional
residues.
Extra Spin
Select to provide additional spin time, increasing energy efficiency through reducing drying times.
2nd Rinse + Extra Spin
Provides both a second rinse and an extra spin.
Deep Rinse
Set this option to provide a deep rinse or when using fabric softener. This option may change other settings (e.g. Spin may go to a
higher setting) to maximize performance.
NOTE: For models GTW490 and GTW500 only. If liquid fabric softener is desired, wait until the Rinse cycle status light is lit and
the final rinse fill is complete before adding the recommended amount of liquid fabric softener directly to the rinse bath. When
adding liquid fabric softener, pour into deeper areas of rinse water while avoiding direct contact with fabric.
F
Consumer Help Indicator
Your washer is equipped with Consumer Help Indicator (CHI). CHI is our way to communicate a simple remedy for some
situations that you can perform without the need to call for service. The chart below describes the helpful lights you may
notice flashing on the display.
Spin light blinking If an out-of-balance condition is detected by the washer, the Spin light will blink during the remaining
portion of the cycle and will stay illuminated for a short time after cycle completion. When this occurs,
the washer is taking actions to correct the out-of-balance condition and complete the cycle normally. In
some cases, the washer may not be able to balance the load and spin up to full speed. If you notice
the load is more wet than normal at the end of the cycle, redistribute the load evenly in the wash
basket and run a Drain & Spin cycle.
Fill light (Water
not entering
washer)
Check your house water supply. Did you forget to turn on one or both supply valves after installation or
coming back from vacation? As soon as the light starts to flash, the washer will initiate a 4 minute lock-
out period. The washer controls won’t respond/change during this time. After the 4 minutes, you can
begin your cycle again. If you try to bypass the lock-out period by unplugging the washer, the 4 minute
timer will start over again.
Lid Locked light Lid Locked light will flash if 3 cycles have been started without opening the lid. The washer will not
start another cycle until the lid is opened. Try opening, then closing the lid and starting a new cycle. If
the problem persists, call GE Appliances at 800.GE.CARES (800.432.2737) for service.
USING THE WASHER
Getting started
14 49-90576-2
Automatic Load Sensing
This determines the correct agitate profile, agitate duration and amount of water suited to the size and type of load placed in the
washer. The washer will not start the wash cycle or fill with water if the lid is open. When the lid is closed the machine is able to
begin filling with water in order to sense the load size.
NOTE: Automatic Load Sensing initiates a spin at the beginning of the cycle and will take as much as 3 minutes to complete
(significantly shorter for smaller loads); this is normal operation.
NOTE: This is a high efficiency washing machine. This system requires less water while providing effective cleaning action. You
may notice that the water level is lower than on your previous washer. This is normal.
The agitator cap fits into the top of the agitator. If it accidentally
comes off, simply put it back on.
The fabric softener dispenser automatically releases liquid fabric
softener at the proper time during the cycle.
Do not stop the washer or raise the lid during the first spin.
This will cause the dispenser to empty too soon.
To use, follow these steps:
1
Make sure dispenser is securely attached to agitator.
2
Use only liquid diluted fabric softener. Pour into dispenser,
using amount recommended on package.
Never pour fabric softener directly on clothes. It may stain
them.
3
Add water to dispenser until it reaches the maximum fill line.
4
Select Deep Rinse option.
NOTE: Fabric softener may not dispense properly if the Deep
Rinse option is not selected.
Liquid Fabric Softener Dispenser (on some models)
Liquid chlorine bleach should be added through the bleach
dispenser in the front left corner. Follow bleach manufacturer’s
recommendations for the correct amount of liquid chlorine
bleach based on load size, taking care to not apply or spill it
directly on clothing.
NOTE: Do not use liquid chlorine bleach and laundry
pretreatments such as an Oxi product in the same wash load.
Liquid Bleach
Place laundry pretreatments, such as an Oxi product, directly
in the bottom of the wash basket before loading clothes.
NOTE: Do not use liquid chlorine bleach and laundry
pretreatments such as an Oxi product in the same wash load.
Pretreatment
ONLY this
portion of the
dispenser is
visible once
installed into
agitator
Do not pour anything into the agitator
if the agitator cap or dispenser is
removed.
Getting started
USING THE WASHER
49-90576-2 15
Average Small Load
Clothes Level
Water Level
Average Medium Load
Clothes Level
Water Level
Clothes Level
Water Level
Average Large Load
DO NOT wash fabrics soiled with flammable liquids or cleaning solvents.
No washer can completely remove oil.
DO NOT wash or dry anything that has been soaked in or spotted with any type of oil (including cooking oils).
DO NOT reach into the washer until all moving parts have stopped.
Doing so can result in death, explosion, fire or amputation.
Always follow fabric manufacturer’s care label when laundering.
Proper Use of Detergent
Using too little or too much detergent is a common cause
of laundry problems.
Use less detergent if you have soft water, a smaller load or
a lightly soiled load.
For spots, apply pre-treatment to items as recommended on
the product label. Application should be made in the basket to
prevent overspray which may cause the coloring on the lid or
graphics to fade.
Place detergent packets in the bottom of the wash basket
before adding clothes.
GE Appliances recommends the use of High Efficiency
detergents such as in your energy efficient washer.
HE detergents are formulated to work with low water
wash and rinse systems. HE detergents reduce the
oversudsing problems commonly associated with regular
detergents.
When using high efficiency or concentrated detergents,
consult the product label to determine amount required for
optimum performance. Excessive detergent will negatively
impact wash performance.
Sorting Wash Loads
Sort by color (whites, lights, colors), soil level, fabric type (sturdy cottons, easy care, delicates) and whether the
fabric produces lint (terry cloth, chenille) or collects lint (velveteen, corduroy). Wash lint producers such as cotton
towels and socks separate from lint collectors including synthetic garments and dress pants.
Loading the Washer
Load dry items loosely in the washer basket. For best
results, load items evenly and loosely around the outside of
the basket, filling in towards the center on larger loads. To
add items after washer has started, press Start/Pause if the
lid is locked; wait until the Lid Lock indicator on the display
is no longer illuminated before attempting to open the lid. Lift
the lid and submerge additional items around the outside of
the basket. Close the lid and press Start to resume. Adjust
load size selection and/or use Deep Fill option if necessary.
Ŷ On Infusor models, do not place large items such as
sheets, blankets and towels across the Infusor. Load
them around the outside of the basket.
Ŷ Do not put lawn or sofa cushions into the washer as they
are too big to move. Remove outer covers and ONLY
wash them.
WARNING
- Fire Hazard
USING THE WASHER
Loading
16 49-90576-2
Appliance communication
APPLIANCE COMMUNICATION
WiFi Connect (For customers in the United States only - on some models)
Your washer may be GE Appliances WiFi Connect compatible
using the optional GE Appliances ConnectPlus module.
If compatible: To connect this appliance to the internet
you will need to purchase a GE Appliances ConnectPlus
and attach the module to your appliance through the
communication port in the appliance. The GE Appliances
ConnectPlus will allow your appliance to communicate with
your smartphone for remote appliance monitoring, control and
notifications.
Please visit www.GEAppliances.com/connect to learn more
about connected appliance features, to learn what connected
appliance app’s will work with your smartphone.
WiFi Connectivity: For assistance with the appliance or the
ConnectPlus network connectivity, please call GE Appliances
at 800.GE.CARES.
Visit your local authorized GE Appliances parts distributor or
order by phone at 800.661.1616 during normal business hours.
Part Number Accessory
PBX10W00Y0 WiFi ConnectPlus module
49-90576-2 17
Care and cleaning
CARE AND CLEANING
Separate for cleaning
Cleaning the Fabric Softener Dispenser (on some models)
1
Remove the dispenser from the top of the agitator.
2
Separate the dispenser cup from the cover by grasping the top and pushing down on the
inside of the cup with your fingers. Dispenser cup will pop free from the cover.
3
To clean the dispenser, soak both the dispenser cup and the dispenser cover in the following
solution:
Ŷ
1 US gallon (3.8 liters) warm water
Ŷ
1/4 cup (60 ml) heavy-duty liquid detergent
Ŷ
1 cup (240 ml) bleach
4
If necessary, loosen buildup with a clean, soft cloth after soaking. Do not use a stiff brush; you
may roughen the surface of the dispenser.
5
Rinse and reassemble dispenser. Place dispenser back on the agitator.
Exterior of the Washer
Immediately wipe off any spills with a damp cloth.
Interior of the Washer
Leave the lid open after washing to allow moisture to
evaporate. If you want to clean the basket, use a clean
soft cloth dampened with liquid detergent; then rinse.
(Do not use harsh or gritty cleaners.)
Water Supply Hoses
Hoses connecting washer to faucet should be replaced
every 5 years.
Moving and Storage
Ask the service technician to remove water from drain
pump and hoses. Do not store the washer where it will
be exposed to the weather.
Long Vacations
Be sure water supply is shut off at faucets. Drain all
water from hoses and water filter pump area if weather
will be below freezing.
Certain internal parts are intentionally not grounded and may present a risk of electric shock only during servicing.
Service personnel – DO NOT contact the following parts while the appliance is energized: Drive Motor, Lid Lock,
Water Valves, Drain Pump and Recirculation Pump.
- Electrical Shock Hazard
WARNING
18 49-90576-2
Installation
Washer
Instructions
If you have any questions, call GE Appliances at 800.GE.CARES
(800.432.2737)
or visit our Website at: GEAppliances.com
In Canada, call 800.561.3344
or visit www.GEAppliances.ca
TOOLS REQUIRED FOR
WASHER INSTALLATION
Pliers
Level
PARTS SUPPLIED
PARTS REQUIRED (Sold separately)
GE Appliances Parts and Accessories
Order on-line at GEApplianceparts.com today, 24 hours a
day
or by phone at 800.626.2002 during normal business
hours.
Part Number Accessory
PM14X10002 4 ft Rubber Water Supply Hoses
Or
PM14X10005 4 ft Braided Metal Water Supply Hoses
WH1X2267 Rubber Washer (1) and Screen (1)
WH49X301
Drain Hose Extension (For discharge
heights from 60" - 96"
Drain Hose Extension (For discharge heights from 60" - 96"
NOTE: We strongly recommend the use of new water
supply hoses. Hoses degrade over time and need to
be replaced every 5 years to reduce the risk of hose
failures and water damage.
BEFORE YOU BEGIN
Read these instructions completely and carefully.
IMPORTANT Save these
instructions for local inspector’s use.
IMPORTANT Observe all
governing codes and ordinances.
Note to Installer – Be sure to leave these
instructions with the Consumer.
Note to Consumer – Keep these
instructions for future reference.
Skill level – Installation of this appliance requires
basic mechanical and electrical skills.
Completion time – 1-3 hours
Proper installation is the responsibility of the
installer.
Product failure due to improper installation is not
covered under the Warranty.
Drain Hose
Cable Tie
Clamp
Drain Hose Clip
Owner's Reference Guide
Water Hoses (2) Rubber Washers (2)
and Strainer Screens (2)
49-90576-2 19
Installation Instructions
LOCATION OF YOUR WASHER
DO NOT Install the Washer:
1. In an area exposed to dripping water or outside
weather conditions. The ambient temperature should
never be below 60°F (15.6°C) for proper washer
operation.
2. In an area where it will come in contact with curtains or
drapes.
3. On carpet. The floor MUST be a hard surface with a
PD[LPXPVORSHRIƎSHUIRRWFPSHUFP
To make sure the washer does not vibrate or move,
you may have to reinforce the floor.
NOTE:,IIORRULVLQSRRUFRQGLWLRQXVHƎLPSUHJQDWHG
plywood sheet solidly attached to existing floor covering.
IMPORTANT: Minimum Installation Clearances
- Alcove or Closet
If your washer is approved for installation in an alcove or
closet, there will be a label on the back of the machine
describing requirements.
Minimum clearance between washer and adjacent walls
or other surfaces: 0" either side, 2" front, 3" rear.
Vertical space from floor to overhead shelving, cabinets,
ceiling, etc. = 60".
• Closet doors must be louvered or otherwise ventilated
and have at least 60 square inches of open area. If the
closet contains both a washer and a dryer, doors must
contain a minimum of 120 square inches of
open area.
NOTE: The clearances stated on this label are minimums.
Consideration must be given to providing adequate
clearances for installing and servicing.
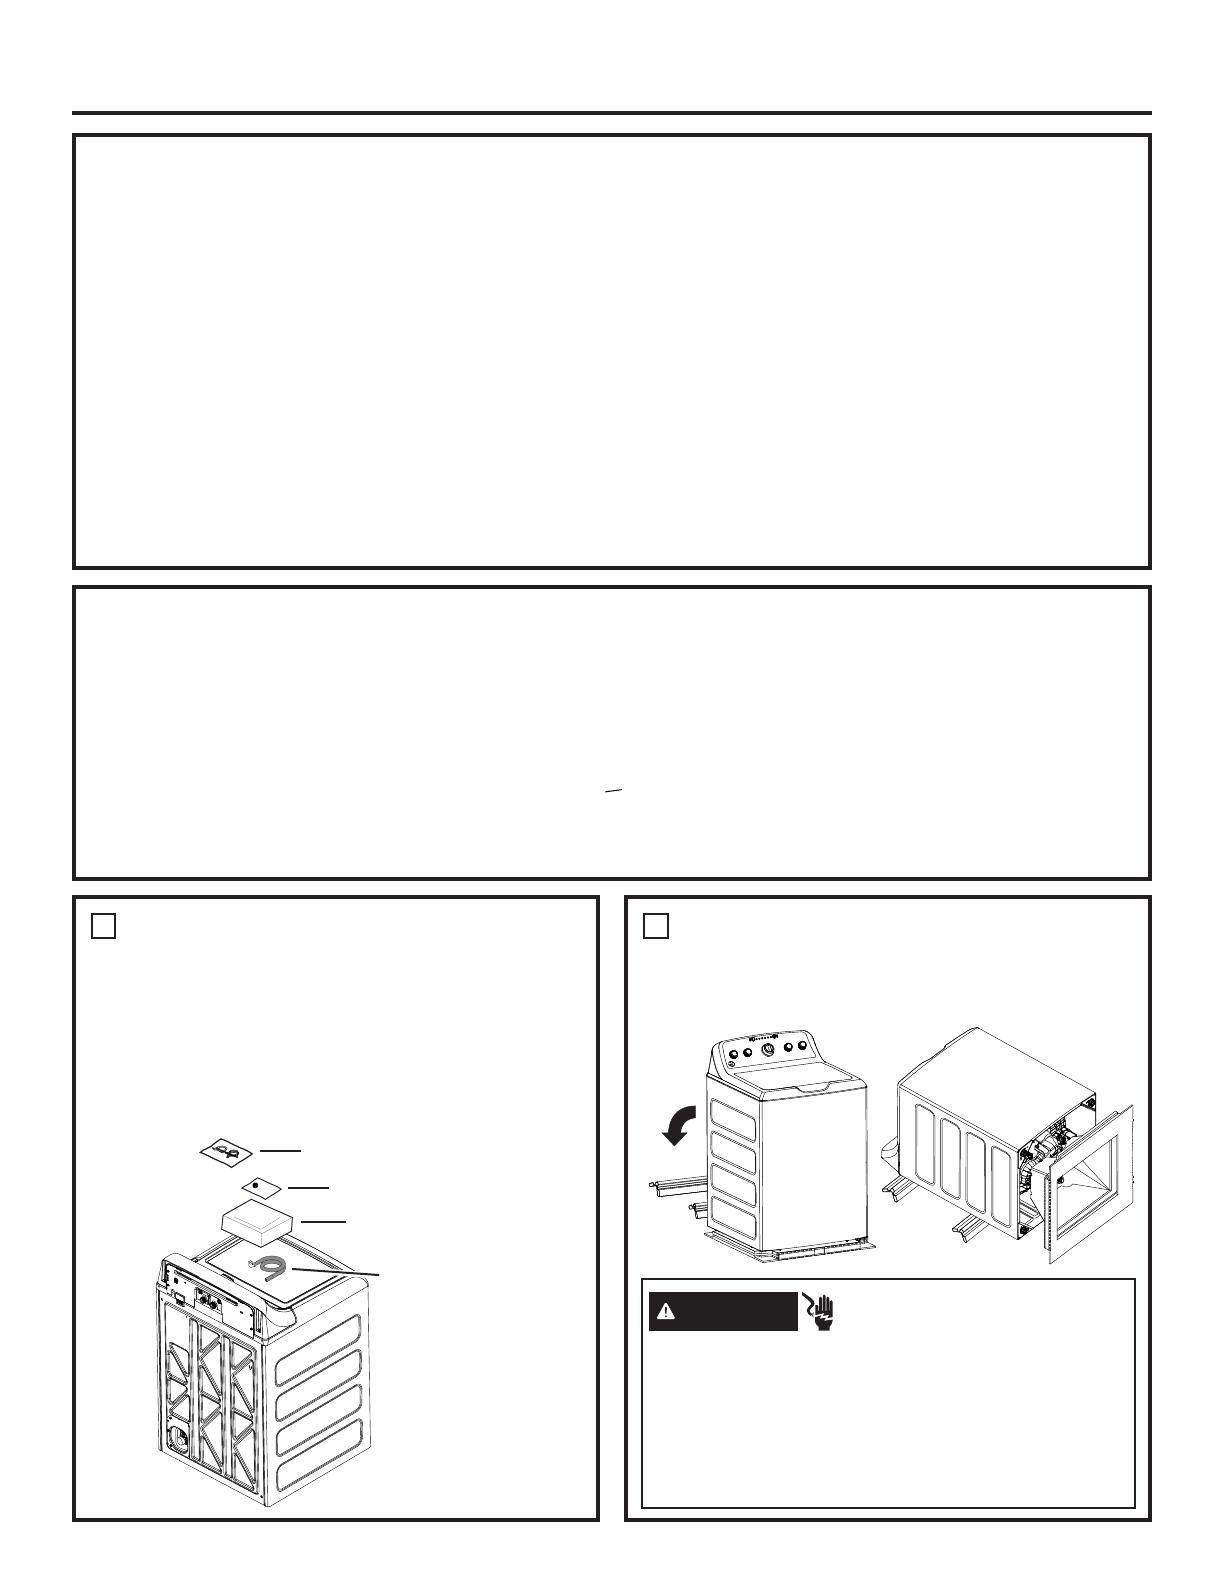
After the machine is in the home, remove outside
packing material/carton from washer.
Remove bag (containing clamp, cable tie and drain
hose clip), drain hose and Owner's Reference Guide
from tub.
NOTE: Leave foam shipping material inside tub
opening to hold tub in place during the rest of
installation.
1
UNPACKING THE WASHER
Remove base from unit by placing foot on side of base
and tipping unit back on corner post. Remove base and
bring the washer back upright.
2
REMOVE THE BASE
WATER SUPPLY REQUIREMENTS
WATER SUPPLY LINES - Purge Hot and Cold water supply lines for 30 seconds prior to installation of hoses and washing
machine. Ensure inlet hose screens are also clean and free of debris.
WATER PRESSURE - Must be 20 psi minimum to 120 psi maximum.
WATER TEMPERATURE - Household water heater should be set to deliver water at 120° to 150°F (50° to 66°C) TO THE
WASHER when hot wash is selected.
SHUTOFF VALVES - Both hot and cold shutoff valves (faucets) should be supplied.
DRAIN - Water should be drained into standpipe. Discharge height MUST NOT BE LESS THAN 30 INCHES, and no
more than 8 feet above the base of the washer. Standpipe must be 1-1/2 inches minimum inside diameter and must
be open to atmosphere.
Bag
Owner's Reference Guide
Leave foam shipping
material inside tub
Drain hose
Certain internal parts are intentionally not grounded
and may present a risk of electric shock only during
servicing.
Service personnel – DO NOT contact the following
parts while the appliance is energized: Drive Motor,
Lid Lock, Water Valves, Drain Pump and Recirculation
Pump.
- Electrical Shock Hazard
WARNING
20 49-90576-2
Installation Instructions
Connect drain hose to drain port on back of washer. Open
clamp with pliers and slide onto hose end. Holding clamp
open, push hose end onto drain port until fully seated.
Release clamp between locating ribs on hose end. Outlet
of hose end should be oriented vertically.
3
CONNECT DRAIN HOSE TO
WASHER
5
CONNECT WATER HOSES TO
OUTLET VALVES
Drain
hose
Drain
port
Drain
end
Clamp
Unplug electrical cord before installing water hoses. If
not installed, install rubber washer in one end of hot
water hose. Thread hot water hose onto connection
labeled H at top rear of washer. Hand tighten and use
pliers to tighten hoses between 1/8 and 1/4 turn beyond
hand-tight.
If not installed, install rubber washer in one end of cold
water hose C. Thread cold water hose onto connection
labeled C at top rear of washer. Hand tighten and use
pliers to tighten hoses between 1/8 and 1/4 turn beyond
hand-tight.
0RYH ZDVKHU DV FORVH WR ¿QDO ORFDWLRQ DV SRVVLEOH
leaving room for you to make water, drain, and electrical
connections to your home.
4
CONNECT WATER HOSES TO
WASHER
Rubber
washer
Rubber
washer
Determine which is HOT water line before attaching
water hoses to faucets. Traditionally, HOT faucet is on
left.
(If screen washers are not installed) With protruding
part of screen toward you, install strainer screen/rubber
washer into each of the free ends of two water hoses.
Connect hot water hose to hot water
outlet valve of your home. Hand
tighten and use pliers to tighten
hoses between 1/4 and 1/2 turn
beyond hand-tight. Open hot water
valve.
Connect cold water hose to cold
water outlet valve of your home.
Hand tighten and use pliers to
tighten hoses between 1/4 and 1/2
turn beyond hand-tight. Open cold
water valve.
Check for leaks and drips at the hose couplings. Tighten
as necessary.
  • Page 1 1
  • Page 2 2
  • Page 3 3
  • Page 4 4
  • Page 5 5
  • Page 6 6
  • Page 7 7
  • Page 8 8
  • Page 9 9
  • Page 10 10
  • Page 11 11
  • Page 12 12
  • Page 13 13
  • Page 14 14
  • Page 15 15
  • Page 16 16
  • Page 17 17
  • Page 18 18
  • Page 19 19
  • Page 20 20
  • Page 21 21
  • Page 22 22
  • Page 23 23
  • Page 24 24
  • Page 25 25
  • Page 26 26
  • Page 27 27
  • Page 28 28
  • Page 29 29
  • Page 30 30
  • Page 31 31
  • Page 32 32
  • Page 33 33
  • Page 34 34
  • Page 35 35
  • Page 36 36
  • Page 37 37
  • Page 38 38
  • Page 39 39
  • Page 40 40
  • Page 41 41
  • Page 42 42
  • Page 43 43
  • Page 44 44
  • Page 45 45
  • Page 46 46
  • Page 47 47
  • Page 48 48
  • Page 49 49
  • Page 50 50
  • Page 51 51
  • Page 52 52
  • Page 53 53
  • Page 54 54
  • Page 55 55
  • Page 56 56

GE HTW200ASKWW Installation guide

Category
Washing machines
Type
Installation guide

Ask a question and I''ll find the answer in the document

Finding information in a document is now easier with AI

in other languages