Page is loading ...

RENESSE
Thank you for your recent purchase
of the TOTO® product. Please read the
enclosed information to ensure the
safe use of your product.
.
Installation and Owner’s Manual
2007.5
•
™
0GU3025
TL170SD
Important Safeguards------------1~2
Specifications -------------------------3
Before Installation--------------------3
Set-Up Drawing -----------------------4
Components ---------------------------5
Installation Procedure ---------6~9
How to Use ---------------------------10
Maintenance --------------------11~12
Troubleshooting --------------------13
Replacement Parts------------------14
Warranty -------------------------------15
Single Handle Lavatory Faucet
Contents
®
English
Español
Français

1
ENGLISH
Important Safeguards
(For your safety, please follow the instructions below)
Warning
Do not reverse the hot and cold water inlet.
You may be scalded if they are reversed.
Do Not
Do not use hot water supply that is higher than
185˚F (85˚C).
If water is hotter than 185°F is used, do not use steam for hot
water supply. If it is broken, property damage, scalding, and
other injuries may occur.
Do not
disassemble
Do not disassemble or modify the item in any
way not described in this manual.
If the system is broken, property damage, scalding and other
injuries are likely to occur.
Read the “Important Safeguards” section thoroughly before installing the product.
Warning
Caution
●The following symbols indicate safe and proper use of the product. Failure to observe them may reult in
injury or property damage.
Failure to observe this symol may
result in serious injury.
Failure to observe this symbol may
result in injury or property damage.
Absolutely Do NOT.
Do not disassemble
Mandatory!
The following table demonstrates the use of safety symbols in this manual.
Less than
185° (85˚C)
H
C
Hot water
Cold water
Do Not
Caution
Do not
Touch
You may get scalded when they are hot.
While using hot water do not touch the spout
and spout body directly.
Do not strike or kick the product
If the system is broken, property damage, scalding, and other
injuries may occur.
Do not use the product at temperature exceding
what local codes allows.
If parts are damaged, property damage, scalding and other
injuries may occur.
HOT
Ah!
Freezing

2
ENGLISH
When the valve at the hot side is opened,
hot water may cause scalding.
To use hot water, you must turn the handle
on the cold side first, then turn the handle
on the hot side slowly and adjust the
temperature.
After water is turned off, leave the handle
in turned off, leave the hand in the
coldside or in the middle.
The next time hot water is used, the hot water
remaining in the valve may cause scalding.
Before using hot water, check with your
hand that the temperature is appropriate.
When the handle on the hot side is turned, hot
water may cause scalding
Warning
Mandatory
Ah!
HOT
Do not
If the system has deteriorated or worn-out,
property damages, scalding and other injuries
may occur.
Check water leakage and looseness in
the pipe (cabinet and inspection hole
etc.) regular.
If the hot water pressure is higher than that
of the cold water, you will not be able to adjust
the temperature normally, and you may be
scalded.
The pressure of the water supply can not
be lower than that of the hot water.
The hot water pressure must be lower than the
pressure of the cold water side.
Ah!
No
looseness
No
leakage
Slowly

3
ENGLISH
34~104˚F (2˚C~40˚C)
Specifications
Cold and hot
water pressure
Minimum pressure
Maximum pressure
20psi ( 0.14MPa) (flowing pressure)
Maximum use temperature
Suitable Water Quality
Suitable ambient temperture
Supply Connection
125psi (0.86MPa) (static)
Less than 185°F (85˚C)
Water that meets National/Primary
drinking water regulation
3/8” NPSM
Before installation
●To prevent being scalded due to malfunction, the water supply
pressure must be higher than the hot water pressure, or you can
make them equal. In addition, if you inrease the pressure of the
hot water, it must still be lower than that of water supply side.
● If the water supply pressure is higher than 0.86MPa, you should buy
a reducing valve to reduce the pressure to the range of 0.2-0.3MPa.
To use the faucet comfortably, the recommended pressure is
about 0.2-0.3MPa.
●To prevent being scalded due to malfunction, the
recommended hot water supply temerature is 140°F.
Max. 2.2gpm (8.32L/min)
Flow Rate

4
ENGLISH
Flex Hose
(Hot)
Flex Hose
(Cold)
Push button
(only for faucet
with pop-up drain)
Gasket
Gasket
Flat packing
Winged packing
Connector Assembly
Spout mounting nut
Components
Check that you have the following parts from the package.
Faucet main body parts
※Some parts may be different depending on the model.
Flat washer
Lever
Outlet
Lock washer
Spout mounting flange
Spout Key
*Observe all local plumbing codes.
*Make sure that water supply is shut off.
*Read these instrutions carefully to ensure proper installation.
*For new lavatory installation, install the faucet before installing the lavatory.
Installation and
Owner’s Manual

5
ENGLISH
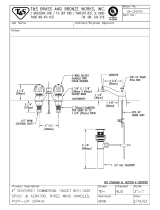
Set-Up Drawing
*Some parts may differ from the illustration depending on the model.
3/8” NPSM
5” (127mm) (CLOSE)
6-7/16” (163mm) (OPEN)
2-15/16”(75mm)
5-5/16 “(135mm)
1-11/16” (43 mm)
5
0
°
5
0
°
Pop-up Drain
cable connector
counter hole
φ
1-5/16” to 1-7/16
(
φ35±2 mm)
HOT
COLD
cable length =
13-13/16” (350 mm)
1-1/4” OD
(32 mm OD)
8-9/16”
(218 mm)
18-3/16”
(462 mm)
Deck Thickness
Max. 1-3/16” (30 mm)
5-5/16 “(135mm)
3-11/16”
(94 mm)

6
ENGLISH
1
Clean the cold/hot
water supply pipes
1
Clean the cold/hot water supply pipes
Before installation
dirt and debris in the cold/ hot water supply pipes
must be washed out
Important
2
Install the spout
3
Connect the
cold/hot flex
hoses
5
Pop-up drain with cable.
Installation Procedure
2
Install the spout.
Insert the packing through the
cold/hot water supply hoses into the
groove in the bottom of the main
faucet body and into the installation
hole.
Measure the installation holes,
select from the two kinds of packing
to suit your needs.
Insert the spout mounting flange, flat
washer, lock washer and nut through
the faucet mounting shaft in that
order, face the spout to from the front
and attach the parts.
Wipe dirt away around the instllation hole.
spout mounting
flange
Faucet mounting
shaft
Cold Water
supply hose
Hot water supply
hose
Packing
Faucet mounting shaft
Section
Flat washer
Lock Washer
Nut
Spout
Close
4
Pop-up Drain with Cable
installation
(Only for faucet with
Pop-up drain).

7
ENGLISH
3
Connect the cold/hot water supply hoses
*Put the gasket into the connectors and tighten the connectors in the
stop valves; use the tool to fasten them.
*Put the gasket into the cap nuts of the cold/hot flex hoses, screw in
the connector, use the tool to fasten them.
Flex hose
(Hot)
Flex hose
(Cold)
Cap nut
Gasket
Gasket
Connector
Stop valve

8
ENGLISH
The minimum bending radius of the hose is 2 3/8”(60mm), if you bend it over the limit,
it will break, which may cause early damage.
●During installation, do not bend the hose from the end surface of the main faucet
body too far.
●Do not pull the hose violently.
This may break the hose.
If the external reinforced layer of the hose is damaged due to friction, the hose
performance will deteriorate.
●Avoid unnecessary contact of similar hoses.
●You have to bend the hoses, but be careful not to break them.
Hot water
supply hose
Cold water
flex hose
R= 2 3/8” (60mm)
and higher
R=2 3/8”(60mm)
and higher
Cautions for installing flex hoses
Good Bad Bad Bad

9
ENGLISH
cable
tailpiece
u-cup seal
drain body pop up
nut
drain seal
cable handle
connector
cable base
connector
cable
lock nut
tailpiece
drain body
locknut
drain gasket
flange nut
drain body
flange
lavatory
cable
cable handle
connector
cable base
connector
press the clip to
be able to connect
clip
clip
groove, to
which connection
is to be made
4
Pop-up Drain with Cable Installation
(Only for Faucet with Pop-up Drain)
- Apply pipe tape to the flange threads.
- Insert flange into the drain hole.
- Assemble the gasket. flange nut and lock nut.
- Apply pipe tape to the end threads of flange
threads and install the tail piece to drain body
-Make sure that cable faces toward the faucet.
- Connect the cable base connector with cable
handle connector.
Push button
faucet handle
Push button

ENGLISH
How to Use
How to adjust the temperature
If it is fully turned to the left side, the
water temperature is at its highest.
Turn the lever
For cold water, turn it to the right side, for
hot water, turn it to the left side.
To prevent scalding due to malfunction,
the recommended hot water supply
temperature is 140°F (60˚C).
Right side
(Cold)
Lever
Left side
(Hot)
Close
Drain
Drain
Push button
Push
Push button
Push
Open
Open and close the Pop-up valve
(Only for Faucet with Pop-up drain )
Push the push button.
When the pop-up is closed, water can be
kept in the washbasin.
Push it again, the drain is opened and
water will drain out.
10

11
ENGLISH
Maintenance
1. Unscrew the aerator.
3. Install the aerator.
Use attached special tool to
remove it.
Use spout key provided to install it.
Brush
Aerator
Spout key
Unscrew
For best performance and sanitary environment, please maintain
it everyday.
Maintain the outlet
2. Use a brush to clear the dirt
and debris from the aerator.
Be careful not to lose the parts
when they are removed.
Use a cloth to clean it
Use water and a damp cloth to wipe away
the dirty completely.
●
Slight dirty
●
Seriously dirty
Use a cloth with dilute detergent
to wipe away the dirt, then
wash and dry it.
Aerator

12
ENGLISH
●
Acidic cleaning agents, alkaline cleaning agents,
bleaches except for the TOTO scale cleaner.
●
Solvents like thinner and benzene
Notes:
Do not use the following materials, which
are harmful to the faucet surface finish.
●
Cleaning agents like cleanser or grinding powder
that contain coarse particles
●
Nylon scrubbers and brushes
No
looseness
Confirm looseness in the main
body
In case of looseness, request for service to
the installer, distributor or Tech Support.
If you still use it when the main body breaks
loose, it will cause leakage due to the load
on the pipe.
2.
1.For maintenance
press the push button
at first
3.
pop up
drain body
pop up
Unscrew the pop up counter
clockwise and take it out of the
drain body
。
Cleaning utensil such as
small brush can be used
to clean the pop up
。
pop up
small brush
Push button
Push
Open
Cleaning Drain
Looseness in the main body
Unscrew

13
Troubleshooting
Do you lower down the lever handle to
stop position? (is it set to fully closed?)
Is the stop valve fully opened?
Is the aerator blocked with debris?
Is the outlet hole frozen?
Check local codes with
professional help and apply hot
water to the outlet.
Clean the aerator.
Use stop valve to adjust flow.
Lower the lever handle to
stop position.
―
―
P.7
P.9
―
Water flows
without stop
Flow is
too small
When gas water heater device is used
with the product, is the switching
method set properly?
Set the gas hot water device
properly with professional help.
Is the stop valve on the cold side fully
opened?
―
―
―
―
―
Adjust flow with stop valve
Does the water heater
give enough hot water
Check settings and functions
on the hot water device
Is the aerater blocked?
Page 9
Clean the aerator
Too hot
Tool Cold
Temperature
can not be
adjusted
easily.
If you do not understand the position of the stop valves, ask the installer for help.
Explanation
Problem
The parts of the product need ”breaking” for a few
days before they become stable.
This is not a problem
The handles become
harder to turn than
when you started to use
the product.
● You can encounter the following during use. This is not a problem
Before contacting a repairman, check the following common problems and solutions.
If the problems perists, contact your dealer or tech support
Check
Solution
Problem
Refer to
Is the stop valve on the hot side fully
opened?
Adjust flow with stop valve
Is the stop valve on the cold/ Hot sides
fully opened?
Adjust water flow with stop
valve
Does the water heater give
adequate water?
Check settings and functions
on water heater with
professional help
ENGLISH

Replacement Parts
14
ENGLISH
Set screw
Lever
Valve cover
Spout Kit
Spout mounting kit
aerator
Flex hose (Hot)
Flex hose (Cold)
Drain Assembly
Cartridge
Connector assembly
1
No.
1
2
3
Description
4
5
6
7
8
9
10
11
2
8
3
4
5
6
7
9
10
11

WARRANTY
©2007 TOTO
USA, Inc. á 1155 Southern Road, Morrow GA 30260
Phone (888)-295-8134 Fax (800)-699-4889 www.totousa.com
TOTO
USA, INC. is a wholly owned subsidiary of TOTO
Ltd.
Printed in August, 2007
0GU3025
LIFETIME LIMITED WARRANTY
Warranty applies to selected residential faucets only.
1. TOTO
®
warrants its faucets (“Product”) to be free from defects in materials and workmanship
during normal residential use for as long as the original consumer end-user purchaser owns their home. This
limited lifetime warranty is extended only to the original consumer end-user purchaser and only so long as
the Product remains in use by the original consumer end-user purchaser in its original place of installation in
the purchaser’s residence. This warranty applies only to Product purchased and installed in North America.
2. TOTO
®
obligations under this warranty are limited to repair or replacement, at TOTO
®
’s
option, of Product or parts found to be defective in normal residential use, provided that such Product was
properly installed and used in accordance with the owner’s manual. TOTO
®
reserves the right to make such
inspections as may be necessary in order to determine the cause of the defect.
3. This warranty does not apply to the following items:
Damage or loss sustained in a natural calamity such as
fire, earthquake,
flood, thunder, electrical storm,
etc.
Damage or loss resulting from any accident, unreasonable use, misuse, abuse, negligence, or improper
care, cleaning or maintenance of the Product.
Damage or loss resulting from sediments or foreign matter contained in a water system.
Damage or loss resulting from improper installation or from installation of the Product in a harsh and/or
hazardous environment, or improper removal, repair or modi cation of the Product.
Damage or loss resulting from the use of an abrasive cleanser.
4. If the Product is used commercially, TOTO
®
warrants the Product to be free from defects in
materials and workmanship for one (1) year from the date the Product is installed, with all other terms of this
warranty applicable except the duration of the warranty.
5. THIS WARRANTY GIVES YOU SPECIFIC LEGAL RIGHTS. YOU MAY HAVE OTHER
RIGHTS, WHICH VARY FROM STATE TO STATE OR PROVINCE TO PROVINCE.
6. To obtain warranty repair service under this warranty, you must take the Product or deliver it prepaid to
a TOTO
®
service facility with proof of purchase (original sales receipt) together with a letter stating the
problem, or contact a TOTO
®
distributor or products service contractor, or write directly to TOTO
®
U.S.A.,
INC., 1155 Southern road, Morrow, Georgia 30260, (888) 295-8134. If, because of the size of the Product
or nature of the defect, the Product cannot be returned to TOTO
®
, receipt by TOTO
®
of written notice of the
defect together with proof of purchase (original sales receipt) shall constitute delivery. In such case, TOTO
®
may choose to repair the Product at the purchaser’s location or pay to transport the Product to a service
facility.
THIS WRITTEN WARRANTY IS THE ONLY WARRANTY MADE BY TOTO
®
. REPAIR,
REPLACEMENT OR OTHER APPROPRIATE ADJUSTMENT AS PROVIDED UNDER THIS
WARRANTY SHALL BE THE EXCLUSIVE REMEDY AVAILABLE TO THE ORIGINAL
PURCHASER. TOTO
®
SHALL NOT BE RESPONSIBLE FOR LOSS OF THE PRODUCT OR FOR
OTHER INCIDENTAL, SPECIAL OR CONSEQUENTIAL DAMAGES OR EXPENSES INCURRED
BY THE ORIGINAL PURCHASER, OR FOR LABOR OR OTHER COSTS DUE TO INSTALLATION
OR REMOVAL, OR COSTS OF REPAIRS BY OTHERS, OR FOR ANY OTHER EXPENSE NOT
SPECIFICALLY STATED. IN NO EVENT WILL TOTO
®
’S RESPONSIBILITY EXCEED THE
PURCHASE PRICE OF THE PRODUCT. EXCEPT TO THE EXTENT PROHIBITED BY APPLICABLE
LAW, ANY IMPLIED WARRANTIES, INCLUDING THAT OF MERCHANTABILITY OR FITNESS
FOR USE OR FOR A PARTICULAR PURPOSE, ARE EXPRESSLY LIMITED TO THE DURATION OF
THIS WARRANTY. SOME STATES AND PROVINCES DO NOT ALLOW LIMITATIONS ON HOW
LONG AN IMPLIED WARRANTY LASTS, OR THE EXCLUSION OR LIMITATION OF INCIDENTAL
OR CONSEQUENTIAL DAMAGES, SO THE ABOVE LIMITATION AND EXCLUSION MAY NOT
APPLY TO YOU.
/