
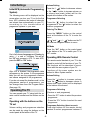
42PD3200
GB
F
D
E
Mode d'emploi
Bedienungsanleitung
User Guide
Manual de Instrucciones
I
Manuale d'istruzioni

- 1 -
Contents
Remote Control Buttons ......................... 2
PLASMA TV ............................................. 3
Preparation ............................................. 5
Features ............................................... 5
Panel Features .................................... 5
Safety Precautions ................................. 5
Before Switching On Your TV ................ 8
Power Connection ............................... 8
Connections To The Aerial Input Socket ... 8
How To Connect Other Devices ........... 8
Inserting Batteries In The Remote
Control Handset ................................... 8
Switching The TV ON/OFF ...................... 8
To switch the TV on: ............................. 8
To switch the TV off: .............................. 8
Initial Settings ......................................... 9
Initial APS (Automatic Programming
System) ................................................ 9
Operating The TV .................................... 9
Operating with the buttons
on the TV set ........................................ 9
Operating With Remote Control .......... 9
Menu System ........................................ 10
Picture menu ...................................... 10
Sound menu ...................................... 11
Feature menu ..................................... 12
Install menu ....................................... 14
Program menu ................................... 14
Source menu ..................................... 15
PC Mode ................................................ 16
Installation .......................................... 16
Menu System in PC mode ................. 16
PC Picture Position Menu .................. 16
PC Picture Menu ................................ 16
Sound Menu ....................................... 17
Feature Menu ..................................... 17
Source Menu ...................................... 17
Sound in PC mode ............................ 17
Other Features ...................................... 17
TV Status ............................................ 17
Mute Indicator ..................................... 17
PIP and PAP modes ........................... 17
Freeze Picture .................................... 18
Zoom Modes ...................................... 18
Teletext .................................................. 19
To Operate Teletext ............................ 19
To Select A Page Of Teletext ............... 19
To Select Index Page ......................... 19
To Select Teletext With A TV
Programme ........................................ 19
To Select Double Height Text ............. 19
To Reveal Concealed Information ... 19
To Stop Automatic Page Change ....... 19
To Select A Subcode Page ................. 19
PAT (Picture and Text) ......................... 20
To Exit Teletext .................................... 20
To Display The Time .......................... 20
Fastext ................................................ 20
Connect Peripheral Equipment ........... 20
Via The Scart ...................................... 20
Via Aerial Input .................................... 20
Decoder.............................................. 20
TV And Video Recorder ...................... 21
Playback NTSC .................................. 21
Copy Facility ....................................... 21
Search For And Store The Test Signal
Of The Video Recorder ...................... 21
Camera And Camcorder .................... 21
Connect The Decoder To The Video
Recorder ............................................ 21
Connecting Headphones .................. 21
Connecting Subwoofer ...................... 21
Aerial Connection ................................. 22
Tips ........................................................ 23
Specifications ....................................... 24
Appendix A: PC Input Typical Display
Modes .................................................... 25
Appendix B: DVD Player Selection ...... 26
Appendix C: Main and PIP-PAP
Picture Combinations .......................... 27
UK Guarantee ........................................ 28
01-ENG-4230-CLE967 UK-HITACHI PLASMA TRIDENT(LG)-50075355.p65 20.03.2006, 17:271

- 2 -
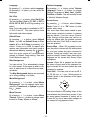
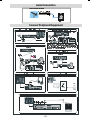
Remote Control Buttons
= Stand by On/Off
= Picture Mode
= Equalizer Sound Mode
= Surround Mode
= Input Source
= Program Information
= Sound Mode
= Sleep Timer
RED / = PAT (Picture and Text)
GREEN / = Subtitle page in TV mode
YELLOW / = Select active window
in PIP mode
BLUE = Only used in Teletext mode
= Menu On/Off
= Go back to previous menu
a
P+ = Programme Up / Cursor Up
_
= Volume Down / Cursor Left
OK = Enter
`
= Volume Up / Cursor Right
b
P- = Programme Down / Cursor Down
= Mute On/Off
= Freeze On/Off
= Aspect ratio
0 - 9 = Digit buttons
= Teletext On/Off
= PIP / PAP / TV
= PIP position
= Sub page
/ = Time / Update
= Hold
= Index Page
= Expand
= Reveal
= Mix
*** These buttons can control most Hitachi DVD Players
and Recorders. Please see P26 for details of how to
operate with other brands.
01-ENG-4230-CLE967 UK-HITACHI PLASMA TRIDENT(LG)-50075355.p65 20.03.2006, 17:272

- 3 -
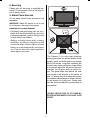
PLASMA TV
FRONT VIEW
REAR VIEW
01-ENG-4230-CLE967 UK-HITACHI PLASMA TRIDENT(LG)-50075355.p65 20.03.2006, 17:273

- 4 -
On/Off switch
Volume Up, Volume Down buttons
Prog. Up, Prog. Down buttons
MENU button
TV/AV button
Power cord input
S-VHS Input
Video Input
Audio Inputs
Headphone
Audio Line Outs
Subwoofer Out
Scart 3 (EXT-3)
PC Audio Input
Aerial
Scart 2 (EXT-2)
Scart 1 (EXT-1)
HDMI Input (EXT-6)
Component Audio Inputs
Component Video (YPbPr) Inputs
VGA Input
EXT-5
EXT-4
01-ENG-4230-CLE967 UK-HITACHI PLASMA TRIDENT(LG)-50075355.p65 20.03.2006, 17:274

- 5 -
Preparation
For ventilation, leave a space of at least 10
cm free all around the set. To prevent any
fault and unsafe situations, please do not
place any objects on top of the set.
Use this apparatus in tropical and/or moder-
ate climates.
Features
Remote controlled colour television.
100 programmes from VHF, UHF bands or
cable channels can be preset.
It can tune cable channels.
Controlling the TV is very easy by its menu
driven system.
It has 3 Scart sockets for external devices
(such as video, video games, audio set,
etc.)
3DS Virtual Surround Sound
Stereo sound system (German+Nicam).
Full function Teletext .
Fastext (1000 Pages), TOP text.
Headphone connection.
Direct channel access.
A.P.S. (Automatic Programming System).
All programmes can be named.
Forward or backward automatic tuning.
Sleep timer.
Child Lock.
Automatic sound mute when no transmis-
sion.
NTSC Playback.
AV in and S-VHS in are available.
It has VGA connector for external devices
such as computer.
It has an HDMI connector for Digital Video
and Audio. This connection is also de-
signed to accept High Definition signals.
It has PIP / PAP / PAT functions.
AVL (Automatic Volume Limiting)
TV Picture in PC
When no valid signal is detected, after 5
minutes the TV switches itself automatically
to stand-by mode.
PLL (Channel Search)
PC Input (Support up to 1024 x 768)
Stereo PC Audio Input
Plug&Play for Windows 9X, ME, 2000, XP
3D Comb Filter
Audio Line Out
Panel Features
42-inch PLASMA display.
High resolution (852x480)
Contrast ratio (10000:1 typical)
Brightness (typical) 1500 cd/m
2.
Display colour 16.7 Million.
Safety Precautions
MPORTANT SAFETY
INFORMATION ON OPERATING
YOUR TV
Dos and Donts
DOs
This Television has been designed and manu-
factured to meet international safety standards,
but like any electrical equipment, care must be
taken if you are to obtain the best results and
safety is to be assured.
DO read the operating instructions before you
attempt to use the equipment.
DO consult your dealer if you are in any doubt
about installation, operation or safety of your
equipment.
DO be careful with glass panels or doors on
equipment.
This TV is supplied with a fitted mains plug.
This plug must not be cut off as it may contain
a special radio interference filter, the removal
of which could lead to impaired performance.
If you wish to extend the lead, obtain an appro-
priate safety approved extension lead or con-
sult your dealer.
Observe the manufacturers instructions when
01-ENG-4230-CLE967 UK-HITACHI PLASMA TRIDENT(LG)-50075355.p65 20.03.2006, 17:275

- 6 -
connecting extension leads to the TV. Check
the fuse rating on the new plug, this should be
fitted with a 5 Amp fuse which conforms to ei-
ther ASTA or BSI (BS1 362) approvals, these
are easily identifiable by either the
or
symbols. If you are in any doubt about the in-
stallation of an extension lead, please consult
a competent electrician.
DONTs
DONT continue to operate the equipment if
you are in any doubt about it working normally,
or if it is damaged in any way switch off, with-
draw the mains plug and consult your dealer.
DONT place water filled vessels on top of T.V.
cabinets.
DONT remove any fixed cover as this may ex-
pose dangerous voltages.
DONT leave equipment switched on when it is
unattended unless it is specifically stated that
it is designed for unattended operation or has
a stand-by mode. Switch off using the switch
on the equipment and make sure your family
know how to do this. Special arrangements
may need to be made for infirm or handi-
capped people.
DONT use equipment such as personal ste-
reos or radios so that you are distracted from
the requirements of traffic safety. It is illegal to
watch television whilst driving.
DONT obstruct the ventilation of the equipment,
for example with curtains or soft furnishings.
Overheating will cause damage and shorten
the life of the equipment.
DONT use makeshift stands and NEVER fix
legs or stands to the TV with any screws other
than those provided - to ensure complete safety
always use the manufacturers approved stand
with the fixings provided.
DONT allow electrical equipment to be ex-
posed to rain or moisture.
ABOVE ALL
NEVER let anyone, especially children
push anything into holes, slots or any
other opening in the case - this could re-
sult in a fatal electric shock.
NEVER guess or take chances with elec-
trical equipment of any kind - it is better to
be safe than sorry!
1. Power Source
The receiver should be operated only from a
220-240V AC, 50 Hz. outlet. Ensure you se-
lect the correct voltage setting for your conve-
nience.
2. Power Cord
The power supply cord should be placed so
that it is not likely to be walked on or pinched
by items placed upon them or against it. Pay
particular attention to cord where it enters
the plug, power outlet, and the point where it
exits from the receiver.
3. Moisture and Water
Do not use this equipment in a humid and
damp place (avoid the bathroom, the sink in
the kitchen, and near the washing machine).
Do not expose this equipment to rain or wa-
ter, as this may be dangerous and do not
place objects filled with liquids on top. Avoid
from dripping or splashing.
4. Cleaning
Before cleaning, unplug the receiver from
the main supply, outlet. Do not use liquid or
aerosol cleaners. Use soft and dry cloth.
5. Ventilation
The slots and openings on the receiver are
intended for ventilation and to ensure reli-
able operation. To prevent overheating,
these openings must not be blocked or cov-
ered in anyway.
6. Lightning
In case of storm and lightning or when go-
ing on holiday, disconnect the power cord
from the wall outlet.
7. Replacement Part
When replacement parts are required, be sure
the service technician has used replacement
parts which are specified by the manufacturer
or have the same specifications as the origi-
nal one. Unauthorised substitutions may re-
sult in fire, electrical shock, or other hazards.
01-ENG-4230-CLE967 UK-HITACHI PLASMA TRIDENT(LG)-50075355.p65 20.03.2006, 17:276

- 7 -
The Plasma TV is a very high techology
product giving you fine picture details. Occa-
sionally, a few non-active pixels may remain
still on the screen. Long-time unmoving still
pictures may cause permanent shade effect
on the screen and even the picture has been
changed, its influence lasts as ghost pic-
ture. This ghost effect may disturb the user
even though it will diminish in the course of
time. To prevent this, don't leave still pictures
for example teletext pages or frozen pictures
on the screen for a long time. Please note
that this does not affect the performance of
your product.
DO NOT LEAVE YOUR TV AT STAND-BY
OR OPERATING WHEN YOU LEAVE YOUR
HOUSE
8. Servicing
Please refer all servicing to qualified per-
sonnel. Do not remove cover as this may re-
sult in electric shock.
9. Naked Flame Sources
Do not place naked flame sources on the
apparatus.
WARNING: When the device is not in use
for a long time, disconnect from power.
Instructions for waste disposal:
Packaging and packaging aids are recy-
clable and should principally be recycled.
Packaging materials, such as foil bag, must
be kept away from children.
Battery, including those which is heavy
metal-free, should not be disposed of with
household waste. Please dispose of used
battery in an environmentally sound man-
ner. Find out about the legal regulations
which apply in your area.
01-ENG-4230-CLE967 UK-HITACHI PLASMA TRIDENT(LG)-50075355.p65 20.03.2006, 17:277

- 8 -
Before Switching On Your TV
Power Connection
IMPORTANT: The TV set is designed to op-
erate on 220-240V AC, 50 Hz.
After unpacking, allow the TV set to reach the
ambient room temperature before you con-
nect the set to the mains.
Connections To The Aerial Input
Socket
Connect the aerial or cable TV plug to the
Aerial input socket located at the rear of the
TV and connect the cable plug coming out
from the TV out socket located on the de-
vices (VCR, DVB etc.) to this socket as well.
How To Connect Other Devices
IMPORTANT: Switch off the TV before con-
necting any external device.
Sockets for external connections are at the
rear side of the TV. For connection of other
devices via Scart refer to the manuals of the
related devices.
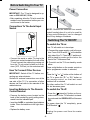
Inserting Batteries In The Remote
Control Handset
Remove the battery cover located on the
back of the handset by gently pulling down-
wards from the indicated part.
Insert two AA/R6 or equivalent type batteries
inside. Place the batteries in the right direc-
tions.
Replace the battery cover.
NOTE: Remove the batteries from remote
control handset when it is not to be used for
a long period.Otherwise it can be damaged
due to any leakage of batteries.
Switching The TV ON/OFF
To switch the TV on:
Your TV will switch on in two steps:
1- Connect the power supply cord to the sys-
tem. Press On/Off switch
at the bottom
right side of the TV. Then the TV switches it-
self to stand-by mode and the led on the
front of the TV becomes Red.
2- To switch on the TV from stand-by mode
either:
Press a digit button on the remote control so
that a programme number is selected,
or,
Press the " " or " " button at the bottom of
the TV or press the P- or P+ button on
the remote control, so that last mode
switched off is selected.
By either method the TV will switch on and
the led becomes green.
To switch the TV off:
Press the (stand-by) button on the re-
mote control, so the TV will switch to stand-
by mode and the GREEN LED will become
RED.
To power down the TV completely, press
On/Off switch
,
or,
Unplug the power cord from the mains
socket.
01-ENG-4230-CLE967 UK-HITACHI PLASMA TRIDENT(LG)-50075355.p65 20.03.2006, 17:278

- 9 -
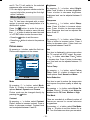
Initial Settings
Initial APS (Automatic Programming
System)
The following menu will be displayed on the
screen when you turn your TV on for the first
time. APS, searches and sorts all channels
and stores them automatically on your TV,
according to the transmission of
programme systems in your area.
First of all choose Language and Country by
using
a
/
b
and
_
/
`
buttons. This will af-
fect the sort process in APS. To start APS,
press the RED or OK button.
After APS is finalized, the programme table
will appear on the screen. In the programme
table you will see the programme numbers
and names assigned to the programmes.
If you do not accept the locations and / or the
programme names of programmes, you
can change them from the Program Menu.
(See page 15)
Operating The TV
You can operate your TV using both the re-
mote control handset and the buttons on the
set.
Operating with the buttons on the
TV set
Volume setting and programme selection
can be made by using the buttons on the
control panel at the bottom of the TV.
Volume Setting
Press the - button to decrease volume
or the + button to increase volume, so
a volume level scale (slider) will be dis-
played at the bottom of the screen.
Programme Selecting
Press the
button to select the next
programme or the
button to select the
previous programme.
Entering The Menu
Press the MENU button on the control
panel at the bottom of the TV to enter the
menu.
/ and + / - buttons on the TV
are used as navigation buttons in menu.
AV Mode
Press the AV button on the control panel
at the bottom of the TV to switch your TV to
EXT modes.
Operating With Remote Control
The remote control handset of your TV is de-
signed to control all the functions of your TV.
The functions will be described in accor-
dance with the menu system of your TV.
Functions of the menu system are de-
scribed in Menu System section.
Volume Setting
Press the button to increase volume.
Press the button to decrease volume. A
volume level scale (slider) will be displayed
at the bottom of the screen.
Programme Selecting
(Previous or next programme)
Press the P- button to select the previous
programme.
Press the P+ button to select the next
programme.
Programme Selecting (direct access):
Press digit buttons on the remote control
handset to select programmes between 0
01-ENG-4230-CLE967 UK-HITACHI PLASMA TRIDENT(LG)-50075355.p65 20.03.2006, 17:279

- 10 -
and 9. The TV will switch to the selected
programme after a short delay.
For a two digit programme number enter the
second digit after pressing the first digit
within 2 seconds.
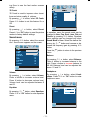
Menu System
Your TV has been designed with a menu
system to provide easy manipulation of a
multifunction system.
Press the
button to enter the menu.
Press
_
/
`
button to select a menu title and
then
a
/
b
button to select a menu item and
_
/
`
or OK button to enter the menu item.
Press the
button to exit the menu.
Press the button to return to the previous
menu.
Picture menu
By pressing
_
/
`
button, select the first icon.
Picture menu appears on the screen.
Mode
By pressing
a
/
b
button, select Mode.
Press
_
/
`
button to choose one of these
options: Natural, Dynamic and Cinema.
Picture mode can be changed directly by
pressing the
button.
Contrast
By pressing
a
/
b
button, select Contrast.
Press
`
button to increase contrast. Press
_
button to decrease contrast. Contrast level
can be adjusted between 0 and 63.
Brightness
By pressing
a
/
b
button, select Bright-
ness. Press
`
button to increase brightness.
Press
_
button to decrease brightness.
Brightness level can be adjusted between 0
and 63.
Sharpness
By pressing
a
/
b
button, select Sharp-
ness. Press
`
button to increase sharp-
ness. Press
_
button to decrease sharp-
ness. Sharpness level can be adjusted be-
tween 0 and 31.
Colour
By pressing
a
/
b
button, select Colour.
Press
`
button to increase colour. Press
_
button to decrease colour. Colour level can
be adjusted between 0 and 99.
Hue
This item is displayed in picture menu when
the TV receives an NTSC signal. By press-
ing
a
/
b
button, select hue. Press
`
button
to increase hue. Press
_
button to decrease
hue. Hue level can be adjusted between -31
and 31.
Colour Temp
By pressing
a
/
b
button, select Colour
Temp. Press
_
/
`
button to choose one of
these options: Cool, Normal and Warm.
Noise Reduction
This item is used to reduce the image noise
and improve the picture quality at weak sig-
nals.
By pressing
a
/
b
button, select Noise Re-
duction. Press
_
/
`
button to set Noise re-
duction level to Off, Low, Medium or High.
Film Mode
Films are recorded at a different number of
frames per second to normal television
programmes.
By pressing
a
/
b
button, select Film Mode.
Press
_
/
`
button to set this feature On or
Off. Turn this feature on when you are watch-
01-ENG-4230-CLE967 UK-HITACHI PLASMA TRIDENT(LG)-50075355.p65 20.03.2006, 17:2710

- 11 -
ing films to see the fast motion scenes
clearly.
3D Comb
3D Comb is used to improve colour transi-
tions and colour quality of pictures.
By pressing
a
/
b
button, select 3D Comb.
Press
_
/
`
button to set this feature On or
Off.
Reset
By pressing
a
/
b
button, select Reset.
Press
_
/
`
or OK button to reset the picture
modes to factory default settings.
Sound menu
By pressing
_
/
`
button, select the second
icon. Sound menu appears on the screen.
Volume
By pressing
a
/
b
button, select Volume.
Press
`
button to increase volume level.
Press
_
button to decrease volume level.
Volume level can be adjusted between 0
and 63.
Equalizer
By pressing
a
/
b
button, select Equalizer.
Press
_
/
`
or OK button to enter equalizer
menu.
In equalizer menu the sound mode can be
changed to User, Pop, Rock, Jazz, Flat and
Classic by pressing
_
/
`
button. Equalizer
menu settings can be changed only when
Sound Mode is User. Select the desired fre-
quency by
a
/
b
button and increase or de-
crease the frequency gain by pressing
_
/
`
button.
Press the button to return to the previous
menu.
Balance
By pressing
a
/
b
button, select Balance.
Press
`
button to increase balance to the
right. Press
_
button to increase balance to
the left. Balance level can be adjusted be-
tween -31 and 31.
Headphone
By pressing
a
/
b
button, select Head-
phone. Press
_
/
`
or OK button to enter
hedphone menu.
01-ENG-4230-CLE967 UK-HITACHI PLASMA TRIDENT(LG)-50075355.p65 20.03.2006, 17:2711

- 12 -
Sound Mode
By pressing
a
/
b
button, select Sound
Mode. Press
_
/
`
button to change the
mode.
You can select Mono, Stereo, Dual A or Dual
B mode, only if the selected channel sup-
ports that mode.
In case of bilingual broadcast (Dual Sound),
you can select original or dubbed language
using mode option.
AVL
Automatic Volume Limiting (AVL) function
adjusts the sound to obtain fixed output level
between programs, having different sound
levels.
Pressing
_
/
`
button will turn this feature on
or off.
Effect
You can use this feature to switch the sound
effect on or off. If the current sound system is
Mono and the sound effect is switched on,
then the sound will be heard as if it is Ste-
reo. If the current sound system is Stereo,
switching this effect on will give a more spa-
tial effect.
Pressing
_
/
`
button will turn this feature on
or off.
Dynamic Bass
Dynamic Bass is used to increase bass ef-
fect of the TV set.
By pressing
a
/
b
button, select Dynamic
Bass. By pressing
_
/
`
button set Dynamic
bass to Low, High or OFF. It is not recom-
mended to select High if listening at high
volume levels. There is a subwoofer output
that can accept an active subwoofer if you
wish to create very high levels of Bass.
3DS
This feature is used to create the impres-
sion that sound is coming from around the
room instead of from the set speakers.
Pressing the
_
/
`
buttons will turn the fea-
ture on or off.
SubWoofer
It is possible to connect an external, active
subwoofer to the set to give a much deeper
bass effect.
By pressing
a
/
b
button, select Subwoofer.
Subwoofer can be set to On or Off.
Set Subwoofer to On when you connect an
external subwoofer to the set.
Feature menu
By pressing
_
/
`
button, select the third icon.
Feature menu appears on the screen.
Sleep Timer
By pressing
a
/
b
button, select Sleep
Timer. The timer can be programmed be-
tween Off and 2 hours in steps of 10 min-
utes by pressing
_
/
`
button. If sleep timer
is activated, at the end of the selected time,
the TV goes automatically to stand-by mode.
Child Lock
You can use this feature to prevent children
turning the TV on or changing programs or
adjustments etc. without remote control.
The child lock feature can be set by
_
/
`
but-
ton to either on or off. When off is selected,
there will be no difference in the operation of
your TV. When on is selected, the TV can
only be controlled by the remote control
handset. In this case the control panel but-
tons, except the Power on/off button, at the
bottom of the TV will not work. If one of these
buttons is pressed, Child Lock On will be
displayed on the screen.
01-ENG-4230-CLE967 UK-HITACHI PLASMA TRIDENT(LG)-50075355.p65 20.03.2006, 17:2712

- 13 -
Language
By pressing
a
/
b
button, select Language.
By pressing
_
/
`
button, you can select the
language.
Ext-2 Out
By pressing
a
/
b
button, select Ext-2 Out.
You can set Ext-2 Out to TV, EXT-1, EXT-3,
EXT-4, EXT-5, EXT-6 or PC by pressing
_
/
`
button.
Note: Only audio output is available for EXT-
4, EXT-6 and PC. The other options have
both audio and video outputs.
Default Zoom
By pressing
a
/
b
button, select Default
Zoom. You can set Default Zoom to Pan-
oramic, 4:3 or 14:9 Zoom by pressing
_
/
`
button. If there is no WSS or aspect ratio
(picture size) information and zoom mode is
selected as Auto by pressing the
button,
then the zoom mode will automatically
change to Default Zoom setting. See also
Zoom Modes on page 18.
Blue Background
You can set the TV to automatically change
to a blue screen if the signal is weak or ab-
sent, or when there is no input from an exter-
nal device.
The Blue Background feature can be turned
on or off by pressing
_
/
`
button.
Menu Background
By pressing
a
/
b
button, select Menu
Background. You can change menu back-
ground to Translucent or Opaque by press-
ing
_
/
`
button.
Menu Timeout
By pressing
a
/
b
button, select Menu
Timeout. Press
_
/
`
button to change menu
timeout to 15 sec, 30 sec or 60 sec.
Teletext Language
By pressing
a
/
b
button, select Teletext
Language. Press
_
/
`
button to change
Teletext Language to West, East, Cyrillic,
Turk/Gre or Arabic. This will normally be set
to West for Western Europe.
Screen Saver
By pressing
a
/
b
button, select Screen
Saver. Press
_
/
`
or OK button to enter
screen saver menu.
This menu has three items related to pos-
sible image retention problem in plasma
display panels. First two items (Screen
Wipe, Inverse) of this menu are used to re-
move the effects after the problem occured
and the last item (Pixel Shift) is used to pre-
vent this problem.
Screen Wipe : When OK is pressed on this
item the panel is driven with full white picture
for one hour unless any user command is
entered. During this mode if any user com-
mand is entered, Screen Saver menu will be
displayed on the screen with Screen Wipe
highlighted.
Inverse: When OK is pressed on this item
the colour of each pixel of the displayed im-
age is inverted for one hour unless any user
command is entered.
Pixel Shift : This item can be set to off, 5,
10, 20, 40 min. or 1 hour. Whole picture is
shifted 2 pixels in the directions of the figure
shown below.
The time entered in this setting refers to the
time between the picture being moved. If you
are using games consoles or similar set to
5 mins but try not to leave static images on
the screen for long periods of time.
01-ENG-4230-CLE967 UK-HITACHI PLASMA TRIDENT(LG)-50075355.p65 20.03.2006, 17:2713

- 14 -
Install menu
By pressing
_
/
`
button, select the fourth
icon. Install menu appears on the screen.
Program
By pressing
a
/
b
button, select Program.
Press
_
/
`
button to select the program
number. You can also enter a number via
digit buttons on the remote control. There
are 100 program storage between 0 and 99.
Band
Band can be selected either C or S by
pressing
_
/
`
button.
Channel
Channel can be changed by
_
/
`
button or
Digit Buttons.
Colour System
By pressing
a
/
b
button, select Colour
System. Press
_
/
`
button to change the
colour system to PAL, PAL60, SECAM or
AUTO.
Note: In EXT mode, you can choose NTSC
3.58 and NTSC 4.43 as well.
Sound System
By pressing
a
/
b
button, select Sound
System. Press
_
/
`
button to change the
sound system to BG, DK, I or L/L.
Fine Tune
By pressing
a
/
b
button, select Fine Tune.
Press
_
/
`
button to adjust the tuning.
Search
By pressing
a
/
b
button, select Search.
Press
_
/
`
button to start program search-
ing. The searching will stop when a signal
is found. You can also enter a frequency
value directly by pressing the digit buttons.
VCR (Video Cassette Recorder)
This item can be seen in all modes except
EXT-4 and PC.
If you want to watch a VCR source from one
of these modes, then it will be better to set
VCR mode on. For this, while the cursor is
on this item press the
_
/
`
buttons to set it
On.
If you want to watch a DVD , then you must
set this item Off.
Store Program
By pressing
a
/
b
button, select Store Pro-
gram. Press
_
/
`
or OK button to store the
adjustments. Program Stored will be dis-
played on the screen.
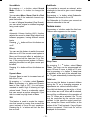
Program menu
By pressing
_
/
`
button, select the fifth icon.
Program menu appears on the screen.
By moving the cursor in four directions you
can reach 20 programmes in the same
page. You can scroll the pages up or down
by pressing the navigation buttons to see all
the programmes in TV mode (except the AV
mode).
By cursor action, programme selection is
done automatically.
01-ENG-4230-CLE967 UK-HITACHI PLASMA TRIDENT(LG)-50075355.p65 20.03.2006, 17:2714

- 15 -
Name:
To change the name of a decided
programme, select the programme and
press the RED button.
The first letter of the selected name starts to
blink. Press
a
/
b
button to change that let-
ter and
_
/
`
button to select the other letters.
By pressing the RED button, you can store
the name.
Insert:
Select the programme which you want to in-
sert by navigation buttons. Press the
GREEN button. By navigation buttons move
the selected programme to the decided
programme space and press the GREEN
button again.
Delete:
To delete a programme, press the YELLOW
button. Pressing the YELLOW button again
erases the selected programme from the
programme list, and the programmes below
shift one up.
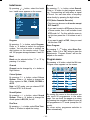
APS (Automatic Programming System)
When you press the BLUE button for APS,
the following warning screen will be dis-
played.
Press the BLUE button to cancel APS if you
do not want to delete your existing
programme list.
To continue APS, first select the country by
pressing
_
/
`
button and then press the
RED or OK button.
After APS is finalized, the programme table
will appear on the screen.
Source menu
By pressing
_
/
`
button, select the sixth
icon. Source menu appears on the screen.
In source menu, highlight a source by
pressing
a
/
b
button and switch to that
mode by pressing
_
/
`
or OKbutton.
01-ENG-4230-CLE967 UK-HITACHI PLASMA TRIDENT(LG)-50075355.p65 20.03.2006, 17:2715

- 16 -
PC Mode
Installation
Power off both Computer and Display before
making any connections.
Set your PCs resolution correctly before
connecting to the TV. See the table on page
25 for supported modes.
Use a D-SUB cable to connect the TVs PC
input to the computers RGB output termi-
nal.
Tighten the screws of the Display cable until
the connectors are fastened securely (fin-
ger-tighten only).
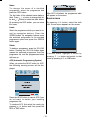
Menu System in PC mode
Press the button. The menu will be dis-
played in the middle of the screen.
PC Picture Position Menu
By pressing
_
/
`
button, select the first icon.
PC Picture Position menu appears on the
screen.
Autoposition
If you shift the picture horizontally or vertically
to an unwanted position, use this item to put
the picture into correct place automatically.
Select Autoposition item by using
a
/
b
buttons.
Press
`
or OK button.
Warning: Auto position adjustment recom-
mended to be done with the full screen im-
age for the proper adjustment.
H (Horizontal) Position
This item shifts the image horizontally to
right hand side or left hand side of the
screen.
Select H Position item by using
a
/
b
but-
ton.
Use
_
/
`
button to adjust the value.
V (Vertical) Position
This item shifts the image vertically towards
the top or bottom of the screen.
Select V Position item by using
a
/
b
but-
ton.
Use
_
/
`
button to adjust the value.
Dot Clock
Dot Clock adjustments correct interference
that appear as vertical banding in dot inten-
sive presentations like spreadsheets or
paragraphs or text in smaller fonts.
Use
_
/
`
button to adjust the value.
Phase
Depending on the resolution and scan fre-
quency that you input to the TV Set, you may
see a hazy or noisy picture on the screen. In
such a case you can use this item to get a
clear picture by trial and error method.
Use
_
/
`
button to adjust the value.
PC Picture Menu
By pressing
_
/
`
button, select the second
icon. PC Picture menu appears on the
screen.
01-ENG-4230-CLE967 UK-HITACHI PLASMA TRIDENT(LG)-50075355.p65 20.03.2006, 17:2716

- 17 -
Contrast, Brightness and Colour Tempera-
ture adjustments in this menu are identical
to adjustments defined in TV picture menu.
When Colour Temp is Manual, you can also
adjust the R,G,B items. R, G and B adjust
the TV image colour in PC mode. You can
change the TV colour to your desired colour:
R (Red), G (Green), B (Blue)
Select Reset and press
_
/
`
or OK button
to reset the picture modes to factory default
settings.
Sound Menu
By pressing
_
/
`
button, select the third icon.
Sound menu appears on the screen.
The items in this menu are described at
Sound menu starting page 11.
Feature Menu
By pressing
_
/
`
button, select the fourth
icon. Feature menu appears on the screen.
The items in this menu are described at
Feature menu starting page 12.
Source Menu
By pressing
_
/
`
button, select the fifth icon.
Source menu appears on the screen.
In source menu, highlight a source by
pressing
a
/
b
button and switch to that
mode by pressing
_
/
`
or OKbutton.
Sound in PC mode
Connect the PCs Audio output to the TVs
PC Audio In socket with an audio cable.
Other Features
TV Status
Programme Number, Programme Name,
Sound Indicator and Zoom Mode are dis-
played on the upper right side of the screen
when a new programme is entered or
button is pressed.
Mute Indicator
It is placed in the upper left side of the
screen when enabled.
To cancel mute, there are two alternatives;
the first one is pressing the
button and
the second one is increasing/decreasing
the volume level.
PIP and PAP modes
Press the button to switch to PIP mode.
At PIP Mode, a small picture (PIP picture) is
displayed on the main picture. There are 1
size and 4 positions available for the PIP
window. You can use
button to change
the PIP position. Aspect Ratio of the PIP win-
dow is fixed and 4:3.
When PIP Mode is entered, the default active
window is PIP window and the active win-
dow is indicated by a green frame around it.
The active window can be changed by
pressing the Yellow button. The status info
OSD belongs to active window. The place of
the status OSDs are same for both win-
dows.
For PIP picture restrictions, see table on
page 27.
Press the button twice to switch to PAP
mode.
At PAP Mode, two pictures with equal sizes
are displayed on the screen. Aspect Ratios
of the windows are fixed.
When you switch to PAP Mode, Main window
in PIP Mode is displayed on the right side of
the screen. The active window can be
changed by pressing the Yellow button.
01-ENG-4230-CLE967 UK-HITACHI PLASMA TRIDENT(LG)-50075355.p65 20.03.2006, 17:2717

- 18 -
Source restrictions of PAP Mode are same
as in PIP Mode.
Freeze Picture
You can freeze the picture on the screen by
pressing the button. At PIP and PAP lay-
outs; only the main picture can be frozen.
Zoom Modes
Zoom mode can be changed by pressing
the
button. You can change the screen
size according to the picture aspect ratio. Se-
lect the optimum one from the following
ZOOM modes.
Note: You can only choose 4:3 and FULL in PC
mode.
Auto:
When a WSS (Wide Screen Signalling) sig-
nal, which shows the aspect ratio of the pic-
ture, is included in the broadcast signal or
the signal from an external device, the TV au-
tomatically changes the ZOOM mode ac-
cording to the WSS signal.
When the AUTO mode does not function cor-
rectly due to poor WSS signal quality or
when you want to change the ZOOM mode,
change to another ZOOM mode manually.
Full:
This uniformly stretches the left and right
sides of a normal picture (4:3 aspect ratio) to
fill the wide TV screen.
For 16:9 aspect ratio pictures that have been
squeezed into a normal picture (4:3 aspect
ratio), use the Full mode to restore the pic-
ture to its original shape.
16:9 Zoom:
This zooms up the wide picture (16:9 aspect
ratio) to the full screen.
16:9 Zoom Subtitle:
This zooms up the wide picture (16:9 aspect
ratio) with subtitles to the full screen.
Default Zoom Modes:
4:3
Use to view a normal picture (4:3 aspect ra-
tio) as this is its original shape.
14:9 Zoom:
This zooms up the wide picture (14:9 aspect
ratio) to the upper and lower limits of the
screen.
Panoramic:
This stretches the left and right sides of a
normal picture (4:3 aspect ratio) to fill the
screen, without making the picture appear
unnatural.
The top and bottom of the picture are slightly
cut off.
01-ENG-4230-CLE967 UK-HITACHI PLASMA TRIDENT(LG)-50075355.p65 20.03.2006, 17:2718

- 19 -
Teletext
Teletext is an information system that dis-
plays text on your TV screen. Using the Tele-
text information system you can view a page
of information on a subject that is available
in the list of contents (index).
To Operate Teletext
Select a TV station where Teletext is being
transmitted.
Press the
button. Usually the list of con-
tents (index) is displayed on the screen.
To Select A Page Of Teletext
Press the appropriate digit buttons for the
required Teletext page number.
The selected page number is displayed in
the top left corner of the screen. The Teletext
page counter searches until the selected
page number is located, the desired page is
then displayed on the screen.
Press the
a
button to move the Teletext
screen forward one page at a time.
Press the
b
button to move the Teletext
screen backward one page at a time.
To Select Index Page
To select the page number of the index (gen-
erally page 100), press the
button.
To Select Teletext With A TV
Programme
Press the button. The text is now super-
imposed over the programme on the
screen.
Press the
button again to return to the
Teletext page.
To Select Double Height Text
Press the button for the top half of the in-
formation page to be displayed in double
height text.
Press the
button again for the bottom half
of the information page to be displayed in
double height text.
Press the
button once more for the full
page of normal height text.
To Reveal Concealed
Information
Pressing the button once will reveal an-
swers on a quiz or games page.
Pressing the
button again will conceal
the revealed answers.
To Stop Automatic Page Change
The teletext page you have selected may
contain more information than what is on the
screen; the rest of the information will be
displayed after a period of time.
Press the button to stop the automatic
page change.
Press the
button again to allow the next
page to be displayed.
To Select A Subcode Page
Subcode pages are subsections of long
Teletext pages that can only be displayed on
the screen one section at a time.
Select the required Teletext page.
Press the button.
Select the required subcode page number
by pressing four digit buttons (e.g. 0001).
If the selected subcode page is not displayed
in a short time, press the
button. TV
programme will be displayed on the screen.
Teletext page number will be displayed on
the upper left corner of the screen when the
selected page is found.
Press the
button to display the selected
Teletext page.
01-ENG-4230-CLE967 UK-HITACHI PLASMA TRIDENT(LG)-50075355.p65 20.03.2006, 17:2719
Page is loading ...
Page is loading ...
Page is loading ...
Page is loading ...
Page is loading ...
Page is loading ...
Page is loading ...
Page is loading ...
Page is loading ...
Page is loading ...
-
 1
1
-
 2
2
-
 3
3
-
 4
4
-
 5
5
-
 6
6
-
 7
7
-
 8
8
-
 9
9
-
 10
10
-
 11
11
-
 12
12
-
 13
13
-
 14
14
-
 15
15
-
 16
16
-
 17
17
-
 18
18
-
 19
19
-
 20
20
-
 21
21
-
 22
22
-
 23
23
-
 24
24
-
 25
25
-
 26
26
-
 27
27
-
 28
28
-
 29
29
-
 30
30


Hitachi 42PD3200 User manual
- Category
- LCD TVs
- Type
- User manual
Ask a question and I''ll find the answer in the document
Finding information in a document is now easier with AI
Related papers
-
Hitachi 32LD8A10A Owner's manual
-
-
-
-
-
Hitachi l26a01 Instructions For Use Manual
-
-
-
-
Other documents
-
JVC AV29BF10EES User manual
-
-
Sanyo CE37FD90-B User manual
-
-
-
-
Matsui MAT37LW507E User manual
-
Metz 42TN92 User manual
-
-