HP DesignJet 30 Printer series User guide

Type
User guide

HP DesignJet 30 Printer series offers professional-grade printing with vibrant colors and crisp lines, ideal for architects, engineers, and graphic designers. With its fast print speeds and versatile media handling, it produces high-quality prints up to 36 inches wide, perfect for posters, presentations, and technical drawings.

HP DesignJet 30 Printer series offers professional-grade printing with vibrant colors and crisp lines, ideal for architects, engineers, and graphic designers. With its fast print speeds and versatile media handling, it produces high-quality prints up to 36 inches wide, perfect for posters, presentations, and technical drawings.

HP LF Printing Knowledge Center
Proof a press with CMYK
Application: Adobe Photoshop CS
Printer: HP Designjet 30/90/130 series
Software: EFI Designer Edition for HP
Operating System: Windows
1. First recommendations:
Some paper types are better than others for proofing, see the
Media type functionality &
features and choose the most appropriate media.
It is essential to have the media type correctly calibrated with the printer and print mode,
consult the Calibrate my printer document.
2. Open the EFI Designer Edition RIP.
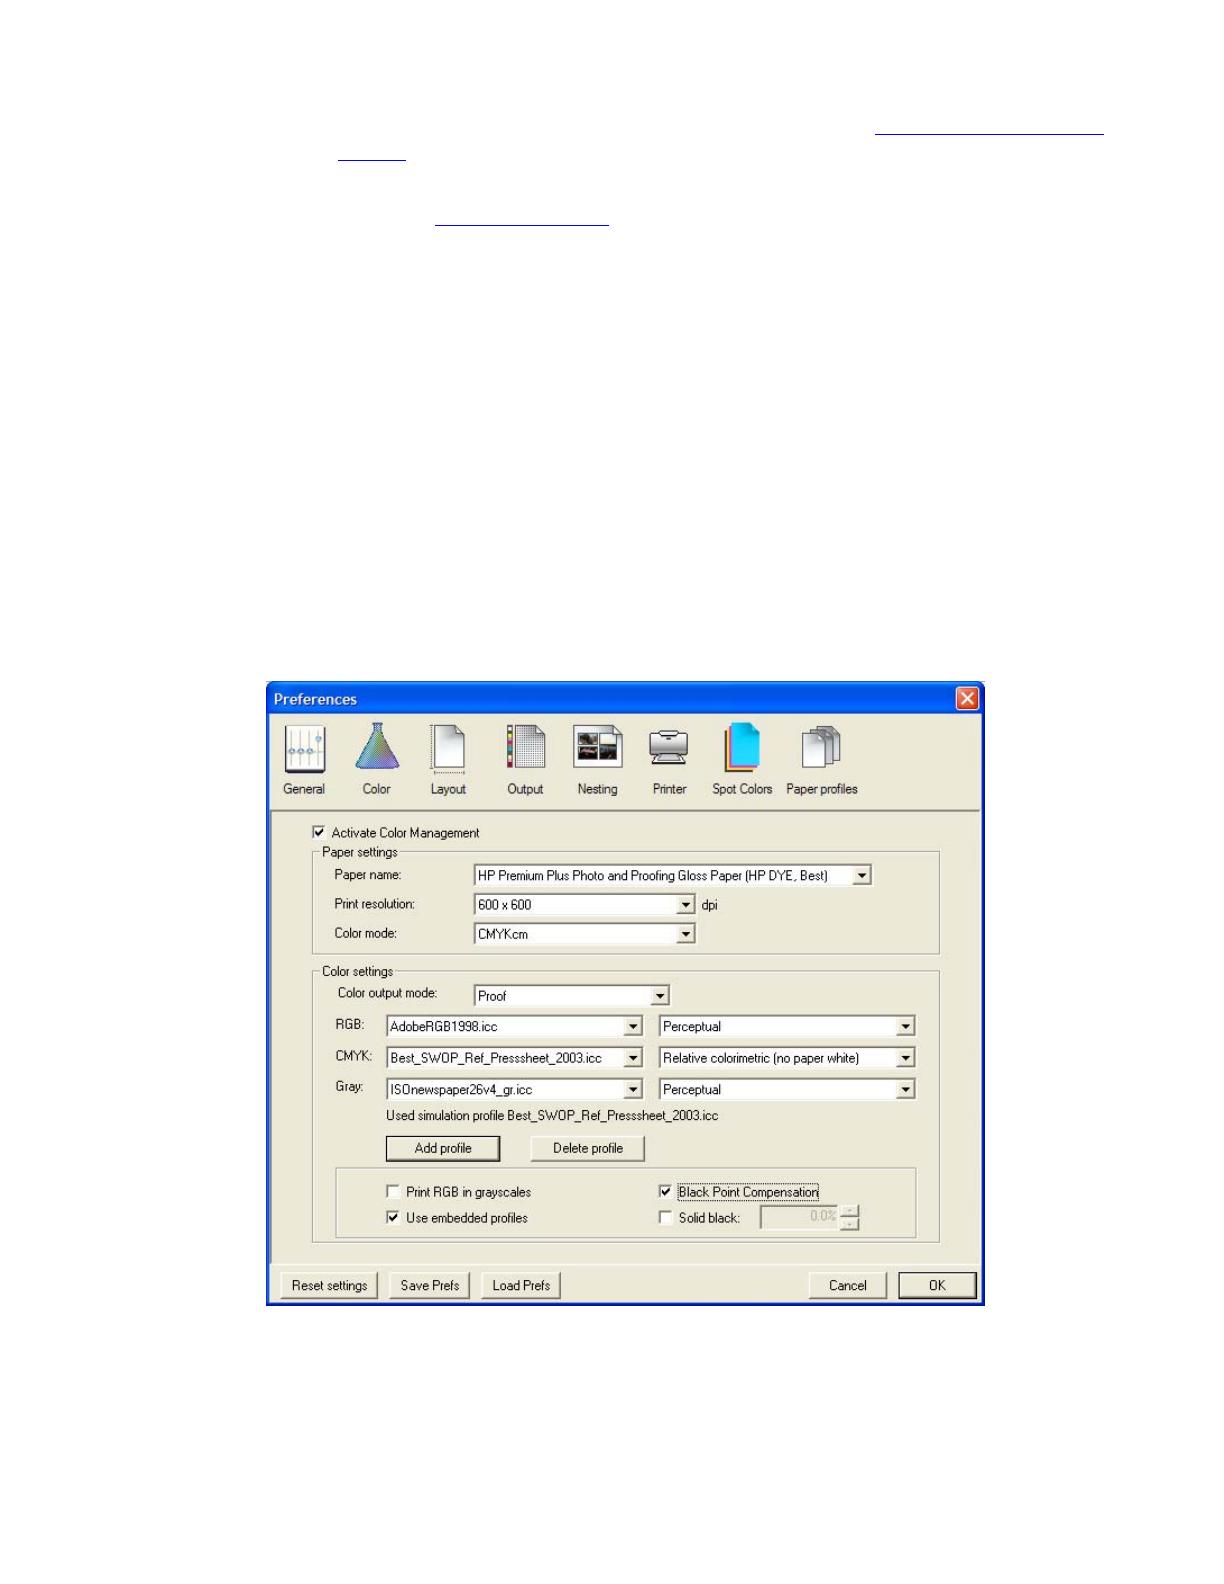
3. EFI Designer Edition RIP settings, Preferences:
Color:
o Check the Active Color Management checkbox.
o Paper name: Select the paper type that is loaded on the printer (always calibrated)
and “Best” print quality.
o Print resolution: 600 x 600.
o Color output mode: Proof.
o You don’t need to worry about the profiles and rendering intent because you will select
Printer Color Management option in the application, then, the application tells the
RIP which source profile and rendering intent should be used for the conversion to the
print space, these are the Document profile and the Print Space Intent of the
application. The RIP color settings will be overridden.
OK
4. Open Adobe Photoshop CS.
5. Configure the Color Settings, Edit menu > Color Settings…:
Make sure the Advanced Mode check box is ticked.
2
Working Space > RGB: Adobe RGB (1998).
Working Space > CMYK: Euroscale Coated v2 (for Europe), U.S. Web Coated (for
SWOP) v2 (US) and Japan Standard v2 (for Japan).
Color Management Policies: Preserve the embedded profiles.
Profile Mismatches: check Ask When Opening and Ask When Pasting.
Missing Profiles: check Ask When Opening.
Conversion Options > Intent: Perceptual (RGB images) or Relative Colorimetric (CMYK
images).
Click OK
6. Open the image, File menu > Open…:
If the document has an embedded color profile that does not match the current working
space, select Use the embedded profile. Otherwise, select Assign working space.
3
Click OK.
7. Select your press profile in the Proof Setup dialog box, View Menu > Proof Setup >
Custom…:
Profile: Select the press profile. If you don’t have the press profile on the list, you should
copy it in the next folder:
Windows 98: WINDOWS>System>Color
Windows NT: WinNT>System32>Color
Windows 2000: C: > WINDOWS > System32 > Spool > Drivers > Color
Windows XP: C: > WINDOWS > System32 > Spool > Drivers > Color
Intent: Perceptual (for RGB images) or Relative Colorimetric (for CMYK images).
Check Black Point Compensation.
Simulate > Paper White: This setting only affects the display, check it if you want to
emulate the white of the paper.
4
Click OK.
8. Adobe Photoshop Print with Preview… settings, File menu > Print with Preview…:
Page Setup:
o Printer...: Select the printer (ex. EFI Designer Edition).
o Click OK.
o Paper Size: Select the paper size of the media loaded on the printer.
o Orientation: Select the orientation of your image on the paper.
o Click OK.
Set the Position and the Scaled Print Size you need.
Check Show More Options.
Select the Color Management tab:
o Source Space: Proof.
o Print Space > Profile: Printer Color Management.
o Print Space > Intent: Relative Colorimetric (select Absolute Colorimetric if you
want to emulate the white of the paper).
9. Print, Print… > Properties > Advanced…:
Document Options > Printer Features:
o Paper Size: Setup
o Select RIP’s Default on the others settings.
5
Click OK until print.
6
For more information on HP Designjet products
www.hp.com/go/designjet
7
© 2005 Hewlett-Packard Development Company, L.P. The information contained
herein is subject to change without notice. The only warranties for HP products and
services are set forth in the express warranty statements accompanying such
products and services. Nothing herein should be construed as constituting an
additional warranty. HP shall not be liable for technical or editorial errors or
omissions contained herein.
Adobe Photoshop and PostScript are trademarks of Adobe Systems Incorporated.
PANTONE is Pantone, Inc.'s check-standard trademark for color.
Rev. 1.0, 09/2005
  • Page 1 1
  • Page 2 2
  • Page 3 3
  • Page 4 4
  • Page 5 5
  • Page 6 6
  • Page 7 7

HP DesignJet 30 Printer series User guide

Type
User guide

HP DesignJet 30 Printer series offers professional-grade printing with vibrant colors and crisp lines, ideal for architects, engineers, and graphic designers. With its fast print speeds and versatile media handling, it produces high-quality prints up to 36 inches wide, perfect for posters, presentations, and technical drawings.

Ask a question and I''ll find the answer in the document

Finding information in a document is now easier with AI