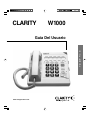
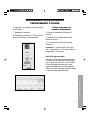
Clarity TELEPHONE W1000 User manual
- Category
- Telephones
- Type
- User manual
This manual is also suitable for

E
S
P
A
Ñ
O
L
F
R
A
N
Ç
A
I
S
E
N
G
L
I
S
H
User Guide
CLARITY W1000
www.clarityproducts.com

SAFETY INSTRUCTIONS: .................................. 3
INSTALLATION:..................................................... 7
FEATURES: ............................................................. 11
• Clarity
®
Power Control .......................................... 12
• Boost Control ....................................................... 12
• Clarity Effect ......................................................... 12
• Boost Override ..................................................... 12
• Sound Level Indicator .......................................... 13
• Ringer Volume Control ......................................... 13
• Ringer Pitch Control ............................................. 13
• Visual Ringer ........................................................ 13
•Tone / Pulse Selection ......................................... 13
• Last Number Redial ............................................. 14
• Flash .................................................................... 14
• Hold ...................................................................... 15
• Mute ..................................................................... 15
• Surge Protection .................................................. 15
• Neck Loop/Auxilary .............................................. 16
• Hearing Aid Compatibility ..................................... 16
OPERATION:........................................................... 16
•To Place or Receive a Call ................................... 16
• Programming Numbers Into Memory ................... 17
CARE: ....................................................................... 19
TROUBLESHOOTING GUIDE................................... 20
FCC REQUIREMENTS.............................................. 23
CLARITY WARRANTY & SERVICE .......................... 25
Table of Contents

E
N
G
L
I
S
H
3
SAFETY INSTRUCTIONS
• Unplug this product from the wall outlet
before cleaning. Do not use liquid cleaners
or aerosol cleaners. Use a damp cloth for
cleaning.
• Do not use this product near water, for
example, near a bath tub, wash bowl,
kitchen sink, or laundry tub, in a wet
basement, or near a swimming pool.
• Do not place this product on an unstable
cart, stand or table. The product may fall,
causing serious damage to the product.
• Slots and openings in the cabinet and
the back or bottom are provided for venti-
lation, to protect it from overheating.
These openings must not be blocked or
covered. The openings should never be
blocked by placing the product on the bed,
sofa, rug, or other similar surface. This
product should never be placed near or
over a radiator or heat register. This
product should not be placed in a built-in
installation unless proper ventilation is
provided.
• Do not allow anything to rest on the
power cord. Do not locate this product
where the cord will be abused by persons
walking on it.
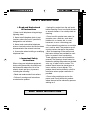
➤
Read and Understand
All Instructions
1.Never install telephone wiring during a
lightning storm.
2. Never install telephone jacks in wet
locations unless the jack is specifically
designed for wet locations.
3. Never touch uninsulated telephone
wires or terminals unless the line has been
disconnected at the network interface.
4. Use caution when installing or modifying
telephone lines.
➤
Important Safety
Instructions
When using your telephone equipment,
basic safety precautions should always
be followed to reduce the risk of fire,
electric shock and injury to persons,
including the following:
• Read and understand all instructions.
• Follow all warnings and instructions
marked on the product.
SAVE THESE INSTRUCTIONS

CLARITY W1000
4
SAFETY INSTRUCTIONS
• Never push objects of any kind into this
product through cabinet slots as they may
touch dangerous voltage points or short
out parts that could result in a risk of fire
or electric shock. Never spill liquid of any
kind on the product.
•To reduce the risk of electric shock, do
not disassemble this product. Opening or
removing covers may expose you to
dangerous voltages or other risks. Incor-
rect reassembly can cause electric shock
when the appliance is subsequently used.
• Unplug this product from the wall outlet
and refer servicing to the manufacturer
under the following conditions:
A. When the power supply cord or plug is
damaged or frayed.
B. If liquid has been spilled into the
product.
C. If the product has been exposed to rain
or water.
D. If the product does not operate nor-
mally by following the operating instruc-
tions. Adjust only those controls that are
covered by the operating instructions
because improper adjustment of other
controls may result in damage and will
often require extensive work by a qualified
technician to restore the product to normal
operation.
E. If the product has been dropped or the
cabinet has been damaged.
F. If the product exhibits a distinct change
in performance.
•Avoid using a telephone (other than a
cordless type) during an electrical storm.
There may be a remote risk of electric
shock from lightning.
• Do not use this telephone to report a gas
leak in the vicinity of the leak.
SAVE THESE INSTRUCTIONS

E
N
G
L
I
S
H
5
The following items are included as part of
the CS-03 Requirements.
The Load Number of the equipment is 20.
The standard connecting arrangement
code for the equipment is CA11A.
NOTICE: The Canadian Department of
Communications label identifies certified
equipment. This certification means that
the equipment meets certain telecommuni-
cations network protective operational and
safety requirements. The Department
does not guarantee that the equipment will
operate to the user’s satisfaction.
Before installing this equipment, users
should ensure that it is permissible to be
connected to the facilities of the local
telecommunications company. The equip-
ment must also be installed using an
acceptable method of connection. In some
cases, the company’s inside wiring associ-
ated with a single line individual service
may be extended by means of a certified
connector assembly (telephone extension
cord). The customer should be aware that
compliance with the above conditions
may not prevent degradation of service
in some situations.
Repairs to certified equipment should be
made by an authorized Canadian mainte-
nance facility designated by the supplier.
Any repairs or alterations made by the
user to this equipment, or equipment
malfunctions, may give the telecommuni-
cations company cause to request the
user disconnect the equipment.
Users should ensure for their own protec-
tion that the electrical ground connections
of the power utility, telephone lines and
internal metallic water pipe system, if
present, are connected together. This
precaution may be particularly important
in rural areas.
Caution: Users should not attempt to make
such connections themselves, but should
contact the appropriate electric inspection
authority, or electrician, as appropriate.
The Load Number (LN) assigned to each
terminal device denotes the percentage of
total load to be connected to a telephone
loop which is used by the device to pre-
vent overloading. The termination on a
loop may consist of any combination of
devices subject only to the requirement
that the total of the load numbers of all the
devices does not exceed 100.
SAFETY INSTRUCTIONS
SAVE THESE INSTRUCTIONS

CLARITY W1000
6
F
A
B
D
E
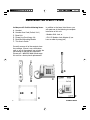
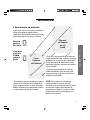
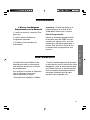
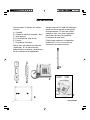
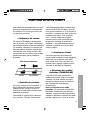
Inside you will find the following items:
A. Handset
B. Handset Line Cord (Coiled, 10 ft.)
C. Base Unit
D. Phone Line Cord (long, flat)
E. Desk/Wall-Mounting Bracket
F. This User’s Guide
Carefully remove all of the contents from
the package. If there is any visible dam-
age, or any of the contents are missing, do
not attempt to operate this equipment.
Please call 1-800-552-3368 to exchange
this unit for a factory-fresh replacement.
UNPACKING THE CLARITY W1000
In addition to the items listed above, you
will need one of the following to complete
installation of this unit:
• Modular Wall Jack, or
• RJ-11C Modular Jack Adapter (if you
have an older 4-prong jack)
C

E
N
G
L
I
S
H
7
Warning: To prevent electrical shock,
always remove the telephone line cord
from the wall jack before removing the
cord from the telephone. Never leave the
line cord connected to the wall jack if it is
not also connected to the telephone.
➤
Select a Location:
• This unit requires a modular phone jack.
• The unit should be located in an area
where it is easy to see the lighted ringer.
• The unit can be used as a desk top
phone or a wall mount phone.
Avoid placing the unit where it will be
exposed to excessive heat or humidity.
INSTALLATION
➤
Connecting the
Clarity W1000 Phone:
To install as a Desk Unit:
• Plug one end of the telephone line cord
(long, flat) into the back of the Clarity
telephone.
• Plug the other end of the telephone line
cord into the wall jack.
• Plug one end of the handset cord (coiled)
into the bottom of the handset.
• Plug the other end of the handset cord
into the jack located on the left edge of the
Clarity telephone.
• Place the handset in the cradle of the
Clarity telephone.

CLARITY W1000
8
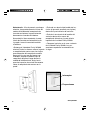
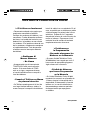
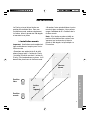
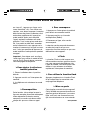
INSTALLATION
Note: If you are
plugging the
phone into an
older 4-prong
jack, use an
RJ11C adapter
RJ-11C
Installation View
Flat cord here
Coiled
cord here

E
N
G
L
I
S
H
9
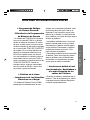
Clarity W1000 comes assembled with
mounting bracket attached in desk mount
position. For wall mounting simply remove
bracket, rotate 180° and reattach as
shown.
To Install As a Wall Unit:
Important: A modular wall jack with raised
mounting pins is required for installation as
a Wall Unit.
• Plug one end of the telephone line cord
(long, flat) into the back of the Clarity
telephone.
Desk
Mount
key
Wall
Mount
Key
INSTALLATION
Back of
Phone
Wall
Mount
Bracket
• Attach the wall-mounting bracket to the
bottom of the Clarity telephone. It snaps
into place. The cord should run under-
neath the wall mounting bracket.
• Plug the other end of the telephone line
cord into the wall jack with raised mount-
ing pins. You can store excess line cord
inside the wall mounting bracket.
Note: If the wall-mounting bracket is
already placed in the desk mount
position, remove it by pressing the tabs
and turning it 180° per the key shown
for the wall-mount.

CLARITY W1000
10
Warning: To prevent electrical shock,
always unplug the telephone line cord
from the wall before removing the cord
from the telephone. Never leave the cord
connected to the wall if it is not also
connected to the telephone.
• Hold the Clarity telephone so that the
holes on the mounting bracket line up with
the raised mounting pins on the modular
wall jack. Once the holes are lined up,
push the phone in towards the wall jack
and then slide the phone downward until it
is securely seated on the wall jack.
• Plug one end of the handset cord (coiled)
into the bottom of the handset.
INSTALLATION
Tabs
Hook
Switch
• Plug the other end of the handset cord
into the jack located on the lower left edge
of the Clarity telephone.
• Place the handset in the cradle of the
Clarity telephone. The special tabs will
hold it in place.

E
N
G
L
I
S
H
11
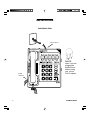
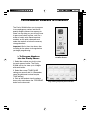
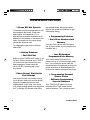
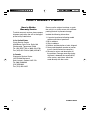
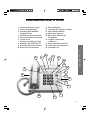
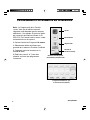
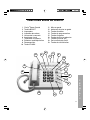
CLARITY W1000 FEATURES
1. Clarity Power Control
®
2. Boost Button
3. Clarity ON/OFF Switch
4. Sound Level Indicator
5. Ringer Volume Control
6. Visual Ringer
7. Ringer Pitch Control
8. Tone/Pulse Selector
9. Last Number Redial
10. Flash Button
11 . Hold Button
12. Hold Indicator
13. Mute Button
14. Program Button
15. Emergency Button
16. Memory Location
17. Braille Button #5 Key
18. Neck Loop Auxillary Port
19. Reset Switch
4
18
19
14
2
3
1
6
5
8
9
10
11
12
13
15
16
17
7

CLARITY W1000
12
Your Clarity W1000 is packed with features
that will help you improve your communi-
cations over the telephone.
➤
Clarity Power Control
®
The Clarity Power Control allows you to
control the clarity of your phone conver-
sations. It will let you hear clearly phone
calls that are normally difficult to under-
stand. The amplification will be increased
by more than 26 decibels and the fre-
quency band from 2000 to 3000Hz will
be specially enhanced to improve the
clarity of your call.
➤
Boost Control
The W-1000 has a boost button that
controls the loudness of the receiver.
Once the boost button is pressed, the
volume will jump to the volume level
indicated by the Clarity Power Control.
➤
To IncreaseClarity Power:
Slide the button marked Clarity Power
toward the right.
➤
To Decrease Clarity Power:
Slide the button toward the left. The
extreme left is the level of a normal tele-
phone conversation.
➤
Clarity Effect (On/Off
Switch) Smart Tone Control
Clarity ON insures the user that the high
frequency sounds are being amplified
more than lower frequencies so that words
are not just louder, but clearer and easier
to understand. Clarity OFF provides the
loudest output possible.
➤
Boost Override
The W1000 has a boost override switch
located on the back of the unit. This switch
will disable the reset feature of the boost
button upon hang up as follows:
ON–When the Boost override switch is in
“on” position volume will remain at the
current volume control setting. This elimi-
nates the need to press the boost button
with each phone call.
OFF–When the Boost Override switch is
in “off” position volume will reset to nomi-
nal upon hangup. The Boost button will
need to be depressed with each phone
call to restore settings.
WARNING: When Boost button is lit
volume may be at a high level. To protect
hearing, lower volume control to minimum.
CLARITY W1000 FEATURES

E
N
G
L
I
S
H
13
➤
Sound Level Indicator
This LED signal indicates if there is
speech or sound present on the line. It will
be bright and steady when a dial tone is
present. It will flash in rhythm with a busy
signal and will flicker when the person on
the other end is speaking. This feature is
designed to assist those individuals with a
more profound hearing loss.
➤
Ringer Controls
The Clarity W1000 comes with a Special
Low-Frequency Ringer designed to be
easily heard by everyone.
The ringer also comes with a volume
and pitch adjustment, allowing it to be
tailored to each user.
The ringer Volume Control has three
settings: OFF, LOW, and HIGH. It is
suggested that you set the volume control
to high when you first start using your
Clarity telephone. To do this, slide the
ringer volume control toward the largest
dot.
The ringer also has a Pitch Control that
has three settings: LOW, MED, and HIGH.
The low frequency is typically the easiest
for people with partial hearing loss to hear.
It is suggested that you set the pitch con-
trol to low (the smallest dot) when you
start using the phone.
➤
Visual Ringer
A lighted ringer works in conjunction with
the low frequency ringer. It sends out a
visual flashing alert every time a phone
call is coming in. (This ringer will light up
regardless of the setting on the ringer
volume control.)
➤
Tone/Pulse Selection
The Clarity W1000 can be used as either a
TONE (touch dial) or PULSE (rotary dial)
phone. Tone dialing is required for using
special phone services such as long
distance calling. Please check with your
local phone company on certain types
of service.
Note for Users with Pulse/Rotary ser-
vice only: Many automated answering
systems used by banks, stores and gov-
ernment agencies ask you to “Push 1 for
service”, “Push 2 for the operator”, etc.
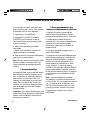
For Low Frequency,
Loud Ring
Look On Right
Edge of Case
Volume
Pitch
CLARITY W1000 FEATURES

CLARITY W1000
14
You must switch the tone/pulse switch on
the top edge of the phone to tone before
responding to these prompts. In summary,
dial the phone number you want to call
in pulse mode, switch to tone mode to
interact with the automated answering
system, switch back to pulse mode when
your call is done. When switching from
Pulse to Tone during a call, there will be
a 3 second delay from the time you first
push a key in tone mode until the key
press is transmitted.
Important: You must have tone signaling
service to use the TONE feature on the
Clarity telephone. If in doubt, contact your
local telephone company.
➤
To Set the
TONE/PULSE Switch:
1. Move the switch towards the correct
setting.
2. Depress the hookswitch once.
3. The phone will now dial in the mode you
selected.
➤
Last Number Redial
Last Number Redial allows you to auto-
matically redial the last telephone number
you called. This feature is convenient for
redialing numbers which are busy. The
phone number stored for redial will be
reset with every new call you make.
➤
To Operate
Last Number Redial:
1. Depress the hookswitch to get a new
dial tone.
2. Press the “Redial” Button once.
3. Stay on the line, and your call will
be dialed.
The last number dialed will be stored in
the Clarity telephone for you until you dial
another number.
➤
Flash
Flash is a special feature that is required
to use some calling services provided by
your local phone company, such as call
waiting. Consult your guide to these ser-
vices which is available from your local
phone company. Flash serves the same
purpose as pressing and releasing the
hook switch very quickly.
CLARITY W1000 FEATURES

E
N
G
L
I
S
H
15
➤
To Use the Flash Feature:
Simply press the Flash button at the
appropriate time as outlined in the guide
provided by your local phone company.
➤
Hold
This advanced feature on your Clarity
W1000 allows you to put a call on hold,
hang up and switch to another extension
or have a private conversation that you
don’t want the person on the other end
of the phone to hear.
You will be able to hear the person on the
other end, but they won’t be able to hear
you while the hold indicator light is on.
The hold light will be on any time the hold
button has been pressed. A call will stay
on hold until you pick up a receiver, or
press and release the hook switch. Press-
ing the hold button a second time will not
take the call off hold.
➤
To Use the Hold Feature:
1. While a telephone call is in progress,
press the hold button once to place the
call on hold. The red hold light will turn on.
2. Hang up the receiver.
3. To take the call off hold:
A. Simply lift the Clarity W1000 receiver
out of the cradle.
-OR-
B. Pick up another telephone extension
in your home.
-OR-
C. If you did not return the handset to the
cradle after pushing the hold button,
press and release the hook switch once.
4. The hold light will turn off.
➤
Mute
The mute button allows the user to con-
duct a private conversation that you do
not want the person on the other end of
the phone to hear. While the mute button
is depressed, the microphone in the
handset will be deactivated, preventing
conversation from being transmitted.
➤
Surge Protection
The unit is equipped with a resettable
fuse. The fuse will automatically reset
within 30 minutes after activation once
the surge condition has subsided.
CLARITY W1000 FEATURES

CLARITY W1000
16
OPERATING THE CLARITY W1000
phone base, next to the program button.
It should sign steady.
3. When placing a call, dial as you
would any phone and wait for someone
to answer.
4. Press the Boost Button
5. Adjust the Clarity Power Control up-
wards to a level where the other party’s
voice is heard loud and clear, and begin
conversation.
6. When you complete the call, return the
handset to the base unit.
7. After hanging up, the sound level will
reset to normal level.
8. Pressing the Boost Button during
subsequent conversations will return the
volume to your set sound level.
Note: If you made an error while dialing,
just depress the hookswitch, listen for a
dial tone, and dial again.
➤
Neck Loop/Auxilary Port
The W-1000 has a 3.5mm phono jack to
use with a neck loop. The volume to the
neck loop is controlled with the Clarity
Power Control. When the neck loop is
plugged in, the receiver in the handset is
disabled.
➤
Hearing Aid Compatibility
The Clarity W1000 is Hearing Aid Compat-
ible with hearing aids that utilize a
T- switch or T-coil.
Once you have installed your Clarity
W1000 according to the instructions noted
previously, it will be ready to use.
➤
To Place or
Receive a Call:
1. Adjust the Clarity Power Control to its
lowest setting (zero).
2. Pick up the handset and listen for the
caller’s voice or a dial tone. Watch the
green sound level light located on the

E
N
G
L
I
S
H
17
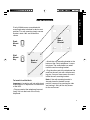
PROGRAMMING NUMBERS INTO MEMORY
The Clarity W1000 allows you to program
in one emergency number and ten fre-
quently dialed numbers into memory for
future use. By doing so, you will only have
to press one button to place a call. As a
matter of safety, write these important
numbers on the quick reference card
under the receiver or below the memory
storage locations.
Important: Wait at least two hours after
installing for the phone to charge before
you begin programming.
➤
To Program Numbers
into the Clarity Phone:
1. Select the number you wish to store
for each memory button. The Clarity
W1000 will let you store up to 16 digits
with each button.
2. Select the correct TONE/PULSE
setting you normally dial in. (Remember,
some long distance services require
TONE dialing.)
3. Pick up the handset from the phone
base, press and release the “PROGRAM”
button on the base unit.
Emergency, Mute
and Boost Buttons
Programming Frequently-Dialed Numbers

CLARITY W1000
18
PROGRAMMING
4. Dial the number you wish to store. The
number is not transmitted while you are
programming it.
5. Press the “PROGRAM” button again.
6. Select the appropriate memory storage
button. Press and release this button.
7. Place handset back into cradle.
8. Repeat steps 3 through 7 for all other
memory storage locations.
➤
To Dial
Programmed Numbers:
1. Pick up the handset and listen for a
dial tone.
2. Press the appropriate Memory
Storage Button.
3. The number will be dialed automatically.
➤
To Delete
Programmed Numbers
1. Pick up handset.
2. Press and release the program button.
3. Press either the # key or 0 either 7 or 11
times (Once for each digit you are trying
to delete).
4. Press and Release the program
button again.
5. Press the memory location button you
are wanting to delete the number from.
6. Return the receiver to the cradle.
➤
Change A Stored Number
Replace a stored number by programming
a new number its place.
Important: The HELP BUTTON is not
pre-programmed for 911. Once program-
ming is completed select the appropriate
sticker from the sticker set provided and
place on the red button.
Programming Note: During the program-
ming sequence the dial tone MAY NOT
break and in some instances an operator
intercept may come on the line. This is
normal. Continue with the programming
sequence to completion.
Note: You can program a pause into the
dialing sequence if necessary. Since there
is not a pause button on the telephone, the
redial button serves this purpose during
programming. Programming in a pause
will cause the phone to wait 3 seconds
before dialing any more numbers. For
Example: Pressing a memory button that
has 9 (pause) 555-1212 programmed into
it will dial the number 9, then wait 3 sec-
onds and dial 555-1212. In most cases,
you will not need to use a pause. You can
store up to 16 digits and the pause func-
tion counts as 1 of those digits.

E
N
G
L
I
S
H
19
The Clarity W1000 has been designed to
give you years of dependable service with
a minimum of care.
To ensure the utmost in
performance, follow
these guidelines in caring
for the unit:
CARE
•Avoid dropping or knocking the unit.
• Dust the unit regularly. Wipe the unit with
a soft, damp cloth. Do not use detergents
and avoid excess moisture.
• The Clarity W1000 is an electrical device.
Avoid electric shock by keeping the phone
away from water. (i.e.: bathroom, kitchen
sink, etc.)

CLARITY W1000
20
the handset before dialing the number.
Wait for the sound level indicator to light
solid before dialing.
➤
Programming Problems
• Can’t Store Numbers Into
Memory
Your new Clarity phone must charge for
two (2) hours before you can program any
numbers into it.
• Loss Of Numbers
Programmed Into Memory
Your Clarity phone will maintain its
memory for up to 12 hours during a power
loss. If you unplug the phone from the
telephone line for long periods or lose your
phone service for an extended period of
time you will need to reprogram the phone.
➤
Programming Personal
Access Codes
• Difficulty Programming
Account Numbers
Your TONE/PULSE selector must be
switched to the TONE mode to enter
account numbers. This is because most
➤
Phone Will Not Operate
Disconnect any other equipment that may
be attached to the phone. Check your
phone cords and connections. Try a
different line cord and/or handset cord to
determine if the problem is with one of the
cords. If problem lies in the cord simply
replace the defective cord.
Tr y plugging the phone into a different
phone jack.
➤
Dialing Problems
• Can’t Dial Out
Make sure that TONE/PULSE switch is set
correctly. Phone should be set to TONE if
you have touch tone service from your
phone company. Phone should be
set to PULSE if operating with rotary
dial service.
• Phone Doesn’t Dial Out On
First Attempt
Your phone may be at the end of a long
line of phones, due to the way the phone
company installed the wiring in your
neighborhood. In this case, your phone
may not get enough power from the phone
line. Try waiting 3-5 seconds after lifting
TROUBLESHOOTING GUIDE
Page is loading ...
Page is loading ...
Page is loading ...
Page is loading ...
Page is loading ...
Page is loading ...
Page is loading ...
Page is loading ...
Page is loading ...
Page is loading ...
Page is loading ...
Page is loading ...
Page is loading ...
Page is loading ...
Page is loading ...
Page is loading ...
Page is loading ...
Page is loading ...
Page is loading ...
Page is loading ...
Page is loading ...
Page is loading ...
Page is loading ...
Page is loading ...
Page is loading ...
Page is loading ...
Page is loading ...
Page is loading ...
Page is loading ...
Page is loading ...
Page is loading ...
Page is loading ...
Page is loading ...
Page is loading ...
Page is loading ...
Page is loading ...
Page is loading ...
Page is loading ...
Page is loading ...
Page is loading ...
Page is loading ...
Page is loading ...
Page is loading ...
Page is loading ...
Page is loading ...
Page is loading ...
Page is loading ...
Page is loading ...
Page is loading ...
Page is loading ...
Page is loading ...
Page is loading ...
Page is loading ...
Page is loading ...
Page is loading ...
Page is loading ...
Page is loading ...
Page is loading ...
Page is loading ...
Page is loading ...
Page is loading ...
Page is loading ...
Page is loading ...
Page is loading ...
-
 1
1
-
 2
2
-
 3
3
-
 4
4
-
 5
5
-
 6
6
-
 7
7
-
 8
8
-
 9
9
-
 10
10
-
 11
11
-
 12
12
-
 13
13
-
 14
14
-
 15
15
-
 16
16
-
 17
17
-
 18
18
-
 19
19
-
 20
20
-
 21
21
-
 22
22
-
 23
23
-
 24
24
-
 25
25
-
 26
26
-
 27
27
-
 28
28
-
 29
29
-
 30
30
-
 31
31
-
 32
32
-
 33
33
-
 34
34
-
 35
35
-
 36
36
-
 37
37
-
 38
38
-
 39
39
-
 40
40
-
 41
41
-
 42
42
-
 43
43
-
 44
44
-
 45
45
-
 46
46
-
 47
47
-
 48
48
-
 49
49
-
 50
50
-
 51
51
-
 52
52
-
 53
53
-
 54
54
-
 55
55
-
 56
56
-
 57
57
-
 58
58
-
 59
59
-
 60
60
-
 61
61
-
 62
62
-
 63
63
-
 64
64
-
 65
65
-
 66
66
-
 67
67
-
 68
68
-
 69
69
-
 70
70
-
 71
71
-
 72
72
-
 73
73
-
 74
74
-
 75
75
-
 76
76
-
 77
77
-
 78
78
-
 79
79
-
 80
80
-
 81
81
-
 82
82
-
 83
83
-
 84
84


Clarity TELEPHONE W1000 User manual
- Category
- Telephones
- Type
- User manual
- This manual is also suitable for
Ask a question and I''ll find the answer in the document
Finding information in a document is now easier with AI
in other languages
Related papers
Other documents
-
Cortelco 440585V0E21F Owner's manual
-
Hasbro New Kids On the Block-Real Telephone Operating instructions
-
Uniden 1100 User manual
-
GE 29253 User manual
-
RCA FOLD 2-9180 User manual
-
Alcatel T22 User guide
-
-
 Conairphone sw2505 Owner's manual
-
Philips PH0900L User manual
-
Ameriphone CLS45i Features
