Page is loading ...

Tools and Materials
Before You Begin
IMPORTANT! This product should be installed by an experienced
installer.
IMPORTANT! Two people are required to lift this toilet into place.
IMPORTANT! This product is designed to be installed directly to 4″
D. PVC waste tubing. It is not designed to use a floor flange. Special
installation measures may need to be taken if there is a floor flange
in place, including removing the floor flange or grinding it to allow
for proper fit.
This toilet does not install to a typical flange. It is designed to
install directly to PVC outlets only. No flange is needed.
Shut off the main water supply.
The supply location is not standard. Install the supply following
the rough-in diagram.
Observe all local plumbing and building codes.
Kohler Co. reserves the right to make revisions in the design of
products without notice, as specified in the Price Book.
Hex
Wrench
Masking
Tape
Socket
Wrench
Phillips
Screwdriver
9/16" Drill
Bit
Sponge
Keyhole/
Compass Saw
Plus:
• Reciprocating Saw
• Soapy Water
• Support Blocks
1095641-2-B 2 Kohler Co.

Roughing-in
IMPORTANT! A4″ D. waste outlet must be used for this
installation.
IMPORTANT! A flange is not required with this installation. For
ease of installation, do not install a flange.
IMPORTANT! The supply location is not standard, and must be
installed at the location shown.
IMPORTANT! If the subfloor is thin OSB, a 1/2″ (1.3 cm) plywood
support under the subfloor is recommended.
A1″ (2.5 cm) gap between the toilet and the wall is required.
Locate the supply following the diagram.
1-3/4"
(4.4 cm)
4-1/8" (10.5 cm)
9-5/8"
(24.4 cm)
3/8" NPS Supply
1-9/16"
(4 cm)
15-3/8"
(39.1 cm)
15-9/16"
(39.5 cm)
14-1/16"
(35.7 cm)
7-1/8"
(18.1 cm)
1"
(2.5 cm)
15-1/2"
(39.4 cm)
17-5/16"
(44 cm)
12"
(30.5 cm) RI
Kohler Co. 3 1095641-2-B

1. Remove the Existing Toilet
CAUTION: Risk of hazardous gases. If the new toilet is not
installed immediately, temporarily place a rag in the closet
flange.
Turn off the water supply.
Flush the toilet.
Sponge out all remaining water from the tank.
Disconnect the supply shut-off valve, if present.
Remove the old toilet.
Remove the old wax seal from the floor with a putty knife.
Scrape off the old wax seal.
1095641-2-B 4 Kohler Co.

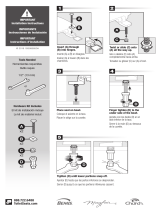
2. Mark the Installation
Remove the gasket from the waste tube.
Tilt the toilet, attach the 4″ D. waste tube, and move the toilet
into the installation position. The waste tube and waste outlet
should be engaged.
IMPORTANT! If there is a flange and the floor flange sits above the
finished floor, check for proper fit with the base of the toilet. If the
base of the toilet does not fit over the floor flange you will need to
cut or grind (depending upon the flange material) the flange to
allow the toilet to install properly.
Make sure there is a 1″ (2.5 cm) gap between the back of the toilet
and the wall.
IMPORTANT! Make sure the toilet is correctly positioned before
marking installation location.
Trace the base of the bowl on the floor.
Remove the waste tube and toilet, and set aside.
Cut the template along the outside line with a scissors.
Waste Stack
Waste Tube
Outlet
Orientation of flange may vary.
Gasket
1"
(2.5 cm)
Remove gasket when
dry fitting toilet.
Front of
Bowl
Waste
Stack
Notch
flange
here.
Kohler Co. 5 1095641-2-B

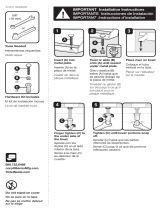
Mark the Installation (cont.)
Lay the template on the mounting location, matching the outside
edge with the line on the floor.
If there is a flange and the holes marked on the template overlap
the flange, you will need to either cut or grind (depending on the
flange material) the flange until the holes can be drilled into the
subfloor
Use masking tape to hold the template in place.
Drill two 9/16″ holes, 1-1/2″ (3.8 cm) deep minimum, at the
locations marked on the template.
1095641-2-B 6 Kohler Co.

3. Install the Toilet
CAUTION: Risk of back injury. Because the toilet is heavy
and awkward, two people should move the toilet into place.
Reinstall the gasket to the waste tube.
Tilt the toilet to one side and install the waste tube.
Position a support block under each side of the toilet to raise the
base 3″ (7.6 cm) off the floor. The blocks should be positioned so
the supply hose can reach the supply when the toilet rests on
them.
Wet the gasket thoroughly with soapy water or O-ring lubricant.
Insert the provided foam block into the gap between the waste
tube and the surface above it. This will provide support to keep
the waste tube from shifting while inserting the waste tube into
the waste outlet.
Connect the supply hose to the supply stop and bring it up
through the opening in the bowl, to be connected with the fill
valve, when installing the tank.
Support Blocks
Supply
Waste
Tube
Waste Stack
Gasket
Styrofoam
Block
Connect
supply.
Kohler Co. 7 1095641-2-B

Install the Toilet (cont.)
With a partner, carefully lift the toilet up and remove the support
blocks.
Hold the toilet over the waste outlet and carefully lower it into
place, making sure the waste tube slides into the waste outlet.
IMPORTANT! If the waste outlet and waste tube are not properly
aligned, the waste tube may shift, resulting in leaks.
Check the toilet for proper operation.
1095641-2-B 8 Kohler Co.

4. Install the Tank
Position the sealing ring on the valve nut.
Thread the supplied supply hose onto the water inlet on the
bottom of the tank.
Position the tank on the bowl, aligning the carriage bolts with the
corresponding holes in the bowl and running the supply hose
through the corresponding hole.
Thread the two supplied bolts into the bowl through the bolt
holes in the bottom of the tank.
Slide a metal washer and rubber washer onto the bolts.
CAUTION: Risk of product damage. Overtightening may
cause breakage or chipping of the vitreous china.
Tighten the bolts using a screwdriver. Do not overtighten.
Turn the water on (There is a shut-off valve in the toilet tank that
should already be in the closed position. Turn it off if the tank
begins to fill) and check for leaks.
Washer
Metal Washer
Rubber Washer
Nut
Valve Nut
Sealing Ring
Supply Hose
Kohler Co. 9 1095641-2-B

5. Install the Floor Bolts
Make sure the plastic anchor on the end of the bolt is relaxed and
not expanded.
Carefully run the bolt through one of the seat holes near the basin
of the toilet.
When the end of the bolt is properly positioned, the top of the
bolt will seat firmly in the hole, slightly below the level of the
toilet. If the bolt sits higher than the toilet, it is not properly
seated in the floor.
Repeat with the second bolt.
Using the provided hex wrench, evenly tighten each bolt until the
toilet is firmly held in place (confirm by trying to rock the toilet).
Bolt
Wall
Plastic
Anchor
1095641-2-B 10 Kohler Co.

6. Install the Seat Brackets
Position the base on the bracket.
Position the mounting bolt through the hole in the bracket.
Thread the bolt into the opening in the center of the floor bolt.
Position the cap over the bolt.
Repeat with the second bracket.
Seat Bracket
Bracket
Base
Cap
Kohler Co. 11 1095641-2-B

7. Install the Seat
Position the seat hinges over the seat bracket and set the toilet
seat in place.
Lift the seat up, keeping the hinge in place.
Tighten the setscrews until the seat is firmly held in place.
8. Complete the Installation
Open the shut-off valve. Make sure the tank fills correctly.
Set the tank lid into place.
Align the flush button in the hole in the lid and thread it into the
flush valve until the tank is firmly held in place.
Flush the toilet several times and check for leaks.
Adjust the Water Level
To adjust the water level, turn the Styrofoam float.
Turning the float counterclockwise raises the water level. Turning
it clockwise lowers the water level.
Tank
Styrofoam
Float
Tank Lid
Flush Button
1095641-2-B 12 Kohler Co.
/