Page is loading ...
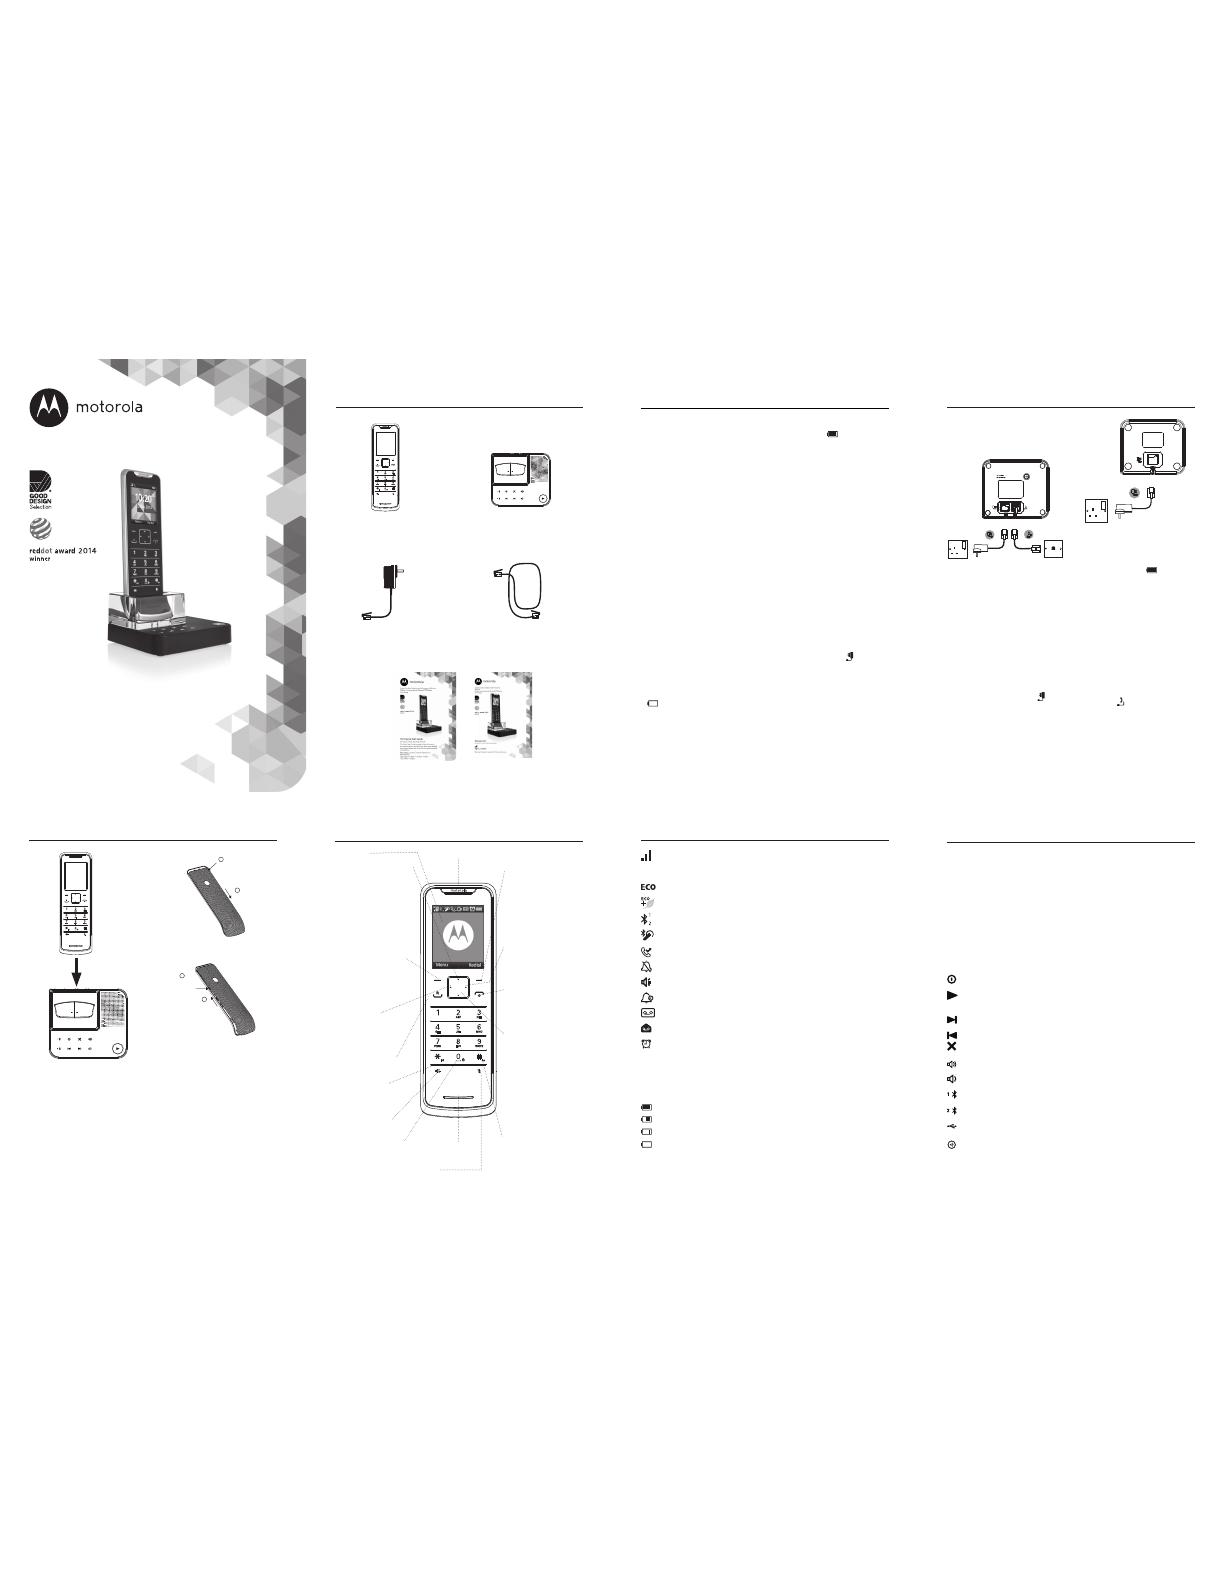
metre away from other electrical
appliances to avoid interference.
Putting it as high as possible
ensures the best signal.
IMPORTANT
The base station must be plugged
into the mains power at all times.
Do not connect the telephone line
cord into the wall socket until the
handset is fully charged. Only use
the power and telephone cables
supplied with the product.
Step 2. Connect the charger
(Multi packs only)
• Plug the mains power cable
into the socket marked
on
the underside of the charger
and plug the other end into the
mains power wall socket.
• Switch on the power supply.
Step 3. Charge the handset
• Place the handset on the base
and charge for at least 24
hours. When the handset is
fully charged, the
icon is
displayed.
IMPORTANT
You cannot access the battery in
the handset. Do not attempt to
remove the battery, as you may
damage the phone. If you need
to replace the battery, contact
customer services.
• When the handset is fully
charged, plug the telephone
line cord into the socket
marked
on the underside of
the base and plug the other end
into the telephone wall socket.
Digital Cordless Telephone with Answering Machine
Mobile Connectivity with Bluetooth
®
Wireless
Technology
IT.6T Quick Start Guide
For IT.6.1T, IT.6.2T, IT.6.3T and IT.6.4T
This Quick Start Guide provides all the information
you need to get you started. If you need more detailed
instructions, please refer to the full user guide available
in the giftbox.
Alternatively, contact Customer Services on:
0800 0820750.
Opening hours: Mon-Fri: 9:00am - 5:30pm
/Sat: 9:00am - 2:00pm.
If you have purchased a multi pack
you will also have the following
additional items:
Twin 1 x Additional handset
and charger.
1 x Mains power
adaptor for charger.
Trio 2 x Additional handset
and charger.
2 x Mains power
adaptor for charger.
Quad 3 x Additional handset
and charger.
3 x Mains power
adaptor for charger.
IMPORTANT
Only use the telephone line cord
supplied. This equipment is not
designed for making emergency
telephone calls when the power
fails. Alternative arrangements
should be made for access to
emergency services.
Warning! You cannot access the
battery in the handset.
BATTERY LOW WARNING
If
icon flashes on the display
and you hear a warning beep every
minute during a call, you will need
to recharge the handset before you
can use it again.
When charging,
icon will scroll
on the display.
BATTERY PERFORMANCE
In ideal conditions, a fully charged
battery should give up to 7 hours
talk time or up to 100 hours standby
time on a single charge.
1
Note that the new battery does not
reach the full capacity until it has
been put to normal use for several
days.
To keep the battery in the best
condition, leave the handset o the
base for a few hours at a time.
1
All talk and standby times are
approximate and depend on
features selected and usage
pattern.
Step 1. Set up the base
• Plug the mains power cable into
the socket marked
on the
underside of the base and plug
the other end into the mains
power wall socket.
• Switch on the power supply
NOTE
Position the base at least 1
Box Contents Getting started
Display icons
Steady when the handset is registered and within range of
the base. Flashes when handset is out of range or
searching for the base.
Displays when ECO mode is on.
Displays when ECO PLUS is on.
Bluetooth function is activated.
Bluetooth headset is paired.
Displays when you have missed calls in the Calls list.
1
Handset ringer volume is O.
Displays when in hands-free mode.
Displays when Do Not Disturb is activated.
Displays when the answering machine is on.
Displays when you have new voicemails.
The alarm clock has been set.
NOTE
Some icons replace others along the top of the display depending which
function is activated.
The approximate power levels of your battery are indicated as follows:
Battery is fully charged
Battery is partially charged
Battery is running low
Flashes when the battery is almost fully discharged.
1
For this feature to work, you must subscribe to Caller ID Service from your
network operator. A subscription fee may be payable.
1
2
IT.6T base
IT.6T handset
Mains power adaptor for
the base
Guides
Telephone line cord
Handset
Display
Phonebook / Scroll up
/ Volume up
In standby mode, press to
open phonebook menu.
Scroll up through lists and
menus.
Increase the earpiece and
hands-free volume.
When the phone is ringing,
press to increase the
handset ringer volume.
Menu / OK / Left
softkey
In standby mode, press to
open the Menu.
Press to select menu
options and to conrm a
displayed option.
Scroll Left
Scroll left though the menu.
Moves the cursor to the left
during editing.
Talk / Recall
Make or answer a call.
Use recall (R) functions.
* / Intercom
Dial a *.
Press to make an internal
call.
Hands-free
Activate and deactivate
hands-free during a call.
Space / Key lock
Press to inset a space in text
/ number editing
Press and hold to lock /
unlock the keypad.
Redial / Clear / Right
softkey
In standby press to enter the
redial list.
Press to delete text or
numbers.
Press and hold to delete
all text.
Select the function displayed
on the handset screen
immediately above key.
Scroll right
Scroll right though the
menu.
Moves the cursor to the right
during editing.
End call / Exit / Switch
Handset On / O
End the call.
Exit menu or operation.
Press and hold to switch the
handset on / o.
Calls List / Scroll down
/ Volume down
In standby mode, press to go
to the Calls list and Answer
machine menu.
Scroll down through lists and
menus.
Decrease the earpiece and
hands-free volume.
When the phone is ringing,
press to decrease the
handset ringer volume.
# / Pause / Change
case
Press and hold to enter a
pause (P) when pre-dialling
or storing numbers.
Press to switch between
upper and lower case during
text editing.
Microphone
Getting started
Step 4. Removing the battery
cover:
If you have purchased an IT.6T with
extra colour covers or have purchased
the covers separately you will need
to remove the original cover to then
replace with the new cover.
• To remove the cover push down
and slide the cover o.
• To replace the cover, line up the
hooks on the cover with the slots
in the back of the handset and
slide up until it is in place.
Step 5. Set the date and time:
• Press
Menu
, scroll to
Date & Time
and press
OK
.
•
Enter Date
is highlighted. Press
OK
.
• Enter the date using the format
DD-MM-YYYY e.g. 04-08-2015
for 4 August 2015 and press
OK
.
• Scroll down to
Enter Time
and
press
OK
.
• Enter the time (hh:mm) and
press
OK
.
If the current time format setting
is 12 hour, press * to select
am
or
pm
.
1
2
Earpiece
Answering machine
The IT.6T answering machine records unanswered calls when it is
activated. It can store up to 59 messages within the maximum recording
time of 60 minutes. Each message can be up to 3 minutes long. Your
personalised outgoing messages can be up to 3 minutes long.
You can operate your answering machine from:
• the base.
• the handset.
• remotely, from another phone
Base control keys
Press to switch the answering machine on/o.
Press to play all stored messages.
Press to stop message playback.
Skip to the next message during message playback.
Press to skip back to previous message.
Delete current message during message playback.
Increase speaker volume during message playback.
Decrease speaker volume.
1
Lights up when Mobile 1 is connected via bluetooth.
2
Lights up when Mobile 2 is connected via bluetooth.
Socket to charge your mobile phone.
In standby, press to ring the handset(s).
Press and hold to enter registration mode when registering handsets.
(The page key can be found on the underside of the base).
Mute
During a call, press to turn
mute on / o.
Push down
Remove
1
2
Slide
Replace
Line up hooks
on the back
cover with the
slots on the
handset
1
Slide
2
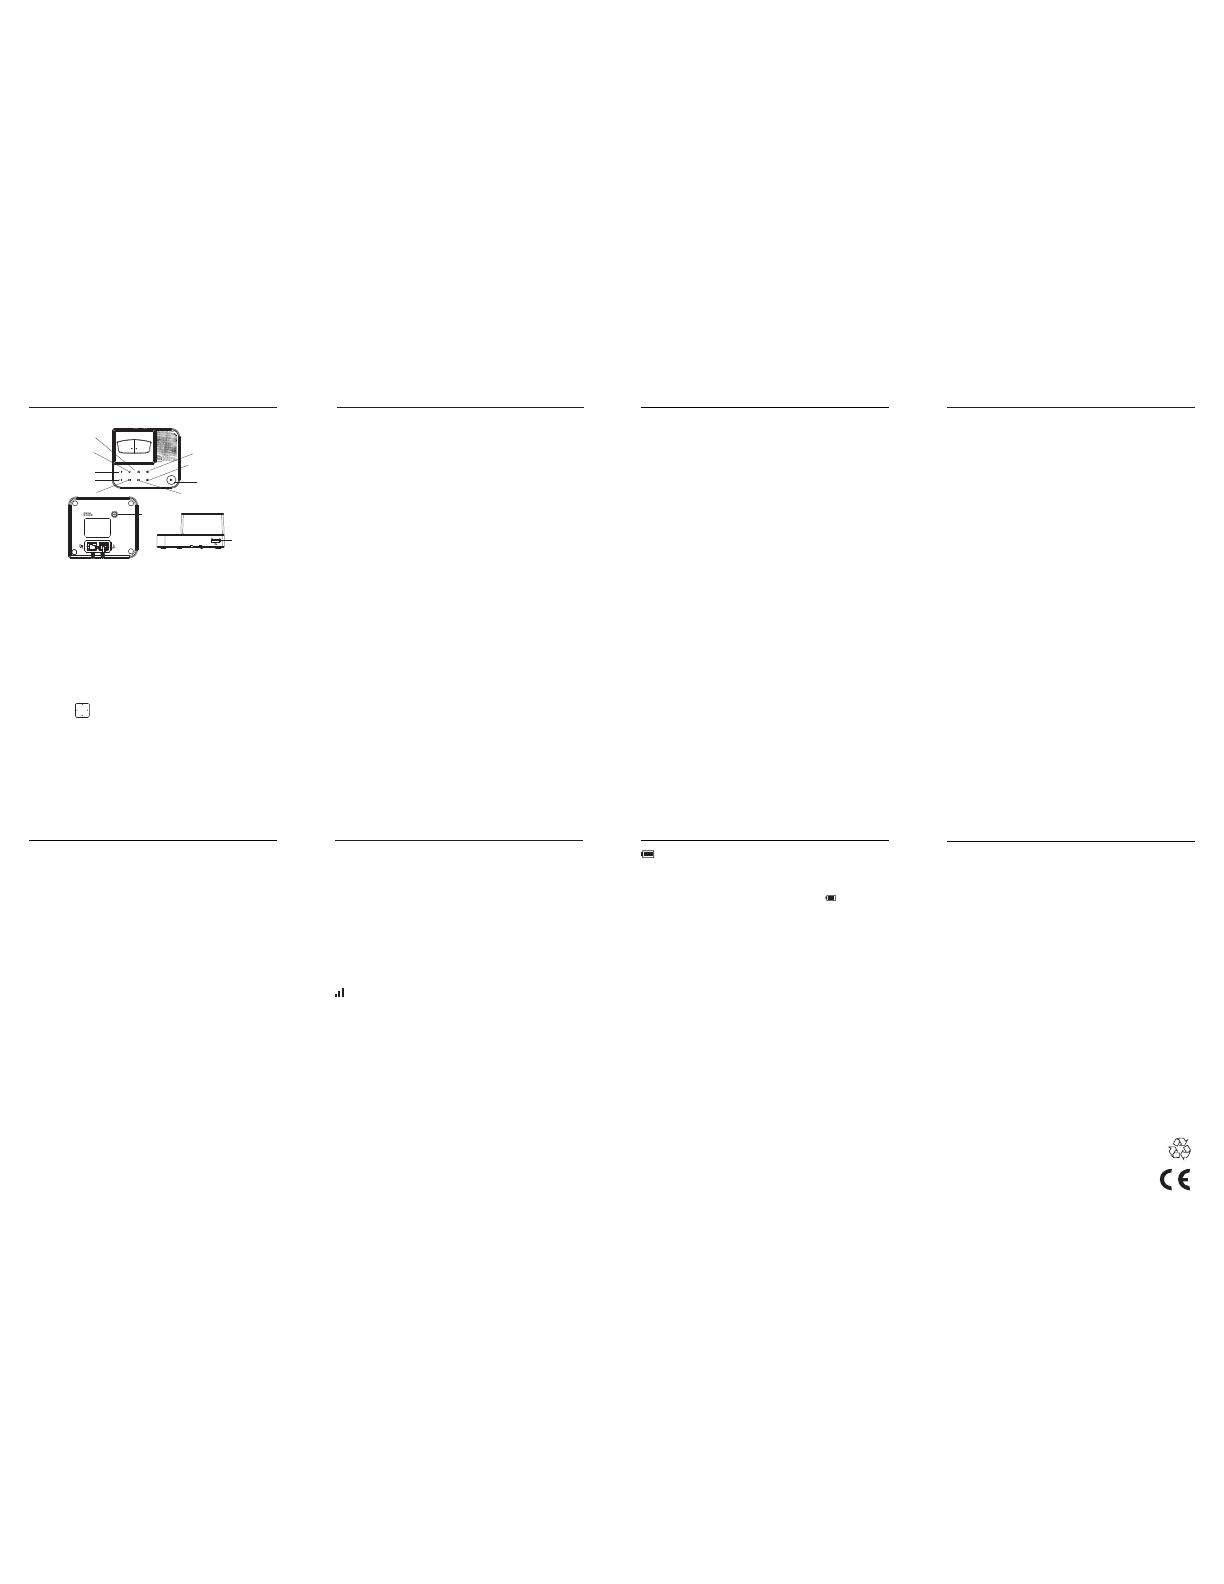
Overview of the answer machine base
Answering machine key illumination
Answering machine On / O - illuminates at all times.
Play - illuminates when the answering machine is on / flashes when there
are new messages.
Other answering machine keys - illuminates when the answering machine
is being accessed.
Bluetooth LED - illuminates when the corresponding mobile is connected.
Navigating the menu
Your IT.6T has an easy to use menu system on the handset.
Each menu has a list of options, which you can see on the menu map on
the following page.
When the handset is switched on and in standby:
1. Press the left softkey
Menu
. The main menu is opened.
2. Then use
button to scroll up / down / left / right through the
menu.
3. Soft key options
OK
and
Back
are displayed.
Press the left softkey
OK
to open a sub-menu or validate an option.
Press the right softkey option
Back
to go back to the previous menu
level, correct a character or cancel an action.
Warranty Information
Please refer to the main user guide.
Help
Using the phoneBluetooth
Your IT.6T can store up to 8 mobile
phones via Bluetooth wireless
technology
1
but can only be
connected to two mobiles at a
time.
The IT.6T will automatically
reconnect with a stored device
when within range, unless 2
devices are already connected.
If you have 8 devices already stored
you will need to delete a device
from the devices list before pairing
another, see below, “Manage your
devices”.
Once your mobile and IT.6T are
connected you can:
• Make or receive calls over the
xed line or mobile network
from your cordless handset.
• When receiving a call the cordless
handset will show Caller ID from the
mobile phone.
• Synchronise your mobile
phonebook to your cordless
handset.
1
Bluetooth
®
wireless technology
provides a wireless connection
of up to 10 metres between the
Motorola IT.6T series and other
Bluetooth compatible mobile
phones. This device supports the
hands-free proles. In order for
Bluetooth devices to communicate
with one another, they must utilize
the same Bluetooth prole.
The IT.6T base has a USB socket
(USB cable not provided) to charge
your mobile phone while taking
mobile calls on the IT.6T handset.
This helps to ensure the mobile is
within the 10 metre range of the
IT.6T base.
Pair your IT.6T with your mobile
You will need to pair your IT.6T with
your mobile phone before you can
take advantage of the Bluetooth
features.
• Press
Menu
, scroll to
Bluetooth
and
press
OK
.
• Scroll to
Find
and press
OK
.
• Turn on your mobile phone’s
Bluetooth function.
• Place the mobile close to
the IT.6T base and search for
devices.
• The IT.6T will show as Motorola
IT.6 on your mobile.
• Enter the Bluetooth PIN on the
mobile phone if necessary and
follow the mobile’s instructions
to pair and connect to the IT.6T.
• Once connect the
handset display shows
!
or : depending on the
device connected and the
corresponding LED on the base
will light up.
Sync or update the phonebook
from a mobile
• Press UP or press
Menu,
Phonebook
is highlighted, press
OK
.
• Scroll to the phonebook list you
want, either
[
or
]
.
• If the phonebook is empty
press
Update
and the mobile
phonebook will start
downloading.
• If the mobile phonebook is
already downloaded, press
Options
and scroll to
Update
and
press
OK
.
• The phonebook will be updated.
Manage the mobile phonebook
privacy settings
Once your mobile phonebook is
synced with the IT.6T you can set
the mobile phonebook to dierent
privacy settings.
• Press
Menu
, scroll to
Mobile Settings
and press
OK
.
• Scroll to the mobile you want to
set and press
OK
.
• Enter the PIN code and press
OK
.
• You can select one of the below
options.
•
O
: No PIN is required
to access the mobile
phonebook and it will always
be available.
•
In Range
: No PIN is required
to access the mobile
phonebook and it will be
available only when the
mobile phone is connected.
•
PIN
: Follow the instructions
to set and activate your PIN.
Once activated although the
phonebook will always be
available a PIN is required to
access the phonebook.
For more solutions, see the full Help section in the main user guide.
No dial tone
• Use only the telephone line cord supplied.
• Check that the telephone line cord is connected properly.
• Check that the mains power is connected properly and switched on.
No display
• Check that the handset is switched on. Press and hold e.
• Reset the base by disconnecting the mains power. Wait for around 15
seconds before connecting it again. Allow up to one minute for the
handset and base to synchronize.
icon only shows 1 bar and handset beeps
• Handset is out of range. Move closer to the base.
• Make sure that the handset is registered to the base.
• Check that the mains power is connected properly and switched on.
My phonebook will not copy from my mobile phone
• Make sure the IT.6T and your mobile are paired.
The IT.6T does not show in my mobile’s device list
• Unplug the IT.6T base from the power and plug back in again.
• Turn the Bluetooth function on the mobile o and on and try again.
• If the problem persists reset the IT.6T to its default settings.
I cannot make / receive calls on the IT.6T via the mobile network
• Make sure your mobile is paired and says “Connected”.
• Turn the Bluetooth function on the mobile o and on and try again.
• Check the signal on the mobile phone.
icon is not scrolling during charge
• Adjust the handset slightly on the base.
• Clean the charging contacts with a cloth moistened with alcohol.
• The battery is full. When the handset is fully charged,
icon will
appear steady on the display.
Cannot register a handset to the base
• You can register up to a maximum of 5 handsets to a IT.6T base. You
must de-register a handset in order to register a new one.
• Check that you have entered the correct PIN code (default = 0000).
• Check that you are at least one metre away from other electrical
equipment to avoid interference when registering.
Answering machine will not record new messages
• Is the recording memory full? Play and delete messages.
• Is the OGM set to Answer Only? Change the OGM to Answer & Record.
Manufactured, distributed or sold by Suncorp
Technologies Ltd., oicial licensee for this product.
MOTOROLA and the Stylized M Logo are trademarks or
registered trademarks of Motorola Trademark Holdings,
LLC. and are used under license. The Bluetooth
trademarks are owned by their proprietor and used
by Suncorp Technologies Ltd. under license. All other
trademarks are the property of their respective owners.
© 2015 Motorola Mobility LLC. All rights reserved.
Version 7 (UK)
Make a call
• Press
r.
Home
is highlighted.
• Scroll to the line you want to use
and press
OK
.
• When you hear the dial tone, dial
the number.
• Preparatory dialling
• Dial the number rst. If you make
a mistake press
Clear
to delete
the last digit.
• Scroll to
P, / or \.
• Press
r to dial.
Answer a call
• When the phone rings, press
r.
End a call
• Press
e.
Redial last number
• Press
Redial
to open the Redial
list.
• The last number dialled is
highlighted.
• Press
r and scroll to the line
you want to dial out from and
press
OK
.
Change the ringer melody
• Press
Menu
, scroll to
Sounds
and
press
OK
.
• Scroll to
Ringtone
and press
OK
.
• Scroll to the line you want (Home
/ Mobile 1 / Mobile 2) and press
OK
.
• Scroll to the ringtone you want
and press
OK
.
Add an entry to the phonebook
• Press UP or press
Menu
and scroll
to
Phonebook
and press
OK
.
• The rst entry in the phonebook
is highlighted.
• Press
Options
,
Add Entry
is
highlighted, press
OK
.
•
First Name
is highlighted, press
OK
, enter the name and press
OK
.
• Scroll to
Last Name,
press
OK
,
enter the name and press
OK
.
• Scroll to the number category
you want to store the number
under, either
Home
,
Oice,
or
Mobile
and press
OK
.
• Enter the number and press
OK
,
press
Save
and the entry is stored.
• If the outgoing line is set to
manual, press
r and scroll
to the line you want to dial out
from.
• Press
r to dial.
Add a Call block number
• Press
Menu
, scroll to
Call block
and
press
OK
.
• If there are already blocked
numbers, the rst entry is
highlighted.
• Press
Options
,
Add Entry
is
highlighted, press
OK
.
• Using the keypad enter the
number you want to block and
press
OK
.
ECO
Your IT.6T oers an ECO mode
function which reduces the
transmitted power and energy
consumption when switched on.
This feature is set to
O
by default.
To turn ECO mode
On
or
O
:
• Press
Menu
, scroll to
Settings
and
press
OK
.
•
ECO
is highlighted, press
OK
.
• Scroll to
O
or
On
and press
OK
.
ECO PLUS
When ECO PLUS is activated and
the unit has been idle for 1 minute
the transmitted power between
the handset and the base will stop,
an incoming call or pressing any
key will activate the unit and it will
revert back to the normal mode.
This feature is set to
O
by default.
To turn ECO PLUS
On
or
O
:
• Press
Menu
, scroll to
Settings
and
press
OK
.
• Scroll to
ECO PLUS
and press
OK
.
• Scroll to
O
or
On
and press
OK
.
NOTE
When ECO and ECO PLUS are set
to ON, the handset range will be
reduced.
1
2
Delete
Answering machine
On / O
Bluetooth 1 LED
Bluetooth 2 LED
Skip back
Volume Up
Volume Down
Play / Stop
Skip forward
USB
Socket
Page
Answering machine
/