Page is loading ...

m southbend
A MiDDlEBY COMPANY
IMPORTANT
FOR FUTURE REFERENCE
Please complete this informa-
tion and retain this manual for
the life of the equipment.
MODEL #
SERIAL #
DATE PURCHASED
I
OWNER’S MANUAL
INSTALLATION
USER’S GUIDE
SERVICE
PARTS
COMPACT
INFRA-RED BROILER
MODELS: MRA=32C, MRA-32, MRA-32W
MRA-36, MRA-60
These instructions should be read thoroughly before attempting installation. Set up,
installation and Performance Check should be performed by a qualified service
technician. The Manufacturer, Southbend (1100 Old Honeycutt Rd., Fuquay-Varina,
North Carolina 2X26), informs you that unless the installation instructions for the above
described Southbend product are followed and performed by a qualified service
technician, (a person experienced in and knowledgeable concerning the instaflation
of commercial gas and/or electrical cooking equipment) then the terms and conditions
of the Manufacturer’s Limited Warranty will be rendered void and no warranty of any
kind shall apply.
If the equipment has been changed, altered, modified or repaired by other than a
qualified service technician during or after the 12-month limited warranty period, then
the manufacturer shall not be liable for any incidental or consequential damages to
any person or to any property which may result from the use of the equipment thereafter.
Some States do not allow the exclusion or limitation of incidental or consequential
damages, so the above limitation or exclusion thereto may not apply to you.
In the event you have any question concerning the installation, use, care, or service
of the product, write Customer Service Department, Southbend, 1100 Old Honeycutt
Rd., Fuquay-Varina, North Carolina 27526.
6.00
COMPACT INFRA-RED BROILER
(Manual Section BR)

Congratulations! You have just purchased one of the finest pieces of heavy-duty, commercial cooking
equipment on the market today.
You will find that your new equipment, like all Southbend equipment, has been designed and
manufactured to some of the toughest standards in the industry - those of Southbend Corporation.
Each piece of Southbend equipment has been carefully engineered and designs have been
verified through laboratory tests and field installations in some of the more strenuous commercial
cooking applications. With proper care and field maintenance, you will experience years of reliable,
trouble-free operation from your Southbend equipment. To get the best results, it’s important that
you read this manual carefully.
TABLE OF CONTENTS:
SECTION ONE - INSTALLATION
Specifications .._._...................................................... 1
Installation . . . . . . . . . . .._.............._......___................._...._. 2
SECTION TWO - USER’S GUIDE
Warranty................................................-.............. 1
Operation _......._.......__........................................~... 2
Maintenance . . __...._ . . . . . . . . . . . . . . . ..__ . . _ . .._ ._ . . . . . . . . . . . . . . . . . . . . . . . 3
SECTION THREE - SERVICE
Adjustments _...,.........................-............_................ 1
Service................................................................. 2
Trouble Shooting ._._.. Se . . . . . . . . . .._..._................................ 3
SECTION FOUR - PARTS
PartsList . . . .._......................_......_....................._.... 1
Southbend In&a-Red Broilers are unique in design. They incorporate our exclusive Schwank ceramic tile burners,
which generate i&a-red rays that provide better quality products in about one-half the usual broiling time,
with less gas input than ordinary broilers. Very little energy is wasted in heating secondary surfaces, as is
necessary in conventional-type broilers.
Since the surface of these tiles become red hot in less than one-half minute, the unit is ready to start broiling
with a very short preheat time, thereby saving
time,
labor and energy.
These glowing surfaces emit intense infrared rays, which are transmitted directly onto the product, thereby
yielding better tasting broiled food in less time.
Use of 100% clean primary air, which is constantly conveyed to these burners, insures efficient combustion and
maintains full production capacity and maximum recovery, even in the most severe conditions of
grease
vapors
and smoke atmospheres, which
are
created during any broiling process.
The Southbend I&a-Red Broilers provide such speed and recovery that broiling techniques may require some
modification in order to take full advantage of its productive capabilities.
CAUTION:
POSTIN PROMINENT
LOCATION
IlVSTRUCTIONS TO BE FOLLOWED
IN THE EVENT THE SMELL OF GAS IS DETECTED. THIS INFORMATION
SHALL BE OBTAINED FROM LOCAL GAS SUPPLIER.
NOT INTENDED FOR HOUSEHOLD USE. FOR COMMERCIAL USE ONLY.
Retain this manual for future reference.
FOR YOUR SAFETY
DO NOT STORE OR USE GASOLINE OR OTHER FLAMMABLE
VAPORS AND LIQUIDS IN THE VICINITY OF THIS OR ANY OTHER
APPLIANCE.
KEEP AREA AROUND APPLIANCES FREE AND CLEAR FROM
COMBUSTIBLES.
IN THE EVENT A GAS ODOR IS DETECTED, SHUT DOWN EQUIP-
MENT AT THE MAIN SHUTOFF VALVE AND CONTACT THE LOCAL
GAS COMPANY OR GAS SUPPLIER FOR SERVICE.
m southbend
A mDDlE$Y
CouPAnY
1100 Old Honeycutt Road
Fuquay-Varina. NC 27526
(919) 552-9161
FAX (919) 552-9798
(600) 346-2666

COMPACT INFRA-RED BROILERS
INSTALLATION
SPECIFICATIONS
MRA-30 (5 ADJUSTABLE GRID POSITIONS)
AT 2’/2”. 3%“. 5”. 6%“. 7%” FROM BURNER
DIMENSIONS
END VIEW
FRONT VIEW
MODEL
WIDTH
DEPTH
HEIGHT
IN INCHES IN INCHES IN INCHES
MRA-32C
Complete untt Consists of (1) MR.L30 Leg Kit
32” (1)
MR:SiOagasic
““llZi’s”
COUNTER UNITS
WALL MOUNT UNITS
FOR MOUNTING OVER SECTIONAL RANGES (32” Wide)
T1: c
MRA-32W
32 ”
1 9% 6"
18Si'
Complete Unit Consists of (1) MR.W-30 Wall Mount Kit
(1)
MRA-30 Basic Untr
MRA-32 32”
19”
355.8“
Complete Umt Consists of (1) MR-S-32 Riser
(1) MRA-30 Basic Umt
MRA.36
36’h ‘I 16”
35’,2 ”
Complete Untt Consists of (1) MR.C36 Riser
(1) MRA-30 Basic Umr
u I
I
FOR MOUNTING OVER CAFE RANGES (36%” Wide)
-.-._
--a
MRA.60 603% ”
i a-'
35V2”
Complete Unit Conststs of (1) MR-K30 her
(1) MRA-30 Bas!c Unit
FOR MOUNTING OVER CAFE RANGES (60%” Wide)
COMPACT INFRA-RED BROILERS
SECTION ONE - INSTALLATION
PAGE 1

1
INSTALLATION
WARNING:
THESE PROCEDURES MUST BE FOLLOWED BY QUALIFIED PERSONNEL OR
WARRANTY WILL BE VOIDED.
GENERAL:
THE UNIT, WHEN INSTALLED, MUST CONFORM WITH LOCAL CODES, OR IN THE ABSENCE
OF LOCAL CODES, WITH THE NATIONAL FUEL GAS CODE ANSI Z223.1-LATEST EDITION.
CANADIAN INSTALLATION MUST COMPLY WITH CAN/CGA-B149.1 NATURAL GAS INSTAL-
LATION CODE, CODE CAN/CGA-B149.2 PROPANE INSTALLATION CODE.
These models are design certifed for operation on Natural and Propane gases.
The Serial Plate is located under the broiler grease drawer at the front, towards the left.
ORIFICE CHART
Total
Burner
Pilot Pressure
Gas
Rating
Orifice
Orifice Regulator
Natural
3 @ 10,666 BTU/Hi-. No. 53 (P/N 1008753) .0240 (P/N 1161263)
4” W.C.
Propane
3 @ 10,666 BTU/Hi-. No. 63 (P/N 1008763) .0145 (P/N 1161262)
10” W.C.
Minimum clearances from combustible construction:
MODELS
!
CLEARANCE
SIDES BACK
MRA-32C 1 IN.
1 IN.
MRA-32W 1 IN. 3% IN.
MRA-32, MRA-36, MRA-60 6 IN.
6 IN.
NOTE: For Model Nos. MRA-32C and MRA-32W a 6” clearance should be provided at the right
side, since it is necessary on all models to remove the body side to gain access to the regulator and
118 NPT pressure test tap.
An adequate gas supply is imperative. Undersized or low pressure lines will restrict the volume of
gas required for satisfactory performance. A pressure regulator, which is provided with each unit,
is set to maintain a 4” W.C. manifold pressure for natural gas and a 10” W.C. manifold pressure for
propane gas. However, to maintain these conditions the pressure on the supply line, when all units
are operating simultaneously, should not drop below 7” W.C. for natural gas or 11” W.C. for pro-
pane gas.
All pipe joints should be tested for leaks with a soap and water solution before operating the unit.
The test pressure should not exceed 14 ’ W .C.
CAUTION:
THIS APPLIANCE AND ITS INDIVIDUAL SHUTOFF VALVE MUST BE
DISCONNECTED FROM THE GAS SUPPLY PIPING SYSTEM DURING ANY
PRESSURE TESTING OF THAT SYSTEM AT TEST PRESSURES IN EXCESS
OF l/2 PSIG (3.45 kPd (13.84 IN. W.C.).
THIS APPLIANCE MUST BE ISOLATED FROM THE GAS SUPPLY PIPING
SYSTEM BY CLOSING ITS INDIVIDUAL MANUAL SHUTOFF VALVE
DURING ANY PRESSURE TESTING OF THE GAS SUPPLY PIPING SYSTEM
AT TEST PRESSURES EQUAL TO OR LESS THAN 112 PSIG (3.45 kPa)
(13.84 IN. W. C./.
The unit must be installed in such a manner that the flow of combustion and ventilation air are not
OBSTRUCTED. An adequate air supply for combustion is obtained at the right rear of the unit. These
openings must NOT be OBSTRUCTED in any way while the unit is operating. The top and right
side must be accessible for service.
EXHAUST FANS AND CANOPIES:
Be sure to inspect and clean ventilation system according to the ventilation equipment manufacturers
instructions. Canopies are set over ranges, ovens, etc., for ventilation purposes. It is recommended
that a canopy extend 6” past appliance and be located 6’ 6” from the floor. Filters should be installed
at an angle of 45 degrees or more with the horizontal. This prevents dripping of grease and facili-
tates collecting the run-off grease in a drip pan, usually installed with a filter. A strong exhaust fan
tends to create a vacuum in the room and may interfere with burner performance or may extinguish
pilot flames. Fresh air openings, approximately equal to the fan area, will relieve such vacuum. In
case of unsatisfactory performance on any appliance, check with the exhaust fan in the “OFF” position.
COMPACT INFRA-RED BROILER
SECTION ONE - INSTALLATION
PAGE 2
LIthO m U S A
Rev 7.91

INSTALLATION
t
WARNING:
FOR AN APPLIANCE EQUIPPED WITH CASTERS, THE INSTALLATION SHALL
BE MADE WITH A CONNECTOR THAT COMPLIES WITH THE STANDARD FOR
CONNECTORS FOR MOVABLE GAS APPLIANCES, ANSI Z21.69ANSI 221.691987,
AND ADDENDA, Z21.69a-1963, AND A QUICK-DISCONNECT DEVICE THAT COM-
PLIES WITH THE STANDARD FOR QUICK-DISCONNECT DEVICES FOR USE
WITH GAS FUEL, ANSI 221.41-1978, AND ADDENDA, Z21.41a-1981 AND
Z21.41b-1983. ADEQUATE MEANS MUST BE PROVIDED TO LIMIT THE MOVE-
MENT OF THE APPLIANCE WITHOUT DEPENDING ON THE CONNECTOR AND
THE QUICK-DISCONNECT DEVICE OR ITS ASSOCIATED PIPING TO LIMIT THE
APPLIANCE MOVEMENT.
,
IF DISCONNECTION OF THIS RESTRAINT IS NECESSARY TO REMOVE THE
APPLIANCE FOR CLEANING, ETC., RECONNECT IT WHEN THE APPLIANCE
IS MOVED TO ITS ORIGINALLY INSTALLED POSITION.
GAS CONNECTION:
1. All MRA- Series broilers are factory equipped with a pressure regulator which is set for the type
of gas denoted on the serial plate.
2. If applicable, the vent line from the gas appliance pressure regulator shall be installed to the
outdoors in accordance with local codes or, in the absence of local codes, with the National Fuel
Gas Code, ANSI Z223.1-Latest Edition.
3. Gas supply connection is made on the right side. Remove the right body side for complete
accessibility to connection.
4. Gas supply connection can be made:
a. Rear:
Connection can be made by going directly into the pressure regulator (female connection
3/S NET).
b. Top:
Connection can be made by:
1. Removing knockout hole in top partition.
2. Screwing elbow into inlet end of regulator.
3. Cut access hole through expanded metal top.
4. Screwing supply pipe into elbow.
c. Bottom:
Connection can be made by:
1. Removing knockout hole in bottom.
2. Removing knockout hole in bottom cover (not supplied in counter units).
3. Screwing elbow into inlet end of pressure regulator.
4. Screwing supply pipe into elbow.
CAUTION:
BE SURE TO HOLD PRESSURE REGULATOR WITH A WRENCH WHEN
TIGHTENING SUPPLY PIPE TO AVOID DAMAGE TO REGULATOR,
VALVE,
AND OTHER COMPONENTS.
5. The unit should be connected only to the type of gas for which it is equipped. Check type of gas
on rating plate. On all threaded connections, the pipe compound must be approved for use with
natural and propane gas.
6. Make sure burner valve is in the “OFF” position before connecting gas to unit. Test pipe con-
nections thoroughly for gas leaks. Use soapy water only.
7. Turn on burners and bleed supply line, then turn burners off.
8. Light pilots and adjust so that flame comes out the ends of the pilot flame carriers and extends
to the burner tile surface. PILOTS ARE ADJUSTABLE THROUGH THE HOLE ABOVE THE
VALVE KNOB.
NOTE: The six burner shipping screws located at each end of the three burners must be removed
after installation.
COMPACT INFRARED BROILER
SECTION ONE - INSTALLATION
PAGE 3

\
INSTALLATION
FIELD ASSEMBLY INSTRUCTIONS AND DIAGRAMS:
The following section covers Field Assembly instructions for the Compact Infra-Red Broiler combi-
nations noted below and shown on Page 1, Section 1.
1. Installing legs for counter units.
Page
ModelNo.MRA-32C . . . . . . . . . . . . . . . . . . . . . . . . . . . . . . . . . . . . . . . . . . . . . . . . . . . . . . . . 4
2. Assembling wall mount and attaching unit.
ModelNo.MRA-32C . . . . . . . . . . . . . . .._....................................... 5
3. Assembling flue riser and attaching unit for mounting over 32” Sectional Range.
ModelNo.MRA-32............................,............................. 7
4. Assembling flue riser and attaching unit for mounting over 36ih” Cafe Range.
ModelNo.MRA-36.......................................................... 9
5. Assembling flue riser and attaching unit for mounting over 60%” Cafe Range.
Model No. MRA-60. . . . . . . . . . . . . . . _ . _ . . , . . . _ _ . . . . . . . . . . . . . . . . . . . . . . . . . . . . 11
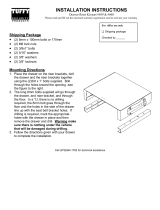
MODEL NO. MR-3X OR MRA-32C
INSTRUCTIONS: For Legs and Rear Spacers on Counter Models
1. Remove the broiler from the container.
CAUTION: INSURE BClRNER SHIPPING SCREWS HAVE NOT BEEN REMOVED.
2. Carefully lay the broiler on its back
3. Install each leg “L” packed in the grease drawer with (4) #lO x
‘/; slotted sheet metal screws
and (81 flat washers in existing 5132 holes in the main bottom as shown (hardware packed in
cloth shipping bag’.
4. Stand the broiler on its legs and install shoulder bolt “B” at the rear of the broiler in 114 diameter
existing holes with ‘1 I flat washer. (1) locknut and (1) #lo-24 hex nut as shown in inset. This
\vill insure a space in the rear of the broiler for entrance of primary air.
NOTE: Bottom Cover (Part No. 1078600) is shipped xvith broiler but is not used on Counter Model.
COMPACT INFRA-RED BROILER
SECTION ONE - INSTALLATION
PAGE 4

INSTALLATION
t
MODEL NO. MRA-32W
DIAGRAM FOR
ASSEMBLING WALL MOUNT BRACKET
WALL MOUNT ASSEMBLY MRW-30
1. Install wall mount to wall using (6) sheet metal screws and (6) washers provided. Make sure
screws hit wall studs. Insure wall mount is adequately secured to wall to support weight of broiler
(150
lbs.).
2. For installation of broiler (see following instructions on page 6).
COMPACT INFRA-RED BROILER
SECTION ONE
- INSTALLATION
PAGE 5

\
INSTALLATION
MODEL NO. MRA-32W
DIAGRAM FOR MOUNTING
BROILER TO WALL MOUNT BRACKET
VIEW “Z-Z”
with Bottom Cover Installed
1 Fasten broiler hook “A” to rear of broiler “B” with (3) slotted hex head sheet metal screws
provided.
2. Prepare gas supply connection before mounting broiler
“B.” (See instructions on Page 3,
Section 1.)
3. Lift broiler “B” with broiler hook “A” installed. Place hook over broiler hanger, line up holes
and fasten with (31 slotted hex head sheet metal screws provided.
4. Fasten bottom of broiler “B” to wall mount with (2) slotted hex head sheet metal screws provided
lone each side). Screws are located on underside of broiler “B” as shown.
5. To install Bottom Cover “C”:
A.
Remove (3 I slotted hex head sheet metal screws (2 each side) that fasten body side retainer
‘.F” (not body front,.
B.
Position bottom cover “C” above flanges as shown in View “Z-Z” and reinstall (4) screws.
COMPACT INFRA-RED BROILER
SECTION ONE - INSTALLATION
PAGE 6
LllhO I” u s A
Rev 7.91

INSTALLATION
1.
2.
3.
4.
5.
6.
7.
8.
MODEL NO. MRA-32
DIAGRAM FOR MOUNTING
MRS-32 SECTIONAL 32” RISER TO RANGE
Front panel “A” is fastened with (4) hex head sheet metal screws. Remove screws and panel.
Remove nuts and lockwasher from collar plate studs “C” on range.
Lower riser onto range allowing studs “C” to enter holes in riser bracket “B.” Secure riser
bracket “B” with nuts and lockwasher removed in instruction No. 2.
The oven flue riser extension “D” (12” high) is packed in oven. Slide flue riser extension “D”
over the flue collar “E” protruding through the center opening of the collar plate “F.”
NOTE: On units where the top of flue collar “E” is approximately 4” above collar plate “F,”
the flue riser extension “D” is not required.
Install angles “H” packaged in riser container with slotted hex head screws provided, into holes
in rear riser bracket “B” and match drill g/64” diameter holes in range body for mounting
angle “H” to range with slotted hex head screws provided.
Install unit (see instructions on page 8).
Replace front panel “A” and fasten with sheet metal screws that were removed in instruc-
tion No. 1.
U-shaped channel “G” is provided for all batteried ranges. Place U-shaped channel “G” over
angles on adjacent ranges to form a sanitary sealing between ranges.
COMPACT INFRA-RED BROILER
SECTION ONE
- INSTALLATION
PAGE 7

INSTALLATION
MODEL NO. MRA-32
DIAGRAM FOR MOUNTING BROILER
TO 32” SECTIONAL RANGE RISER NO. MRS.32
VIEW “Z-Z”
with Bottom Cover Installed
1. Fasten broiler hook “A” to rear of broiler “B” with (3) slotted hex head sheet metal screlvs
provided.
2. Prepare gas supply connection before mounting broiler
Sectlon 1.1
“B.” (See instructions on Page 3.
3. Lift broiler “B” with broiler hook “A” installed. Place hook over broiler hanger, line up holes
and fasten with 13) slotted hex head sheet metal screws provided.
4. Fasten bottom of broiler “B” to riser \vith (2) slotted hex head sheet metal screws provided ione
each side) Screws are located on underside of broiler “B” as sho\vn.
5. To Install Bottom Cover “Z”:
A
Remo1.e (4) slotted hes head sheet metal screws (2 each side) that fasten body side retainel.
“F” (not body front 1.
B.
Position bottom cover “C” above flanges, as shoun in View
“Z-Z” and reinstall 14) scre\vs.
COMPACT INFRA-RED BROILER
SECTION ONE - INSTALLATION
PAGE 8

INSTALLATION
t
1.
2.
Front panel “A” is fastened with (4) hex head sheet metal screws. Remove screws and panel.
3.
Lower riser onto range, line up holes in riser bracket “B” with weld nut holes in range. Secure
riser bracket “B” to range with (4) hex head I’
,,-20 screws and 14) washers (2 each side) provided.
The oven flue riser extension “C” is packed in oven. Slide flue riser extension “C” through hole
in rear rest “D” over collar protruding through burner box bottom “E.”
4.
Install angles “F” packaged in riser container with slotted hex head sheet metal screxvs provided
into holes in rear of riser bracket “B” and match drill 9164” diameter holes in range body for
mounting angle “F” to range with slotted hex head sheet metal screws provided.
5. Install broiler (see instructions on Page 10, Section 1).
6. Replace front panel “A” and fasten with sheet metal screws that were removed in instruction
No. 1.
MODEL NO. MRA-36
DIAGRAM FOR MOUNTING
MRC-36 CAFE 36” RISER TO RANGE
COMPACT INFRA-RED BROILER
SECTION ONE
- INSTALLATION
PAGE 9

\
INSTALLATION
MODEL NO. MRA-36
DIAGRAM FOR MOUNTING BROILER
TO 36” CAFE RANGE RISER NO. MRC-36
VIEW “Z-Z”
with Bottom Cover Installed
1.
Fasten broiler hook “A” to rear of broiler “B” with (3) slotted hex head sheet metal screws
provided.
2. Prepare gas supply connection before mounting broiler
“B.” (See instructions on Page 3.
Section 1.1
3.
Lift broiler “B” with broiler hook “A” installed. Place hook over broiler hanger, line up holes
and fasten with (31 slotted hex head sheet metal screws provided.
4.
Fasten bottom of broiler “B” to riser with (2) slotted hex head sheet metal screws provided cone
each side). Screws are located on underside of broiler “B” as shown.
5. To install Bottom Cover “2”:
A.
Remove (4) slotted hex head sheet metal screws (2 each side) that fasten body side retainer
“F” (not body front).
B.
Position bottom cover “C” above flanges as shown in View
“Z-Z” and reinstall (4) screws.
COMPACT INFRA-RED BROILER
SECTION ONE - INSTALLATION
PAGE 10

INSTALLATION
t
MODELNO. MRA-60
DIAGRAMFORMOUNTINGBROILER
TO
60%" CAFE RANGE RISERNO.MRK-30
r10 Sheet Metal Screws
10.24 Machme Screws w,‘Lock Washers &
Nuts
!~.20 Hex Head Bolts aFlat Washers. Lock
Washers & Nuts
k-20 Hex Head Bolts w Flat Washers &
Lockmg Washers
NOTE: Most 603/” riser and broiler assemblies are shipped from the factory preassembled to the
range. If not, however, follow the mounting method depicted in the diagram. The following instruc-
tions should then be followed to mount a broiler to an MRK-30, 603h” riser assembly.
1.
Determine method of gas piping before mounting broiler
“A.” (See instructions on Page 3,
Section 1.1
2.
Lift broiler “A” with broiler hook “B” installed. Place hook over broiler hanger, line up holes
and fasten with (3) slotted hex head sheet metal screws.
3.
Fasten bottom of broiler “B” to riser with (2) slotted hex head sheet metal screws provided (one
each side). Screws are located on underside of broiler “B” as shown.
4.
To install Bottom Cover “Z”:
A. Remove (4) slotted hex head sheet metal screws (2 each side) that fasten body side retainer
“F” (not body front).
B. Position bottom cover “C” above flanges as shown in View
“Z-Z” and reinstall (4) screws.
COMPACT INFRA-RED BROILER
SECTION ONE
- INSTALLATION
PAGE 11

COMPACT INFRA-RED BROILERS
USER’S GUIDE
LIMITED WARRANTY
Southbend, a Middleby Co., warrants that the Southbend equipment, as originally supplied to the original pur-
chasers, is free from defects in materials and workmanship. Should any part thereof become defective as
a result of normal use within the period and limits defined below, then at the option of Southbend such parts
will be repaired or replaced by Southbend or its Authorized Service Agency. This warranty is subject to the
following conditions:
If upon inspection by Southbend or its Authorized Service Agency it is determined that this equipment has not
been used in an appropriate manner, has been modified, has not been properly maintained, or has been subject
to misuse or misapplication, neglect, abuse, accident, damage during transit or deiivery, fire, flood, riot or Act of
God, then this warranty shall be void.
Specifically excluded under this warranty are claims relating to installation; examples are improper utility connec-
tions and improper utilities supply. Claims relating to normal care and maintenance are also excluded; examples
are calibration of controls, and adjustments to pilots and burners.
Equipment failure caused by inadequate water quality is not covered under warranty.
This equipment is intended for commercial use only. Warranty is void if equipment is installed in other than
commercial application.
Repairs under this warranty are to be performed only by a Southbend Authorized Service Agency.
THIS WARRANTY MUST BE SHOWN TO AN AUTHORIZED SERVICE AGENCY WHEN REQUESTING IN-
WARRANTY SERVICE WORK. THE AUTHORIZED SERVICE AGENCY MAY AT HIS OPTION REQUIRE PROOF
OF DATE OF INSTALLATION.
This warranty does not cover services performed at overtime or premium labor rates nor does Southbend assume
any liability for extended delays in replacing or repairing any items in the equipment beyond the control of Southbend.
“Southbend, a Middleby Co., shall not be liable for consequential or special damages of any nature that may arise
in connection with such product or part.”
Should service be required at times which normally involve overtime or premium labor rates, the owner shall be
charged for the difference between normal service rates and such premium rates.
In all circumstances, a maximum of one hundred miles shall be allowable for travel.
The actual warranty time periods are as follows:
For a product shipped into the 48 Continental United States and Hawaii, twelve months labor, twelve months parts
effective from the date of installation (when installed in place and utilities connected). There will be no labor coverage
for equipment located on any island not connected by roadway to mainland.
On all shipments outside of the 48 Continental United States and Hawaii, our warranty will be no labor but twelve
months on parts from the shipping date of the equipment from the manufacturer.
Our warranty on all replacement parts which are replaced in the field by our Authorized Service Agencies will be
limited to three months on labor, six months on materials (parts) effective from the date of installation. See LIMITED
WARRANTY - REPLACEMENT PARTS for conditions and limitations.
If the equipment has been changed, altered, modified or repaired by other than a qualified service technician during
or after the 12-month limited warranty period, then the manufacturer shall not be liable for any damages to any
person or to any property which may result from the use of the equipment thereafter. Some States do not allow
the exclusion or limitation of incidental or consequential damages, so the above limitation or exclusion thereto may
not apply to you.
“THE FOREGOING WARRANTY IS IN LIEU OF ANY AND ALL OTHER WARRANTIES EXPRESSED OR IMPLIED
INCLUDING ANY IMPLIED WARRANTY OF MERCHANTABILITY OR FITNESS, AND CONSTITUTES THE ENTIRE
LIABILITY OF SOUTHBEND, A MIDDLEBY CO., IN NO EVENT DOES THE LIMITED WARRANTY EXTEND
BEYOND THE DURATION OF 12 MONTHS FROM THE EFFECTIVE DATE OF SAID WARRANTY”
HEAVY DUTY RESTAURANT RANGES
SECTION TWO
- USER’S GUIDE
PAGE 1

.’ OPERATION
‘JG
WARNING:
FOR AN APPLIANCE EQUIPPED WITH CASTERS, THE INSTALLATION SHALL
BE MADE WITH A CONNECTOR THAT COMPLIES WITH THE STANDARD FOR
CONNECTORS FOR MOVABLE GAS APPLIANCES, ANSI 221.691987, AND A
QUICK-DISCONNECT DEVICE THAT COMPLIES WITH THE STANDARD FOR
QUICK-DISCONNECT DEVICES FOR USE WITH GAS FUEL, ANSI 221.41-1978,
AND ADDENDA, Z21.41a-1981 AND 221.4113-1983. ADEQUATE MEANS MUST BE
PROVIDED TO LIMIT THE MOVEMENT OF THE APPLIANCE WITHOUT
DEPENDING ON THE CONNECTOR AND THE QUICK-DISCONNECT DEVICE OR
ITS ASSOCIATED PIPING TO LIMIT THE APPLIANCE MOVEMENT.
WARNING:
IF DISCONNECTION OF THIS RESTRAINT IS NECESSARY TO MOVE THE
APPLIANCE FOR CLEANING, ETC., RECONNECT IT WHEN THE APPLIANCE
1 IS MOVED TO ITS ORIGINALLY INSTALLED POSITION.
I
OPERATION:
1. Check that the pilots are ignited.
2. Turn burner valve to “HI.” Burner will ignite from the pilot. If burner fails to ignite, turn burner
to OFF, check pilots.
CAUTION: THESE ARE NOT SAFETY PILOTS AND WHEN OUT, THEY DO NOT
INTERRUPT THE FLOW OF GAS TO THE BURNER. CONSEQUENTLY, IT
IS THE RESPONSIBILITY OF THE OPERATOR TO CHECK THE IGNITION
OF THE BURNERS IMMEDIATELY AFTER THE BURNER VALVE HAS
BEEN TURNED ON. SHOULD IGNITION FAIL AFTER 5 SECONDS, TURN
VALVE OFF AND WAIT 5 MINUTES BEFORE TRYING AGAIN.
The pilots should burn continuously unless the unit is to be completely shut down. When extin-
guished, the pilot gas supply is NOT INTERRUPTED automatically. For complete shutdown,
the installer-supplied manual service valve on the inlet gas supply line should be turned to OFF.
3. When the burner ignites, a blue haze-type flame will cover the surface of the ceramics for 60
seconds. This haze will gradually disappear and within two minutes the ceramics will glow red.
The flame on the surface of the ceramics should be barely visible, with little or no blue haze.
4. LOW SETTING:
After the burner has operated on HIGH for several minutes, turn the valve counterclockwise
as far as possible, to the LO setting.
At this low setting the surface of the ceramics should become a very dull red, with a blue haze.
The burner should not “flutter” or “pop” at this setting. If such condition does exist, the set-
ting is too low and should be increased. Regulation of this low setting is by a set screw inside
the hollow stem of the valve. Turn IN or clockwise to reduce and OUT or counterclockwise
to increase.
BURNER CONTROL:
There are two definite positions on the burner valve, one at HI and the other at LO. Between these
settings, a variety of burner rates can be obtained.
RACK POSITION:
Models with an adjustable rack handle lever arm (denoted by letter Al incorporate five (5) rack posi-
tions. These are adjustable by moving the lever arm to the right and then up or down. Models without
letter A incorporate three (3) rack positions and are adjustable by bringing the rack forward, removing
and then placing back in the desired position.
PRODUCTS:
This is intended as a guide only. Temperature of meat, size of portion, load in broiler, degree of done-
ness, or other variables will effect broiling results to some extent.
210 - 114 pound, 4%” diameter hamburgers to medium
doneness. . . _ . . . . . . . . . . . . . . . . . . . . . . . . in only one hour
10 - a-ounce,
1”-thick top butt steaks to medium
rare.............................
in only five minutes
4 - No. 7 Mexican food platters - cheese bubbling
hot . . . . . . . . . . . . . . . . . . . . . . . . . . . . in only 20-25 seconds
It is important that the rack drip pan be used at all times. Without it in place, excessive air is pulled
past the burners, reducing temperature and cooking efficiency.
COMPACT INFRA-RED BROILERS
SECTION TWO - USER’S GUIDE
PAGE 2
LRho tn USA
Rev 7.91

MAINTENANCE
WARNING:
ADJUSTMENTS AND SERVICE WORK MAY BE PERFORMED ONLY BY A
QUALIFIED TECHNICIAN WHO IS EXPERIENCED IN AND KNOWLEDGEABLE
WITH THE OPERATION OF COMMERCIAL GAS COOKING EQUIPMENT.
HOWEVER, TO ASSURE YOUR CONFIDENCE, CONTACT YOUR AUTHORIZED
SERVICE AGENCY FOR RELIABLE SERVICE, DEPENDABLE ADVICE OR
OTHER ASSISTANCES, AND FOR GENUINE FACTORY PARTS.
MAINTENANCE:
1. Keep exposed, cleanable areas of unit clean at all times.
Daily:
A. Remove rack and wash daily. Remove grease drawer and wash thoroughly.
B. Remove the entire side linings, to which the rack slides are fastened, by lifting up and
inward. Wash thoroughly. (Models without letter A only.)
C. Make sure objects are not set on top of broiler to block the escape of exhaust gases.
Monthly:
A. Lubricate valve as required.
B. Clean around oven burner air mixer and orifices if lint has accumulated.
STAINLESS STEEL:
1. To remove normal dirt, grease and product residue from stainless steel that operates at LOW
temperature, use ordinary soap and water (with or without detergent) applied with a sponge
or cloth. Dry thoroughly with a clean cloth.
2. To remove grease and food splatter or condensed vapors that have BAKED on the equipment,
apply cleanser to a damp cloth or sponge and rub cleanser on the metal in the direction of the
polishing lines on the metal. Rubbing cleanser as gently as possible in the direction of the
polished lines will not mar the finish of the stainless steel. NEVER RUB WITH A CIRCULAR
MOTION. Soil and burnt deposits which do not respond to the above procedure can usually be
removed by rubbing the surface with SCOTCH-BRITE scouring pads or STAINLESS scouring
pads. DO NOT USE ORDINARY STEEL WOOL, as any particles left on the surface will rust
and further spoil the appearance of the finish. NEVER USE A WIRE BRUSH, STEEL
SCOURING PADS (EXCEPT STAINLESS), SCRAPER, FILE OR OTHER STEEL TOOLS.
Surfaces which are marred collect dirt more rapidly and become more difficult to clean.
Marring also increases the possibility of corrosive attack. Refinishing may then be required.
3. To remove heat tint: Darkened areas sometimes appear on stainless steel surfaces where the
area has been subjected to excessive heat. These darkened areas are caused by thickening of
the protective surface of the stainless steel and are not harmful. Heat tint can normally be
removed by the foregoing, but tint which does not respond to this procedure calls for vigorous
scouring in the direction of the polish lines using SCOTCH-BRITE scouring pads, or a STAIN-
LESS scouring pad, in combination with a powdered cleanser. Heat tint action may be lessened
by not applying, or by reducing, heat to unit during slack periods.
BLACK BAKED ENAMEL:
1. Allow unit to cool somewhat after use and wash exterior with a hot, mild detergent or soap
solution; particularly clean off all grease deposits. Dry thoroughly with a dry cloth.
COMPACT INFRA-RED BROILERS
SECTION TWO
- USER’S GUIDE
PAGE 3

COMPACT INFRA-RED BROILERS
SERVICE
J
4
ADJUSTMENTS /
WARNING:
ADJUSTMENTS AND SERVICE WORK MAY BE PERFORMED ONLY BY A
QUALIFIED TECHNICIAN WHO IS EXPERIENCED IN AND KNOWLEDGEABLE
WITH THE OPERATION OF COMMERCIAL GAS COOKING EQUIPMENT.
HOWEVER, TO ASSURE YOUR CONFIDENCE, CONTACT YOUR AUTHORIZED
SERVICE AGENCY FOR RELIABLE SERVICE, DEPENDABLE ADVICE OR
OTHER ASSISTANCES, AND FOR GENUINE FACTORY PARTS.
All units are adjusted at the factory. In case of problems in operation at initial installation, check
type of gas and manifold pressure and compare with information listed on the serial plate, located
under the broiler grease drawer at the front towards the left.
PILOT VALVE LOCATIONS:
There is a single adjustment for the pilot burners located through the hole above the valve knob.
Adjustment to pilots is made by turning the small slotted screw on the pilot valve. The flame on each
pilot should be large enough to extend along the flame carrier to the burner surface.
LOW SETTING:
The LO adjustment of the broiler burner valves is by a set screw in the hollow stem of this valve.
Turn “IN” or clockwise to reduce, and “OUT” or counterclockwise to increase. Burner flame on low
setting should not flutter or “POP,” but should burn with a dull red and a blue haze.
AIR ADJUSTMENT:
The infra-red burner requires no field air adjustment. However, if a major change in burner opera-
tion is noted, check for obstruction of air flow, as well as around burner air mixer and orifice. Burner
performance is effected by (a) orifice size, (b) pressure, (cl injection, and cd) primary air flow.
Burner orifice must be centered with the air mixer opening.
PRESSURE REGULATOR:
1. The pressure regulator is located in the right-hand compartment.
2. For access to the reguiator, remove the right body side.
3. The regulator is preset for 4” W.C. for natural gas, or 10” W.C. for propane gas.
4. This pressure regulator is adjustable. The top of the regulator screws off with a screwdriver,
exposing the adjustment screw. Rotating this screw clockwise increases the pressure.
Natural = Preset 4” W.C. Propane = Pre-set 10” W.C.
5. To check line pressure, a connection is provided toward the rear of burner manifold (l/8 NPT).
With valve in “OFF” position, remove pipe plug and connect measuring device. The pressure
reading at the manifold, with the burners on high, should be 4” W.C. on natural gas, or 10”
W.C. on propane gas.
COMPLETE SHUT DOWN:
1.
Turn off all burner valves.
2. Turn off pilot adjustment valve.
3. Turn off main supply valve. (Valve provided during installation.)
COMPACT INFRA-RED BROILERS
SECTION THREE - SERVICE
PAGE 1

$$, ADJUSTMENTS
ACCESS TO SERVICEABLE PARTS:
Some serviceable parts are only accessible by removing the body side and/or front. The following
diagram depicts the procedure to follow should this be necessary.
A. Body side “B” is fastened with (2) slotted hex head sheet metal screws “Sl and F,” for left side,
or “S, and F,” for right side, as shown. Remove screws and slide body side “B” rearward and
up. It is not necessary to remove the main front when removing the body sides, provided instal-
lation clearances are adequate.
B. The main front “M” is fastened with (6) slotted hex head sheet metal screws “F,, F,, F,, F,, F,,
and F,, as shown. Valve knob is slipped on and fastened with a set screw. Upon removing these,
the main front can now be pulled forward and removed. (“A” models must have arm
knob removed. 1
There may be times when it will be easier to perform service with the broiler section removed from
the riser or wall. This may be accomplished by:
1. Shut off gas supply to broiler.
2. Disconnect gas supply line.
3. Remove bottom cover by removing (4) slotted hex head sheet metal screws - 2 on each side.
4. Remove (2) slotted hex head sheet metal screws from bottom, located on underside of broiler.
5. Remove (3) slotted hex head sheet metal screws from top of hanger.
6. Lift broiler section straight up until rear hanger clears top of riser or wall bracket.
To Reinstall Broiler:
1. Lift broiler back into position, line up holes for (3) screws and fasten same.
2. Install (2) screws at bottom sides.
3. Reconnect gas supply line.
4. After turning on gas supply, check gas connection and any other piping which was affected by
the repair, with soapy water to be positive there are no gas leaks.
5. Reinstall bottom cover with (41 screws.
COMPACT INFRA-RED BROILERS
SECTION THREE - SERVICE
Lflho I” US A
PAGE 2
Rev 7.91

ADJUSTMENTS @
/
TROUBLE SHOOTING:
Problem
Look for -
Not enough heat
-
Restriction in valve.
-
Restriction in gas supply.
-
Misalignment of orifice tube.
- Clogged orifice.
- Incorrect orifice.
-
Low pressure on gas supply.
Burner with blue haze
-
Misalignment of orifice tube.
- Low gas pressure.
-
Blocked primary air, exhaust gases blocked by objects setting
on top of broiler.
Burner fluttering
-
Adjust valve on low setting
Burner popping
- Cracked or loose ceramic.
Too much heat
-
Incorrect orifices.
-
Defective or incorrectly set pressure regulator.
Slow burner ignition
-
Check for proper pilot flame length.
-
Check for proper pilot alignment.
- Clean pilot orifice.
Pilot outage
- Clogged orifice.
- Draft condition.
-
Incorrect orifice.
-
Adjustment.
AT LEAST TWICE A YEAR HAVE YOUR SOUTHBEND AUTHORIZED SERVICE
AGENCY CLEAN AND ADJUST THE UNIT FOR MAXIMUM PERFORMANCE.
COMPACT INFRA-RED BROILERS
SECTION THREE - SERVICE
PAGE 3

COMPACT INFRA-RED BROILERS
PARTS
PARTS ?
@
WARNING:
INSTALLATION OF OTHER THAN GENUINE SOUTHBEND PARTS WILL VOID
THE WARRANTY ON THIS EQUIPMENT.
The serial plate is located inside unit under drip pan on left.
Replacement parts may be ordered either through a Southbend Authorized Parts Distributor or a
Southbend Authorized Service Agency.
When ordering parts please supply the Model Number, Serial Number, Part Xumber, Description,
plus Finish, Type of Gas and Electrical Characteristics, as applicable.
For parts not listed consult a Southbend Authorized Parts Distributor or Southbend Authorized Service
Agency. If necessary, please consult Southbend Parts Department for assistance.
SUFFIX DATE
INDICATES
No Suftix 1977 & Before
Unit has a cast iron venturi.
A
B
C
W
1977
1977
Unit has a rack adjustable with a handle and a tubular
steel venturi.
Unit has a rack which must be moved manually (no handle),
also has a tubular steel venturi.
Unit is a counter model.
Unit is a wall mount model.
COMPACT INFRA-RED BROILER
SECTION FOUR - PARTS
PAGE
1
/